 Adobe Community

Copy link to clipboard
Copied
Hi all. I've been noticing a really noticable shift in colors from the in-camera process to my RAW image in Lightroom.
I know that the color profile in-camera and Lightroom use different alogorithms and won't be exactly the same all the same, and I know that RAW images are usually flat and require processing. However, I haven't noticed a shift this significant before.
I haven't found it possible to edit it to a similar place without losing dimension in her skin and hair (messing with reds in camera calibration and red/orange hue). I normally shoot in RAW landscapes, but these are some of my first studio-lit portraits.
I've looked into switching the color profile (Adobe Color vs. Camera-matching), but the camera-matching profiles aren't available for some reason in my program (I've gone into browse, tried managing profiles, etc, they're just not there).
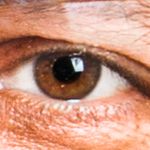
I use a Canon 90D. Here is an example of the difference I'm seeing.
Preview image, colors look true to life:

RAW undeveloped, skin tones shift green and I lose her hair:

Unavailable camera-matching profile:

Preview image in thumbnail, RAW color-shifted image in develop window.

Any thoughts on how to best get the image to a better starting place and/or manual editing tips to get closer to camera-processed colors would be fantastic. Thanks!


 1 Correct answer
First; about camera matching profiles:
” Support for a particular flavor of a camera’s raw file does not necessarily mean that there will be Camera Matching profiles for that camera at the time of raw file support. It is normal for Camera Matching profiles to follow raw support by one or two releases. In the case of some camera manufacturers or the event of major changes by a particular manufacturer, that time may be greatly increased.
Note: Not all cameras will ever receive a set of Camera Matc
... 5
Replies
5
5
Replies
5
Copy link to clipboard
Copied
First; about camera matching profiles:
” Support for a particular flavor of a camera’s raw file does not necessarily mean that there will be Camera Matching profiles for that camera at the time of raw file support. It is normal for Camera Matching profiles to follow raw support by one or two releases. In the case of some camera manufacturers or the event of major changes by a particular manufacturer, that time may be greatly increased.
Note: Not all cameras will ever receive a set of Camera Matching profiles. ”
So the next move would be using the profile you have, messing with the various controls to get a closer rendering desired and make that a preset. DO NOT ignore the Camera Calibration panel for such work!
OR, consider making your own DNG camera profiles which is easy to do, with free software if you happen to have the correct target to do so:
Everything you thought you wanted to know about DNG/DCP camera profiles:
All about In this 30 minute video, we will look into the creation and use of DNG (.dcp) camera profiles in three raw converters. The video covers:
What are DNG camera profiles, how do they differ from ICC camera profiles.
Misconceptions about DNG camera profiles.
Just when, and why do you need to build custom DNG camera profiles?
How to build custom DNG camera profiles using the X-rite Passport software.
The role of various illuminants on camera sensors and DNG camera profiles.
Dual Illuminant DNG camera profiles.
Examples of usage of DNG camera profiles in Lightroom, ACR, and Iridient Developer.
Low Rez (YouTube):
http://youtu.be/_fikTm8XIt4
High Rez (download):
http://www.digitaldog.net/files/DNG%20Camera%20profile%20video.mov
Copy link to clipboard
Copied
HI, First of all, by "in camera process" are you referring to what you see on the back of the camera?
The camera will always show a JPG version of your RAW with settings applied by your camera settings.
The RAW in Lightroom will never look like what you saw on the back of the camera.
Check your white balance setting in LR just to be sure.
And can you tell us which computer operating system and which version of LR you are using?
Copy link to clipboard
Copied
To add my 5 cents: raw files are what they say: raw! What you see as an embedded jpeg file is a preview file generated by your camera. What you see as an undeveloped raw file in Lightroom is a preview file generated by Lightroom according to some Lr parameters (yes, even undeveloped raw files are indeed developed raw files...). Canon does it's "cuisine interne", Adobe does also so. both use similar but different algorithms to get the results. If you want faithful Canon results you need absolutely to use DPP.
Copy link to clipboard
Copied
O totally agree with Abambo!!!Digital Photo Professional that you get free with your Canon Camera is the way to get eactly what you see on your camera to being what you see on the screen!
Although....I did forget to ask ... have you calibrated your monitor? Use a "puck" like one of the ones from XRite.com, that helps you calibrate the monitor. The software help you align your monitor with a known standard, and is the best way to more accurately see the colors that exist in your photo.

Copy link to clipboard
Copied
And to follow along with what Kent said, if you take the time to calibrate your monitor, you should also calibrate your camera's sensors.
It is quite surprising how inconsistant they are. This can best be done by using X-rite's Passport. See the link for more information.

 AdChoices