• Global community
    • Language:
      • Deutsch
      • English
      • Español
      • Français
      • Português
  • 日本語コミュニティ
    Dedicated community for Japanese speakers
  • 한국 커뮤니티
    Dedicated community for Korean speakers
Exit
1

Colour difference between Develop Mode and Library

Community Beginner ,
Jan 09, 2022 Jan 09, 2022

Copy link to clipboard

Copied

Hi everyone! I`ve had this problem since one of the updates of LR for Mac in december`21. I`ve already read all the simillar topics here and I`ve already did everything suggested in comments, all the methods that helped the others.


I know that tthe diffeerence of colours is possible, because of different colour space in these modes (ProPhoto RGB and Adobe RGB), but all the way before I didn`t have any problem like this. Everything was perfect. 


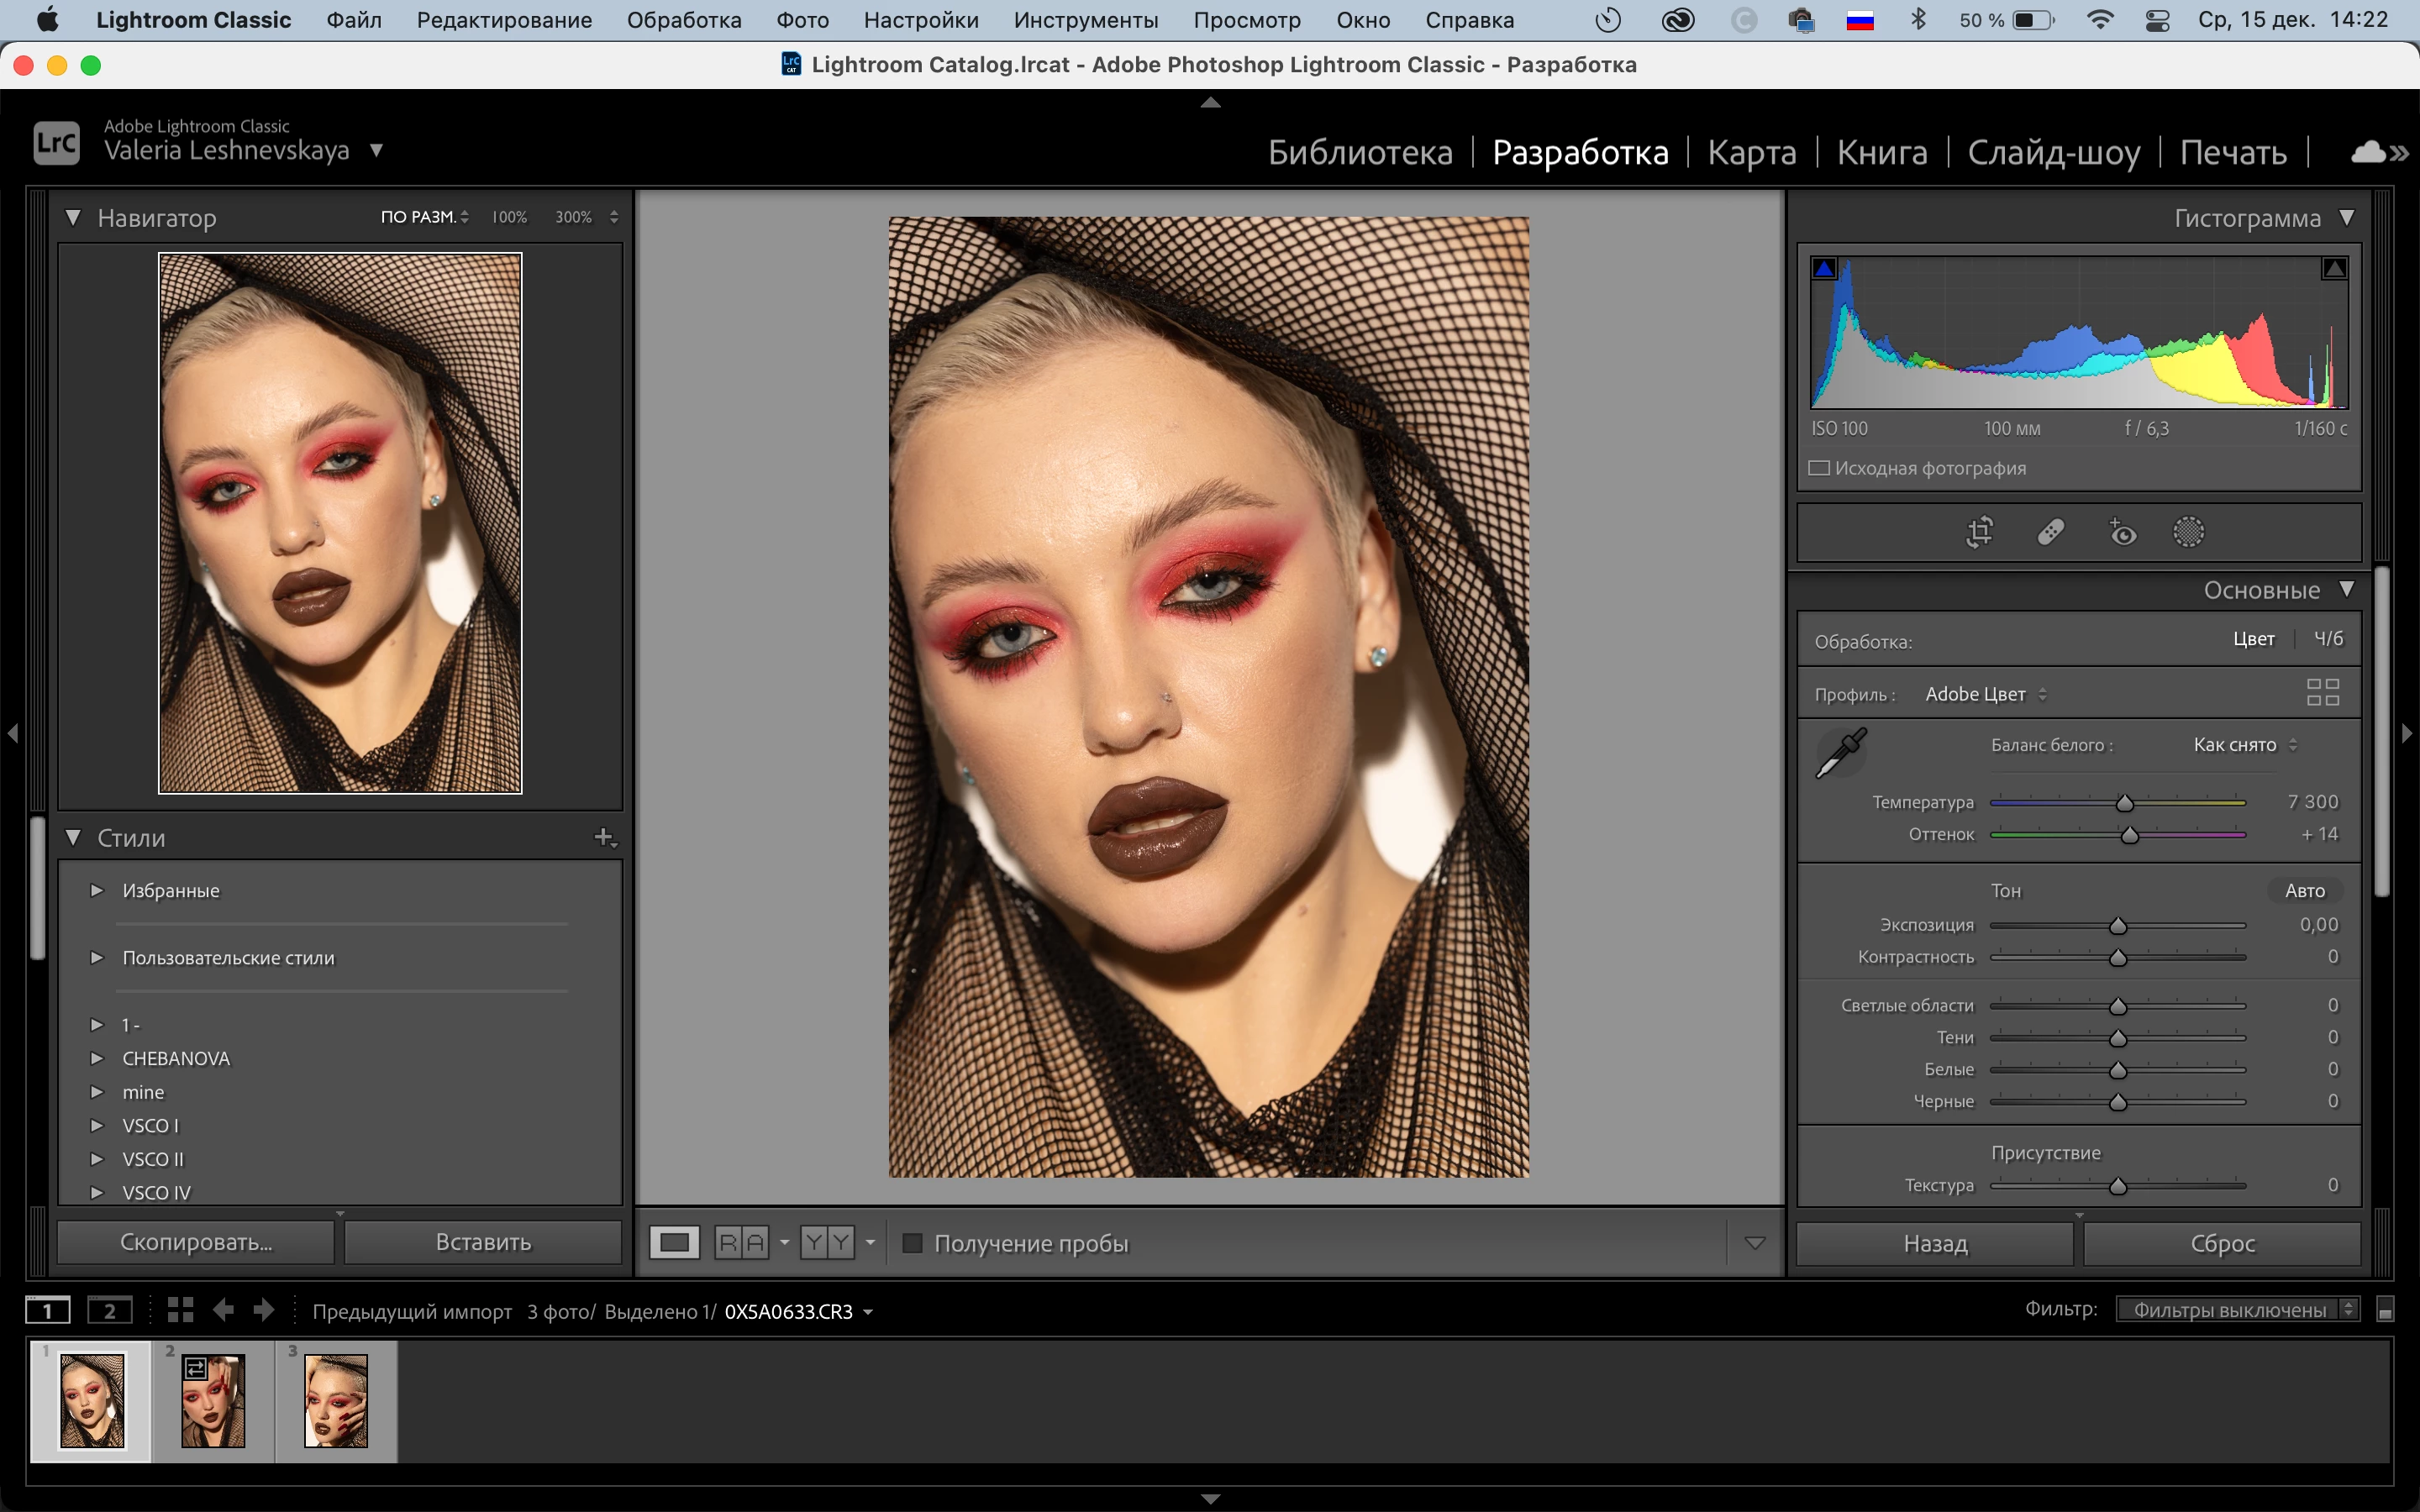
The problem is that The colors look correctly in the Library mode (naturally, as they always were), the picture is loaded slightly in the Develop mode and the color distortion occurs, the feeling is as if there is some preset. The faded warm filter seems to be applied and I can't change it in any way, because in fact no settings were applied. I`ve already changed the colour profile of my monitor, on/off grafic processor, reinstalled all new and previous versions of LR, wrote to the customers support. Nothing helped. 

I need to pay specific attention, that in library mode the colours are true, in Develop mode they are false. I don`t need just to avoid the difference by deleting previews, in this case the colours just start look false in both mode. I need to correct this strange processing of colour of images. 

I exported them and saw on my phone, the colour is distorted. I compared screenshots on Mac and on Iphone, I can see this false colour on both devices.


I can`t work because of the problem. I really hope that you will help me 🙏🏻

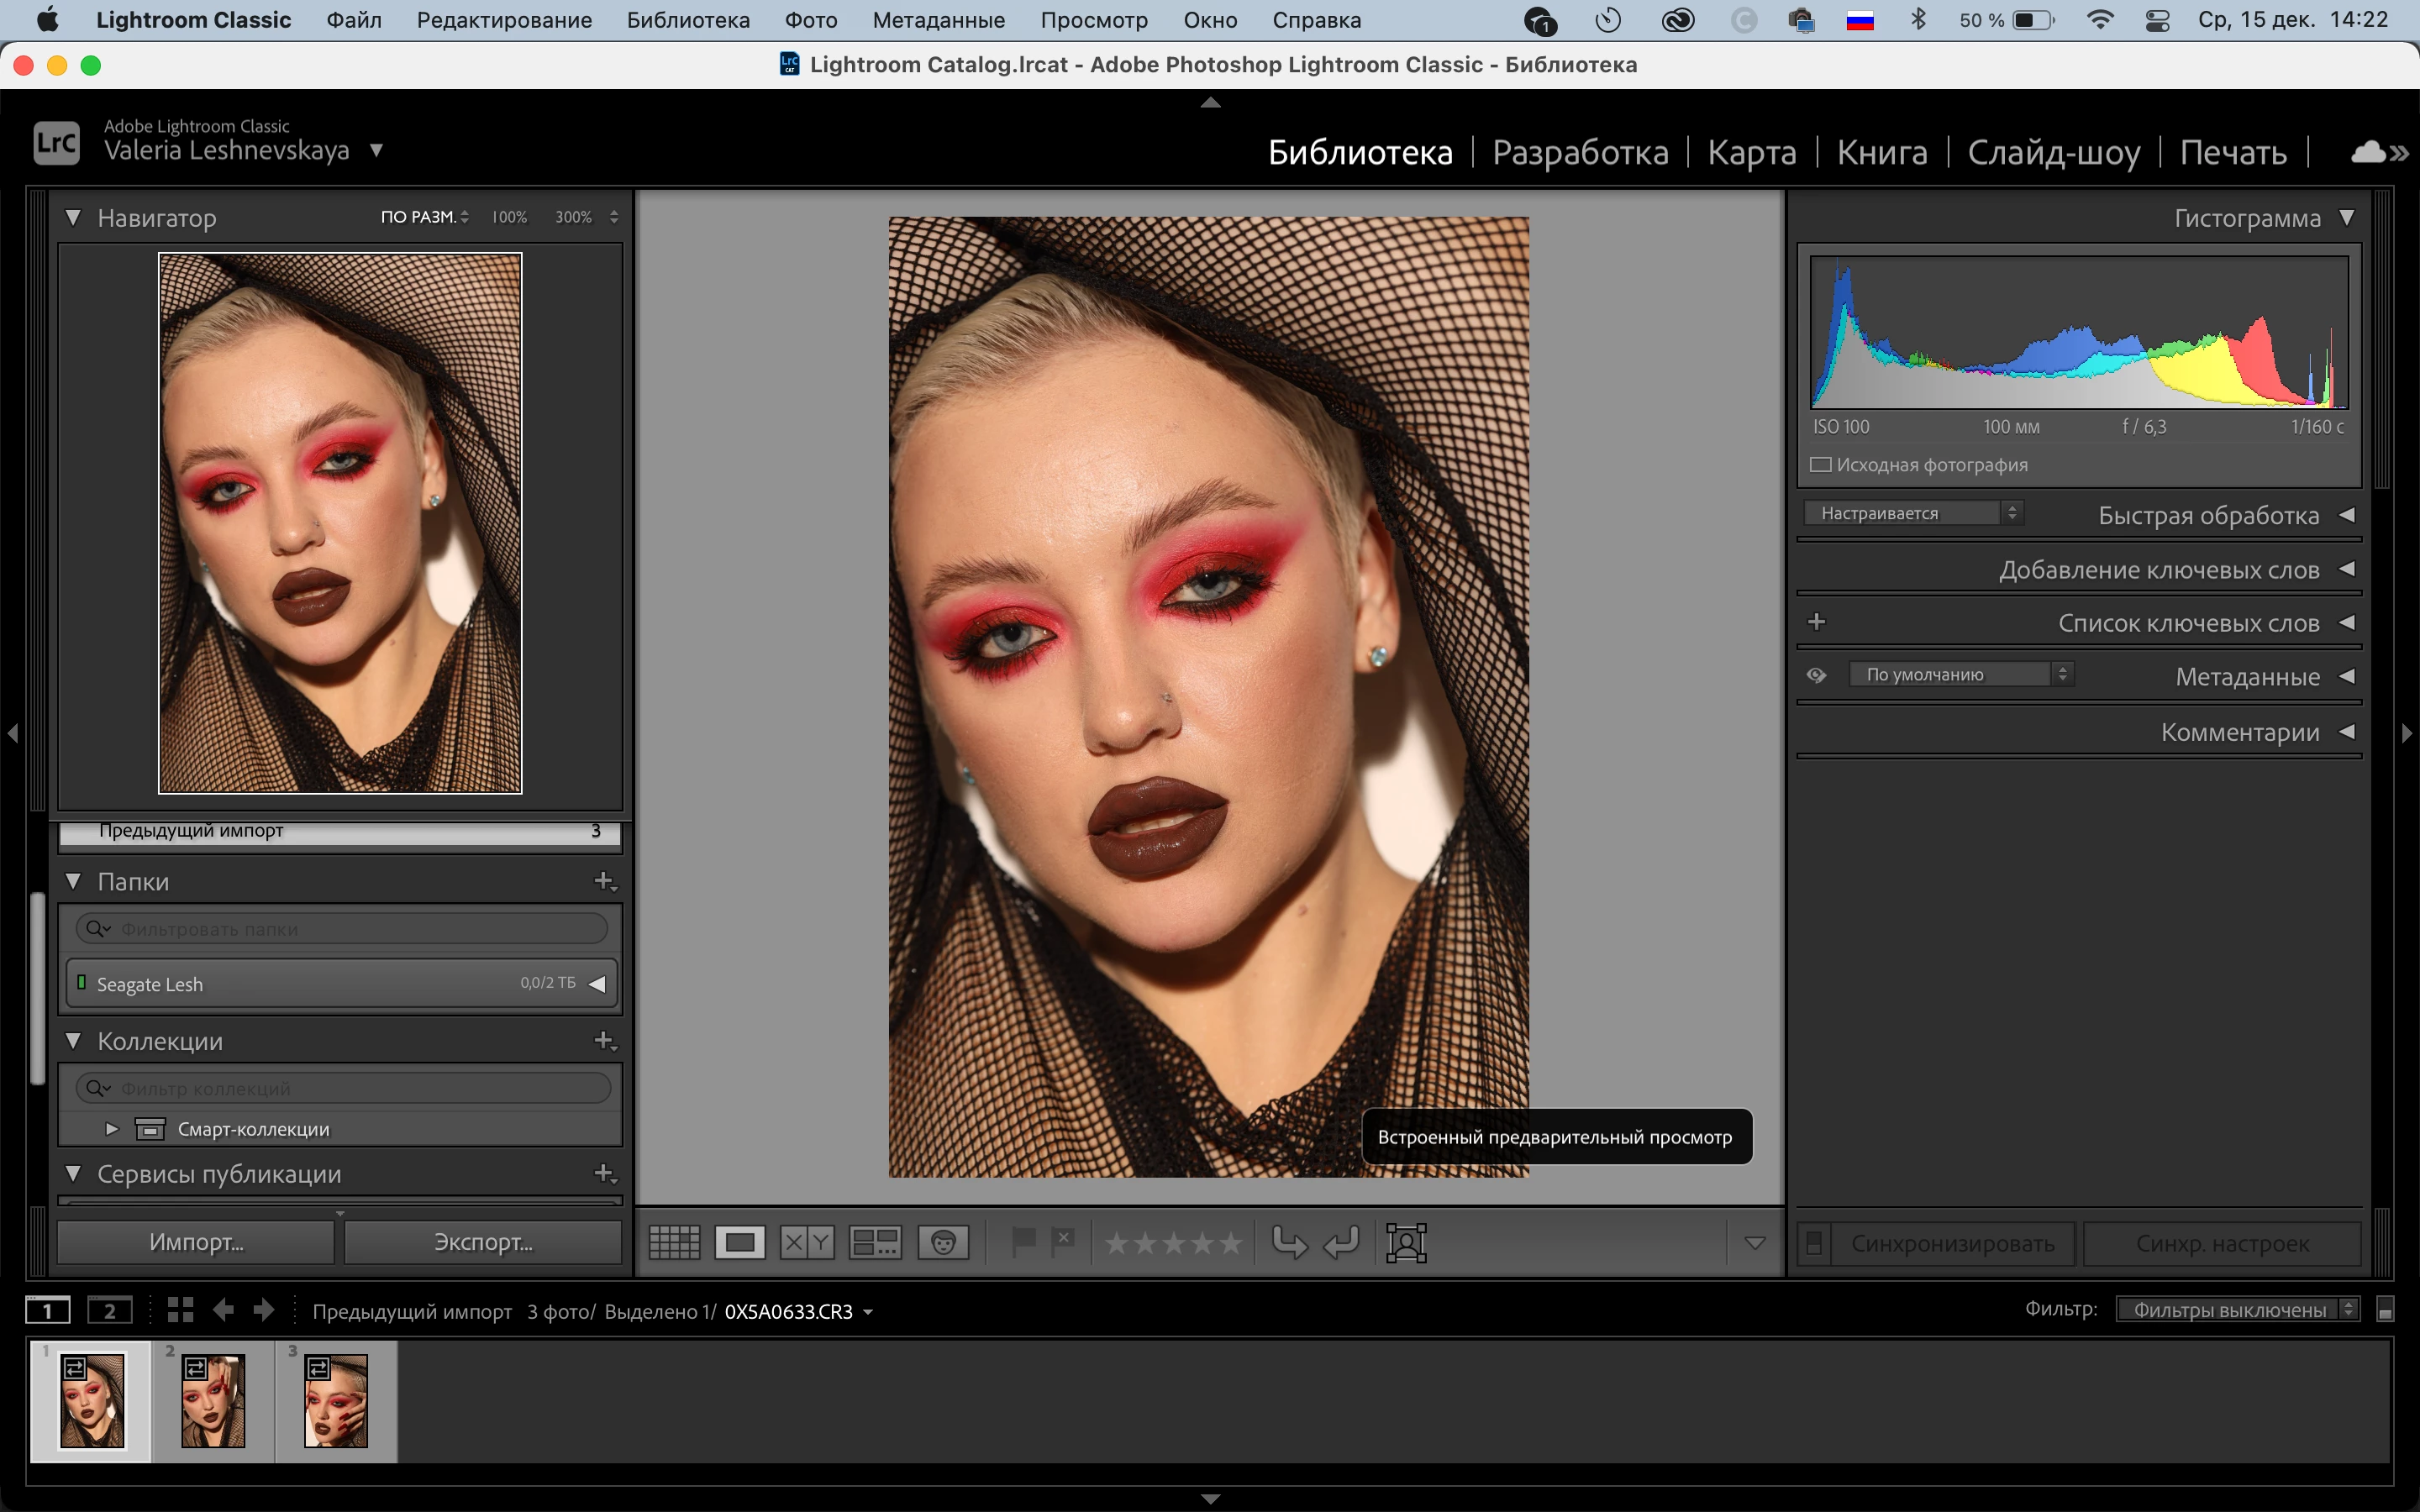
 1st picture: Develop mode - false colours
Снимок экрана 2021-12-15 в 14.22.47.pngСнимок экрана 2021-12-15 в 14.22.20.png 
2nd picture: Library mode - true, natuural colours
 

TOPICS
macOS

Views

7.9K

Translate

Translate

Report

Report
Community guidelines
Be kind and respectful, give credit to the original source of content, and search for duplicates before posting. Learn more
community guidelines
LEGEND ,
Jan 10, 2022 Jan 10, 2022

Copy link to clipboard

Copied

[This post contains formatting and embedded images that don't appear in email. View the post in your Web browser.]


The second screenshot, of Library Loupe, shows a message in the lower-right corner:

johnrellis_0-1641834233309.png
Встроенный предварительный просмотр


That's the message that LR displays in Loupe when it is displaying the JPEG preview embedded in the photo by the camera. Google translates that as "Built-in preview", but LR in English displays it as "Embedded Preview".


The embedded preview is how the camera has rendered the raw photo, e.g. what it displays on its view screen.  In general, the embedded previews can appear much differently than the default way that LR renders the raw.


When you imported that photo into LR, you used the option File Handling > Build Previews: Embedded & Sidecar (or perhaps Minimal):


johnrellis_1-1641834763773.png


Instead, you should use Standard, which will cause LR to build its own previews, more closely matching what you see in Develop.


For the existing photos that are showing Embedded Preview in Library Loupe, select them and do Library > Previews > Build Standard Previews. Now Develop and Library should be close matches.

Votes

Translate

Translate

Report

Report
Community guidelines
Be kind and respectful, give credit to the original source of content, and search for duplicates before posting. Learn more
community guidelines
Community Beginner ,
Jan 11, 2022 Jan 11, 2022

Copy link to clipboard

Copied

Thank you for the answer! I really appreciate that. 

But the problem is actually not in the diffrence, but in strange render of raw file by LR. I`ve already tried what you wrote, but the images become yellow and unsaturated now in both modes. 


I used Canon 70D before my Canon R and the images in develop mode were rendered the same way in Library and Develop. There was practically no difference between them in color. 

Now after import raws become yellow and unsaturated and I don`t think it is right pure colour for RAWs.

Votes

Translate

Translate

Report

Report
Community guidelines
Be kind and respectful, give credit to the original source of content, and search for duplicates before posting. Learn more
community guidelines
Community Expert ,
Jan 10, 2022 Jan 10, 2022

Copy link to clipboard

Copied

Another thing to do if the change from the embedded jpeg preview to the Lightroom rendering which only happens when you go into Develop if you have selected embedded previews in import, is to set the default for your camera to "camera Settings". This is done in Preferences->Presets. Doing so will (for the more popular cameras) make the default rendering pretty close to the in-camera jpeg rendering and minimize this change. It is just caused by the difference in how your camera intereprets raw data vs how Lightroom interprets raw data. There is no single standard but "camera Settings will attempt to approximate the in-camera rendering and might be less confusing.

Screen Shot 2022-01-10 at 5.52.59 PM.png

Votes

Translate

Translate

Report

Report
Community guidelines
Be kind and respectful, give credit to the original source of content, and search for duplicates before posting. Learn more
community guidelines
Community Beginner ,
Jan 11, 2022 Jan 11, 2022

Copy link to clipboard

Copied

Thank you for the answer! 


I`ve already tried to do so, but it didn`t help. The color becomes more in-camera rendering alike only if I choose Camera Faithful v2 in Profile in Develop mode. But it is still unsaturated and with lots of magenta in Shadows. That`s the difference.


I already tried CR3 from Canon R and R5 and they open the same wrong way. I even tried to install LR from my Creative Cloud on the other Mac and it opened the same way as I wrote (yellow and unsaturated). So I can say that the problem is not in my camera or laptop. Maybe I should change some settings in lightroom and ACR, but it seems like I`ve already tried every setting🥲 

Votes

Translate

Translate

Report

Report
Community guidelines
Be kind and respectful, give credit to the original source of content, and search for duplicates before posting. Learn more
community guidelines
Community Expert ,
Jan 11, 2022 Jan 11, 2022

Copy link to clipboard

Copied

How are you calibrating your display? It is essential that you use calibration hardware such as a colormunki, spyder X, etc. even on Mac computers.


Make sure your Lightroom Classic is completely updated. There were some problems with the camera matching profiles for EOS R cameras in older versions.


You will always see a difference between the camera preview and the rendering in Lightroom. Adobe does not use the canon raw engine. Every raw engine is different. You need to do a bit of editing on every image. 

Votes

Translate

Translate

Report

Report
Community guidelines
Be kind and respectful, give credit to the original source of content, and search for duplicates before posting. Learn more
community guidelines
Community Beginner ,
Jan 11, 2022 Jan 11, 2022

Copy link to clipboard

Copied

Calibration is OK, because I made printscreens and sent it to my phone and the colour was the same as on laptop + I read that when it happened because of wrong calibration of monitor histogramm also went yellow/brown in whites. 

I have the latest version and this problem appeared in october and december after I updated LR and PS. At that time they updated camera profiles for R series. 

Votes

Translate

Translate

Report

Report
Community guidelines
Be kind and respectful, give credit to the original source of content, and search for duplicates before posting. Learn more
community guidelines
LEGEND ,
Jan 11, 2022 Jan 11, 2022

Copy link to clipboard

Copied

"Calibration is OK, because I made printscreens and sent it to my phone and the colour was the same as on laptop"


That's not necessarily a reliable test of whether your Mac display is well-calibrated --- too many unspecified variables.  A hardware calibrator is by far the best way to ensure your display is calibrated.

Votes

Translate

Translate

Report

Report
Community guidelines
Be kind and respectful, give credit to the original source of content, and search for duplicates before posting. Learn more
community guidelines
LEGEND ,
Jan 11, 2022 Jan 11, 2022

Copy link to clipboard

Copied

"I have the latest version"


Please do Help > System Info and tell us exactly what the first line says.  Unfortunately, over the years the Creative Cloud app has fooled many people into thinking they're on "the latest".

Votes

Translate

Translate

Report

Report
Community guidelines
Be kind and respectful, give credit to the original source of content, and search for duplicates before posting. Learn more
community guidelines
LEGEND ,
Jan 11, 2022 Jan 11, 2022

Copy link to clipboard

Copied

Upload one of the problem raw photos to Dropbox, Google Drive, or similar and post the sharing link here.  Then we can all be on the same page with how LR is rendering the image on known well-calibrated displays and we'll be able to narrow down the source of your issue more efficiently.

Votes

Translate

Translate

Report

Report
Community guidelines
Be kind and respectful, give credit to the original source of content, and search for duplicates before posting. Learn more
community guidelines
Community Beginner ,
Jan 11, 2022 Jan 11, 2022

Copy link to clipboard

Copied

"Upload one of the problem raw photos to Dropbox, Google Drive, or similar and post the sharing link here.  Then we can all be on the same page with how LR is rendering the image on known well-calibrated displays and we'll be able to narrow down the source of your issue more efficiently."


There are some of my raws: https://disk.yandex.ru/d/gBvCRNTEtgzmtw

Votes

Translate

Translate

Report

Report
Community guidelines
Be kind and respectful, give credit to the original source of content, and search for duplicates before posting. Learn more
community guidelines
Community Beginner ,
Jan 11, 2022 Jan 11, 2022

Copy link to clipboard

Copied

Снимок экрана 2022-01-11 в 20.43.53.png

Votes

Translate

Translate

Report

Report
Community guidelines
Be kind and respectful, give credit to the original source of content, and search for duplicates before posting. Learn more
community guidelines
Community Expert ,
Jan 11, 2022 Jan 11, 2022

Copy link to clipboard

Copied

One thing that isn't clear from your original email is where the color change occurs. So in addition to posting a raw, can you tell us what happens after you import an image from the following two options:


1. When imported, the image looks like what you expect. Then when you shift to Develop it changes. When you go back out of Develop, the image changes back to looking good.

2. When imported, the image looks like what you expect. Then when you shift to Develop it changes. When you go back out of Develop, now the image also looks 'bad' in Library and will stay identical to the Develop image from now on.


If 1. you probably have a bad display profile

If 2. this is just caused by Adobe's different raw engine than your camera. If using Camera standard as the profile doesn't help you need to do slight edits or use a preset to get you closer to what you like. Which one of the images in your original posts you like best just comes down to taste and style which one you prefer. It should be easy to make the Develop image look like the original jpeg. If you shoot raw, you shouldn't expect your images to be perfect right away. The whole point of shooting raw is editing lattitude. 


Votes

Translate

Translate

Report

Report
Community guidelines
Be kind and respectful, give credit to the original source of content, and search for duplicates before posting. Learn more
community guidelines
Community Beginner ,
Jan 11, 2022 Jan 11, 2022

Copy link to clipboard

Copied

Actually both of variants are true: 

I import images => see them in Library in Embedded preview in right way => go to Develop mode, for a second the color of the image is ok, then it is like loading, and it becomes more yellow and less saturated 

then 

if I do some corrections (chage profile for example) the embedded preview in Library disappears and in both modes now there is wrong color. 

if I just switch the modes and the embedded preview does not dissappear - the color in Library is ok and in Develop is not.


The reason why I am concerned about this rendering of raw file is that for about a month I didn`t have any problem with raw files from this camera. Everything was OK with the color. There was little unsignificant difference in colour between modes and it wasn`t critical at all. 

Votes

Translate

Translate

Report

Report
Community guidelines
Be kind and respectful, give credit to the original source of content, and search for duplicates before posting. Learn more
community guidelines
Community Expert ,
Jan 11, 2022 Jan 11, 2022

Copy link to clipboard

Copied

It might not actually update the Library preview if you don't do anything in Develop. This really appears that what you are looking at is just the difference in rendering between Adobe's raw engine and Canon's raw engine. You should get very minimal difference if you import with camera settings enabled. You can also apply camera settings for already imported images from the preset area where there will be a camera settings preset.

Votes

Translate

Translate

Report

Report
Community guidelines
Be kind and respectful, give credit to the original source of content, and search for duplicates before posting. Learn more
community guidelines
Community Expert ,
Jan 11, 2022 Jan 11, 2022

Copy link to clipboard

Copied

Took your raw and imported using the camera settings setting. switching between the embedded preview in Libary and then to Develop only shows a very minor shift. 

Library embedded preview:

Screen Shot 2022-01-11 at 11.02.28 AM.png

And this is after opening in Develop:

Screen Shot 2022-01-11 at 11.03.43 AM.png

These are virtually identical to my eyes. The develop endeing is slightly brighter in a few very limited areas (mostly just the bright forehead area) but that is only visible when I switch between the two screenshots. 

If I change to Adobe standard for the profile, you get this:

Screen Shot 2022-01-11 at 11.08.52 AM.png

This is much more yellow and succinctly different which is expected for using the different profile. Bottom line is that if you set your Lightroom to import using camera settings you should get basically identical rendering between the initial import and going into Develop.

Votes

Translate

Translate

Report

Report
Community guidelines
Be kind and respectful, give credit to the original source of content, and search for duplicates before posting. Learn more
community guidelines
Community Beginner ,
Jan 11, 2022 Jan 11, 2022

Copy link to clipboard

Copied

Exactly the same, that I can see on my laptop. But for me there is a big difference. Thank you for your time and for your help 🙏🏻 My experience with Canon 70D raws was much better than CR3. Colors were just neutral and naturel, maybe I try to achieve something that is impossible. 

Votes

Translate

Translate

Report

Report
Community guidelines
Be kind and respectful, give credit to the original source of content, and search for duplicates before posting. Learn more
community guidelines
Community Expert ,
Jan 11, 2022 Jan 11, 2022

Copy link to clipboard

Copied

These differences are much smaller than the potential error introduced by not calibrating your screen using calibration hardware. If you are not calibrating you shouldn't focus too much on these very small differences. The shift possibly introduced when you would calibrate is much larger.

Votes

Translate

Translate

Report

Report
Community guidelines
Be kind and respectful, give credit to the original source of content, and search for duplicates before posting. Learn more
community guidelines
Guest
Aug 14, 2022 Aug 14, 2022

Copy link to clipboard

Copied

I have the exact same problem as you, develop module looks unsaturated compared to the library module. Also, when exporting the images, they look more like the library then the develop module, and it's very frustrating cause they look oversaturated. One think I noticed, it only happens on my Macbook Pro M1, on my Macbook Pro M1 Pro the colors are exactly the same between both modules. Did you manage to solve the issue? 

Votes

Translate

Translate

Report

Report
Community guidelines
Be kind and respectful, give credit to the original source of content, and search for duplicates before posting. Learn more
community guidelines
LEGEND ,
Aug 14, 2022 Aug 14, 2022

Copy link to clipboard

Copied

First, the preview architecture in Develop is unique to all other modules and the most accurate preview of the data. You should always view previews there and elsewhere at 1:1 or greater and when comparing, use the same zoom for each. 
It is normal to see slight differences at 1:1 but if really excessive, the first thing to try is to disable GPU in preferences; better? If not, you might have a corrupted display profile. Recalibrate the display or whatever you usually do to create a display profile. When given the option to build this profile, pick Version 2 (not V4) and Matrix not LUT. 

As to viewing Develop module and Library and outside of LR, it helps to soft proof in Develop using the same profile used in Library (Adobe RGB (1998)) OR the profile selected in Export for the edited image. 

Author “Color Management for Photographers" & "Photoshop CC Color Management/pluralsight"

Votes

Translate

Translate

Report

Report
Community guidelines
Be kind and respectful, give credit to the original source of content, and search for duplicates before posting. Learn more
community guidelines
New Here ,
Oct 21, 2022 Oct 21, 2022

Copy link to clipboard

Copied

Had the same problem. The issue were on external monitor. Solved by switching off HDR function on second monitor. 

Votes

Translate

Translate

Report

Report
Community guidelines
Be kind and respectful, give credit to the original source of content, and search for duplicates before posting. Learn more
community guidelines
New Here ,
Sep 13, 2023 Sep 13, 2023

Copy link to clipboard

Copied

Me too!!!! Help me!!!

Votes

Translate

Translate

Report

Report
Community guidelines
Be kind and respectful, give credit to the original source of content, and search for duplicates before posting. Learn more
community guidelines
New Here ,
Oct 16, 2023 Oct 16, 2023

Copy link to clipboard

Copied

*sorry for how long this is...


I am having this exact same issue. I have read through this thread and tried everything mentioned as well and im not making any progress with the issue - I have shot on 5D Mark IVs and have never had this issue. It is so frustrating - the difference in the embedded preview in the library mode in LR compared to the develop module is crazy (i even showed my husband the difference and when i show him different edits or something he can never tell the difference - It is hard to get him to see a difference in coloring. and his immediate reaction was "oh wow. EW. Thats crazy, why does it do that?". My main point here is i know im not crazy or being meticulous about it because he even saw a huge and obvious difference, and not in a positive way)

I have also tested this in Photo mechanic because i know photo mechanic creates a preview as well. I have found the same thing is happening, the preview photo mechanic makes is similar if not exact to the preview that LR make in the library mode but then pull that photo side by side in photo mechanic and the develop mode the difference is obvious (and again not in a good way).


I also have had second shooters of mine for weddings use both the first R6 body and the R5 bodies in the past and while i noticed a difference in the 5D Mark IV photos and the photos off the mirrorless bodies, it was not as drastic of a difference and between the two and before i wasn’t having issues with the mirrorless camera photos looking different on their own between the Library and Develop mods. 

I took about a year off from weddings so i wasn’t editing any of my second shooters photos (the mirrorless cameras) and then I took a few more months off as a whole and while I was off I decided to order the R6 mark II (i believe that was around April or May of this year (2023) and ever since I have struggling and extremely frustrated when it comes to the editing process as a whole. 


I have recently made the decision to go back to my 5D Mark IVs and ditch going mirrorless at all. So disappointing because I LOVE shooting with this R6 ii, but once I sit down at the  computer with the photos it makes me loath the process, and my job as a whole. 

I love my 5D Mark IV so recently I have come to the conclusion, “why fix what was broke?” There is no reason I have to keep using my R6. With that being said I still need to figure out this issue because I have associate shooters and second shooters that still shoot mirrorless (and while I wasn’t having all these issues before when editing their photos I am having now) and also I still have work I am trying to (struggling to) finish that I was still shooting on the R6 before I decided I was done with it. 


I feel like it is an update that Lightroom made at some point but im not sure when. 

I originally thought that it was just my new camera but I have tested it with multiple different computers and every which way to determine it not just my camera or my computer. I also have pulled up old RAWS from wedding of my second shooters to see the same issue that I didn’t have when I originally edited and processed them. And I have tested the issue on new photos from the same second shooters on the their cameras on both my computer and theirs and the issue is there all around now… but like I said wasn’t in the past.


If anyone has an answer on how to fix this I would so so so appreciate it - this issue keeps me up at night and honestly makes me questions my sanity (I know that sounds dramatic, and maybe it is, but I’m so serious) 

I have only seen one of two people bring up this issue between this site and other forums but nobody seems to have an answer or people responding just aren’t understand the issue, or understand it but dont see an issue with it. 


Send help pls im begging 

Votes

Translate

Translate

Report

Report
Community guidelines
Be kind and respectful, give credit to the original source of content, and search for duplicates before posting. Learn more
community guidelines
Community Expert ,
Oct 16, 2023 Oct 16, 2023

Copy link to clipboard

Copied

This is an old thread but I'll quickly give you the answer. You need to set the raw default in Lightroom's preferences to 'camera settings'. This will make Lightroom try to recreate the camera's jpeg rendering (which is what you see with the embedded preview setting). This applies to newly imported images. For already imported images just apply the camera settings preset. This should get you quite close to the in-camera jpeg. Note that the JPEG rendering cameras do is a proprietary rendering that has nothing to do with accurate rendering. It is what the camera makers consider their special sauce. By default Lightroom uses profiles adobe created by shooting test charts with color patches. It is actually more accurate but it is also more boring than the in-camera rendering and if you expect to see what you saw on the camera lcd it is always weird. Adobe reverse engineered this rendering for many cameras (mostly all the main brand cameras) and that is what you get with the camera settings raw default. It applies a raw profile that should match the in-camera setting and it applies a number of edits that correspond to certain camera settings you might have made that affect the raw rendering the camera does (highlight priority auto contrast, etc) that don't actually affect the raw data but affect how Canon renders it. Hope this helps!

Votes

Translate

Translate

Report

Report
Community guidelines
Be kind and respectful, give credit to the original source of content, and search for duplicates before posting. Learn more
community guidelines
New Here ,
Mar 15, 2024 Mar 15, 2024

Copy link to clipboard

Copied

Go to preferences>Performance>use graphics processor

 then select off.  This is what worked for me.  I've been struggling with this for months since an update.  I was completely deflated and stopped creating in Lightroom.  Then I stumbled upon this solution.  I don't understand why it works or if it's the wrong way to correct this issue, but none of the condescending techy incoherent fixes offered by the tech gurus were of any help.

98FFC62D-F3DC-4E7F-A233-E76EEE160D42.jpeg

Votes

Translate

Translate

Report

Report
Community guidelines
Be kind and respectful, give credit to the original source of content, and search for duplicates before posting. Learn more
community guidelines