

- Home
- Lightroom Classic
- Discussions
- Re: Having problems selecting and draggng image in...
- Re: Having problems selecting and draggng image in...

Copy link to clipboard
Copied
I have my 29 Word file pages non intuitive LR notes on how to create a pdf image portfolio.
I"m on the beginning stage of just selecting six images and dragging them to the collection.
The six images are in the Folder hardrive area.
But when I select all and then try to drag all, the minute the cursor clicks another image, the rest all deselect. Also, nothing drags even if I just try to drag one.
Exasperated, thanks!


 1 Correct answer

I am not sure if you understand the difference- but this might be your problem.
Clicking on a thumbnail BORDER affects only SELECTIONS
Click and hold on the IMAGE allows drag & drop. (Into Collections or Move to another folder, etc)
So to add your six images to the book collection- Select them (Click the BORDERS with Ctrl and Shift options), then place the mouse cursor on one of the selected thumbnail IMAGES, hold the L-Mouse button down, drag all the selected photos to the Collection.
(You cannot d
... 14
Replies
14
14
Replies
14
Copy link to clipboard
Copied
I am not sure if you understand the difference- but this might be your problem.
Clicking on a thumbnail BORDER affects only SELECTIONS
Click and hold on the IMAGE allows drag & drop. (Into Collections or Move to another folder, etc)
So to add your six images to the book collection- Select them (Click the BORDERS with Ctrl and Shift options), then place the mouse cursor on one of the selected thumbnail IMAGES, hold the L-Mouse button down, drag all the selected photos to the Collection.
(You cannot drag from the grey borders)
And are you aware that Collections are 'Virtual'. they are not physical images, folders or locations. Photos shown in a collection are simply a reference to the original image where it stays in a folder location. Like a list of photo favorites for a specific purpose (the Book).
Copy link to clipboard
Copied
Thanks Wobert, opposite from every software in the world, as you usually have to grab sides to move. BTW, also confusing how to get selected images to look separated from background. Tips on that?
Copy link to clipboard
Copied
how to get selected images to look separated from background.
I am not sure I understand what you mean by this.
If you are looking to select and extract part of an image and place it on another background, then you need a 'Pixel' editor like Photoshop.
The adjustment tools in Lightroom can selectively darken, lighten, vignette, desaturate, etc, to achieve different looks. Sometimes just brushing negative exposure, or using the Radial filter, can 'high-light' the main subject in a photo.
Copy link to clipboard
Copied
No what I meant in the edge is light grey, the background is medium grey so selected images are barely noticeable. How do I make the edge Red? Crazy how the LR defaults barely see something is selected.
Copy link to clipboard
Copied
It might be easier, instead of much typing, if I just copy and paste from my notes.
Forgive the Capitals- I am not 'shouting' 
(THE FOUR SHADES OF GREY)
- MID-GREY : UN-SELECTED IMAGE BORDERS ARE MID-GREY.
- LIGHT GREY : ONE SELECTED IMAGE, (or- IMAGES IN A MULTIPLE SELECTION- EXCEPT THE "MOST SELECTED IMAGE" as in 3.)
- VERY LIGHT GREY: THE IMAGE SELECTED THAT IS THE “PRIMARY” OR “MOST SELECTED” IMAGE AMONG MULTIPLE SELECTED IMAGES. THE OTHER IMAGES SELECTED BY HOLDING [CTRL] OR [COMMAND] OR [SHIFT] KEYS, BECOME THE “SECONDARY” SELECTED FILES WITH A LIGHT GREY BORDER.
- DARK GREY: IMAGES WITH A VIRTUAL COPY (STACKED BY DEFAULT), OR IMAGES MARKED FOR "GROUP INTO A STACK", ALL SHOW AS DARK GREY IN LIBRARY GRID MODE. (UNSTACKED VCs RESUME THE MID-GREY SHADE as for 1. )
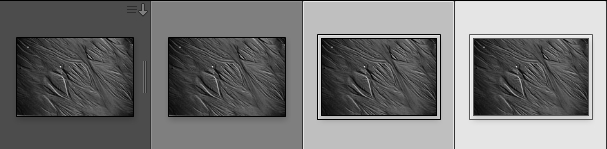
DARK GREY MID GREY LIGHT GREY VERY LIGHT GREY
WHEN MULTIPLE FILES ARE SELECTED-
*CLICKING ON THE IMAGE AREA IN A THUMBNAIL UPGRADES THIS IMAGE TO THE “PRIMARY” SELECTED IMAGE. (aka. “MASTER” IMAGE) AND THE “SECONDARY” SELECTIONS (aka “CHILD” SELECTIONS) REMAIN SELECTED.
*CLICKING ON AN IMAGE THUMBNAIL GREY BORDER- DESELECTS ALL OTHER IMAGES.
[CTRL+A] WILL SELECT ALL IMAGES.
[CTRL+D] WILL DESELECT ‘ANY SELECTED’ IMAGE (NONE ARE SELECTED).
PRESSING THE [ / ] KEY DESELECTS THE SELECTED IMAGES STARTING FROM THE PRIMARY IMAGE SELECTED AND RESETS THE NEXT IMAGE TO THE “PRIMARY”
IN LIBRARY GRID VIEW
IN LOUPE VIEW
SELECTED IMAGES CAN BE STACKED [CTRL+G], A STACK WILL SHOW THE NUMBER OF IMAGES IF SET IN PREFERENCES. UNSTACK IMAGES [CTRL+SHIFT+G].
STACKING IS USEFUL FOR IMAGES IN A SERIES- eg. ‘HDR’ EXPOSURES, TIME LAPSE.
VIRTUAL COPIES CAN BE ‘STACKED’ BY CLICKING THE VERTICAL BAR ON THE IMAGE BORDER.
Making the 'edge' red is only possible if you use color labels. It is not a feature to aid vision or change the entire interface of Lightroom.
When you tag an image with a color label the total border shows the label color. If the image is then selected the color only shows as a thin border around the image.
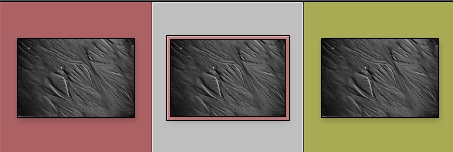
Color Label 'Red' Selected +'Red' Color Label Yellow
Copy link to clipboard
Copied
Not sure what you mean.
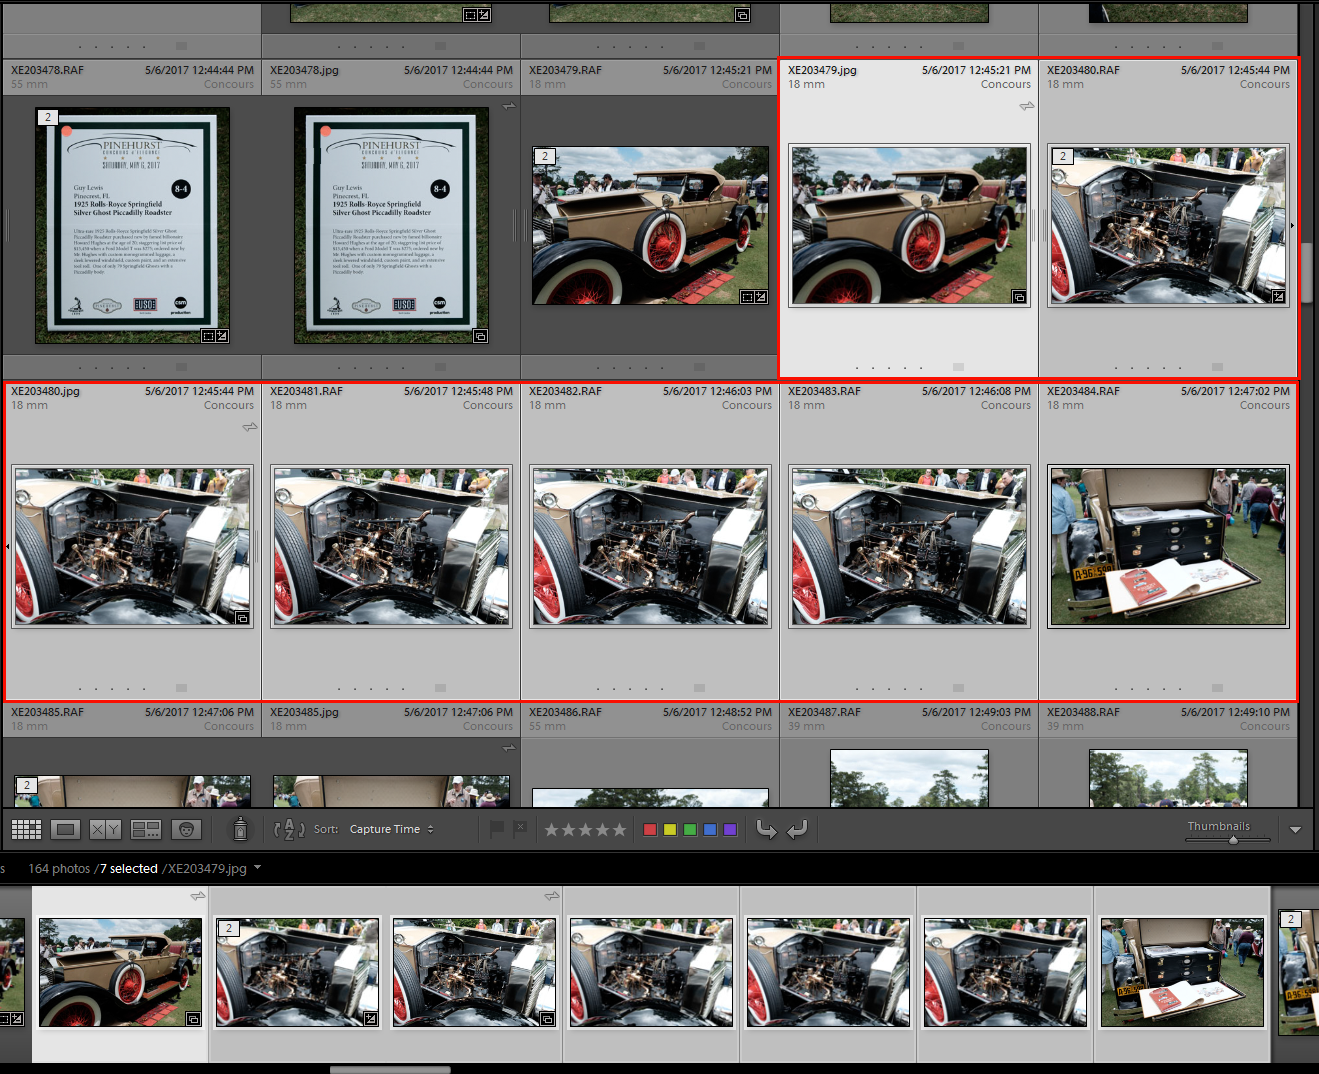
Here is the whole LR program interface with nothing selected.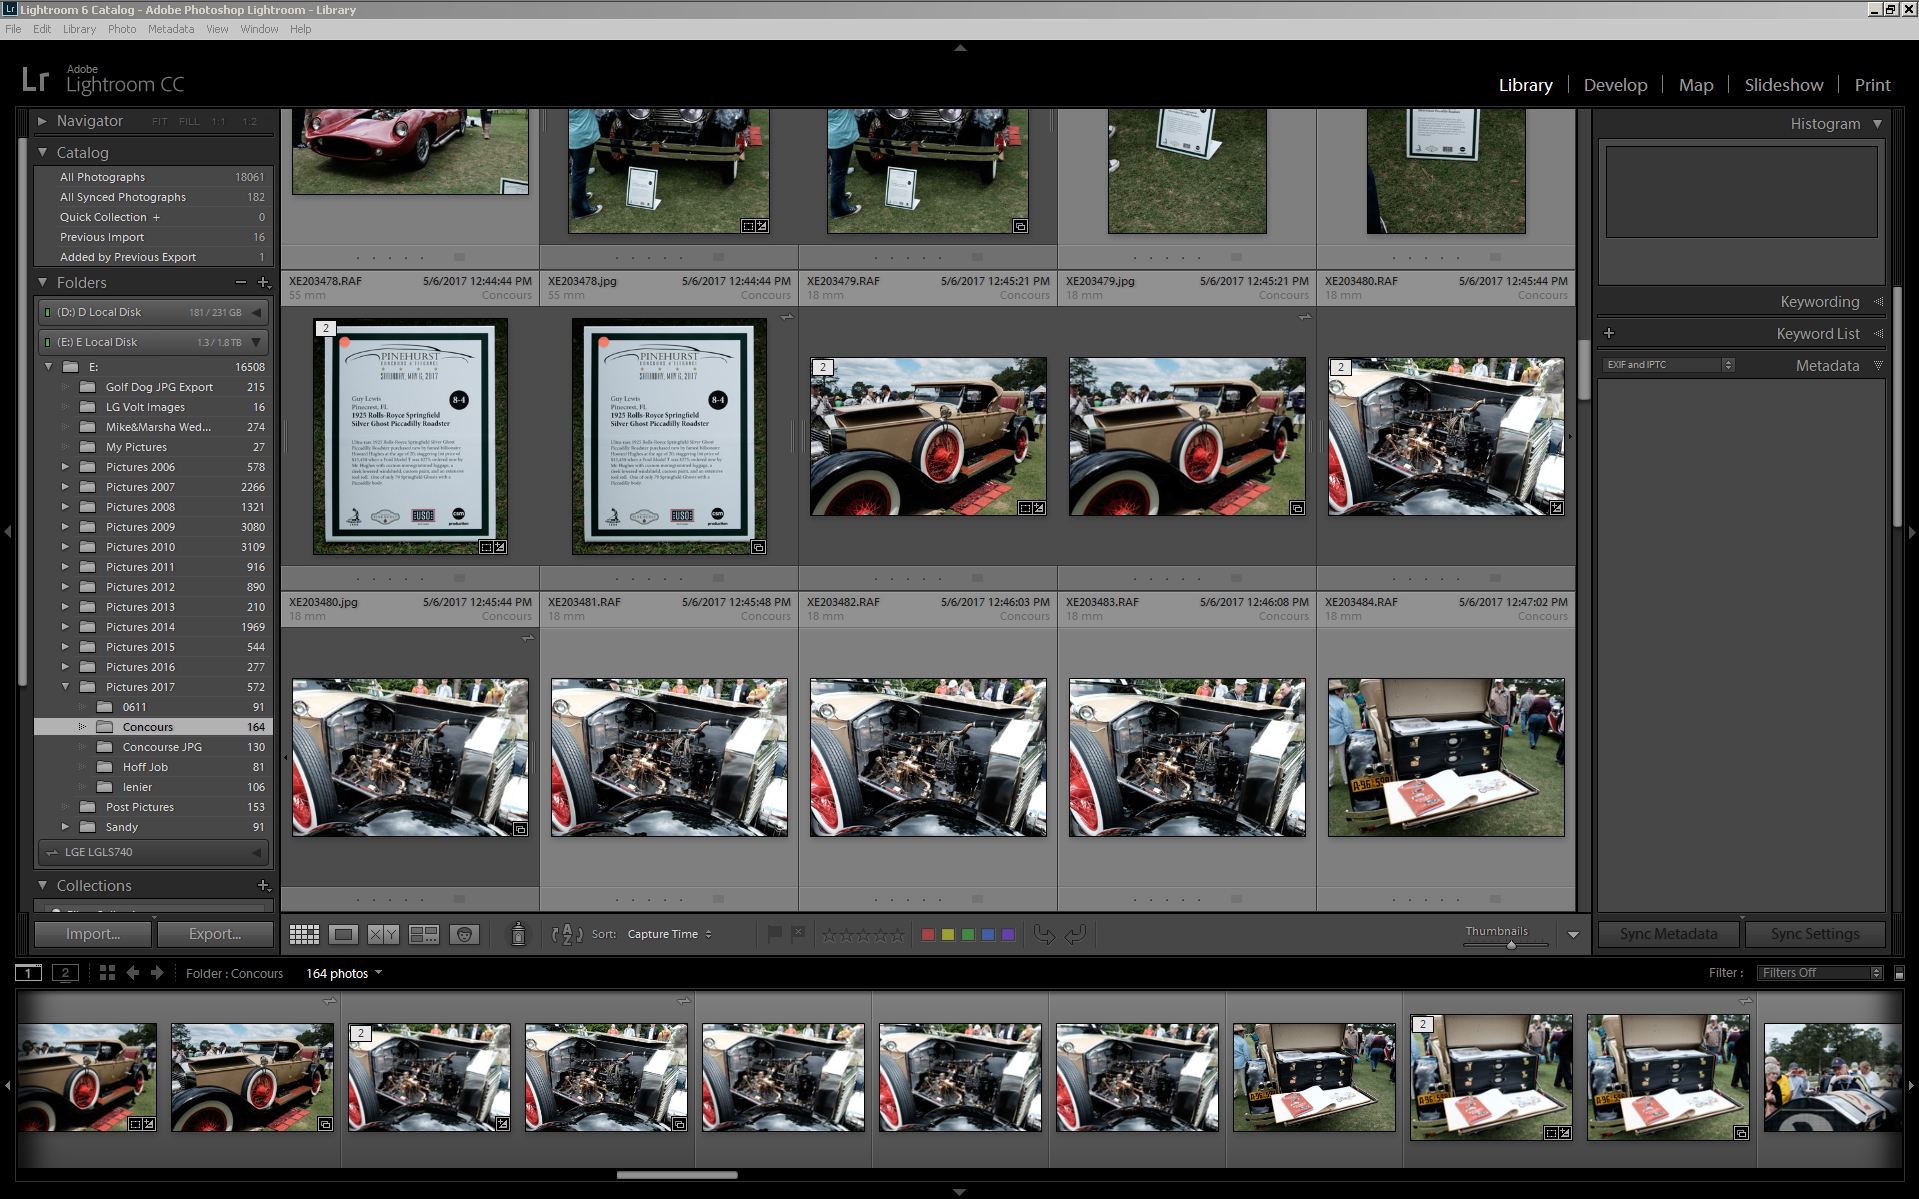
In the Grid View you see 2 shades of gray surrounding the image. The darker of the 2 is because those images are in a Stack and the lighter gray around the image is because those are not in a Stack.
If you select an image that gray area around that one image, whether is was the darker or lighter gray to start with, turns even a lighter shade of gray.

If you select more than one image the first selected turns that lighter shade of gray and the others you select turn a lighter but slightly darker than the first image you selected and images that are not selected.
I'm not sure what you are seeing on your system but on mine there is no boarder other than what I have displayed in my screen shots.
Copy link to clipboard
Copied
Great info guys thanks. Can one change the selected image our color or fixed?
See how confusing LR is, I don't even know what stack images are!
Can selected images had that outer red outline that justshootme has in his example but I suppose that was made just for this example?
Copy link to clipboard
Copied
Then you need to view some online tutorial on how LR works and how to work with LR.
And maybe buy a book on LR.
Copy link to clipboard
Copied
The free e-book "Quick Start Guide" from Victoria Bampton is also great-
https://www.lightroomqueen.com/blog/
Copy link to clipboard
Copied
I've been using LR since it was invented, though admittedly sparsely just for pdf, and web galleries. Ive seen the books, too broad, for my needs. But, I'm not complaining because LR just is by far million times better then PS for pdfs and web galleries. But wow, for me it's just so non - intuitive. Am I wrong? Who would think of selecting a group of anything by not clicking the edge?
An old friend said he uses LR for 99% of all photography needs. I suppose if one goes full blast it will get more intuitive.
Final to confirm, what they offer is what you get: you can not make the edge black (or that red outline-- you just made that for t his thread?), or something that will really set if off and let my know it's an image selected.
Copy link to clipboard
Copied
let me know it's an image selected.
Light Grey and Very Light Grey - is all we have to work with for selected photos.
Adobe has not given us any other options to change the interface. So we are stuck with it.
And a thought- is your monitor calibrated so you see the shades of grey distinct?
Copy link to clipboard
Copied
Yes, I see them W. but you have to know LR is like this or else you could think it's not working. Another weird thing: usually the item selected is very obvious or you would think it would be.. t hanks.
Copy link to clipboard
Copied
larry4545 wrote
Yes, I see them W. but you have to know LR is like this or else you could think it's not working. Another weird thing: usually the item selected is very obvious or you would think it would be.. t hanks.
It's like everything else. You have to Learn how something works to actually work with it. If you have been working with LR from when it came out, which was 10 years ago and 7 major releases, I would expect you would of figured out what a selected image looks like.
LR is for images. It only recognizes image files. So I wonder why you keep saying you use it for PDFs. You can't import PDFs into the LR catalog. You can add Acrobat as an external editor, although you can't really edit an image in acrobat.
Copy link to clipboard
Copied
I'm making pdf portfolios. It's very non intuitive software. I should post the notes on to make this pdf portfolio it would make your head spin

Find more inspiration, events, and resources on the new Adobe Community
Explore Now
 AdChoices