Inspiring
February 22, 2021
Answered

Is there a way to open 2 folders in library module, one on each monitor?

  • February 22, 2021
  • 4 replies
  • 2774 views

Is there a way to open 2 folders in library module, one on each monitor?


I have a folder with Colorchecker Passport shots that I want to copy and paste to photos in another folder.  The photos are 12 bracketed panoramas, so I need to display exactly 12 images in each row so I know which 12 to paste the color profile to.  I have one Colorchecker Passport shot per panorama, with a couple hundred panoramas.


I do not want to display both folders together into the same library module on the same display, otherwise, the images will be mixed ordered and I won't get exactly the correct set of 12 images split by rows.


I don't want to open each folder individually on one display and switch back and forth in the same library module, because each time I switch folders, I lose selection of the last photo in the folder and I lose my place and have difficulty finding where I left off.


I want each folder on a separate library module on its own separate display.

This topic has been closed for replies.
Correct answer Conrad_C
@sdinweoinasd9384152 wrote:

Now, I want to copy and paste these profiles and white balance adjustments from the colorchecker passport photos from one folder, to panorama shots in another folder.


OK, I think I slightly misunderstood what you are after, but first we need to straighten out some terminology which led to my misunderstanding.


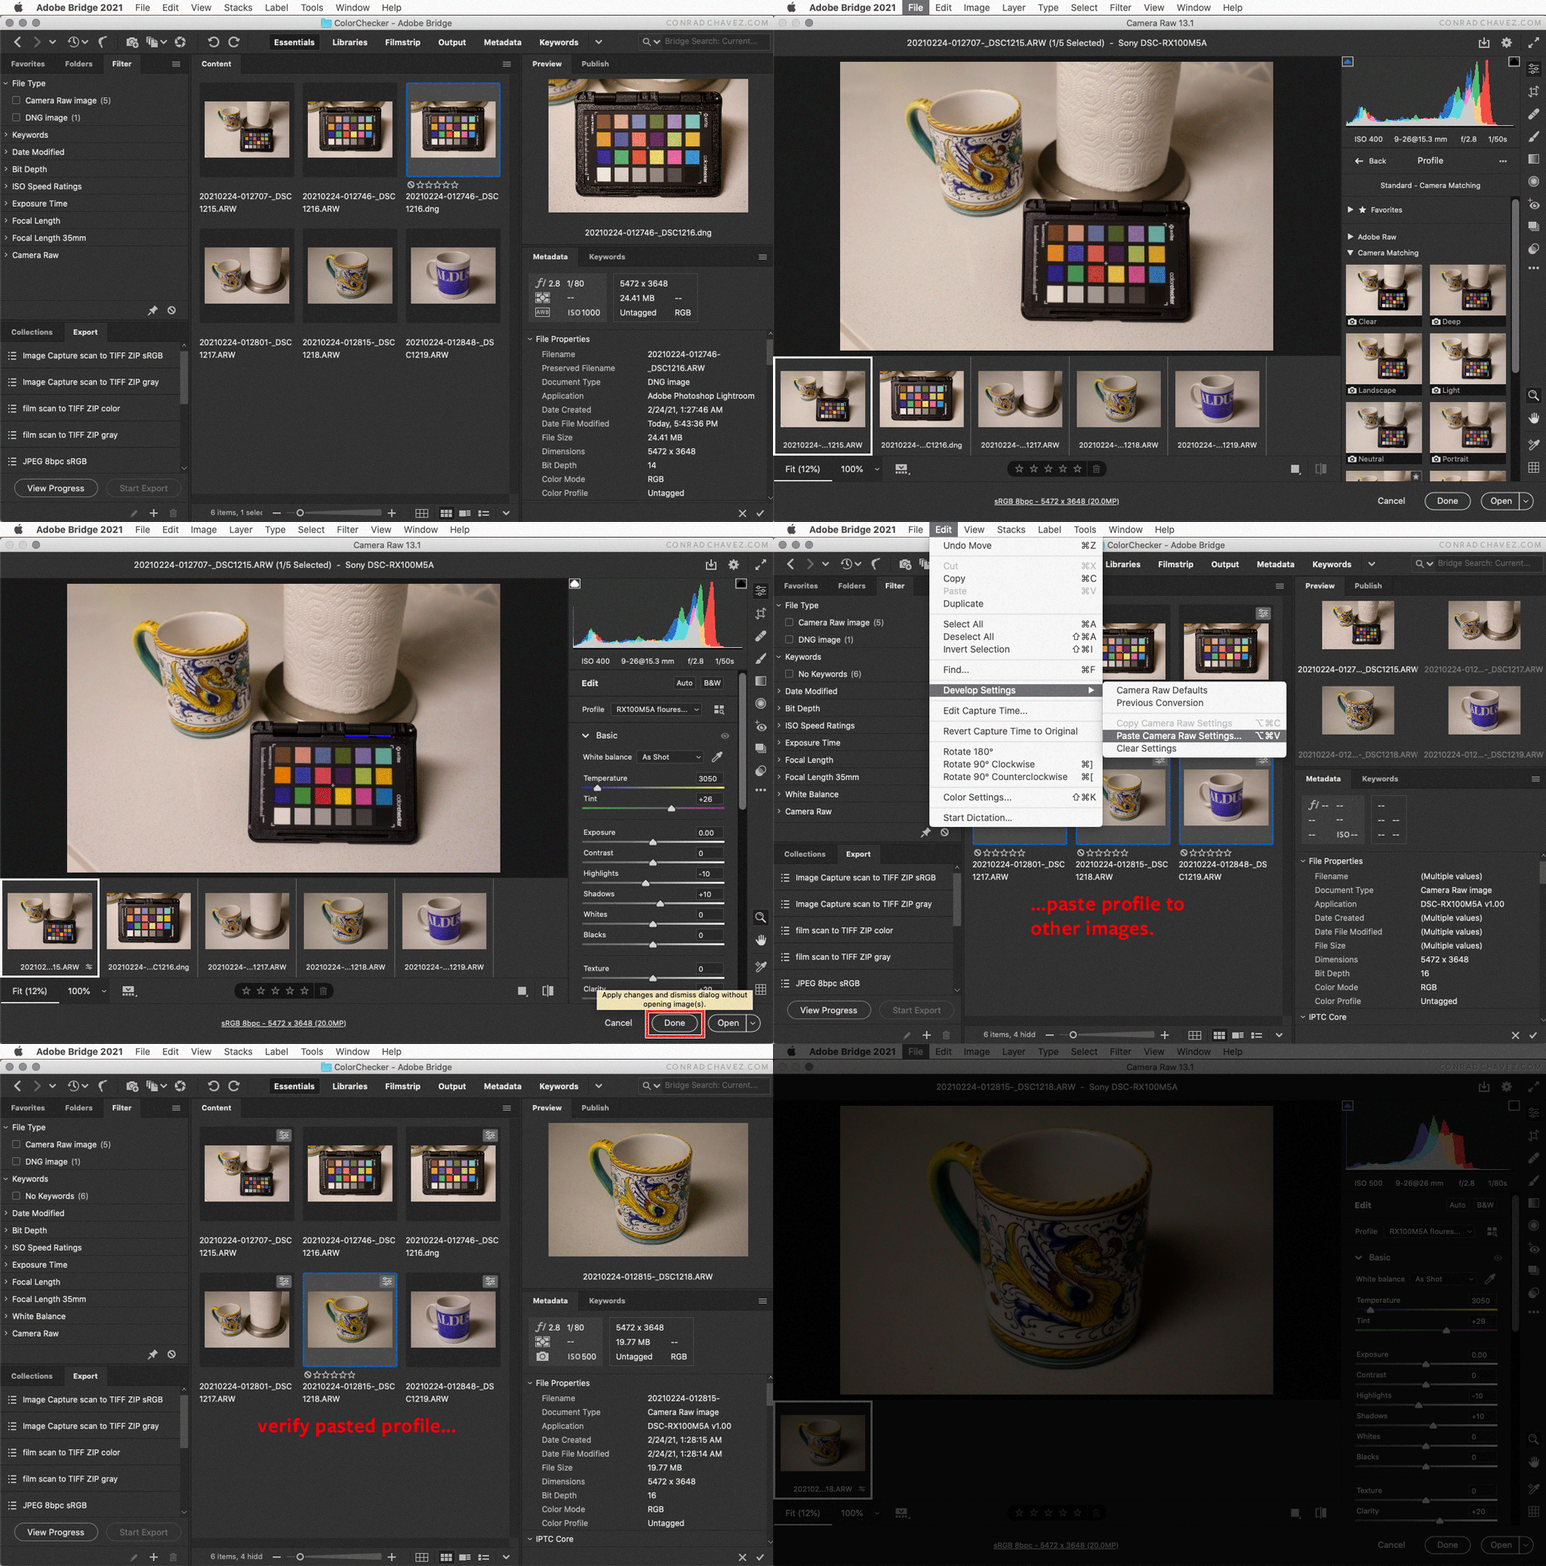
I thought you were talking about copying and pasting profiles between Lightroom Classic and Bridge for the purpose of applying them. That is the part that isn’t necessary, since any profiles installed for either is available to both. The animation below shows how to apply a camera profile in Camera Raw 13.

Now that I better understand what you want to do, I see that it’s possible using the Copy Camera Raw Settings and Paste Camera Raw Settings commands in Adobe Bridge. These work similarly to the way you would copy and paste Develop settings in Lightroom Classic. The animation below demonstrates one way this could work.


Re-reading your post, I see that I left out something that you need. When I show the Paste Camera Raw Settings dialog box and how to select only the profile for pasting, I should have also selected White Balance because you want that too. You would want to select both the profile and White Balance.


When you copy and paste, you will switch to a second Bridge window to paste. (For simplicity I am showing only one Bridge window.) To open a second Bridge window, choose File > New Window and browse to the other folder you want to view.


Also, please ignore the general quality of images and corrections in the example. It was a very rough test in the kitchen, just to create a quick ColorChecker DNG so I could make a current camera profile to use. I did not make any white balance or other adjustments in the examples.

4 replies

DdeGannes
Community Expert
Community Expert
February 23, 2021

Just a thought outside the box, is it possible to achieve the desired by creating presets?

Regards, Denis: iMac 27” mid-2015, macOS 11.7.10 Big Sur; 2TB SSD, 24 GB Ram, GPU 2 GB; LrC 12.5,; Lr 6.5, PS 24.7,; ACR 15.5,; (also Laptop Win 11, ver 24H2, LrC 15.0.1, PS 27.0; ) Camera Oly OM-D E-M1.
Bob Somrak
Legend
February 23, 2021

It seems like if you are going to the trouble of using a CCP than you should take the CCP photo at the SAME time you took the panos for all the panos.  How do you guarantee the light hasn't changed after the several hours it took to take the 100 panos.  Beings you don't want to keep changing the ISO and Shutter Speed all the time (I don't blame you) than I would get an extremely light and small light stand and put the CCP on that and take the CPP photo at the same time with the long exposure.  Take CPP photos for every pano.  It would probably save you time and headaches in the long run as they would be easy to match and pretty much error free.  They are cheap.  I would probably get a better one than this but 20 bucks


https://www.bhphotovideo.com/c/product/262758-REG/Impact_LS_6B_Light_Stand_Black.html 


M4 Pro Mac Mini. 48GB
Inspiring
February 23, 2021

The main reason to shoot the panorama consecutively, and then the colorchecker photos afterward is to prevent the possibility of human error in counting the 4 rotations to capture the complete panorama.  Inserting a colorchecker photo in between every panorama may cause me to forget the last shot, or accidentally think that I've already taken the first shot.  You may not think it's possible, but it does happen. For example, if someone walks in front of the camera during one of the shots, I take a duplicate shot after the person gets out of the frame, and accidentally count 4 when there were actually only 3. Or if I set down the tripod at a new point, and the exposure is different, so I take a test shot, look through the playback, and forget to shoot the next 3.


Shooting 4 shots uninterrupted help prevent these types of errors.


Not every panorama needs a separate colorchecker photo, for example multiple panoramas in a long corridor with identical lighting. The longest exposure in the bracket could be up to 10-15 seconds, so not switching to faster exposure would maybe take an extra 15-20 minutes for 100 panoramas, although shooting at the same time would save some time for walking back and forth.  I had a project with 300 panoramas, so that would be an extra hour if I had to use the long 15 second exposure and shoot a colorchecker photo for every panorama.


The lighting change over an hour for interiors doesn't really have too much of an effect on colors, except maybe the white balance patch, but I'm usually adjusting manually the WB warmer anyway.


Conrad_C
Community Expert
Community Expert
February 23, 2021

This doesn’t sound like the kind of thing that Lightroom Classic can easily be forced to do.


However, it sounds like the perfect job for Adobe Bridge. You can use Bridge to open two windows (File  > New Window) for two separate folders, customize the width of the Content panel to show an exact number of thumbnails across, and because Bridge is a desktop-like file browser (unlike Lightroom Classic), both file copy/paste and file drag/drop are fully supported between Bridge windows.


I believe Adobe Bridge is part of any subscription that includes Lightroom Classic.

Inspiring
February 23, 2021

Can I copy and paste Lightroom presets from bridge into Lightroom?

Conrad_C
Community Expert
Community Expert
February 23, 2021

It is not necessary to copy and paste either presets or profiles. Lightroom and Camera Raw both reference the same folders containing presets and profiles. Once you install for one, both see them. This is because Camera Raw and Lightroom use the same Camera Raw processing engine.


I just checked my Camera Raw through Adobe Bridge, and sure enough, the list of Presets and the list of Profiles are identical to what I have in Lightroom Classic.

Community Expert
February 23, 2021

One way to switch back and forth between two folders, is via the 'recent sources' at top left of Filmstrip.


More radically, since the different folders images are stored in, are largely incidental to LrC - and should certainly never hamper you - another approach is to add both the 'source' and 'destination' images to a new Collection. Then within this Collection, you can tidily stack the 12 members of each panorama together with their related Colorchecker image. Collapse all of these stacks and everything is (virtually) tidied for the task - expanding each stack in turn to work on it. Remove images from this Collection as you go, or collapse that stack again and keep this Collection. There's no practical penalty from doing so.


More radically still: LrC would be perfectly capable of managing the difference between the panorama images and the Colorchecker images for you, even if they were stored together in the same folder. Arguably if they are so tightly related they may belong together? And then you could stack - or custom order - or filter these images on whatever attributes. Generally speaking IMO, organisation by physical folders for workflow reasons, is to forego the many looser, more flexible tactics of the Catalog approach. Sometimes what feels like necessary control does (on reconsideration) turn out to be unnecessary rigidity!

Inspiring
February 23, 2021

Thanks. The colorchecker photos are not shot at the same time as the panorama photos, so grouping them together would not allow them to be clearly separated into 13 images per row without manual reordering.


However creating a collection would allow me to virtually combine them while keeping them in separate folders, which is important because I batch export the panoramas to Tiff for further processing, and accidentally exporting the colorchecker photos will mess up the batch process in the other software. So I need to keep the colorchecker photos in a separate folder.


I will attempt to combine both folders into collections as a solution to this problem. I will have to see if I can create virtual copies of the colorchecker photos to pad the rows by 13 images, because there are for example 85 colorchecker photos for 100 panoramas. 

Inspiring
February 23, 2021

I just tried using a collection, but this added a lot of complications, because some panoramas have no corresponding colorchecker photos, while other panoramas have multiple colorchecker photos with dual illuminant profiles, so they don't divide equally into rows of 13.  I had to create fake virtual copies to pad the images to divide them into 13, and then delete the extra colochecker photos and leaving only 1 if a panorama had multiple colorchecker photos.


This caused problems because for the panoramas that have no colorchecker photos, I have to scroll up and down the 100 rows to search for colorchecker photo from a different panorama that most closely matches. It's a very slow process to scrow through the rows, and I might accidentically skip a row and forget to replace one of the fake virtual copies of the colorchecker photos.


It would be much simpler if I could open 2 separate library module windows, each with different folders, each on separate displays.


I tried your suggestion of using the "recent sources" on the timeline, but this did not help other than removing the need to open the folder browser side panel, because switching folders with the filmstrip will still reset the photo selection and move the library to the top of the folder. I still lose my place and have to try and remember which image I was still working on last.


For the moment, the best I can do is either 1) create the collections, manually reorder, and manually pad the rows with fake virtual copies and hope that I don't skip a row or copy the profiles from the wrong colorchecker photo, or 2) switch back and forth 200 times between folders and write down the 2 file names that there last selected in each folder on a piece of paper (200 times), and then scroll down to the folder to try and find the last selected image each time I switch folders.

DdeGannes
Community Expert
Community Expert
February 23, 2021

I do not know of any way to copy/paste images from another application into LrC. To work with images in Lightroom you first have to import the files to the LrC Catalog so that Lightroom has a record of them and where they are located on your computer system. There are no actual image files in LrC. See the info at the link below.

https://www.lightroomqueen.com/what-is-a-lightroom-catalog/ 

Lightroom can only open one Catalog at a time.

One thing you can probably try is to create a collection in LrC Library module and place files from different folders into the collection, select the collection and work with those files in the develop module.


Regards, Denis: iMac 27” mid-2015, macOS 11.7.10 Big Sur; 2TB SSD, 24 GB Ram, GPU 2 GB; LrC 12.5,; Lr 6.5, PS 24.7,; ACR 15.5,; (also Laptop Win 11, ver 24H2, LrC 15.0.1, PS 27.0; ) Camera Oly OM-D E-M1.
Inspiring
February 23, 2021

Sorry I didn't make myself clear. All photos are already imported to the catalog. I don't actually want to copy and paste images. I want to copy and paste the Lightroom adjustments from the colorchecker passport photos in one folder and paste them to equal sets of 12 images that make up 100 sets of panoramas. Each panorama set has one unique colorchecker passport photo that contain the plug-in generated color profile and white balance gray patch. Therefore I scale the library module to show 12 images per row so that every set of panorama is already split by rows. However, copying and pasting adjustments from images from one folder to images in another folder 100 times requires switching folders 200 times in the library module, and each time I switch folders the selection is reset and the library goes back up to the top of the folder so that I lose my last place and lose track of my work. 


I cannot simply select both folders to show both at the same time in the same library module because the images would get mixed and I would no longer have each set of 12 images per panorama clearly split by separate rows, and the colorchecker passport photos were not shot in the same order as the panoramas.


Therefore, I want to be able to open 2 separate library modules, on different monitors side by side, one module opened to the folder containing the colorchecker photos and the other module opened to the folder containing the panoramas. Then I can copy and past the the adjustments from one monitor the the other monitor without losing my place.

Bob Somrak
Legend
February 23, 2021

Why don't you put the CCP photos in the same folder or collection as the panos and then show 13 photos per row sorted by capture time.  Wouldn't then each corresponding CCP photo be in the same row as the pano photos?

M4 Pro Mac Mini. 48GB