Darius Mihai
Known Participant
March 21, 2024
Question

Lightroom Classic 13.2 issues with inconsistent Shadows, Highlights and more

  • March 21, 2024
  • 5 replies
  • 1293 views

There is an issue with the following 4 settings  in LRC 13.2: Highlights, Shadows, Whites, Blacks


The issue is that they are applied erratically and the same setting values yield very different results in photos taken at the same time with the same camera, lens, iso, aperture and shutter speed.

In my case it was a timelapse, so the photos are identical in terms of properties and I could reproduce this easily with adjacent images in the timelapse.

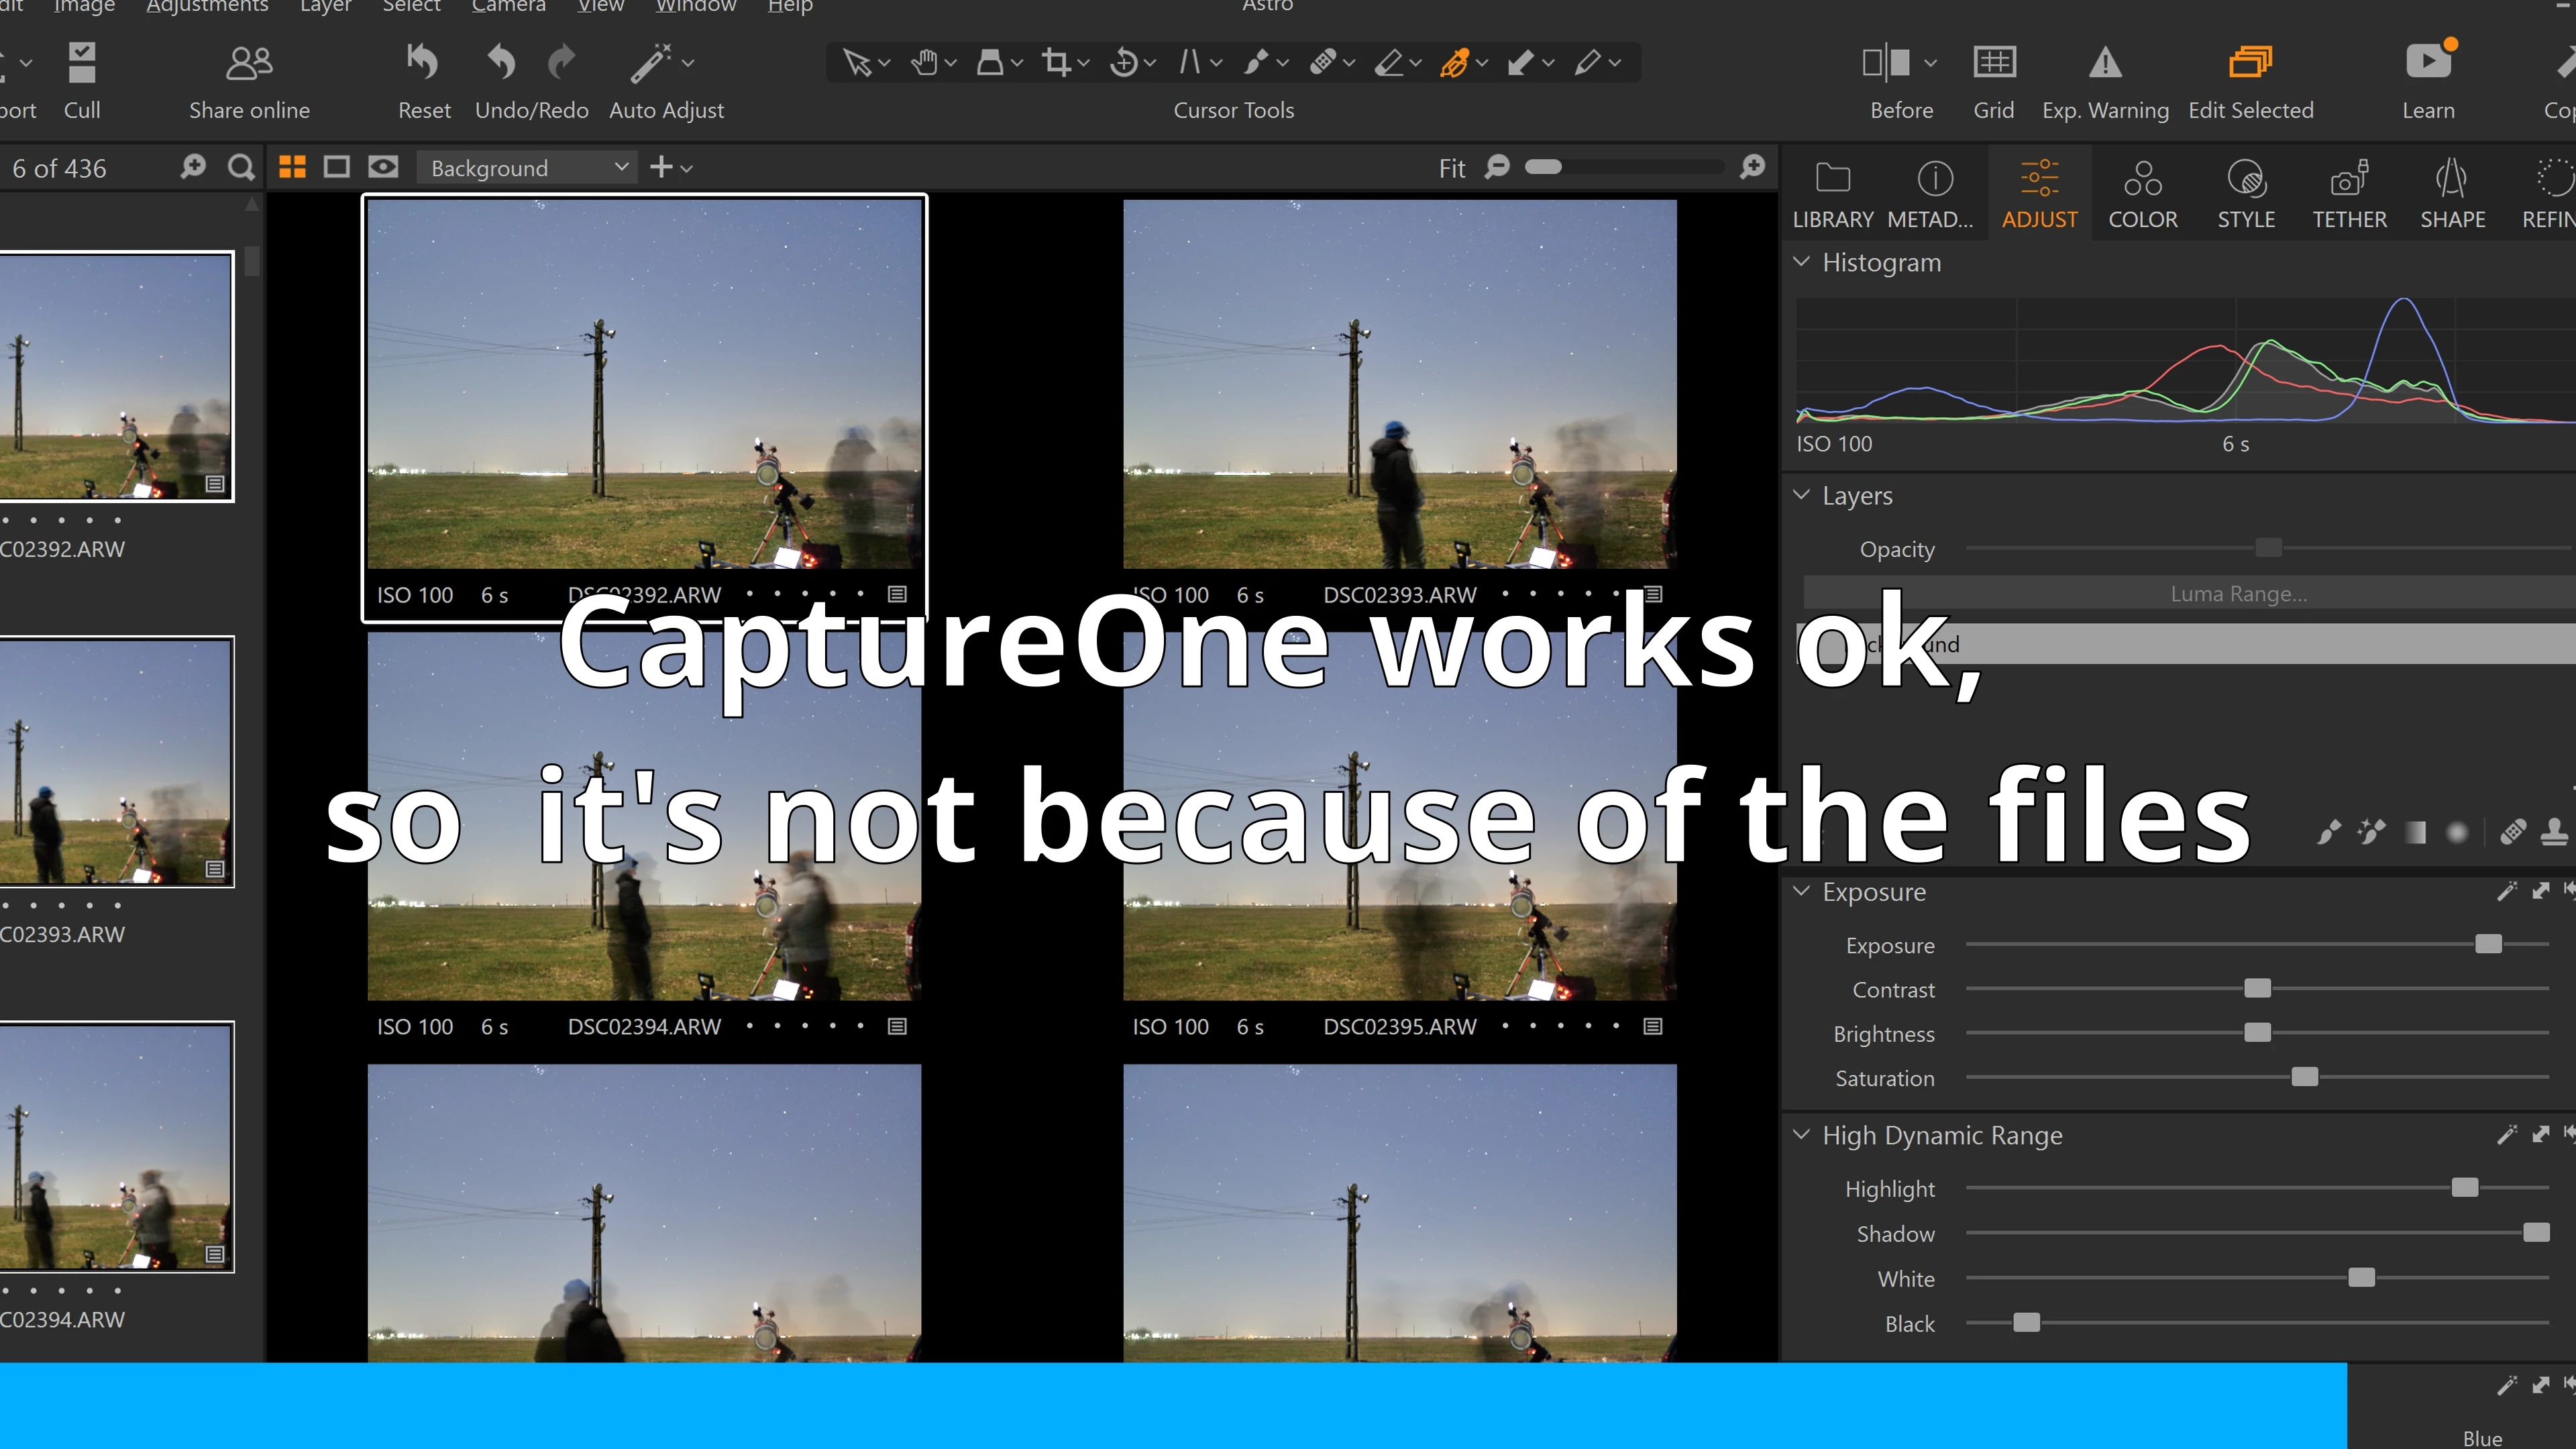
To make sure my files aren't damaged somehow, I did the same edits in CaptureOne and everything works fine there.

Furthermore I downgraded to LRC 13.0 and all is good again, the issue cannot be reproduced.


Steps to reproduce:

1. Setup the camera for a timelapse, in my case I used:

  • shutter speed: 6 seconds
  • iso: 100
  • aperture: f1.4
  • 1 frame every 10 seconds
  • quality: raw

2. Get the raw files into LRC

3. Go to Develop and enable "Auto Sync", then click on the first image in the set.

4. Edit this image, move the shadows slider about 3/4 to the right, highlights to the left, whites and blacks the same. It doesn't really matter how you set these, the results will be erratic and inconsistent anyway.

5. Scroll the filmstrip to the left until you find a group of images that look very different from one another, most often than not you'll find such groups of images every here and there.

This can also be reproduced with Auto Sync off, then Copy/Paste the develop settings between images.
This can also be reproduced by manually editing each file, for example after resetting all develop settings.


  • Camera: Sony A7IV
  • Lens: Sigma 20mm f1.4 DG DN Art
  • Shutter speed: 6 seconds
  • ISO: 100
  • Aperture: f1.4
  • Quality: raw, uncompressed
  • Memory cards: Lexar 128Gb v60 270Mb/s


Video of the issue

Lightroom Erratic Settings


Some images, in case the video doesn't work or you are on a limited bandwidth:


Image showing the settings of the photos:


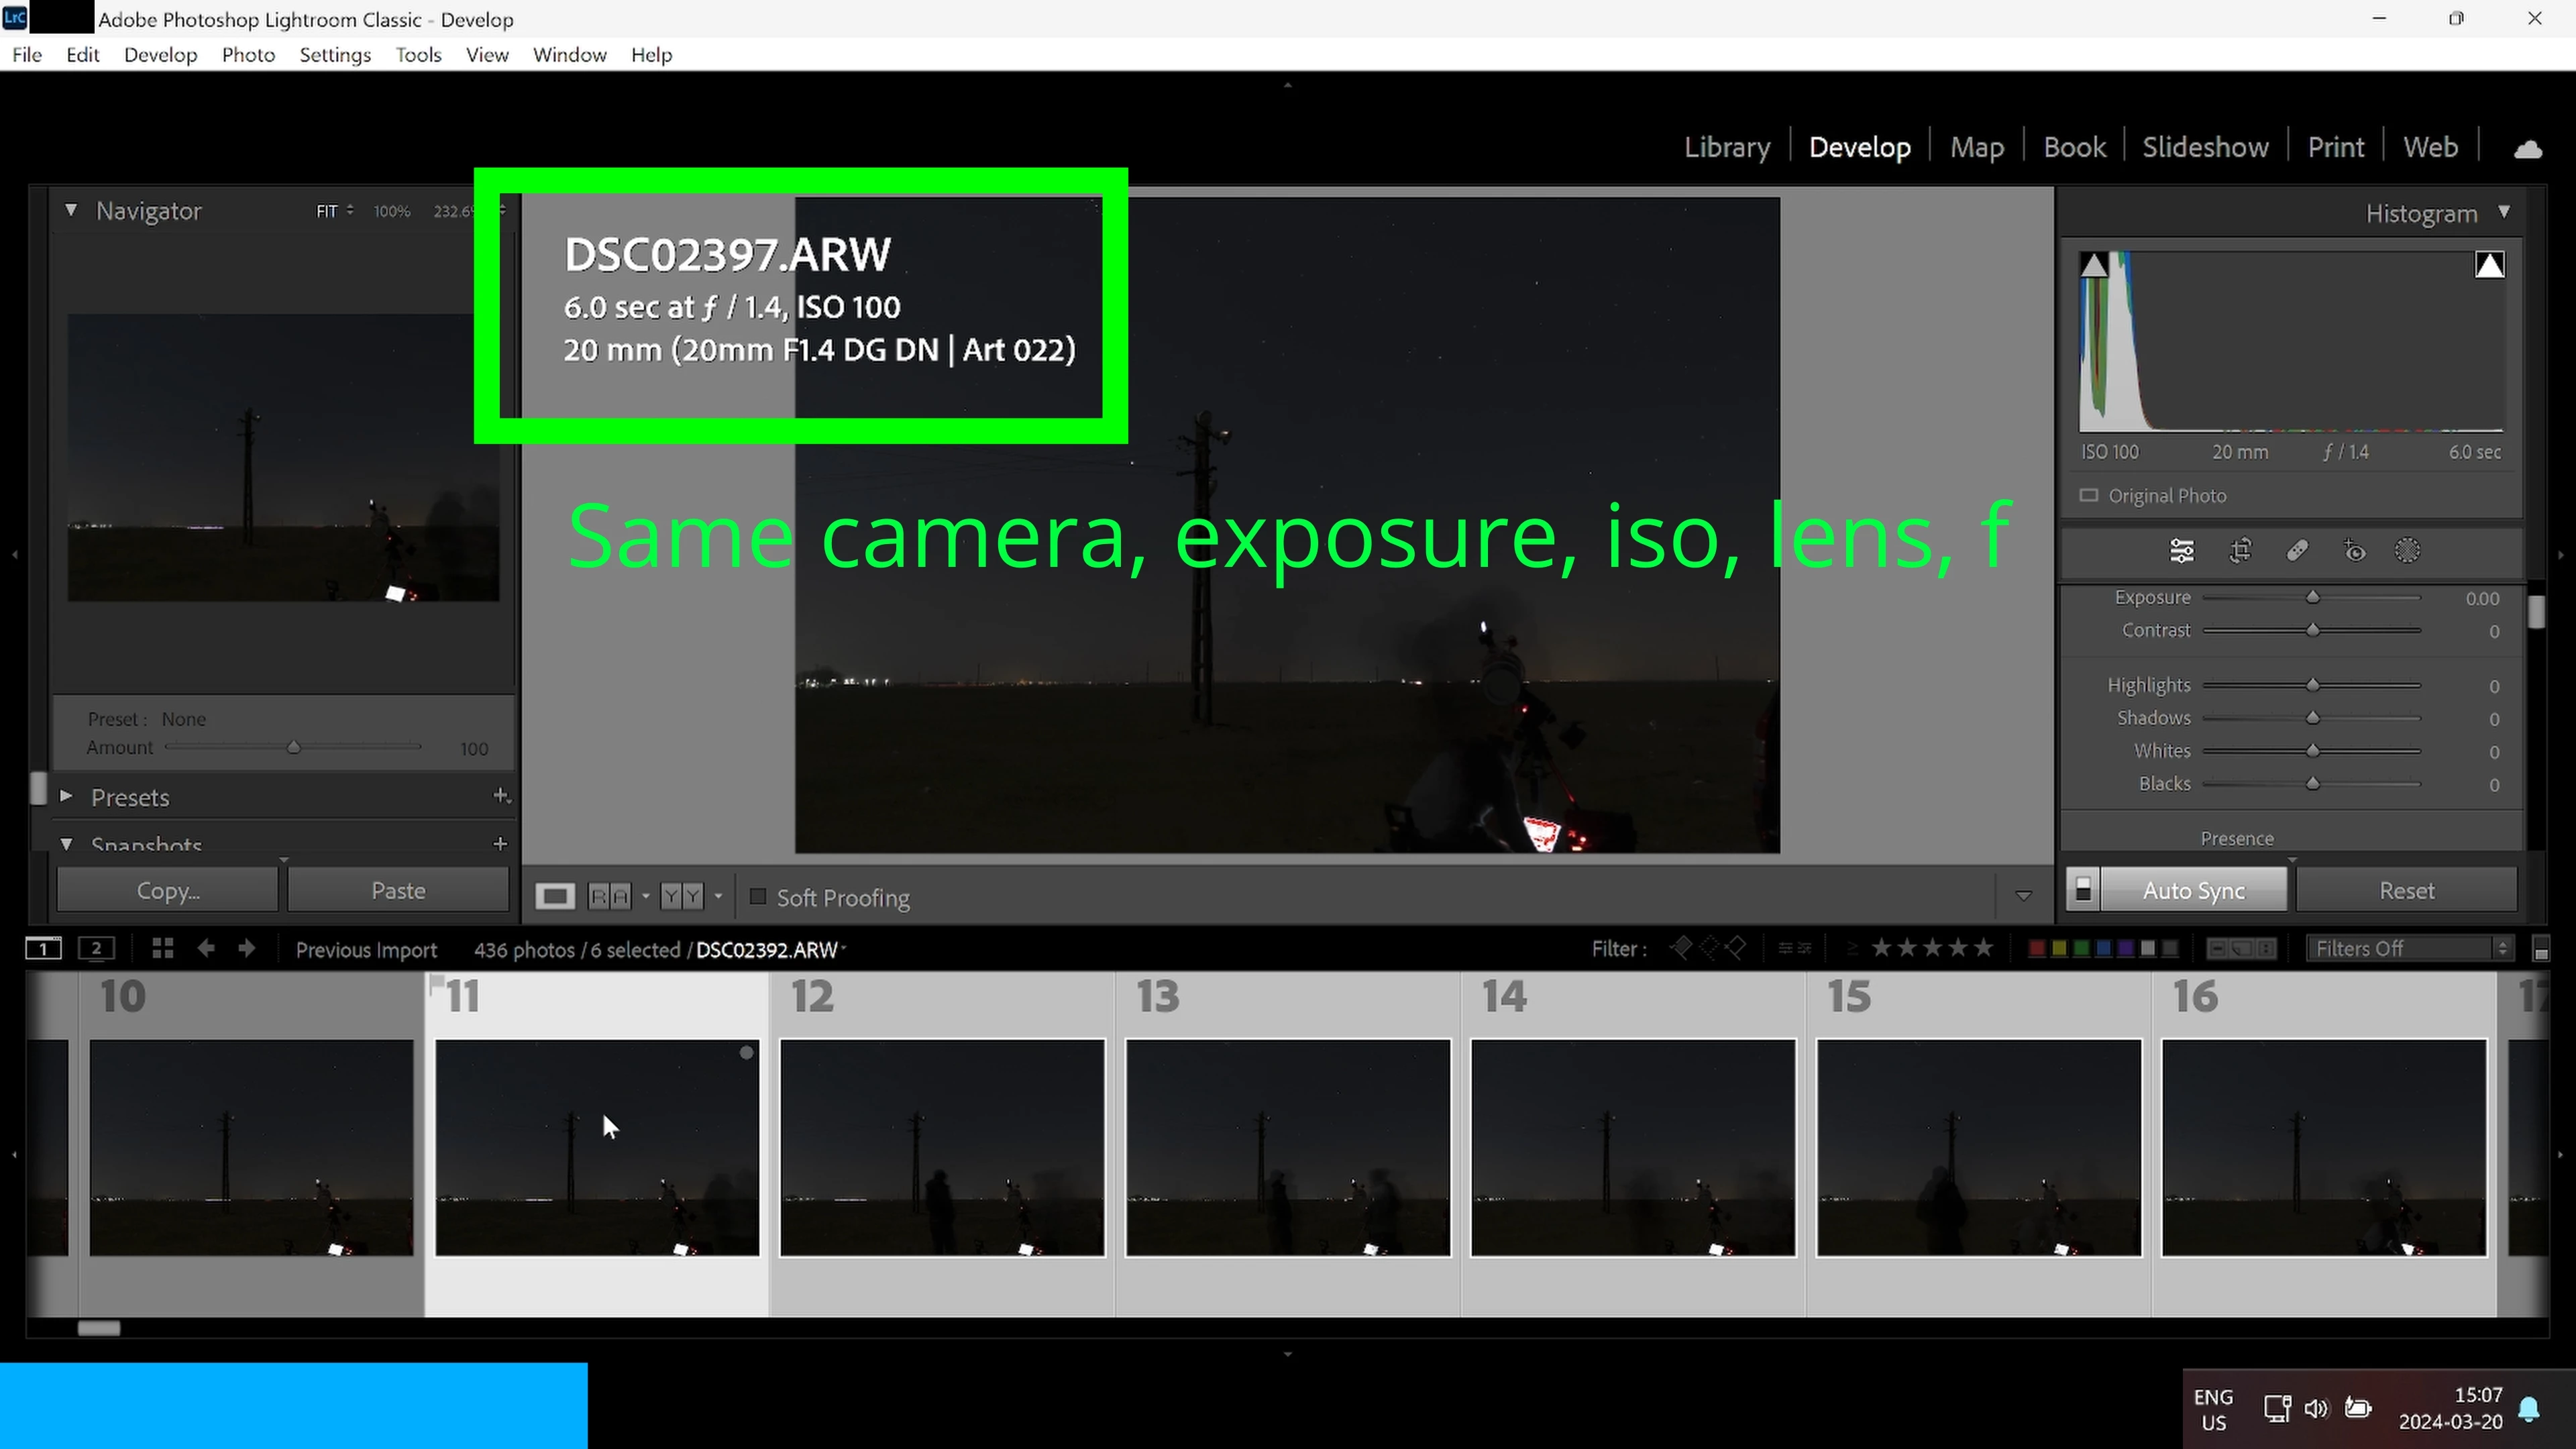
Image showing how I've changed the settings:

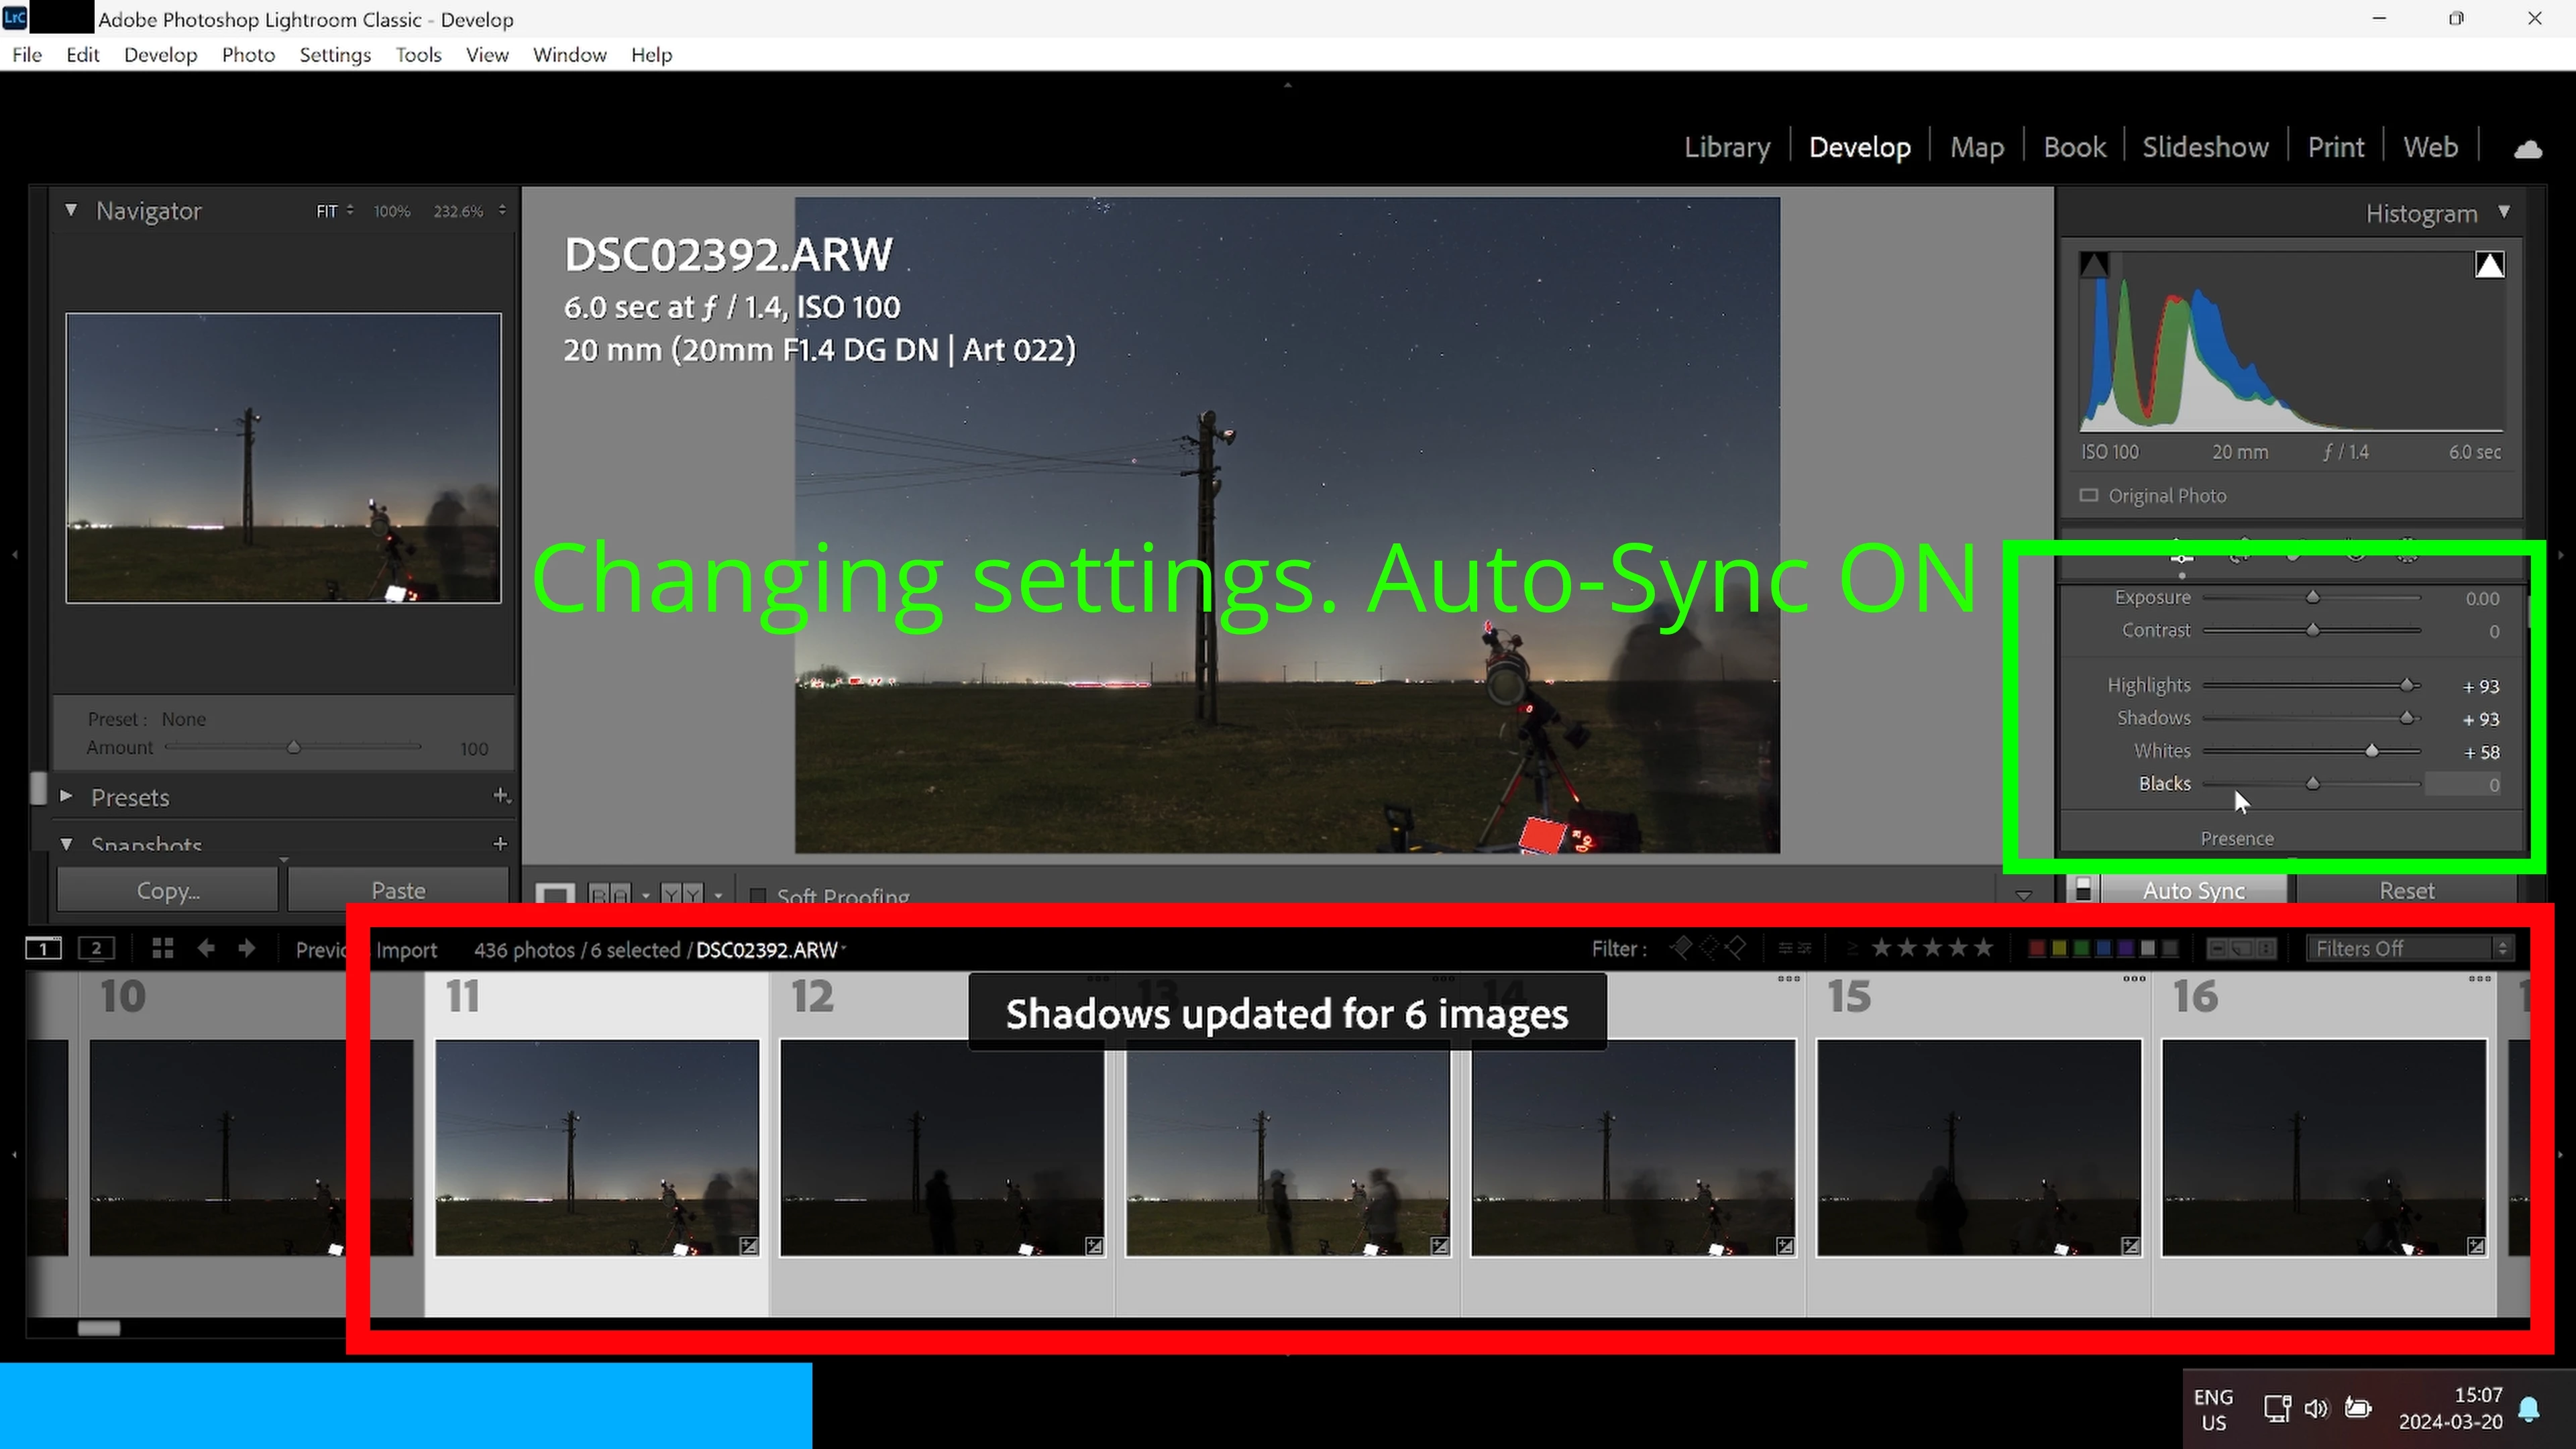
Image showing how the images are all different even though they're all selected and the same settings are applied to all:


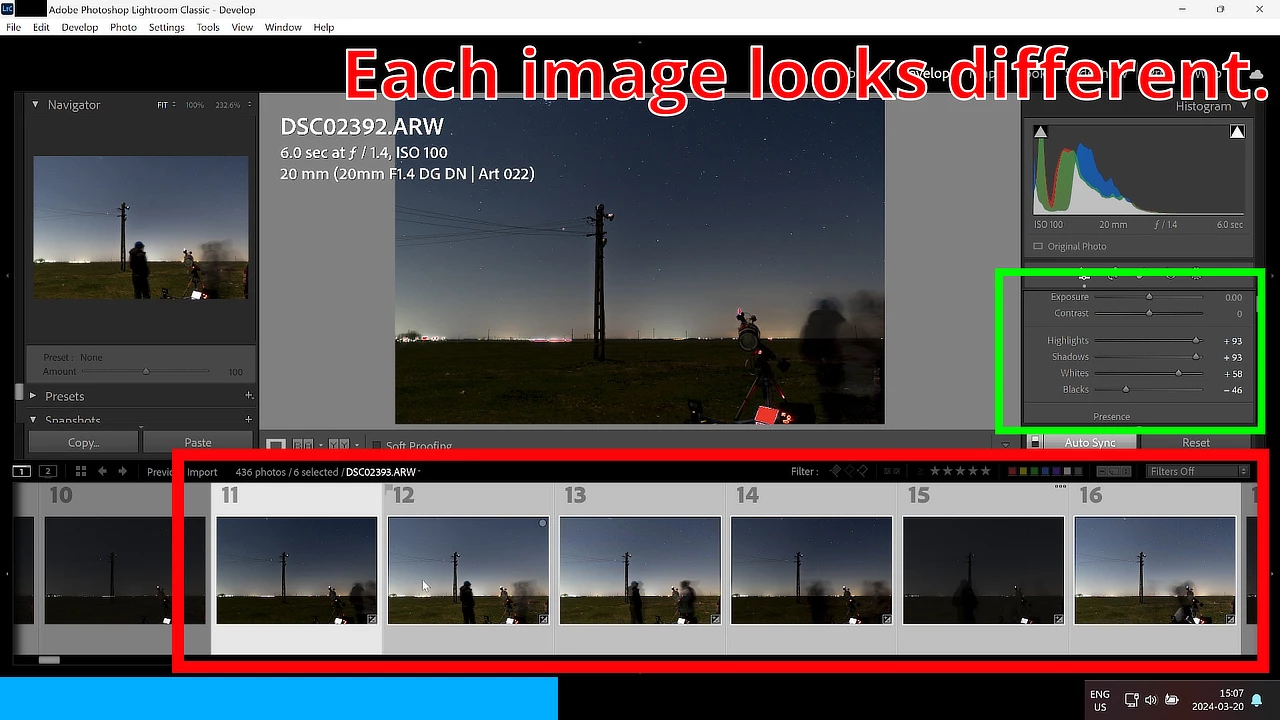
Image showing how the same files can be properly edited in CaptureOne, so the files are not the culprit: 

5 replies

Darius Mihai
Known Participant
March 23, 2024

Correction:

The camera used for this specific set was a Sony A6400, not A7IV as I have stated in the original post.

Conrad_C
Community Expert
Community Expert
March 21, 2024

I don’t have a quick answer, but some suggestions to try and narrow it down.


Unless I’m missing something, I am not seeing people complaining about this on the LRTimelapse forums. That doesn’t mean it isn’t happening, but problems like this usually turn up there quickly since that software is so tightly integrated with Lightroom Classic.


Capture One may have options with the same name, but it is extremely important to verify whether or not those are adaptive adjustments, because the ones in Lightroom Classic Basic panel are. For example, Lightroom Classic also has Highlights and Shadows options in its parametric Curves, but the code for those identically named options is totally different (non-adaptive). So which code is Capture One using, adaptive or non-adaptive? Because if it’s non-adaptive Capture One will not be expected to produce the same result. In fact this is true across all raw processors: You can never, ever assume that an option name does exactly the same thing across any two raw processing apps. It is much more likely that the actual code works differently. (Adobe Highlights/Shadows are based on specific research that Adobe was part of, so it is unlikely that Capture One works exactly the same way.)


Although there might not be any settings or lighting changes among frames, one thing seems to be changing: The content. People seem to be moving around, changing the distribution of light and dark in the frame. This can change the results of the same adaptive adjustment value.


Finally, the adjustments made were to extreme values like +93. Maybe you only pushed them that far to help make the problem more visible, but the fact is, as Guenther wrote in the lrtimelapse link earlier, when you apply these image-adaptive adjustments across time lapse sequences, it is vitally important to use the smallest value necessary to fix a problem, because values above about 10 or so start to create these visual differences as image content changes across frames. I have seen those variations happen myself in the past when I set those values too high (which in my case was maybe +25), and sometimes I decide it’s better to adjust highlights or shadows with a curve instead of with the Basic/Highlights option to avoid those adaptive frame-to-frame variations.


So this is all not to deny that there is a problem, but to help point out that these are areas where engineers and others may have doubts and more questions, so it’s good to be prepared for these types of questions to help prove that there actually is a bug. Also, it will help to look around the time lapse communities on the Internet and see how many other time lapse pros are running into the same thing, and collect those links. Because if it’s really happening, you can’t be the only one seeing it.

Darius Mihai
Known Participant
March 23, 2024

Indeed the extreme values are there to make the issue more obvious and visible.
Originally I noticed some small differences with smaller values, but those wouldn't have been that easily visible in a screen recording.

I mentioned the results with CaptureOne just as a confirmation that the raw files are not broken in any way,

I guess I'm just confused about the unexpected nature of the results when using these controls over photo sets - not just limited to timelapses. It looks like these settings are more aimed at single photo edits and not sets.

Adobe Employee
March 21, 2024

Hello Darius! I tried to replicate this issue at my end, but it works as expected. If it's okay with you, please upload the images  on wetransfer/google drive and share the link. Thanks!

Darius Mihai
Known Participant
March 23, 2024

Thank you for replying and for your interest in the isseu.
I'll upload some photos that can reproduce the issue and get back to you.

In the meantime please have a look at the huge difference between 13.2 and 13.1. I'm currently testing with 13.0.2.

Participant
June 12, 2025

Can I ask if you ever found a solution? I believe I'm running into this same issue in 14.3.1. I've tested dozens of things and the shadows & highlights are what isn't carrying over exactly as you've described. 

@Pavan Kumar T S perhaps you have some insight, but this is the last update on the subject. 

Inspiring
March 21, 2024

This is by design because settings are image content adaptive, i.e. what is shadows, highlights, whites and blacks is not predetermined and depends on image content.

You have changes in your images (light changes, etc) so same values are giving you different results.

Watch this for details:

https://lrtimelapse.com/knowhow/lightroom-introduces-contrast-flicker/

Darius Mihai
Known Participant
March 21, 2024

Thanks for taking the time to reply, but it is not the correct answer.
Have a look at the video to see the high amount of differences.
Each image is taken at an interval of 10 seconds. There aren't any lighting changes in the span of 10 seconds.

Also, this bug is not present in Lightroom Classic v13.0.
Also, this works just fine in other software packages such as Capture One.

Community Expert
March 21, 2024

If the entire shot appears underexposed, as your edits suggest, an Exposure increase should IMO be the first port of call, and then Contrast, and then adjust around that accordingly with the sliders below. 


Shadows exerts only a weak influence on midtones, and the same for Highlights. Whites and Blacks have almost no effect for the general tonality either.  All these can be described more as secondary "tweaks", simply not intended AFAICT for doing the heavy-duty tonal work. Cranking them up near maximum can be expected to give flakey and unpredictable results: by greatly magnifying the effect of small accidental differences between the input images.


Exposure, and Contrast, are the primary go-to controls. Then far less extreme Shadows etc values will be accordingly needed.


This is supported by how when processing from HDR, the "range power" of Exposure (number of stops) and of Contrast automatically increase accordingly, while the other tonal controls below remain as they normally are.

Darius Mihai
Known Participant
March 21, 2024

For some reason the video doesn't work in the post. Here it is: