- Home
- Lightroom Classic
- Discussions
- Re: Lightroom Desktop CC 8.3.1 OSX adjustment brus...
- Re: Lightroom Desktop CC 8.3.1 OSX adjustment brus...
Copy link to clipboard
Copied
Has anyone else seen this?
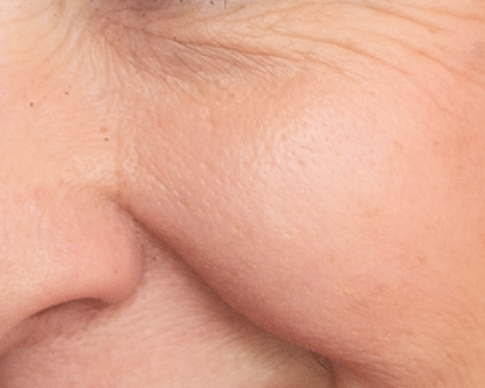
I was playing with the new texture slider when I discovered this (first thought it was fault of the texture parameter, but it turns out to be global) - I always toggle ON/OFF to check/compare my work - but found it happens using nothing at all as well.
In the images below no texture slider was used - nothing was used.
To many it might not be very noticeable - but after painting 100% density Adjustment Brush on someone's face with ZERO parameters assigned...
Toggling ON/OFF shows a color shift. It adds redness.
Below OFF (LH) - ON (RH) If one is able to layer/toggle these images it's easy to see.
I've tried this test on more than one catalog - same result.

 1 Correct answer
Thanks everyone for the replies. It's been solved by someone on DPR!
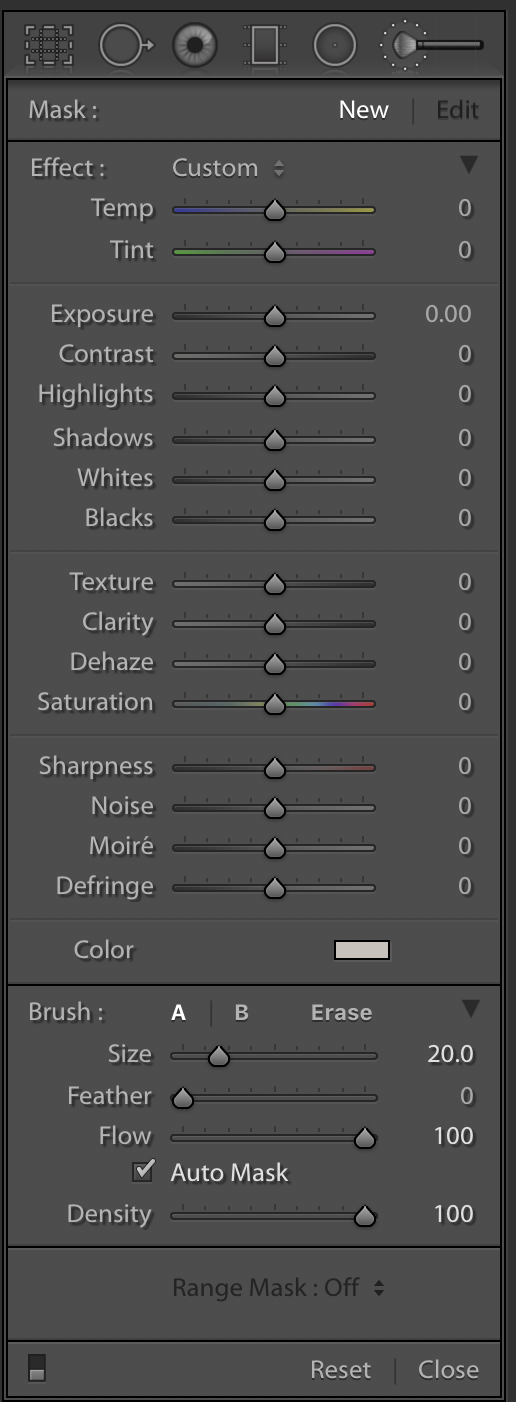
You have got a slight tint selected in the 'color effect' box (just below Defringe).
When that is set to apply zero effect, it will show an X through this box.
I'm unsure how that became moved from zero as I have never once ever used that parameter in years of LR use.
Because it was blank/white it didn't jump out either.
It's even more strange because I had just updated the program to a new version - which in theory should be a
Copy link to clipboard
Copied
I downloaded your two images and brought them into photoshop, aligned the layers and set the blend on the top one to Difference and here is the result. Difference blend is Black is the same, White is different. It looks all black to me.

I also followed you instructions on your photo and toggled the brush off and on and observed NO difference.
Copy link to clipboard
Copied
Thanks for trying. I don't see anything on your all black image -
The difference between the two is clear as day to me on my calibrated 5K monitor. With the brush ON becomes more red than without - even though there is no parameter assigned. I just looked at them on my iPhone XR and can also see a difference.
See if toggling between these two make a visual difference - I've asked the same thing on DPR - just use arrow keys back and forth. the image doesn't move - but the color does.
https://www.dpreview.com/forums/post/62833267?image=0
Can you not see the difference? Maybe someone else can? Maybe no one else can? 😕
Copy link to clipboard
Copied
KE_DP wrote
I don't see anything on your all black image -
The image is not totally BLACK because if you import it into Lightroom there is around 1% in each RGB channels over the image. That means there is a difference but that could be attributable to errors in the Align Layers function in Photoshop. The Align Layers function does NOT work well. I had issues long ago and tested this with the exact same images and many times the first alignment was off by quite a bit and as a result I always align layers twice. I even started a thread on this in the Photoshop Forum and a couple of the pro said this has been an unfixed issue. Was never resolved.
KE_DP wrote
Can you not see the difference?
I don't see any perceptible difference in Photoshop when toggling between the two images.
Copy link to clipboard
Copied
I don't see any perceptible difference in Photoshop when toggling between the two images.
OK, thanks and I really appreciate your efforts.
Copy link to clipboard
Copied
See if toggling between these two make a visual difference - I've asked the same thing on DPR - just use arrow keys back and forth. the image doesn't move - but the color does. https://www.dpreview.com/forums/post/62833267?image=0
I see a small but noticeable difference -- both in Photoshop toggling between layers and in the samples you uploaded to dpreview.com.
I took the difference in Photoshop, aligning the layers manually (*). Here's a Levels histogram of the flattened difference:
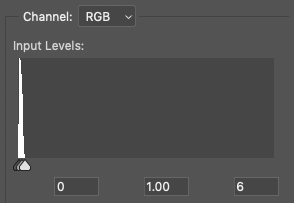
Moving the white point to 6 shows that the differences in pixel values are 6 or less (out of 255). Here's what the white-point adjusted image looks like:
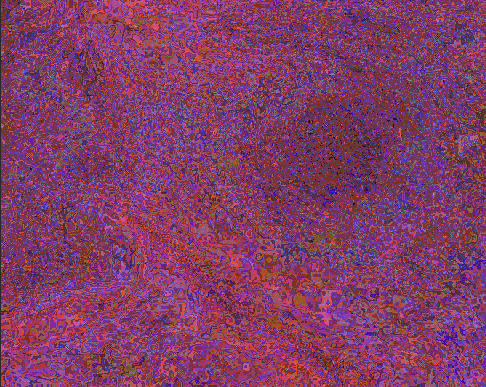
This shows qualitatively that there's more of a difference in red than in blue and green. Here's the histogram of the white-point adjusted red channel, showing that most of the pixels differ in the red channel by values of 3 or 4 (out of 255):
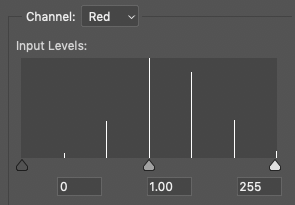
(*) Footnote: To align two images precisely, place on in a layer above the other. Set the blend mode of the top layer to Difference. Then, with the top layer selected, select the Move tool, and use the cursor keys to move the top layer left, right, up, down until you find a position that minimizes the differences. Alternatively, set the transparency of the top layer to about 50%, select the Move tool, and use the cursor keys to move the top left until you get the best alignment.
Copy link to clipboard
Copied
Can you share that image with us? We can see if the issue happens in other LR configurations and put the file under the microscope to see what might be going on. Select the image, do Metadata > Save Metadata To File, and upload it and its .xmp sidecar to Dropbox or similar. Post the sharing links here.
Copy link to clipboard
Copied
I wasn't able to replicate this using a couple of images of faces.
Copy link to clipboard
Copied
Could this be due the fact that since Process Version 2 or so Lightroom applies some highlight recovery to the GLOBAL image even with all the GLOBAL sliders set to ZERO but when you use the Local Adjustment tools it is applying different algorithms that do not apply automatic highlight recovery when set to ZERO like the global sliders. This could be why there is a slight difference for areas effected by the Brush tool even when no adjustments are made. Just an idea.
Copy link to clipboard
Copied
I can see the difference clearly in my web browser.
You could try disabling the GPU to see if that makes a difference. (Preferences > Performance > Uncheck Use graphics processor) With a 5k screen you probably need the GPU, but you can at least try it for troubleshooting.
If it helps, you should update your graphics driver, but since you're on a Mac, I think you have wait for an OS update.
The difference between the two is clear as day to me on my calibrated 5K monitor.
When calibrating, make sure to create a version 2, matrix-based profile. Lightroom doesn't like version 4 and/or table-based profiles. I've never seen a bad monitor profile causing anything like this, but recalibrating is worth trying.
You can also try resetting the preferences, see https://www.lightroomqueen.com/standard-lightroom-troubleshooting-steps/
Copy link to clipboard
Copied
I see the red difference clearly on my screen. Out of curiosity, is this from an image straight out of camera with Process Version 5? Also I'm curious if you cover with brush @ 100% without automask if the same result obtains. And one more thing for fun, does it do it with the radial and graduated filters. Also is your original WAW? I know, a lot of questions and no answers... If you care to put the original image out there, others of us could try it too.
Copy link to clipboard
Copied
I can see the changes on the images on dpreview.com when I toggle between but not on the ones uploaded to this thread.
Copy link to clipboard
Copied
Thanks everyone for the replies. It's been solved by someone on DPR!
You have got a slight tint selected in the 'color effect' box (just below Defringe).
When that is set to apply zero effect, it will show an X through this box.
I'm unsure how that became moved from zero as I have never once ever used that parameter in years of LR use.
Because it was blank/white it didn't jump out either.
It's even more strange because I had just updated the program to a new version - which in theory should be a clean copy.
My best guess - it might have recently been altered somewhere along the way going through presets possibly? No matter - mystery solved! Thank goodness my eyes and monitor are good enough to have immediately caught it.
Copy link to clipboard
Copied
Glad you got it resolved. We all stared at your screenshot and didn't see that white rectangle no longer had an "x" in it! Richard (who also contributes here) has a sharp eye.
For future reference by others, uploading a sample file would have called this out immediately, since we would have simply saved the metadata to file and examined the .xmp sidecar for the actual settings being applied by the brush.

