Participant
April 4, 2018
Answered

Lightroom won.t export my sharped images!

  • April 4, 2018
  • 3 replies
  • 1688 views

Hello! Since few days ago Lightroom won.t export my sharpening effect, even more i think it.s blurrs the images more after export..  I haven.t made any changes to my computer settings or to Lightroom export settings. The difference between the images is big. I.ve reinstalled the app and it.s still not ok. The image from the left is the exported one and from the right is in Lightroom before export.HELP!

This topic has been closed for replies.
Correct answer Per Berntsen

Thank you for your answer and suggestions. I.ve tried setting the output sharpening to screen , its slightly better but still not the result i used to have before the problem appeared.  I also changed the photo viewer but that.s wasn.t the problem. I.ve mixed all the possible export settings but nothing changes. Some images seem sometimes even more blurred than the original.  i.ve attached two examples of different exported files :  WeTransfer


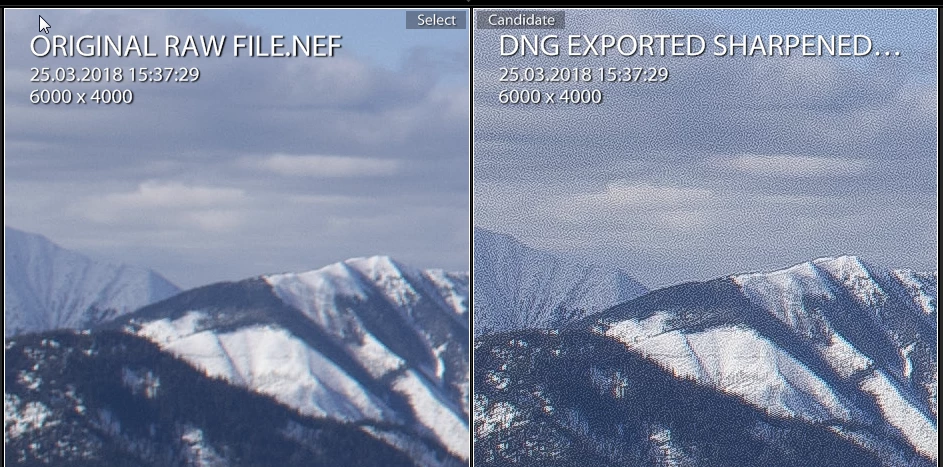
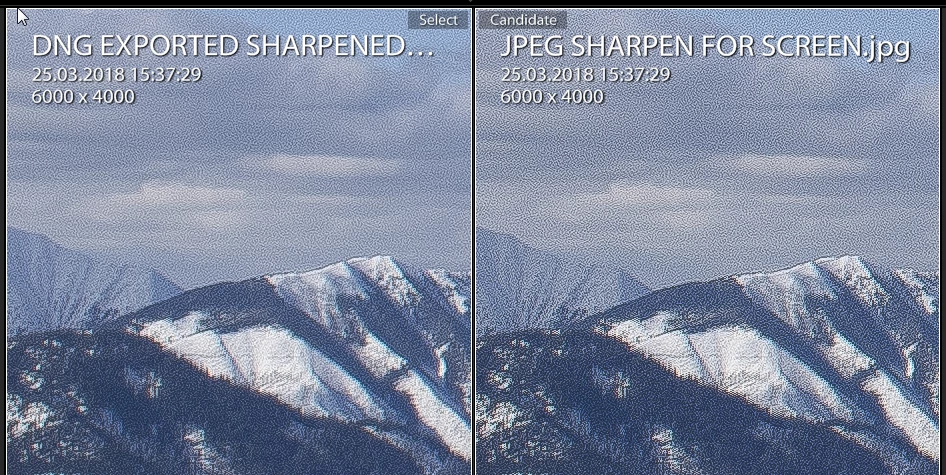
To evaluate and apply sharpening and noise reduction, you must view the image at 1:1 (100%) -  any other view will be inaccurate and misleading, because the image has been scaled. At 1:1, one image pixel is represented by one screen pixel, and this is the only true representation of the image on screen.

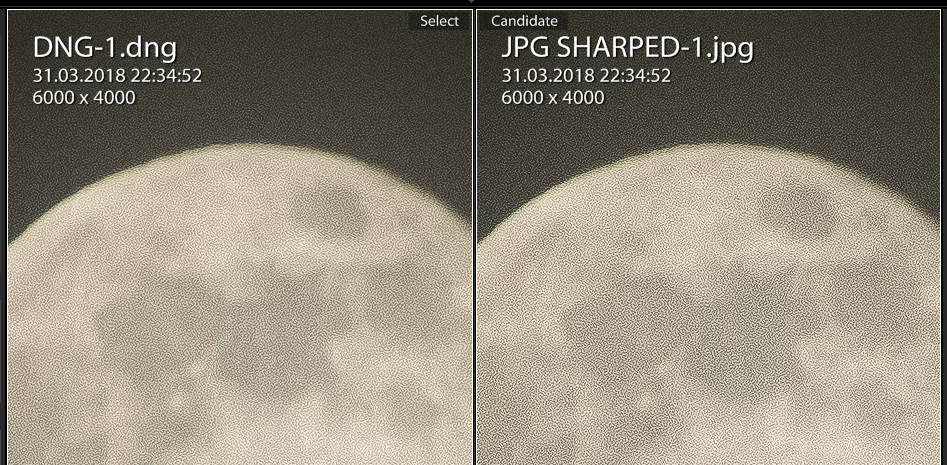
I downloaded your files, and imported them in Lightroom.

The screenshot at 1:1 below shows that the dng is sharper than the nef, but it is also grossly oversharpened (Amount 148 and Detail 95). And since the masking slider is set to zero, everything is sharpened, also the noise in the sky.  Setting Masking to a high value would eliminate the pattern in the sky, but the underlying problem is that the image wasn't sharp from the camera. Most kit lenses, like the 18-55 you used don't produce very sharp images, and you also shot the image at f/4.5. Stopping down to f/8 or 11 would have improved image quality.

When sharpening an image in Lightroom, setting Amount to a higher value than 50 should be avoided, and a high Detail value generally requires a low Amount value. And the Masking slider is very useful for avoiding sharpening of noise in smooth areas. Hold down the Alt key while dragging the slider to see the effect. White areas will be sharpened, black areas will not be sharpened.

The jpg that was sharpened for screen looks even worse than the dng, because the sharpening has made the noise more pronounced. When you start out with a low quality image like this, no amount of sharpening is going to make the image look good, so just use a little sharpening, and try to avoid creating artifacts and sharpening of noise.

Here are screenshots of the moon image, also at 1:1

3 replies

Todd Shaner
Legend
April 11, 2018

mihaela1988  wrote

Hello! Since few days ago Lightroom won.t export my sharpening effect, even more i think it.s blurrs the images more after export..  I haven.t made any changes to my computer settings or to Lightroom export settings.

observations are right on target concerning proper adjustment of the Detail panel's Sharpening and Noise Reduction controls.

However, there's something else causing the "softness" observed in the two posted NEF files. In both NEF files it appears the lens focus setting is incorrect and focused on the foreground (front focusing). In addition the DSC1238.NEF shot of the Moon I see motion blurring. If shot hand-held at 300mm (1.5 Crop Factor x 300mm = 450 mm effective focal length) 1/00 sec. that would do it!  I checked the EXIF data for both files:

File Name                  : DSC_1238.NEF
Camera Model Name          : NIKON D3300
Lens                       : 55-300mm f/4.5-5.6
Exposure Time              : 1/100
F Number                   : 5.6
ISO                        : 100
Focal Length               : 300.0 mm
Focal Length In 35mm Format: 450 mm
Focus Distance             : 29.85 m
Depth Of Field             : 2.20 m (28.79 - 31.00 m)
Field Of View              : 4.5 deg (2.36 m)

The Depth of Field (i.e. the range of sharp focus) is from ~29 m to 31 m. The Moon is over 340,000,000 m from Earth!

SUGGESTION

For long focal length you have two options: 1) Use a shutter speed setting that is the reciprocal of the effective 35 mm focal length (i.e. 450 mm) or faster. For this shot use 1/500 sec. or higher. OR 2) Use a sturdy tripod and perhaps mirror lockup. In addition for low-light shots I suggest using your cameras 'live-view' mode with manual focusing.

File Name                  : ORIGINAL RAW FILE.NEF
Camera Model Name          : NIKON D3300
Lens                       : 18-55mm f/3.5-5.6
Exposure Time              : 1/2000
F Number                   : 4.5
ISO                        : 100
Focal Length               : 18.0 mm
Focal Length In 35mm Format: 27 mm
Focus Distance             : 5.31 m
Depth Of Field             : inf (2.15 m - inf)
Field Of View              : 67.2 deg (7.05 m)

This shot shows a 'Depth of Field' extending out to infinity, but in the picture only the foreground is in sharp focus. In addition the Nikon 18-55mm kit lens used for this shot is going to be challenged to produce a sharp 1:1 view image on a 24 megapixel body. In the future you could try using the single center focus point with half-shutter depression to lock the focus on  a more distant point and/or use a smaller aperture like F8. I believe the D3300 also has the capability to correct focusuing errors if you find this this lens is "front focusing" at all focal length settings:

https://www.nikonimgsupport.com/ni/NI_article?articleNo=000004089&configured=1&lang=en_US

In summary the primary issue appears to be due to focusing errors and perhaps lens quality, which on a 24 megapixel body become much more obvious at 1:1 view.

Participant
April 11, 2018

thank you very much for your observations and advice. i know and understand the focusing issues of the pictures , and don.t deny that that is part of the problem. But i still must add that i.ve been taking pictures in the same way for half year already and correct them in lightroom, oversharping them as i did now, as i.ve always done it , just that since two weeks ago the result is different that it used to be before.

Todd Shaner
Legend
April 11, 2018

The Moon NEF file is clearly out of focus as revealed by the EXIF data, but probably due to subject auto focus error. The mountain scene NEF file has limited depth of field (front focus) probably due to the camera focusing on a close object AND the relatively wide F4.5 aperture. The two kit lenses you're using should perform better when stopped down to F8 or F11, which will also increase the depth of field (range of sharp focus). You can check their performance at different aperture settings and compare them to other more expensive lenses here:

Nikon 18-55mm f/3.5-5.6G AF-S VR DX Nikkor Lens Image Quality

I'll be glad to examine some of your previously edited images that are sharper to determine what might have changed. Export the NEF file with your LR settings applied to DNG file format as shown below and provide the share link.

Abambo
Community Expert
Community Expert
April 6, 2018

mihaela1988  wrote

I haven.t made any changes to my computer settings or to Lightroom export settings.

That seams to be quite impossible. May be you have changed something and you are not aware of the change. Please show your export settings. That is the best method to find out what is wrong.

ABAMBO | Hard- and Software Engineer | Photographer
Participant
April 10, 2018

I can.t think of something that might have caused this change. i have used the settings i always use. And even if i would have changed something, shouldn.t reinstalling the program fix the problem?

Abambo
Community Expert
Community Expert
April 10, 2018

Reinstalling the program rarely helps fixing this type of problems, as most programs still keep the old configurations and in MHO it’s a config problem.

The good points:

  • Quality is at 100%
  • no resisize
  • no limit

The bad point:

  • no output sharpening.

May be you should set the output sharpening either to screen or print.

I you could share your RAW file an your final output file would be of great help. Convert (export) the RAW file to a DNG file. This will keep your dev parameters inside the file, an the one taking the file to look after it, will see your parameters set. Take a file you can share or shoot a picture specially for this. you will be sharing your filr with the workd and may be yo do not want getting control out of your hands fir your masterpiece.

Sharing needs to be done via dropbox, wetransfer or similar.

ABAMBO | Hard- and Software Engineer | Photographer
Todd Shaner
Legend
April 6, 2018

In the Export module settings you may have selected 'Original' under the 'File Settings' panel. This creates a copy of the original file with NO LR settings applied. The other possibility is that you are using 'Resize to Fit' in the Export module 'Image Sizing panel without applying an 'Output Sharpening' setting. When a file is resized it is necessary to apply output sharpening to restore the edge sharpening. Here are typical Export settings for resizing the image file: