

- Home
- Lightroom Classic
- Discussions
- Re: LR4 auto tone continues to be a disaster?
- Re: LR4 auto tone continues to be a disaster?
LR4 auto tone continues to be a disaster?

Copy link to clipboard
Copied
How is it that Photoshop's auto tone can produce such pleasing results, yet Lightroom's auto tone can be so wildly off the mark? This is not a recent LR4 thing, it's been a problem ever since Lightroom was released 6 years ago and Photoshop's auto tone has worked well as far back as I can remember. It just baffles me that this feature of LR still hasn't been fixed in this latest release. Lightroom's auto tone feature, as it stands, is essentially useless and I see many people posting similar experiences. It's erratic too... sometimes setting exposure wildly too high, other times wildly too low. It seems it's biggest problem is in setting exposure. All I ask for is an auto tone that behaves like Photoshop because I don't have time to manually tweak all of my photos.
Any insights on why this behaviour might be?
Does anyone have any suggestions? I saw a few people suggesting manually tweaking the text of the preset (e.g. turn off auto exposure).
I trust I'm not alone in this frustration?
Does anyone have experience with Aperture?
I realize there can never be a magic "fix any photo" button, but it would be so helpful if Lightroom could at least give me a good starting point. As it stands, I have to manually adjust every photo, which is fine for my favourite shots, but way too time consuming to perform on the rest (either I do that or I edit in Photoshop, which kind of defeats the purpose of having Lightroom in the first place).
cheers


 117
Replies
117
117
Replies
117

Copy link to clipboard
Copied
Sorry I didn't read #94 and zoned in on the one with pics
Had a hard time finding an image that over-exposed but eventually found one where I used flash with a murky background that LRs "auto" attemted to recover (I used flash to get rid of the back-scene in the first place but LR wasn't to know I suppose).
I did find the esiest way to correct and still keep a decent tonal width was instead of flaffing around with the sliders/histo/clipping-warnings was to use a pull-curve in the Tone Curve segment. It was a quick enough adjustment to make me reconsider if I should check the box to apply auto toning on import from now on and make small corrections with the tone curve box.

Copy link to clipboard
Copied
Hi Rob,
Absolutely agree. Raised a detail "request for improvement" and all.
It is interesting that when I scan a photo on my Canon scanner, the auto tone option changes the tonal balance of the photo in direct response to the cropping of the photo. Significant changes occur when I crop out the white borders. Exactly what I expect.
Lightroom has a practice that you generally work through the develop module top to bottom. The crop tool is above auto-tone  .
.
The "poorly behaving" photos (scans or photos) still occur when there are some specular highlights (or light source), but has improved with v4.1. The discussion that based the solution on "your desired emphasis" is the key. Preserve Highlights, improve shadow detail, or neutral setting can only be driven by the context of the photo. i.e. Snow shots versus wine cellar that is candle lit.
-s
Copy link to clipboard
Copied
Hi,
Yes still have to agree with you Rob, exposure is no better at all although I have found that excessivly over/underexposed seem to get almost correct treatment. For example, if I take a series of -2EV 0EV and +2EV if I use autotone I usually get the following exposure compensation:
-2EV __- +1.5
0EV __ -0.45
+2EV __ -2.15
So, I think that it is consistently wrong but apart from exposure seems OK
Copy link to clipboard
Copied
Nice to see the Auto Tone has come a long way with the 4.2 release ... still exposure leaves a little to be desired but, overall, it is great ... thanks Adobe.

Copy link to clipboard
Copied
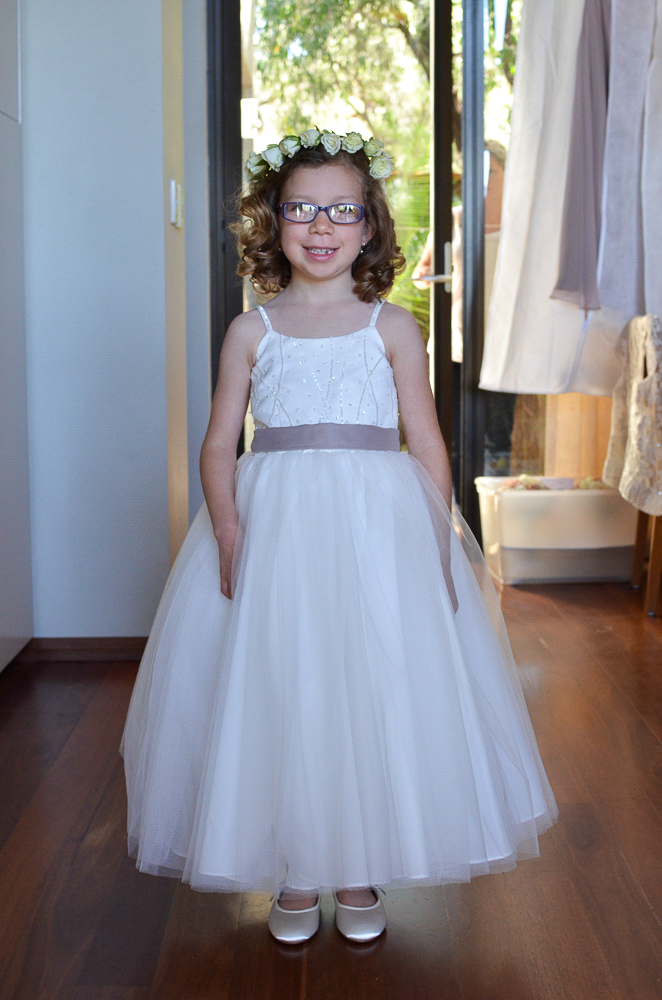
I'm having the same problem. Auto Tone often massively over exposes, or under exposes. It is completely unreliable. The 2010 process was much better. 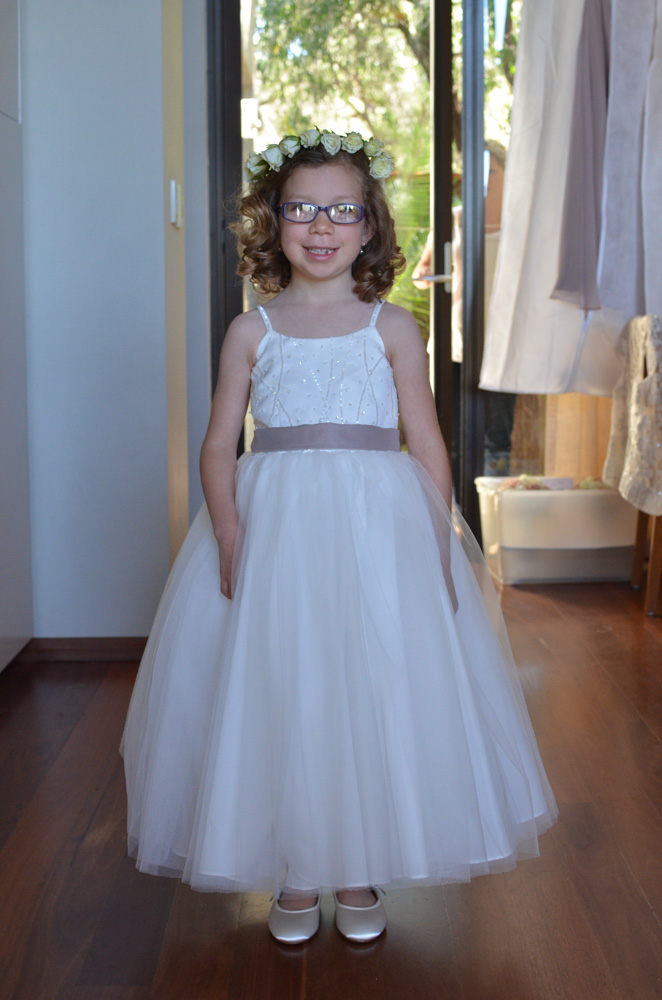 The first image is as shot. 2nd image is 2012 process "auto tone". 3rd image is 2010 process "auto tone". This is a pretty mild sample.
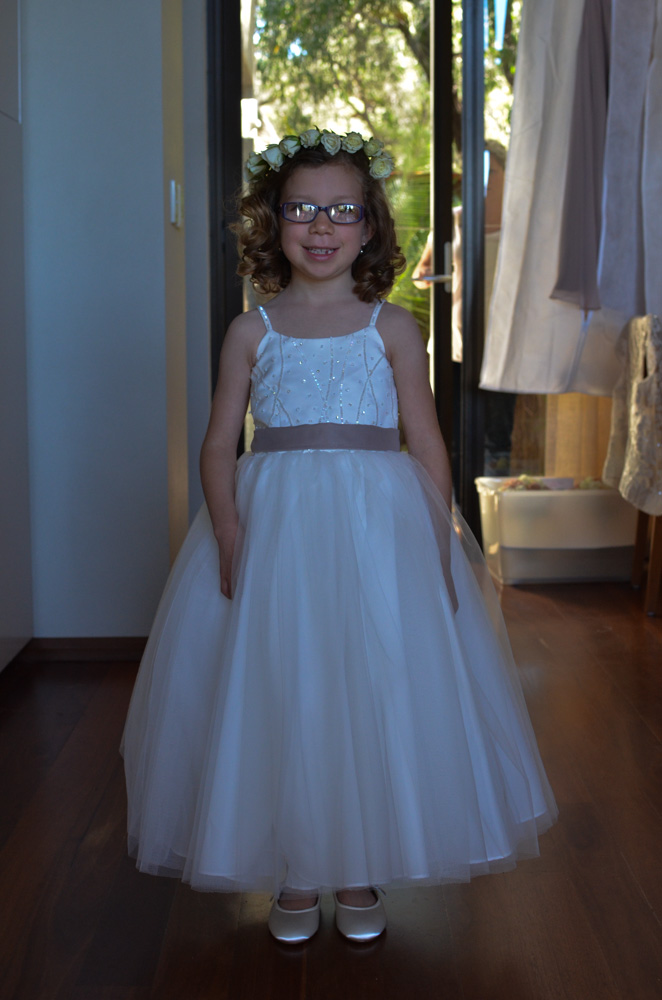

Copy link to clipboard
Copied
It underexposes with small but bright highlights. The bright light through the trees, just above the girl's head impacts the auto-tone. The approach is auto-tone and double click on Exposure to reset and potentially contrast as well.
Copy link to clipboard
Copied
Does LR5 auto tone do a better job?

Copy link to clipboard
Copied
CoolNameGoesHere wrote:
Does LR5 auto tone do a better job?
I doubt it. From casual checking it seems about the same to me. I'm pretty sure if Adobe improved the auto-toning in Lr5 there'd have been some mention of it by now, but there's been no such mention...
Copy link to clipboard
Copied
I'd be happy if I could set auto tone so it didn't apply a negative number to exposure during a batch process.
Copy link to clipboard
Copied
The accepted practice which proves quite good is:
1) Select all files, or the set you are interested in
2) Click once on Autotone button to process all
3) Click once on the word "Exposure" to reset them back to zero
4) Click once on the work "Contrast" to reset them back to zero
This assumes you are just starting editing process as steps 3 & 4 will reset those items back to zero.
Copy link to clipboard
Copied
That is what I have been doing for each image that was set with a negative exposure when it shouldn't be.
More often than not I'm happy with the Exposure and Contrast settings if Exposure is positive. But the auto negative explosure is usually off for my images which are mainly sports. Hence the desire to limit Auto Tone with a "Not less then Zero" Exposure setting.
Copy link to clipboard
Copied
OttoToned (the web jpeg posted above) thusly:
1. cropped the middle portion of (a virtual copy of) the original for auto-tone consideration:

Note: excludes the specular highlights above, and the dark corner of the room (i.e. includes just the part we want toning optimized for).
2. Auto-toned using OttoTone's manual mode (since Lr's native auto-toning is good over limited crop regions like the one above, there was no need for auto-compensation logic):
I also gave a short leftward tug to the blacks slider (because Lr's auto-toner is brain-dead when it comes to blacks when auto-toning rgb files) - which you may not like. Personally, I don't like it so much on the web, but it looks better in Lr environment.
Notes:
* Image is plenty contrasty and fairly bright.
* specular highlights above her head have not been recovered (nor should they be).
PS - (other than the blacks adjustment which I probably shouldn't have done) Lr's PV2012 auto-toner did the whole toning job - the difference being that it was restricted to consideration of the cropped region, instead of the whole photo. Compare to Lr's native (PV2012) auto-toned result in post above, which recovers all specular highlights outside at the expense of under-brightening everything else.
Rob
Copy link to clipboard
Copied
This plugin solves most problems with Lr's auto-toning, granted it is more cumbersome to use than native.
Copy link to clipboard
Copied
Are there any improvements noticeable in Lr5.2?

Copy link to clipboard
Copied
I gotta tell ya, it's not bad. I will be giving it a real test soon though. I am double checking the code in my preset that I will be using.
It's been a long time coming!
Chris Joyce
Copy link to clipboard
Copied
I agree Chris, it seems a lot better to me too.
(I'll have to rethink OttoToner at this point...).
Anybody else??
Copy link to clipboard
Copied
Yep, Adobe has done a good job here ... sometimes the Exposure is over a little ...

Copy link to clipboard
Copied
This is a thread revival but the techniques mentioned to work the color really made me understand how to dial in the correct settings. LR5 still always over exposes for me on most pics (I have used all the techniques to calibrate monitor for gamma, brightness, and contrast).

 AdChoices