

- Home
- Lightroom Classic
- Discussions
- Re: Noise Reduction Settings Not Exporting
- Re: Noise Reduction Settings Not Exporting

Copy link to clipboard
Copied
Hi all. I'm SUPER frustrated right now, and feel like I've been chasing my tail. And I think that there just isn't a solution for my problem, that it is a bug in the software, but I'm really hoping that is not the case.
So, when I export my RAW files as jpegs, my noise reduction settings are completely ignored, and the images turn out extremely grainy with a lot of noise.
Just to clarify... I understand high ISO, I am NOT applying any sharpening or sharpening output settings, and my images look great (with NR) in both the library and develop modules.
It is only when I EXPORT that they become a grainy mess.
So, after spending hours researching what could be wrong, I discovered that if I export the image with ANY kind of resizing, the NR DOES apply. It is only if I try to export it in its original size that it the NR settings are not applied.
Trouble is, I really want to export all my images in their ORIGINAL size. I do not want to make them smaller in any way, as I am a photographer and my clients buy large wall art from me.
This has never been an issue for me as I used to only shoot outdoors, but now that I am offering in-home family sessions with higher ISO values I need to be able to apply NR settings.
Any advice? Or if this is just a bug that is unfixable, any advice on what size I should be resizing my long edge too to preserve the integrity of the image so it can still be printed really large?
Thanks!


 1 Correct answer

When you are exporting the file you you need to specify the time jpeg, tiff, etc.
Make sure you are not selecting "Original" under file settings. See the screen capture.
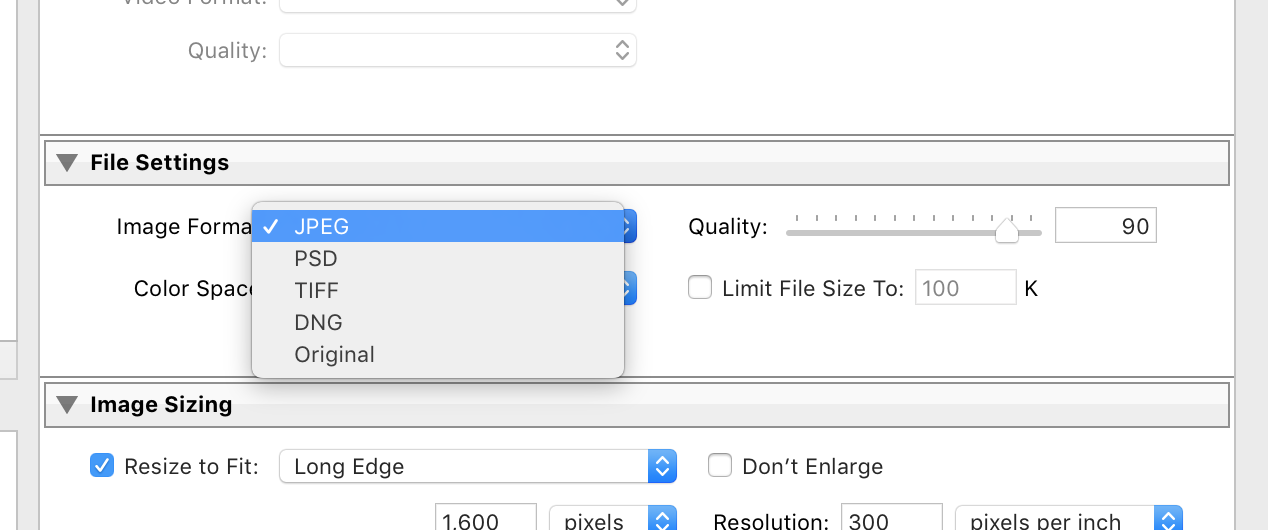
If you select "original" all you will end up with is a copy of the original file with no Lightroom adjustments.
 17
Replies
17
17
Replies
17
Copy link to clipboard
Copied
When you are exporting the file you you need to specify the time jpeg, tiff, etc.
Make sure you are not selecting "Original" under file settings. See the screen capture.
If you select "original" all you will end up with is a copy of the original file with no Lightroom adjustments.
Copy link to clipboard
Copied
Thanks for responding! I should have been more clear. I am exporting as jpeg. All other adjustments to color contrast etc DO export. Just not noise reduction settings.

Copy link to clipboard
Copied
Had same issue 😕 spent several hours/days of my time figuring this out. At this point I should get this software for free. The The Lightroom Classic CC removes noise reduction on export. To fix this I reverted back to an old edition. The best one closest to the new version is Lightroom 6.13 which gives noise reduction and dehaze.

Copy link to clipboard
Copied
I am not experiencing this problem with Lightroom Classic CC. Noise reduction is properly applied at Export. Did you try the suggestion from @ddegannes above?

Copy link to clipboard
Copied
Did you ever come right? I am having same problems

Copy link to clipboard
Copied
I am having it too.

Copy link to clipboard
Copied
I'm having this problem in 2021.

Copy link to clipboard
Copied
Noise/noise reduction and sharpness/sharpening must be evaluated and applied at 100% view, where one image pixel is represented by one screen pixel.
Any other view (like Fit view) will be inaccurate and misleading, because the image has been scaled.
This applies not only to the image in Lightroom, but also to the exported image.
Because of scaling algorithms in the application you are viewing the exported image in (some apply a lot of sharpening when scaling), the image may appear to be noisy.
View at 100% to see a true representation of the image.
Copy link to clipboard
Copied
Thank you for your response! I looked at the images closely at 100% and I see what you meant. If I print this image (say 36" x 24") would it come out like in LRC or as exported? Perhaps it's not a simple answer as there are many variables. Should I get a smaller print first?
Copy link to clipboard
Copied
At Talon, your question is relevant but difficult to answer and deal with, what you see on your screen is limited by the screen specifications, and your screen will display best at 1 to 1 pixels.
So my iMac 27” 5K resolution is 5120 pixels on the long side.
The long side is 23.5” i.e 217 pixels per inch.
An Epson Photo printer will print at 720 DPI (dots per inch) so a 36” print on the long side would need 25,920 PPI (pixels per inch) for absolute quality.
It's unlikely that your vision can distinguish between 360 DPI and 720 DPI so you may be advised to resize 360 pixels and allow the printer driver resize the image when printing.
The 217 PPI may actually provide a reasonable print.
You can test by printing say a 6x4 portion of the print at 360 PPI for viewing.
Copy link to clipboard
Copied
The dpi of the printer is unrelated to the ppi of the image.
Printer dpi (dots per inch) is the number of ink dots put down on the paper per inch.
Image ppi (pixels per inch) is the number of image pixels used to print one inch of the image.
Digital images don't have physical dimensions, so the ppi value (which is optional metadata) is used to calculate the printed size. For instance 3000 pixels / 300 ppi = 10 inches.
For prints larger than 20 x 24" on an Epson printer, 180 ppi is sufficient, and a 24 x 36" image only requires 4320 x 6480 pixels, which is 28 megapixels.
Epson printers will produce best results when image ppi can be divided in 720 – like 180, 360 or 720.
I use 360 for small prints, and have found that there is little advantage in using 720.
I believe that for the latest Epsons, these numbers are 150, 300 and 600.
If I print this image (say 36" x 24") would it come out like in LRC or as exported? Perhaps it's not a simple answer as there are many variables. Should I get a smaller print first? I always export images for printing at the exact printed size, which prevents any scaling from happening when printing. If you have prepared a 24 x 36" image for printing, you can crop out a part of it – like 8 x 10" – and use that for a test print. A smaller version of the whole image will not give you any useful information about how it will print at a larger size.
Copy link to clipboard
Copied
@PerBerntsen, I totally agree with all you have said and if Talon follows your instructions I am pretty sure he will achieve acceptable prints.
I was simply trying to explain to Talon how difficult it is to get a print to view exactly as he sees on his computer display. The computer monitor is displaying RGB pixels and the print is dots CMYBK on a sheet of photo paper.

Copy link to clipboard
Copied
This is not the solution. I've tried this so many times. So frustrated, about to break my computer!
Copy link to clipboard
Copied
This thread dates back to 2017. Much has changed intrhe meantime. I recommend you start a new thread and provide as much details to your specific issue, with screesnhots, etc.

Copy link to clipboard
Copied
You’ve posted to a very old thread. It is highly unlikely that the issue described in this thread, though not impossible, is the same issue which you are currently experiencing. Rather than resurrect an old thread that is seemingly similar, you are better posting to a new thread with fresh, complete information including system information, a complete description of the problem and step-by-step instructions for reproduction.
In the unlikely event the issue is the same, we will merge you back into the appropriate location.
Thank you!
Copy link to clipboard
Copied
This is not the solution. I've tried this so many times. So frustrated, about to break my computer!

Copy link to clipboard
Copied
Okay, so I don't know if this will help anyone, but I have this exact same problem. I apply noise reduction to the photos that need it, and they look perfect in Lightroom. But after I export them to JPEG, I look at them in Finder (I use a Mac), and they look a grainy mess, just like described in this thread. However, I discovered that if I open those same images up in the Preview app, they look exactly like they should. They also look perfect when I put them on my online galleries. I'm not sure if you're using Finder to preview your JPEGs or not, but I don't think they're being exported incorrectly. I think Finder just drops the Noise Reduction effect in its previews (maybe not for everyone, but at least for some of us). So don't trust Finder. Preview your JPEGs on multiple apps to make sure it's not just an app problem.

Find more inspiration, events, and resources on the new Adobe Community
Explore Now
 AdChoices