- Home
- Lightroom Classic
- Discussions
- P: Perform Healing Operations ( CAR / Spot / Clone...
- P: Perform Healing Operations ( CAR / Spot / Clone...
Copy link to clipboard
Copied
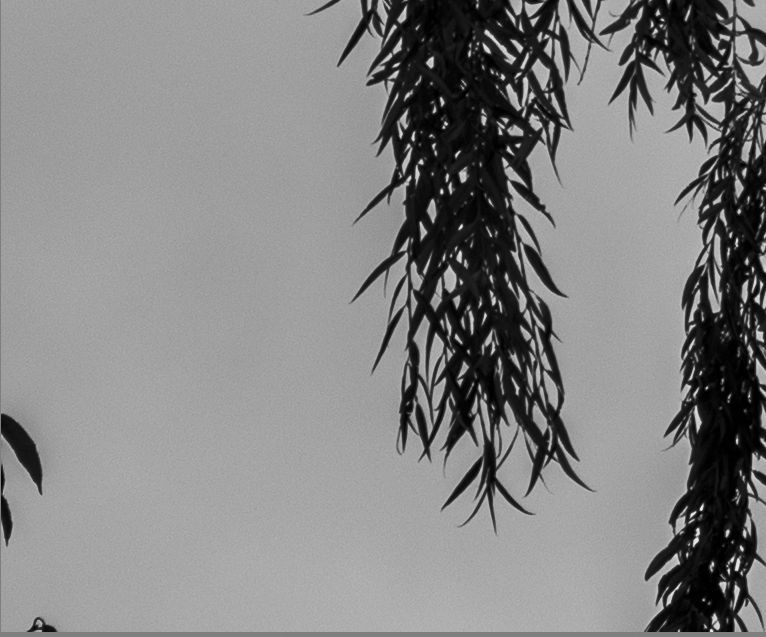
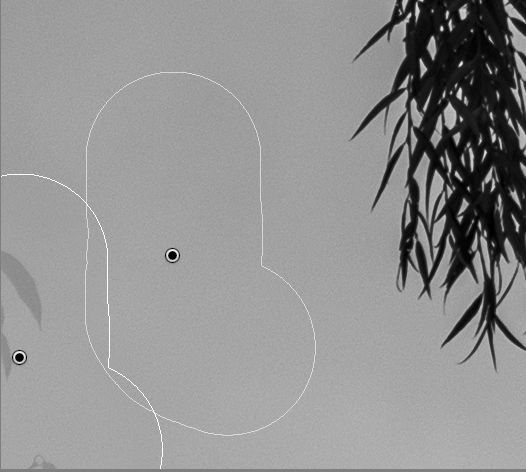
Problem: When I use the spot removal tool in Lightroom Classic version 11 to remove a leaf against open sky after Sky Select was used, Lightroom fails to remove the spot completely. It leaves a light gray version of the leaf behind. See samples below. I checked and opacity is set to 100%.
The problem does not occur if I do spot removal before Sky Select is used.
This is on Windows 10, working on a Fuji GFX 50R RAF.
 1 Correct answer
This is current as-designed behavior.
The workflow is to correct spots (Content Aware Heal, Spot Heal Tool, Clone Tool) prior to using any AI Masking (Sky, Subject, Object, People, etc.)
Using the Healing tools after applying an AI Selection Mask will likely show artifacts where they overlap.
Copy link to clipboard
Copied
Hello,
Upon updating to Camera Raw 14 and testing out the new masking functionality, I've found a major flaw. It seems that Camera Raw's Healing Brush is sampling data from the image "under" the adjustment masks/layers. See photo:
The tree branch is cloned out; however, the replacement data is far too bright, as if it is sampled from the unedited, original state of the raw file
Thanks,
Benjamin Root
Edit: Oops, I had only searched the Camera Raw forum and failed to search the Lightroom forum as well. Thanks.
Copy link to clipboard
Copied
Version: Lightroom Classic 11.1 Release
Platform & OS Version: Mac OS Montery Version 12.0.1
The Spot Removal (Healing) tool has been whack. It doesn't fully remove the spot required, instead leaves a remnant, almost a reminder of what was once there lol. It's especially bad when it comes to removing small light sources (like a spotlight or an exit sign). Is anyone else facing this issue? I'm going to attach screenshots of what I am talking about. Please help return to the glory days of flawless spot removal. Thanks!
Copy link to clipboard
Copied
Sounds like you use spot removal on an area with a subject mask or a sky mask. This is a known limitation of these masks. You need to perform the spot removal before you add the mask.
Copy link to clipboard
Copied
A schoolboy error: If I darken my sky by a third of stop, say, and then apply the heal brush to a place in the sky in Lightroom, I get healing, but without the mask adjustments.... This is very unhelpful and counter-intunitive. Please fix.
Copy link to clipboard
Copied
It's a design limitation rather than a bug, although from a user perspective there is little difference. The recommended workflow to avoid what you see is to apply the heal/clone tool before the 'Sky' or 'Subject' mask tools.
Copy link to clipboard
Copied
For instance if I use the AI mask tool to select subject and then invert the mask to include everything but the subject and adjust that mask to -1.00 exposure and -30 temp. Then if I try to clone something on that masked area (not the subject) the clone tool leaves behind a white ghost which is especially obvious in areas of high contrast. On the attached photo, you can see this above his head and behind his back. If the dev team for Lightroom could try to trouble shoot this issue for future versions of Lightroom, that'd be really helpful!
Copy link to clipboard
Copied
Adobe has acknowledged this behavior and says to do Clone/Heal first before Select Sky / Subject:
See the first replies from Adobe's Rikk Flohr about the rationale.
Copy link to clipboard
Copied
Moderators, @Rikk Flohr: Photography, please merge with the existing thread:
Copy link to clipboard
Copied
Ever since I updated LR (in January 2022), my close/heal tool is not working correctly. Instead of making an image disappear (with clone, for example), it will change the color of the item to a bright grey...so I will see where an image once was ( instead of getting rid of fly-away hairs, I end up fly-away grey hairs; instead of getting rid of a red stop sign, I'll now end up with a bright grey hexagon shape in its place). Any thoughts? I've restarted LR multiple times; doesn't matter what opacity level is at (only changes how much of the image turns to grey), size, feather...I've been throwing these things into PS, but I'd prefer to just do it all in LR if I can (and like I used to be able to).
Copy link to clipboard
Copied
Any difference if you disable GPU in preferences?
Copy link to clipboard
Copied
Are you using the Select Subject/Sky tools? If so there is an issue if you do the Clone/Heal AFTER you do the Select Sky/Subject.
Copy link to clipboard
Copied
Thank you! This must be it-I had not idea it would do that with the select subject feature. Thanks!
Copy link to clipboard
Copied
There is a known issue that requires that the clone heal/tool must be used before either Sky or Subject selection masks.
Copy link to clipboard
Copied
Thank you! I didn't know that could happen and couldn't find anything in my research (why I posted here). Now that I know, I can make editing adjustments going forward. Thanks for helping make me aware of the issue!
Copy link to clipboard
Copied
This is not a design, it's a bug, plain and simple.
Copy link to clipboard
Copied
IMO we do need an easier way to invoke a fresh 'AI' analysis on demand. Maybe with one button or keystroke that recalculates both Sky and Subject for the current image in one go - for all its masks.
But is it truly a "bug" that the software does not automatically recalculate Subject and Sky after each new edit operation, that could potentially affect those - assuming LrC can even distinguish which actions are or are not relevant?
Say recalculating Subject took 2 seconds, and Sky another 2 seconds. I feel it is surely a valid and pragmatic "design decision" (not a bug) if those 4 seconds delay are not added after each new action, within images that use those forms of masking. Say you have got nine separate bits of cloning to do. It would surely be overkill if a whole separate AI recalculation had to happen after every one of those nine actions, just in order to keep the masking and the visible picture content perfectly aligned at every intermediate moment.
I suppose an automatic AI 'refresh' could be caused to happen regardless at certain fixed moments - Export, Print, External Edit say - but this would a) heavily impact the performance of those features, almost always unnecessarily - and b) would mean the user had not seen and reviewed the results from that update.
Each new AI recalculation may then require different corrective interventions afterwards. So we need to be aware that these have happened.
Copy link to clipboard
Copied
Thank you, Richard, that was an illuminating response.
I note that while creating the spot removal edits, LR shows me the expected result, then reverts to it's "50% version". I could see a possible approach for LR to persist those "edit previews", banking up all my edits until the computer gets some lag time, at which point it could re-render the AI masks. Overlap of edits would be tricky, but I feel those would be possible given the current "edit previews".
Copy link to clipboard
Copied
Yes, a "recalculate AI on demand" button would help alleviate a lot of the annoyance of this "bug" or poor design. It can be done now by "replacing" the old mask with a new mask but is a convoluted procedure.
Copy link to clipboard
Copied
Lightroom Classic v. 11.4
MacOS 12.4 (Apple Silicon)
1. Select the sky using the "Select Sky" mask option
2. Adjust any of the possible parameters making the selected sky significantly different (darker)
3. Using the Spot Removal tool, erase some sensor dust or any object inside the region affected by the sky mask. (using Heal or Clone options make no difference)
What happens:
The object is erased but leaves a bright contour that does not reflect the adjustment applied to the sky mask.
More information:
Reversing the order of the tools, (Spot Removal first followed by Select Sky mask) gives the expected correct result. The problem seems to only appear with Select Sky mask, all the other mask options work fine (did not try Select Subject)
Copy link to clipboard
Copied
It's a design limitation, which has already been discussed on numerous occasions over recent months. As you've discovered, you need to apply the spot/clone tool prior to either AI Sky or Subject selections.
Copy link to clipboard
Copied
Thanks for the quick reply. I failed to find the previous discussions on the subject. Sorry
Copy link to clipboard
Copied
With all due respect, Adobe, don't you think that this is something that should be stated clearly? My editing process - including use of the Spot Removal tool - was messed up AFTER one of your auto updates. Which is why, by the way, I have turned that feature off.
Copy link to clipboard
Copied
I'm on the latest LR Classic (11.4.1) on MacOS Monterey ver 12.5. I found a bug that occurs when using spot removal (clone in this instance) over an AI Sky overlay. For instance. I have an AI Sky overlay on and am trying to remove an unwanted tree branch using the spot removal close tool. When I use the tool it somewhat removes the unwanted item but leaves behind an almost 'ghost' shadow of the object. I've attachd a photo of what this looks like (branch is still visitible as a whiteish blob near the top of edge of this image). My spot removal opacity is at 100%, feather is around 30%. Please fix! As I will not need to correct this in photoshop after I export.
Copy link to clipboard
Copied
I was having the same issue until I saw a post (somewhere in this thread
but can't remember from who) where apparently, it is expected that we
should or would do spot removals, etc BEFORE applying the sky AI mask. As
it turns out, that's the solution for right now. I hope this helps!
Copy link to clipboard
Copied
A workaround until this is fixed is to do the following:
To fix the issue with the Spot Tool being used After you do a Sky AI do the following.
Go to the mask with the Sky AI selection
Create a NEW Sky AI (it will be on top)
Move the New Sky AI so it is ABOVE the OLD Sky AI
Delete the Old Sky AI.


