JapanMike
Inspiring
November 18, 2013
Answered

Printing from Lightroom 5.2 to Canon Pixma Pro-1

  • November 18, 2013
  • 1 reply
  • 21516 views

Hi

I am new to Lightroom 5 and the Canon Pro-1. I am not sure that I fully understand what is happening when I use ICC profiles for printing (despite pouring through forum after forum). When I print the results look nothing like the on-screen results. I have tried soft-proof and the proof image does look like my output but I am failing to understand how I am supposed to use the ICC profile.

System

Windows 7

Lightroom 5.2

Canon Pixma Pro-1

8Gb RAM

1. Using soft proofing it appears that I need to adjust my image to each paper type. This doesn't make sense to me - I thought that the profile would adjust the printing so that I wouldn't have to adjust the image.

2. When I'm printing I have set the following settings on the printer:

3. When using non-Canon paper, what paper types should I select? Is there a resource anywhere that tells me?

4. Do I have my basic Lightroom print settings correct?

Could someone please tell me what I have understood/misunderstood please? I know this is a beginners forum but still please excuse to total lack of understanding.

Help greatly appreciated.

Thanks,

Mike

This topic has been closed for replies.
Correct answer Bill Sprague

I don't want to seem to be turning this into a blog. I have been using Lightroom for years, but this is the first time I have ever used a printer that uses profiles. And I have discovered that in Lightroom it is possible to soft proof using the paper profiles and get a good idea of what the final product will actually look like.

When I first installed this printer I made several prints of the same image using different profiles, not realizing that I could soft proof with those profiles. Then, through further experimenting, I have gone back and soft proofed the image that I printed using the different paper profiles. Guess what? The soft proof remarkably resembles the prints that I created.

Doing this successfully depends on preparing the image for the specific paper that is going to be used. Then in Lightroom, create a soft proof copy with the adjustments that are necessary to optimize that proof. The soft proof will be created as a virtual copy and will be named with the profile that was used. Then, you can go to the print module and set up a print job that should be exactly what you are expecting.  The soft proof copy will not reflect the effects of the profile or any adjustments that you made while soft proofing was enabled. But those adjustments will be applied to the printed image.

This may seem very basic to some of you. That is why I have posted in the beginners forum. But maybe this will help the OP with the original question. If I have misunderstood something, I hope someone will correct me. But I'm amazed at how accurate my prints are matching now.


I've been using the Pro-100 for a few months.  It is a great printer that I'm very happy with.  There is currently a very aggressive rebate program if anyone wants a new printer.  FWIW, I've been unable to find anyone, anywhere not happy with the Canon Pro printers.  Basically, you can get $170 worth of paper and ink for $99 with a "free" printer until the end of the year.   

Back to the subject!

There are potentially three completely different workflows between Lightroom and the Canon Pro- 1, 10, 100 series that involve selecting papers, ICC profiles and color management.

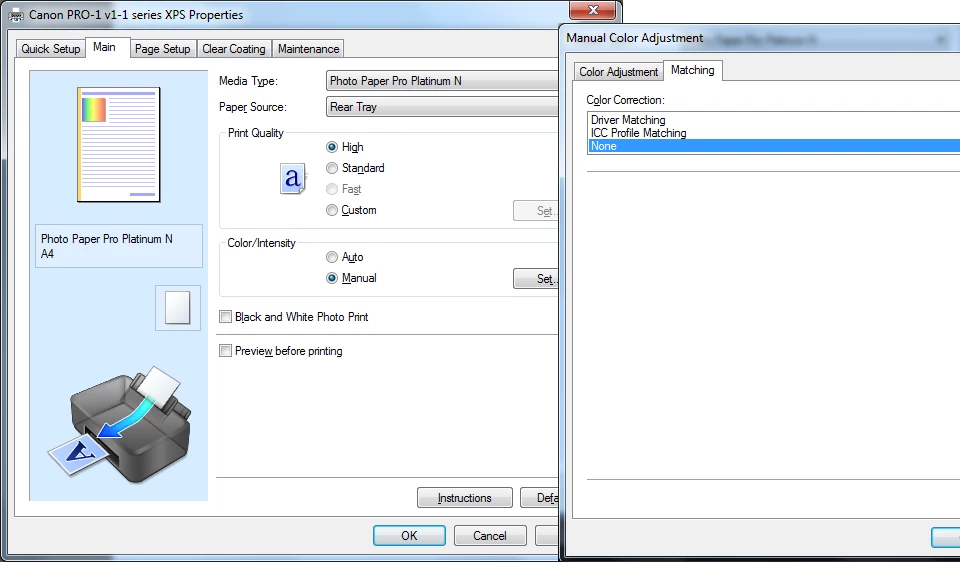
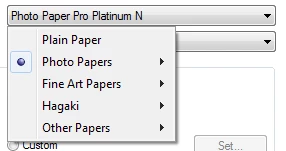
1.  Print with Lightroom controlling the colors.  You have to open the printer driver and disable the printer's color management.  Selecting the paper in the driver seems to set the profile.

2.  Print with the printer managing the colors.  In LR you have to select  Color Management > Managed by Printer.  Then turn the color management in the printer back on through the driver.

3.  Print with the Canon supplied plug in.  After installing the plug in from the supplied disk, in LR go to File > Plug-in Extras > Canon Print Studio Pro.

As a Lightroom fan, addict and believer in everything J Kost says, I was using #1 and loving it for landscapes.  I had to work a little to figure out how to disable the printer's control as J Kost's examples were for Epson.  Then I tried to print a portrait of my granddaughter and her cheeks kept getting a little bit purple.  When I checked the Print Preview button in the printer driver, I could see the color shift from the LR preview. 

I switched to #2 where the printer makes the decisions.  The previews matched and the cheeks stopped blushing.

Then I watched a one hour video lecture done by a Canon product specialist on the B&H Photo website.  He demoed the Canon Plug-In.  I'm strongly considering using that from now on.  I hope J Kost won't be upset with me!  It appears that the Canon plug-in really does have better quality control over the printing process.

One especially interesting feature in the plug-in  is a test sheet that looks like a proof sheet.  There are a bunch of thumbnails printed on a single sheet with different color casts and adjustment numbers under them.  Once you pick the one that's "right" you can save the setting as a preset for that paper. 

Note that in the long video, the Canon rep emphasized the support of 3rd party papers in the plug-in.

The too long video was worth the time investment.  I understand my printer and printer more from having watched it.  The link:  http://www.bhphotovideo.com/indepth/photography/tips-solutions/canon-pixma-professional-inkjet-printers-exactly-you-envisioned

Bill

1 reply

JP Hess
Inspiring
November 18, 2013

I don't know that my answer is going to be of much help to you, but I will try. And maybe someone else will chip in with some reliable information. I have ordered, but have not yet received a Canon pro-100. I know, it is nowhere near what you have purchased. But it's my first step into a world of printer profiles.

As I understand it, a printer profile is designed to make the printer produce what you are seeing on the screen. Assuming that your monitor is calibrated so that the colors and brightness and contrast are correct, the printer profile tells the printer the appropriate ink mixture to produce an image that looks like what you are seeing on the screen. The profile takes into account the paper you are using.

When you are using paper other than the Canon brand, that company should tell you what paper you should choose (from the choices given you) that is closest to what you are using. For instance, I like using Read River paper, and I have downloaded profiles for the paper that I use so that I can be ready when I receive my new printer this week. The profiles came with instructions telling me what Canon paper I should choose and what settings should be used with that paper. If the paper you are using doesn't provide such instructions then you are obviously on your own to test to find the right combination.

As far as I can see, your print settings in the Canon printer setup dialog should produce good results. Likewise, I believe your Lightroom settings are good except it seems to be the recommended procedure to leave the print resolution unchecked. By doing so you will allow Lightroom to control the resolution and set it appropriately for the size print and the type of paper you are using. I am not familiar yet with the Canon setup dialog. If you have done everything necessary to turn off color management in the printer, it looks to me as if you have set everything correctly.

If all settings are correct, and your printing results are noticeably different then it would seem to me that your monitor is not calibrated correctly. I apologize for providing such a vague answer. But I was interested in your question because I have been researching these color profiles as I anticipate the arrival of my new printer.

Incidentally the little "!" next to the printer resolution setting in Lightroom indicates that there is something wrong with your choice. You might want to check you into that.

JapanMike
JapanMikeAuthor
Inspiring
November 18, 2013

Thanks for the response.  I was hoping that I had something obvious wrong. It sounds as though my understanding of profiles is pretty much right.  I probably should mention that I don't seem to get entirely consistent results across different (art) papers either. I'm going to try some Canon paper in a bit and see how that goes.

Just to cover your comment, the "!" is only there because, "You have chosen a high resolution for printing which could cause memory issues or failure to print on some systems." This has not posed a problem for me.  The setting is the max quality that lightroom allows.

JP Hess
Inspiring
November 18, 2013

That's what I thought I remembered from when I have seen that before, but I wasn't sure. If you watch Julianne Kost's printing primer video, she says to leave that checkbox unchecked, allowing Lightroom to choose the appropriate resolution for the size of print being created. Others have indicated that leaving the box unchecked allows the printer to print in its native resolution. I have normally chosen to leave it unchecked. I wish I had more information for you.