• Global community
    • Language:
      • Deutsch
      • English
      • Español
      • Français
      • Português
  • 日本語コミュニティ
    Dedicated community for Japanese speakers
  • 한국 커뮤니티
    Dedicated community for Korean speakers
Exit
0

Reduce size of TOO large panorama .DNG's

Community Beginner ,
Mar 19, 2018 Mar 19, 2018

Copy link to clipboard

Copied

When merging 3 RAW files of 22MB each with an overlap of 1/3 I would expect a file < 60M.

Instead I am getting one with a size of 110MB. This makes me think that also the original RAW are embedded as well.

Is there a trick to reduce the .DNG to the more reasonable < 60MB size. ?

P.S.: When I export to .JPEG highest quality the size is 18MB.

Views

5.4K

Translate

Translate

Report

Report
Community guidelines
Be kind and respectful, give credit to the original source of content, and search for duplicates before posting. Learn more
community guidelines

correct answers 1 Correct answer

LEGEND , Mar 20, 2018 Mar 20, 2018

christians37487347  wrote

Is there a trick to reduce the .DNG to the more reasonable < 60MB size. ?

This is what I love about participating in the Adobe forums–I almost always learn something! I woke up this morning and had a DUH moment. You CAN reduce the size of the LR panorama DNG using the Export module and selecting DNG Image Format and 'Use Lossy Compression.' Yes it's a lossy file format, but unlike JPEG file format it contains the original raw data. I tried this on a few panorama DNGs and

...

Votes

Translate

Translate
LEGEND ,
Mar 19, 2018 Mar 19, 2018

Copy link to clipboard

Copied

You're most likely using Perspective projection, which stretches the image to fit the "rectilinear" angle of view. Try using Cylindrical projection for panoramas that show stretching with the Perspective setting as shown below. Not only does it inflate the file size, but it also degrades the image quality in the stretched areas (corners and edges). Also there's nothing wrong with exporting the panorama DNG to a JPEG file and then deleting it. But make sure to apply the Basic panel Tone settings to recover any highlight clipping or blocked shadows, which won't be fully recoverable once exported. There's generally no need to apply other settings, which can just as effectively be applied to the JPEG. You may also want to choose 'Adobe RGB' Color Space in the Export module to help preserve areas that are outside the sRGB gamut. A JPEG Quality setting of 80 is more than sufficient unless you plan on also editing the file in PS. All "destructive" pixel editing should be done using 16 bit/color TIFF file format to prevent build-up of compression artifacts when using multiple file saves.

Don't take my word–Try it for yourself. Create a panorama DNG, apply the Tone edits I suggested above, Export to 80 Quality Adobe RGB JPEG with no Resize or Sharpening, and then continue editing both files in LR. Once completed compare the two files at 1:1 Zoom View.

Votes

Translate

Translate

Report

Report
Community guidelines
Be kind and respectful, give credit to the original source of content, and search for duplicates before posting. Learn more
community guidelines
Community Beginner ,
Mar 19, 2018 Mar 19, 2018

Copy link to clipboard

Copied

Hi,

many thanks for the fast suggestion.

95% of my pianos are spherical or cylindrical.

Going .JPEG and keeping the source files (just in case) was something I was considering, in case nobody knows the trick to get rid of the redundant data. For sure there is redundant data if 3 x 22M results in 110MB.

I looked at some files and it looks like: Filesize = merged image + source images.  

I found the merged image is smaller if there is plenty of overlap.

I am sure the jpeg is no compromise when it comes to resolution, I just want to do have the full dynamic range of .DNG/RAW for subsequent tone curve adjustments.

Maybe somebody knows the trick.

Votes

Translate

Translate

Report

Report
Community guidelines
Be kind and respectful, give credit to the original source of content, and search for duplicates before posting. Learn more
community guidelines
Community Expert ,
Mar 19, 2018 Mar 19, 2018

Copy link to clipboard

Copied

Your raw files are probably 12 or 14-bit, while the merged DNG is 16-bit, which could explain the file size.

I don't do panoramas, but when I do an HDR merge of two 40 MB,14-bit DNGs (converted from NEF), the merged DNG is 135 MB.

Other than that, I wouldn't worry about a 110 MB file size, it's not all that big.

Votes

Translate

Translate

Report

Report
Community guidelines
Be kind and respectful, give credit to the original source of content, and search for duplicates before posting. Learn more
community guidelines
LEGEND ,
Mar 19, 2018 Mar 19, 2018

Copy link to clipboard

Copied

christians37487347  wrote

Hi,

In case nobody knows the trick to get rid of the redundant data. For sure there is redundant data if 3 x 22M results in 110MB.

I looked at some files and it looks like: Filesize = merged image + source images.

As best as I can tell the DNG file contains the stitched raw data bit map, which has interpolated to fit the selected projection. It is then recompressed using an Adobe proprietary loss-less algorithm. Other than what I've already suggested I don't think it's possible to further reduce the panorama DNG file size. It's a function of the output panorama image dimensions (pixels x pixels) and raw data compression algorithm.

christians37487347  wrote

Hi,

I am sure the jpeg is no compromise when it comes to resolution, I just want to do have the full dynamic range of .DNG/RAW for subsequent tone curve adjustments.

If you apply the Basic panel Tone settings as suggested there should be no loss of dynamic range. However, if you apply an extreme tone curve to the JPEG file it may cause visible banding in the image due to stretching of the 8 bit/color data. You can prevent this by applying the Tone controls and Tone curve BEFORE export to JPEG. Most of the panoramas I create are also edited further in PS. If then saved to TIFF file format it will be significantly larger than the original panorama DNG. Saving to JPEG format makes good sense and is of no consequence unless you need to do further editing in PS, which I also done with no visible issues. I always save the original raw files used to create the panorama as a backup.

Votes

Translate

Translate

Report

Report
Community guidelines
Be kind and respectful, give credit to the original source of content, and search for duplicates before posting. Learn more
community guidelines
Community Expert ,
Mar 19, 2018 Mar 19, 2018

Copy link to clipboard

Copied

The reason behind this is actually fairly simple. The resulting dng file is demosaiced and has red, green, and blue values at every pixel. Your original raw files are Bayer Mosaiced, meaning that every pixel only has a red, green, or blue filtered value. In the resulting dng file because the projection is completely remapped and you would lose information by artificially remosaicing the pixels into the new file, every pixel has to have all three components. So for a 24 megapixel camera (which this probably is), the original raw file size is expected to be 12 bit/8 bit*24 million which is 36 MB uncompressed and about 20 megabytes losslessly compressed. When you stitch this into a three-raw cylindrical panorama with 1/3 overlap, you end up with about 56 megapixel in the ideal case but usually somewhat more. However, now you need to store a full 12 bits of red, green, and blue at every pixel, which means the file size would be 12/8*56 * 3 = 252 MB uncompressed, or about 100 to 126 MB compressed (Adobe's compression algorithm is far better than that that camera makers use).

There really is no way around this. I have asked Adobe several times for a way to reduce the resolution of the resulting panorama in the panorama stitcher interface with a simple slider as I often end up with panoramas that are so large that Lightroom can't deal with them very well anymore (200 to 1000 megapixels is not out of the ordinary for me) but they haven't implemented it.

Votes

Translate

Translate

Report

Report
Community guidelines
Be kind and respectful, give credit to the original source of content, and search for duplicates before posting. Learn more
community guidelines
LEGEND ,
Mar 20, 2018 Mar 20, 2018

Copy link to clipboard

Copied

christians37487347  wrote

Is there a trick to reduce the .DNG to the more reasonable < 60MB size. ?

This is what I love about participating in the Adobe forums–I almost always learn something! I woke up this morning and had a DUH moment. You CAN reduce the size of the LR panorama DNG using the Export module and selecting DNG Image Format and 'Use Lossy Compression.' Yes it's a lossy file format, but unlike JPEG file format it contains the original raw data. I tried this on a few panorama DNGs and couldn't any difference at 1:1 Zoom View between the original DNG and Lossy DNG files.

EDIT: I noticed when 'Use Lossy Compression' is checked 'Resize to Fit' is enabled and can be used to reduce the DNG panorama image size. I compared lossy DNGs created without Resize and with 50% Resize using RawDigger and their histograms are identical. So you can also resize the panorama DNG.

More details here:

Adobe expands DNG format with inclusion of smaller, Lossy DNG option: Digital Photography Review

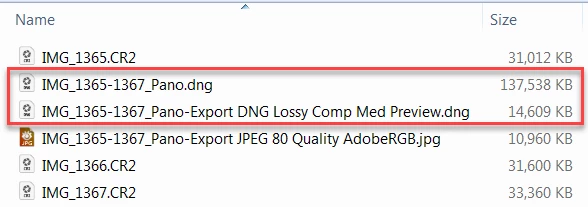
You can also reduce the DNG image size using the Adobe DNG Converter, but you're limited to 20 megapixel maximum size. Too bad Adobe didn't offer more options for larger image sizes!

EDIT: I tried the DNG Converter with Medium Preview, Embed Fast Load Data,  Lossy Compression, Limit Size to 20MP, and the same settings in LR 7.2. The stats and histograms in RawDigger are identical for both files indicating the same processing is used in the DNG Converter and LR.

Votes

Translate

Translate

Report

Report
Community guidelines
Be kind and respectful, give credit to the original source of content, and search for duplicates before posting. Learn more
community guidelines
Community Beginner ,
Mar 20, 2018 Mar 20, 2018

Copy link to clipboard

Copied

Wow!

What a thread! I am impressed!

Many Thanks to ALL an in particular trshaner.

I can add a tiny bit from my end. Instead of export one can use: Library --> Convert Photo to DNG --> (select lossy option).

This makes it even more seamless.

Again many thanks!

Votes

Translate

Translate

Report

Report
Community guidelines
Be kind and respectful, give credit to the original source of content, and search for duplicates before posting. Learn more
community guidelines
LEGEND ,
Mar 20, 2018 Mar 20, 2018

Copy link to clipboard

Copied

LATEST

Glad to help and good suggestion. Just remember you can also use the Import module to convert to Lossy DNG AND Resize to reduce image dimensions with very large panoramas.

Votes

Translate

Translate

Report

Report
Community guidelines
Be kind and respectful, give credit to the original source of content, and search for duplicates before posting. Learn more
community guidelines