

What is clipping here?

Copy link to clipboard
Copied
Hi. I was never into preparing photos for printing. First time I take care of clipping areas I get warning that light magenta is somehow clipping. Is it something with color profiles? I totally can't find the reason. Even when I reduce magenta luminance dramaticly LR keeps telling me it's clipping.


 17
Replies
17
17
Replies
17

Copy link to clipboard
Copied
As you are showing the clipping, LrC is using a color overlay to show where it is occurring, one color for hilites (by default red, not really magenta) clipping, a different color for shadow clipping.
see:
https://digital-photography-school.com/understand-lightroom-histogram/
https://www.creative-photographer.com/lightroom-classic-histogram/
actualy this video would be more helpfull:
https://www.youtube.com/watch?v=vQBzixj1CGY
In your photo, the hilites on the leafs are clipping.
Copy link to clipboard
Copied
I've seen this video prior posting here. I know that RED overlay indicates clipping area. What I'm asking is, why light magenta area is shown as clipping while it's not white a bit? Let's start from the beginning cause perhaps I missunderstood something. Clipping area is area with too bright/dark color, so it will be presented as 100% white(blank) or black spot on a print. Wright? So again, if I'm not mistaken, why magenta/pink(if you like) area is shown as clipping?

Copy link to clipboard
Copied
What I'm asking is, why light magenta area is shown as clipping while it's not white a bit? Let's start from the beginning cause perhaps I missunderstood something. Clipping area is area with too bright/dark color, so it will be presented as 100% white(blank) or black spot on a print. Wright? So again, if I'm not mistaken, why magenta/pink(if you like) area is shown as clipping?
By @kuba15B9
You will get the clipped highlight warning even if only one channel is clipped.
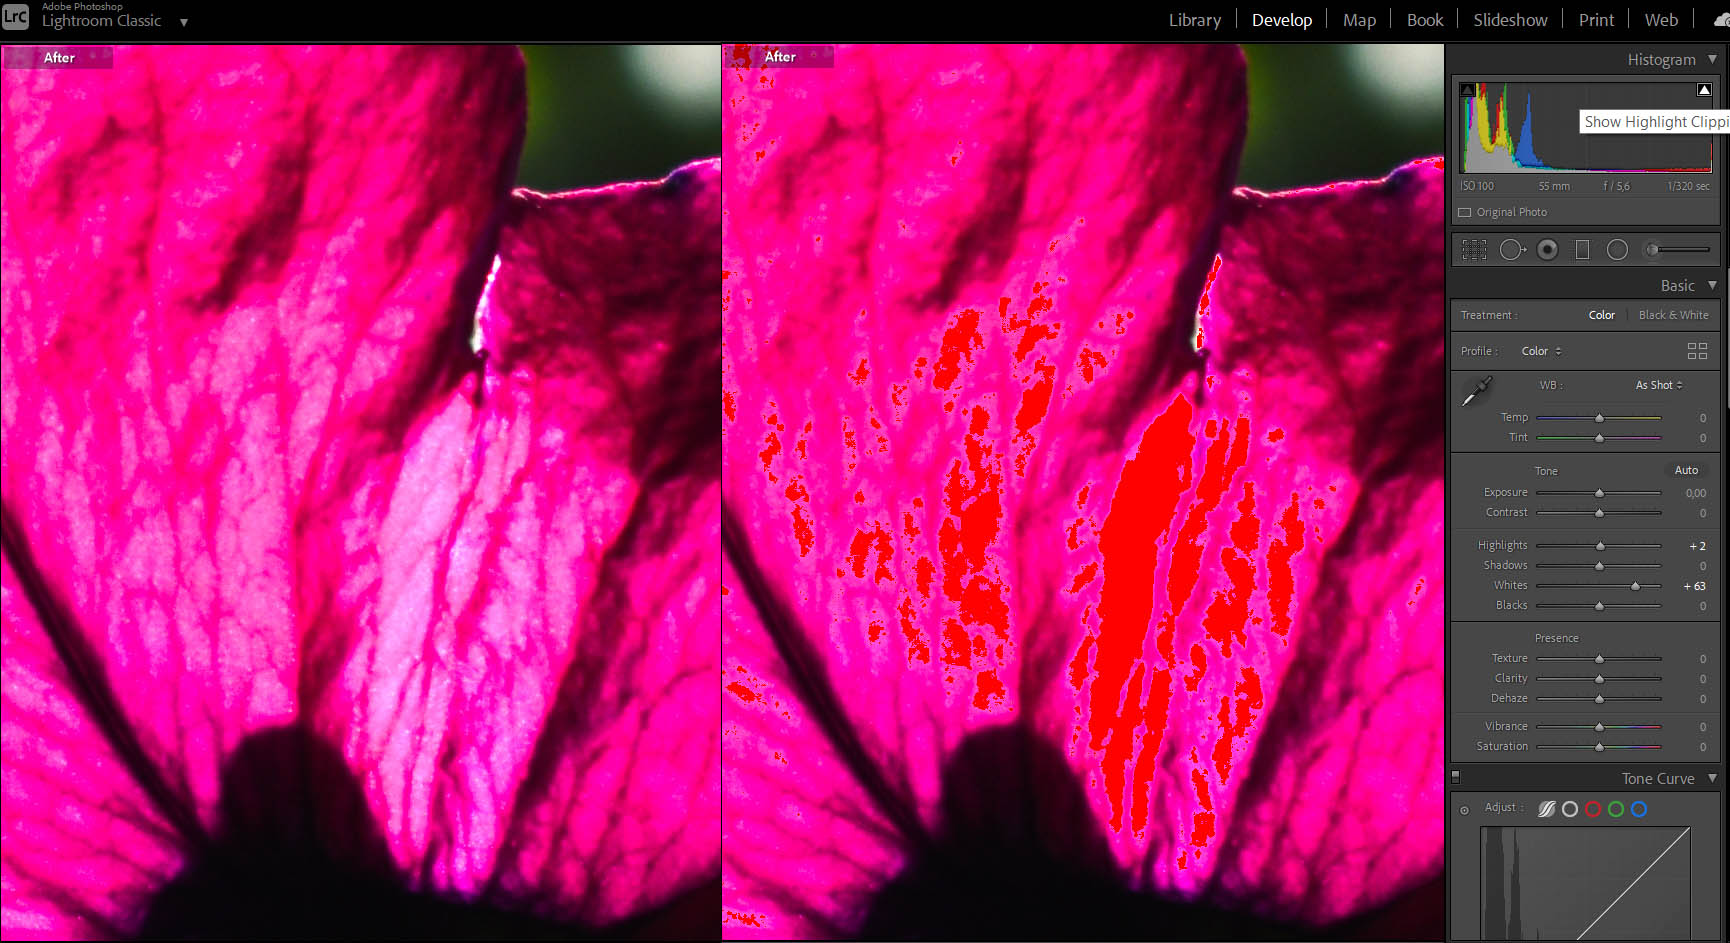
If you mouse over the bright magenta areas of the image and watch the numbers below the histogram, you will find areas that are 100% red as well as 100% blue.
Copy link to clipboard
Copied
Highlight clipping is controlled by dragging the Highlights and/or Whites slider to the left.
You have Highlights set to +2 and Whites set to +63.
Try setting Highlights to 0, and then dragging Whites to the left until there is no clipping.
Alternatively, leave Whites at 63, and drag Highlights to the left until there is no clipping.
Without seeing the whole (unedited) image, it's difficult to give specific advice.
It could be that leaving Whites at 0, and increasing Exposure instead would be better.
If the image is just dark, try increasing Exposure. If it lacks contrast, try increasing Whites.

Copy link to clipboard
Copied
I'm sorry but you really don't get my point. I'm asking for help, yes. But I'm not asking how to move 2/3 sliders to don't get warnings. I'm asking why am I getting warning signs when accordeing to my best knowledge there's shoudl be none. Can you explain it please?
Copy link to clipboard
Copied
All three channels are clipped in a small area, which is pure white.
So the clipping indicator triangle top right in the histogram is white.
Had it not been for this white area, the triangle would have been magenta, indicating clipping of the red and blue channels.

Copy link to clipboard
Copied
Clipping area is area with too bright/dark color, so it will be presented as 100% white(blank) or black spot on a print. Wright? So again, if I'm not mistaken, why magenta/pink(if you like) area is shown as clipping? On those leafs, bits may be clipped enough to be white, it dowes not take much for the clipping alert to show up. And clipping can show up before pure white.
Copy link to clipboard
Copied
So, on WIndows, and I am currently on a Windows computer, as to test my words out.
Press down on the ALT key, and move either Whites or Highlights slider. This will display where the clipping in a way you can pinpoint where those clipping are. Easier to see than the default method you are using (I often have problems seeing thru the overlay what is what). Works with Shadows and Blacks as well.
Tip: Altering the Highlites and/or Whites in that way, can allow you to attemt to move the white point to just before clipping occurs, this is useful if you plan on printing your photo, as pure white is not an ink in printers and resultas as a unprinted area (using paper stock white color to display as pure white)
Copy link to clipboard
Copied
That was quite helpful. So when I'm moving sliders while alt key is pressed I get something like gradient of clipinng. As shown on pic below, white overlay is truely pure white so no ink on a print. But then, there's also a blue/yellow/green/red areas. Red stayed the same like first pic. Also, while cliking histogram triangle, there's only red overlay. Can you tell me what do this colors mean?
Copy link to clipboard
Copied
Here's a post on the Lightroom Queen forum by Conrad Chavez that explains these colors in detail.
Copy link to clipboard
Copied
Wow, now this is something. I cannot thank you enough for this link.
I know I'might be boring, but let me ask you one last question. So in terms of printig, when LrC tells me that red channel is clipping like on my fist pic, but my eyes tells me this is the place I want to be, how woud it print? Is developing photos for screen/print SO much different?
Copy link to clipboard
Copied
Clipping is not necessarily a bad thing. If the image looks the way you want it on screen, it doesn't matter if there is shadow or highlight clipping. The most objectionable clipping is when it happens in all three channels, so that shadow and highlight detail is obscured, like a white sky. But this is all subjective, if you want a white sky with no detail, that's up to you.
It's possible to make prints that are very close to what you see on screen.
For this to happen, you need to work on a calibrated monitor (calibrated with a hardware calibrator), and also use the correct printer profile when printing. If you do your own printing, choose the profile for the paper/printer that you are using.
If you use a printing service, you are usually told to deliver a jpg in sRGB. Use a service that lets you download the printing profile, so you can check how the image will print.
You can use Lightroom's Proof preview to get an idea of how an image will print with a particular printing profile.
Press S while in Develop, and choose the profile that you will be using.
Copy link to clipboard
Copied
But then, there's also a blue/yellow/green/red areas. Red stayed the same like first pic.
I think I lost the train of thought on that, or I am confused. Yes confused, so, some images to help inquire for a bit of clarity on that.
Here are a few examples from a absolutely hideous photo I took looking into the sky. Self inflicted error. And what the heck, some bad edits to help make the examples more visually helpful.

Bad day at Zion, right into sun (unavoidable was just bee bopping in route) and filthy multiple square filters (I have sense replaced with easier to clean glass)

Naturally the sun is clipped. Is the red in the overlay the color you are referring to?

An the Histogram shows R, G, B channels as well as brightness (overall)

And clipping indicator, hmm used to show different colors for different clipping amounts (although this one is ballistic bad)
Copy link to clipboard
Copied
In this example, and I think I now understand the questions. I have international gone into HSL/COLOR, selected Color, selected Blue, and increased luminance. Hence clipping the blue. Histogram Clipping warning is in Blue, Overlay on loupe still red.


For your highlight clipping of a particular color, you could do the opposite, on the right, select the HSL/Color panel, select color, and modify as you see fit. One way to do it, not the only.
Copy link to clipboard
Copied
Another way would to be to use an adjustment brush, select a range mask, base that on color, and alter the highlight slider (or other). THis would allow you to just adjust the one color (or close to one color) in a particular area of the photo. Say you did not want blue that bright in that area, but you did not want to darker all blue areas.
Copy link to clipboard
Copied
I tried your thing and gotta admit, it does the job I didn't know it. Thank you.
Copy link to clipboard
Copied
Gents, I really apprieciate your help but main problem is alredy solved thanks to @Per Berntsen.
Remaining thing is, how, image that appears perfect on screen but whith some clipping colors/channels would appear on print. Eg. nice looking petal details whith one(red) channel clipping.

Find more inspiration, events, and resources on the new Adobe Community
Explore Now
 AdChoices