• Global community
    • Language:
      • Deutsch
      • English
      • Español
      • Français
      • Português
  • 日本語コミュニティ
    Dedicated community for Japanese speakers
  • 한국 커뮤니티
    Dedicated community for Korean speakers
Exit
54

P:(Masking) Invert/Flip Mask Group

Explorer ,
Oct 28, 2021 Oct 28, 2021

Copy link to clipboard

Copied

Description:

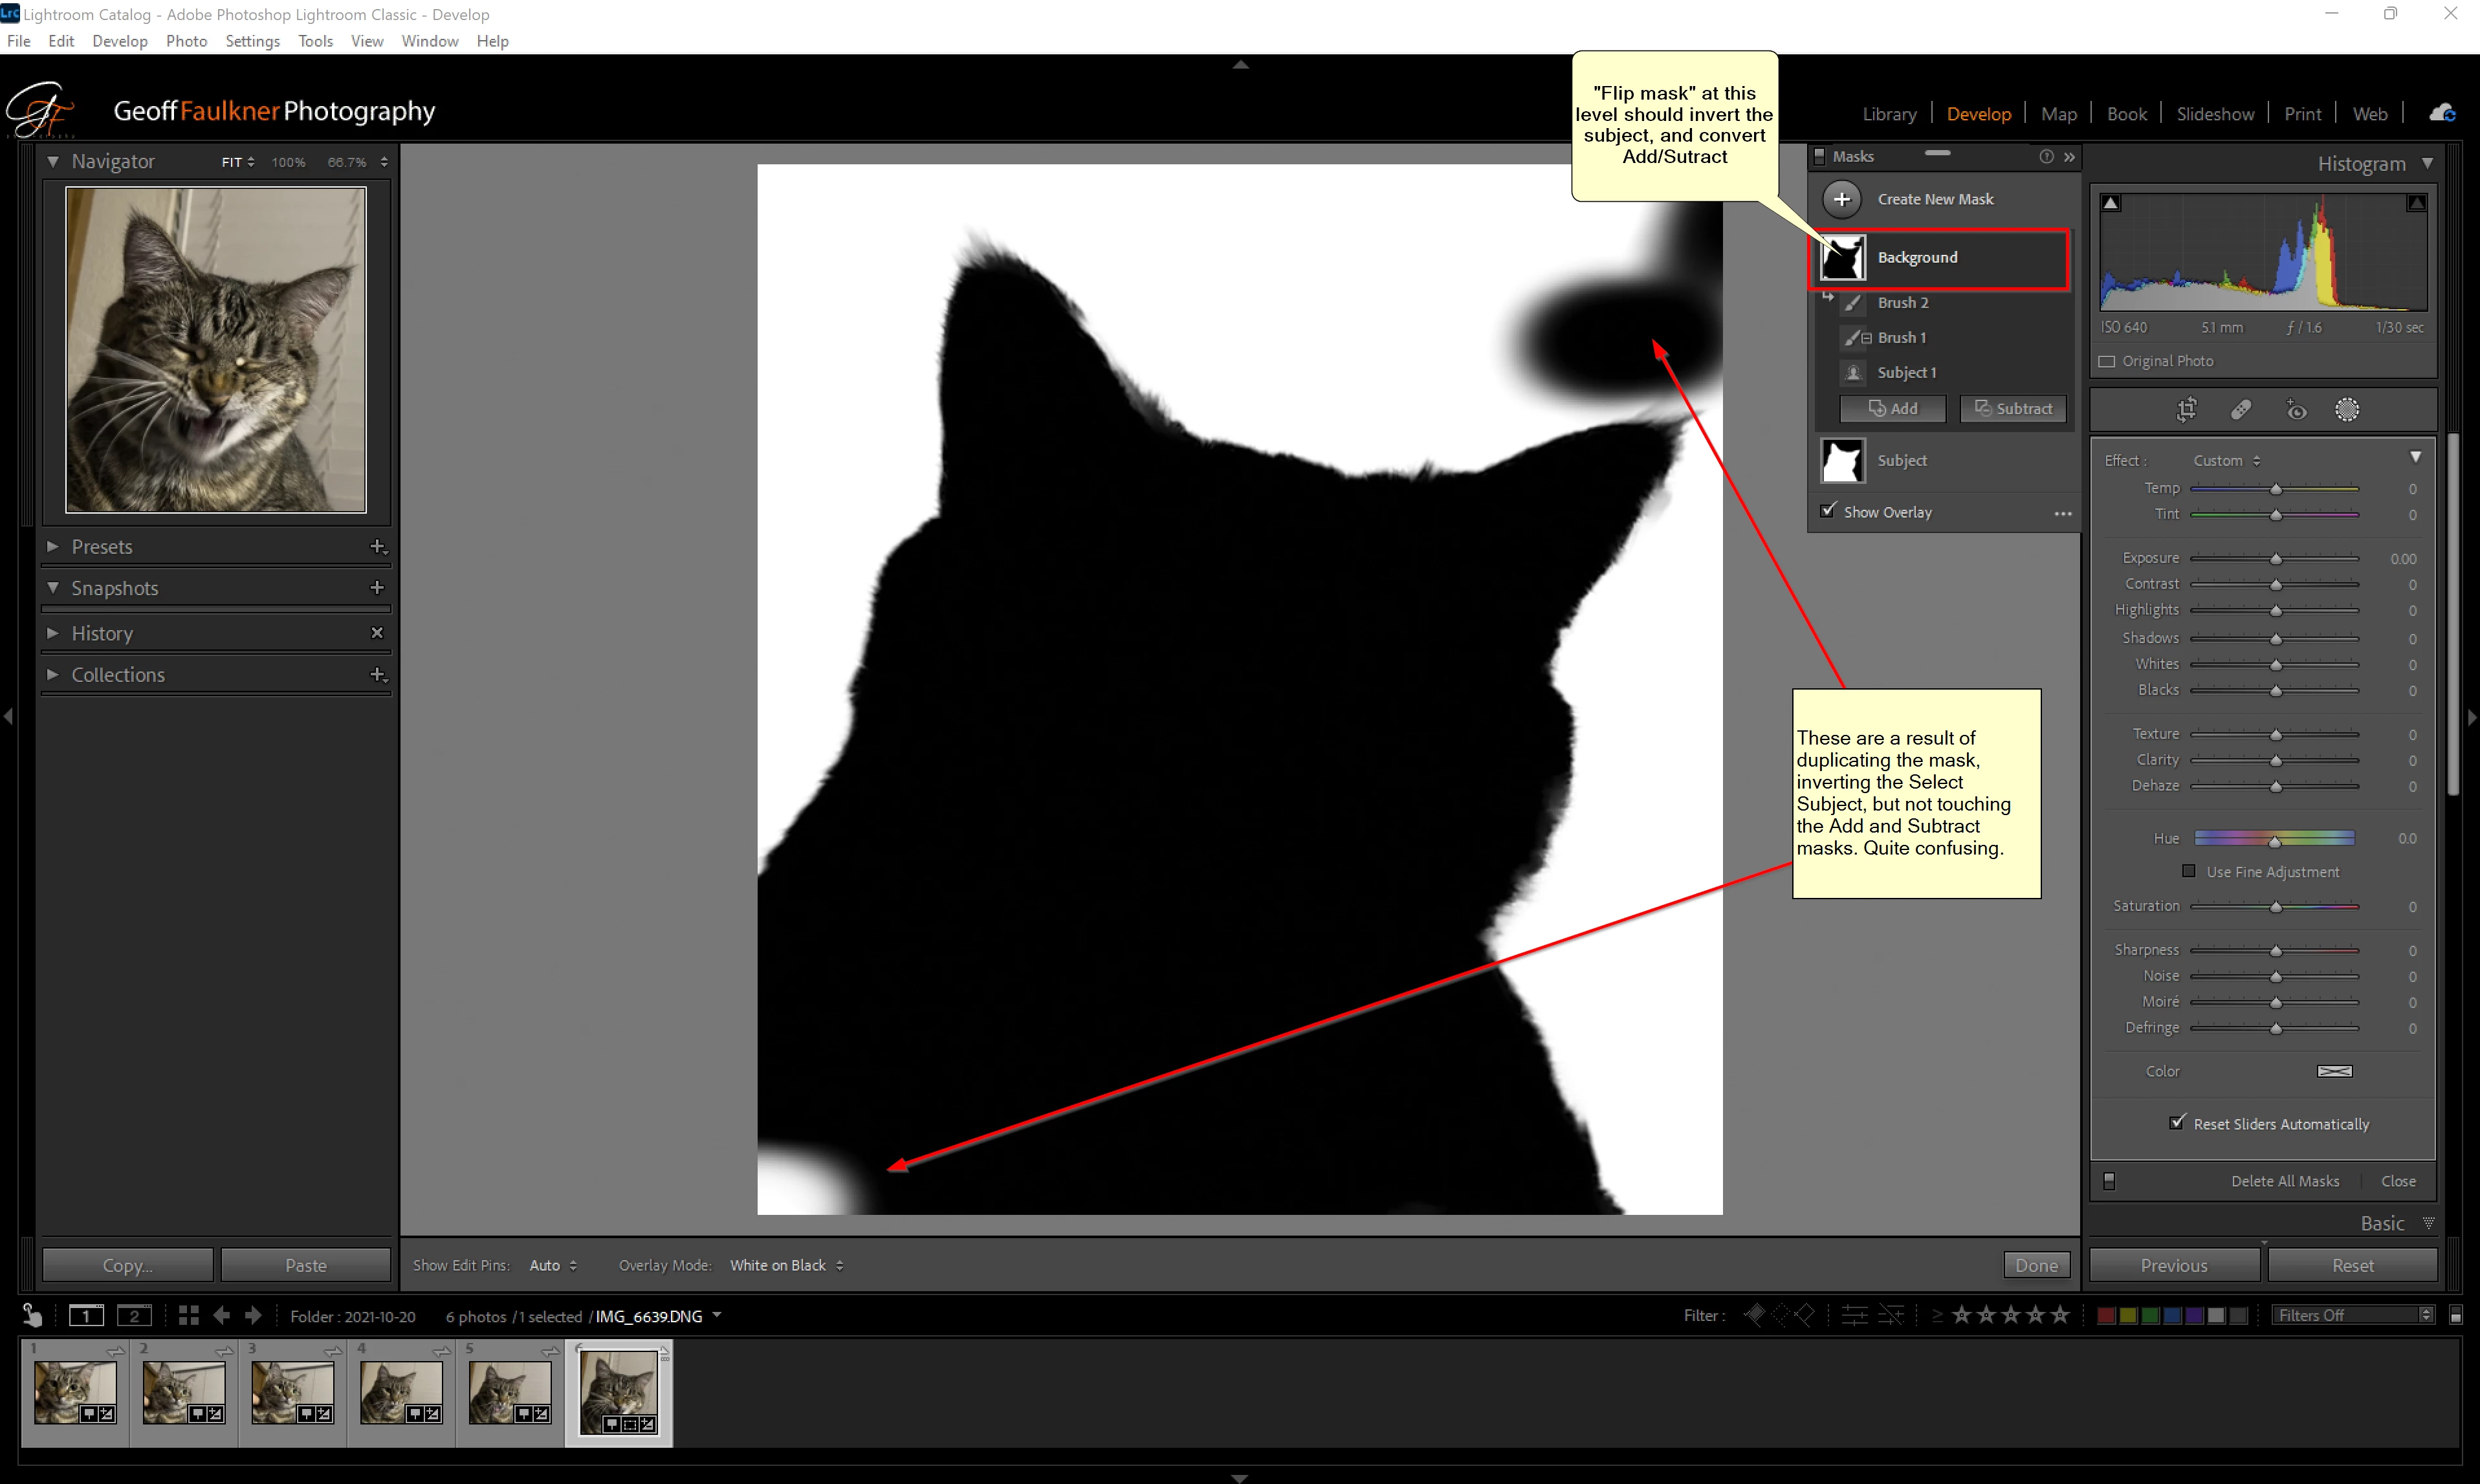
Selecting subject in the new Lightroom release is great...but no automatic tool is perfect. After creating a subject selection mask, I often Add or Subtract with a brush to clean it up (There is currently no "Refine edge" function, which would be awesome, by the way).  My problem is this--Now that I have the Subject selected, I duplicate the mask so I can select the background. But the Add/Remove brushes don't work properly and must be converted.

Proposed improvement:

Instead of duplicating the mask and going to each element to invert, convert to add, convert to subtract, I would like to see an option on the mask itself to "Flip" it. The Flip at the top level would invert the select subject mask, and convert the Add to Subtract, and convert the Subtract to Add. Then the mask would be a perfect inversion in one step. 

You would have to consider how it would behave with the other mask elements--I was only considering the select subject/Add/Subtract.

mask.png

Idea Released
TOPICS
macOS , Windows

Views

5.0K

Translate

Translate

Report

Report
Community guidelines
Be kind and respectful, give credit to the original source of content, and search for duplicates before posting. Learn more
community guidelines

correct answers 2 Correct answers

Adobe Employee , Jun 14, 2022 Jun 14, 2022

Greetings,


Updates to the Adobe Photography Products were released on June 13. This feature request is now implemented. Thanks to all who participated in the is thread. 


If you do not see the update (Mac and Win) you can refresh your Creative Cloud App with the keyboard shortcut [Ctrl/Cmd]+[Alt/Opt]+[ R ]. 

Status Released

Votes

Translate

Translate
Adobe Employee , Jan 06, 2022 Jan 06, 2022

Setting status to Planned

Status Planned

Votes

Translate

Translate
55 Comments
Explorer ,
Oct 28, 2021 Oct 28, 2021

Copy link to clipboard

Copied

Hello,

I LOVE the now "select subject" option for masking! Of course, it does not work perfectly. So you have to add or substract parts to/from the resulting mask by using the paint brush. When you try to reverse the completed mask afterwards (for instance to work on the background of the subject instead of the subject itself) it only reverts the added/substracted area, but NOT the automatically selected subject! This is a big problem, as reverting a mask is one of the most needed features when working with main subjects. 

How can I reverse the whole mask? I tried to reverse both parts separately (subject and brush) but that doesn't work either. 

Looking forward to your help,

Foto-Curly

Votes

Translate

Translate

Report

Report
Explorer ,
Oct 28, 2021 Oct 28, 2021

Copy link to clipboard

Copied

Why is this so important? Because in 90% of all cases I want to make the background of my main subject smoother, darker, lighter etc., instead of working on the subject itself. 

Votes

Translate

Translate

Report

Report
Mentor ,
Oct 28, 2021 Oct 28, 2021

Copy link to clipboard

Copied

yes, it's pretty frustrating that there's not an invert option on the layer group. No idea why this feature wasn't included. Even better would be a instance dependency, so that if you changed one mask, the duplicate would be dynamically updated.

Votes

Translate

Translate

Report

Report
Community Expert ,
Oct 28, 2021 Oct 28, 2021

Copy link to clipboard

Copied

Subtract + Invert creates an Intersect, i.e. only the subtracted part remains masked. That's a specific design.

To do what you want, try inverting the Subject mask first, then correct the edges with the Brush.

Votes

Translate

Translate

Report

Report
Explorer ,
Oct 28, 2021 Oct 28, 2021

Copy link to clipboard

Copied

That works actually, thanks. But then, when I have refined the mask with the brush, how can I then use the same refined mask for working on my actual subject? I tried to dublicate the mask, but then it doesn't offer me the option to reverse it. Am I doing something wrong?

What I am trying to do is: Use "select subject" to find my main object. Refine the mask as needed with the add and subtract brushes. Then, work on the main object as needed. Then, dublicate this mask, so you don't have to do all this add and substract refinement again, and reverse it to have the background selected. Smooth background and make it darker. 

And that doesn't work, as I cannot reverse the refined mask.

Votes

Translate

Translate

Report

Report
Community Expert ,
Oct 28, 2021 Oct 28, 2021

Copy link to clipboard

Copied

Just because it is now easier to address our pictures as a "patchwork" of different abutting regions - typically people seem to want one for adjusting the subject, and another for adjusting everythiing else except the subject - does not mean this has to be the approach now.


The believable coherence of our photos, still demands the same aesthetic restraint IMO. And we still have got the global adjustments which will help us to naturally maintain that coherence.


There is nothing wrong now, any more than there used to be, with adjusting the whole photo globally to get the appearance you want for the general scene - and then applying local adjustment as needed, to particular main subject areas. Or, instead, adjusting globally for those main subject areas - and then applying a local adjustment to other areas.


Whichever way makes practical sense to you as a working method; also, whichever way makes the most sense in terms of the technical dependency of the processing of global adjustment, on the results from local adjustment.

Votes

Translate

Translate

Report

Report
Community Expert ,
Oct 28, 2021 Oct 28, 2021

Copy link to clipboard

Copied

What you need to do is invert the subject mask, and then right-click on the refine brush mask(s) and not invert them, but toggle from subtract to add, or vice versa.


-- Johan W. Elzenga

Votes

Translate

Translate

Report

Report
Explorer ,
Oct 28, 2021 Oct 28, 2021

Copy link to clipboard

Copied

Sorry Richard, but I disagree. That is not the same what I described above. 

Votes

Translate

Translate

Report

Report
Explorer ,
Oct 28, 2021 Oct 28, 2021

Copy link to clipboard

Copied

That is the solution, Johan!!! Thanks a lot! I still wish there was a inverse button for the whole mask set that would handle that, but at least this is a workaround!

Votes

Translate

Translate

Report

Report
Participant ,
Oct 29, 2021 Oct 29, 2021

Copy link to clipboard

Copied

I propos a list of improvement that I think can improve the workflow with the new masking panel:


  1. Invert a mask: Add the possibility to invert a complete mask groun and not only the single selection tools.
  2.  Change the Add/Subtract mode after creation: Add the possibility to change the sum mode (Add/Subtract) from the masking panel, for example by using the ALT+click over the small icon of the mask.
  3.  Easy creation options: Add the possibility to add new mask in easy way without click in the mask panel in order to simulate the old workflow (with previous version, using gradient or rdial filter was possible to add multiple contribute simply by cliccking).
    So I propose to have a similar behavior when you select Linear Gradient and Radial Gradient that permit to "continuous" drawing new mask (for example without ALT in the same group and with ALT in a new group). This behavior can be controlled by a flag. 
    I know that is present the shortcut, but the short cut waas slowest and different from Lrc, Lr and Cr.
  4.  Auto rebuild of AI mask after syncronization: Add an option that enable the auto-recalculation of the AI mask when this mask was copied or synced in a new photo.
  5. Add the possibility to indicate the subject: As alreeady present in photoshop from the previous version, I think that can be interesing add some features to the subject selection tools. For example add the pre indication of the subject or the area subject selection tools in order to guide the Sensei to select the object that we want.
  6. Add the shape selections tools: Add an istrument similar to the "Lasso" selection tools to create a custom shape selection. Moreover add the possibiliti to "feather" the selection.
  7. Add the Feather controll of a Mask group: Similar to photoshop, please evaluate the possibility to add the feather control of a complete mask group. 


I thinks that this new instrument was very powerfull but whit some imprevement can be super!

Votes

Translate

Translate

Report

Report
Community Expert ,
Oct 29, 2021 Oct 29, 2021

Copy link to clipboard

Copied

It's just an available alternative, but with some clear advantages IMO.


Consider for example, what if you later want to change the line of this subject vs background masking. Unless you carry this job out 100% perfectly, or unless you delete and re-duplicate one of the masks, you can then be left with some awkward gaps / overlaps. They will not automatically continue to dovetail with each other.


Also, say your background is being made a certain relative amount darker and more blurred compared to the remainder of  the picture, by a masked adjusment targeting this background - on top of global processing otherwise. On updating this global processing later, that same "differentiation" of the background vs the remainder, will naturally continue the same.

Votes

Translate

Translate

Report

Report
Advocate ,
Oct 31, 2021 Oct 31, 2021

Copy link to clipboard

Copied

Mac OS 11.6, Lightroom Classic 11.0. - When I select my 'completed' mask, both the Lightroom selection of the subject and the brush strokes I've added to it, the 'Invert' box is covered and not available. My aim is to now select the background which is outside of the mask I'v made, but without the 'Invert' box I cannot make this choice. How can I make this work? I've included a screen shot of the subject, Mask 1,  and added brush strokes showing on the image and in the mask pallette to help clarify.

TIA,

Ken

Ken_NIelsen_example_lightroom_mask_screen_shot.jpg

Votes

Translate

Translate

Report

Report
Community Beginner ,
Nov 01, 2021 Nov 01, 2021

Copy link to clipboard

Copied

The new selection and invert feature is a great addition and works well with subject selection but when I add and/or subtract areas (brush) and then invert the result is a mess. Am I missing something or is this a bug? Can these multiple selections be combined into one?

Votes

Translate

Translate

Report

Report
LEGEND ,
Nov 01, 2021 Nov 01, 2021

Copy link to clipboard

Copied

With the two or more components in your mask group, in this case one for Subject, How does the invert behave, component by component


I may be using the wrong words


For example, Create the Mask, selection Subject, Add to that a brush. Now select the subject one, and invert, probably everything but the subject? THen undo that, select the brush, invert, that not go as desired?

Votes

Translate

Translate

Report

Report
LEGEND ,
Nov 01, 2021 Nov 01, 2021

Copy link to clipboard

Copied

To invert the WHOLE mask do the following.  Adobe will hopefully implement a whole mask in the future but this is a workaround.


Select the BOTTOM Mask component and Invert it

Select each of the Mask components above it and if it has been Added then change it to Subtract and if it has been Subtracted change it to Add using the Right Click menu on the mask component.


A convoluted workaround that needs to be fixed but it works if you need it.

Votes

Translate

Translate

Report

Report
Community Beginner ,
Nov 02, 2021 Nov 02, 2021

Copy link to clipboard

Copied

I like your new masking feature in Lightroom. Thanks a lot. I have one observation and suggestion. Say I choose the option to mask using select object and the selection is 90% correct but I have to do a bit Add and Substract to get it right.

After that I am unable to Inverse the masking. The invert option is for the original subject selected which was only 90% correct.

Votes

Translate

Translate

Report

Report
Community Beginner ,
Nov 02, 2021 Nov 02, 2021

Copy link to clipboard

Copied

Thanks for figuring that out Bob. It saves a lot of effort  Pity Adobe did not pick this up under Beta testing. I would like Adobe to enable a single mask (selection) to be made up from the composite. Using the linear gradient to blur the background (like tilt shift in PS) works well but need to be able to subtract the subject in one action rather than keep fiddling with the brush


What do others think? Would like to see a tutorial from Adobe on different techniques for applying the new feature - but for now I'm really enjoying playing with it. 

Votes

Translate

Translate

Report

Report
LEGEND ,
Nov 02, 2021 Nov 02, 2021

Copy link to clipboard

Copied

Yep, same


Take a different approach


Two ways


Creat the initial mask, Do not Add/Subtract just yet. Invert the mask, then Add/Subtract


Or you could create the initial mask, copy it, invert the copy, continue.


Oh, a new idea? Flatten Mask? I think I will go and post that.


Votes

Translate

Translate

Report

Report
Community Expert ,
Nov 03, 2021 Nov 03, 2021

Copy link to clipboard

Copied

You can invert a combined mask. What you need to do is invert the base mask, and then right-click on each submask above the base mask and toggle between add and subtract. I hope that Adobe will add a button one day, that does all of this in one click, but you do not have to start all over again if you want to invert a mask that you already fine tuned with one or more submasks.


-- Johan W. Elzenga

Votes

Translate

Translate

Report

Report
Explorer ,
Nov 03, 2021 Nov 03, 2021

Copy link to clipboard

Copied

Following this as I have the same query.

Votes

Translate

Translate

Report

Report
Community Expert ,
Nov 03, 2021 Nov 03, 2021

Copy link to clipboard

Copied

This has been asked and answered several times now. Maybe you missed it because you posted this in the wrong forum (I will move your post to the Lightroom Classic forum).


What you need to do is the following: Invert the base mask. Then right-click on each brush mask and toggle add/subtract. So if you added the mask, change it to subtract. And vice versa.


-- Johan W. Elzenga

Votes

Translate

Translate

Report

Report
Advocate ,
Nov 03, 2021 Nov 03, 2021

Copy link to clipboard

Copied

- Johan W. Elzenga,      This is so fabulous to hear that there is a way, but please explain one little bit more... First, How do I 'invert' the base mask? Then... of course, I added to the mask that are now shown as sub-edits to the original mask as I needed to 'touch up' and 'fill in' areas that either were not included or that needed better defining through editing, deleting and adding with the paint brush so that the central item was completely defined by the resulting accumulated masks. So then, you are saying I need to 'Subtract' or change it to 'Subtract' because I added it. This is why I ask for more clarification. This could be the most important answer to a question on these forums.... extremely important to my work, but it is not clear yet and if you could expand on your answer I know many already that will be helped by this. 


Votes

Translate

Translate

Report

Report
LEGEND ,
Nov 03, 2021 Nov 03, 2021

Copy link to clipboard

Copied

Invert the bottom mask component

For the mask components above the bottom convert to subtract if it has been added and convert to add if it has been subtracted.

Votes

Translate

Translate

Report

Report
Community Expert ,
Nov 03, 2021 Nov 03, 2021

Copy link to clipboard

Copied

A few pictures are worth a thousand words here, because it isn't intuitive at first:


Assuming you started with a mask that was in "ADD" mode by creating a "Select Subject" mask:


Step 1

Choose the three dots menu next to the "Select Subject" base mask ("Subject 1," not the main composite mask thumbnail "Mask 1"):


2021-11-03_21-36-28.png


Step 2

Choose "Invert" from the popup menu:


2021-11-03_21-37-03.png


Step 3

For each additional mask you added, choose the three dots menu and choose "Convert to subtract:"


2021-11-03_21-38-33.png


Note that if you created additional brush masking using "Subtract," You would need to "Convert to add."


Votes

Translate

Translate

Report

Report
LEGEND ,
Nov 04, 2021 Nov 04, 2021

Copy link to clipboard

Copied

<deleted>

Votes

Translate

Translate

Report

Report