
Lightroom Classic: Set defaults for raw file import
Apply a Camera Matching color profile and preset for each camera when importing raw files
Wouldn't it be nice if you could specify a different preset for each of your camera brands when you import raw files into Lightroom Classic? Or better yet, how about if we could differentiate one Canon camera from another (or two or more of any camera brand), and apply a different preset to each. Well, those options do exist today in Lightroom Classic.
New options in the preferences menu of Lightroom 9.2/Camera Raw 12.2 allow you to configure a variety of settings defining how to treat raw files upon import. You now have the option to set up a default or “master” preference that can be overridden by a camera specific preference if desired. If you have several of the same camera, then it can be further managed by camera serial number. These settings are applied when importing raw files into Lightroom Classic. Follow this tutorial to see how to set your defaults:
❶ Navigate to the preferences panel
To specify default settings for importing raw images, first navigate to the preferences panel:
Edit > Preferences (Win) or Lightroom Classic > Preferences (macOS)
Select the Presets tab from the Preferences dialog box to see the new Raw Defaults section

❷ Master defaults
In the Master drop-down, you will see 3 options: Adobe Default, Camera Settings, and Preset.
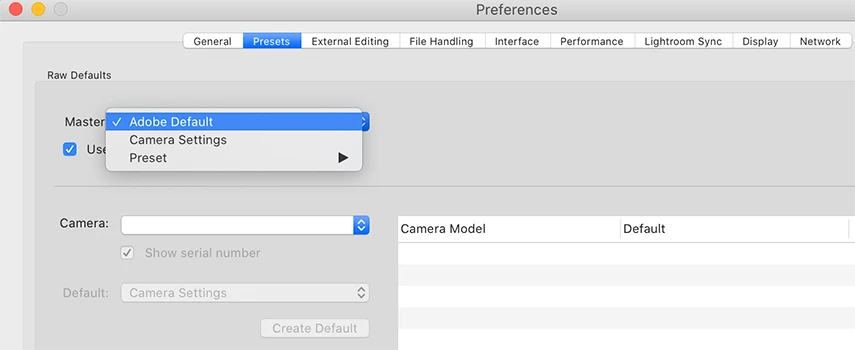
Adobe Default: This option will apply Adobe default settings to your raw images.
Camera Settings: If you want Lightroom Classic to select a Camera Matching color profile that corresponds to your in-camera style settings, then you should choose Camera Settings from the Master drop-down. This feature takes in to account the style of the photo (such as Canon Picture Style, Fujifilm Film Simulation, Nikon Picture Control, Olympus Picture Mode, Panasonic Photo Style, Sony Creative Style), and in some cases also settings from the Basic and Detail panels. Camera Settings will override the Adobe Default, but if any camera or setting is unrecognized, Lightroom will use a reasonable substitute instead.
Preset: This option allows you to choose a specific develop preset from your list to apply to all of your raw images as they are imported.
❸ Set defaults for specific camera models
If you use many different cameras, then you may want to process files from each camera differently. In this case, you might want to consider using the Use defaults specific to camera model option. This option appears as a checkbox under the Master settings.

You can choose from the same 3 options just described: Adobe Default, Camera Settings, and Preset. The only difference here is that it is chosen on a per camera basis. When you choose Use defaults specific to camera model, the option settings will override the choices that were set above in Master. If you have more than one camera of the same make, you can click the option for Show serial number. This will give you the ability differentiate the cameras that are the same model and allow you to select defaults for each camera separately. For more details, please see: How to set-up raw defaults in Lightroom Classic
Please Note:
Raw default settings made prior to version 9.2 will not be migrated when you update to Lightroom Classic 9.2. The settings for previously imported images will be retained but the default settings will be the Adobe defaults. If you wish to maintain your previous defaults, we recommend configuring new default settings after updating to Lightroom Classic 9.2.
Related topics:
How to set-up raw defaults in Lightroom Classic
Feature summary | Lightroom Classic (February 2020 release)
Get started with Lightroom Classic
