nickw62284179
Participant
August 8, 2020
Question

Lightroom to Photoshop and back. Colour preset performs differently when re-applied

  • August 8, 2020
  • 4 replies
  • 502 views

Hi there,


I am a designer and have quite a lot of experience in Photoshop, but I am much less experienced in Lightroom. I am understanding how I need to adjust my workflow to keep my Lightroom colour work and still do my image editing and retouching in Photoshop (Removing the shadow in this instance). 


I am working with a photographer and encountering one problem that I am unable to fix whereby I am following this work flow:


1. Photographer has imported and completed colour work

2. I created a virtual copy of the image

3. Reset the colour to as imported, to be reapplied once finished in Photoshop (I don't want to flatten all of the photographer's colour settings)

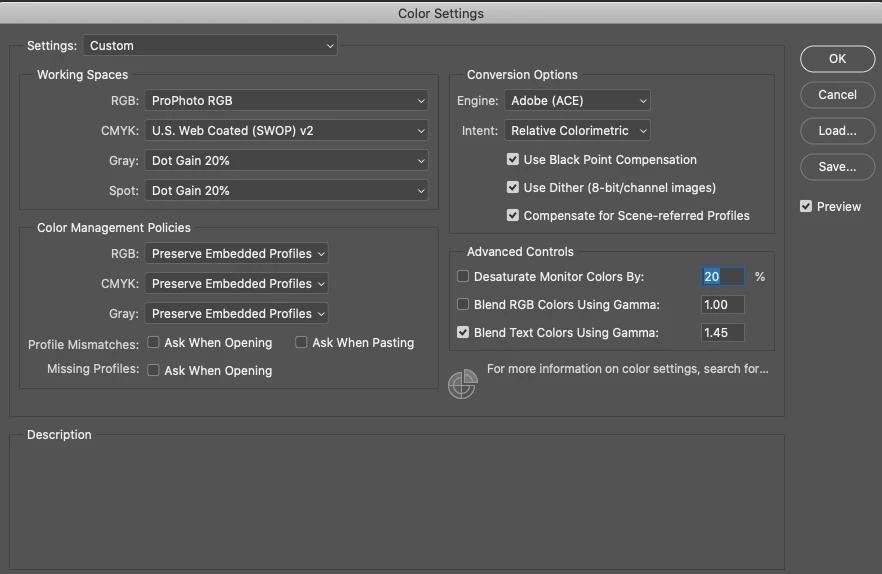
4. I do some edits in Photoshop (Edit in photoshop > Edit original) (I have my photoshop colour settings set to 'Preserve Embedded Profiles')

5. Save the image and come back to Lightroom

6. Copy and paste the colour work from original to my new photoshopped image.


Here is where my problem lies.


The colour is completely different and I have discovered a couple of things, but not been able to fix.

1. The color profile changes.

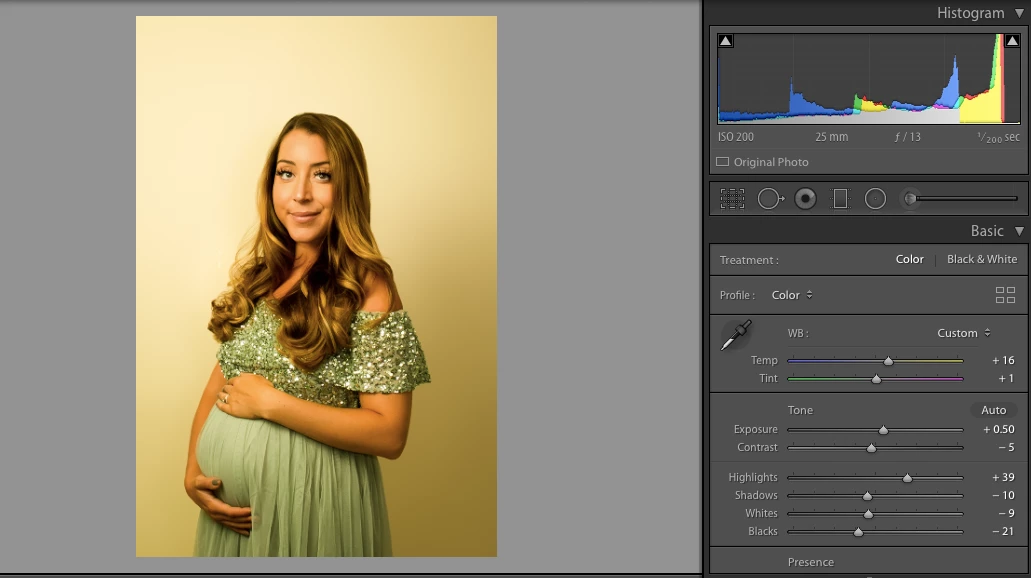
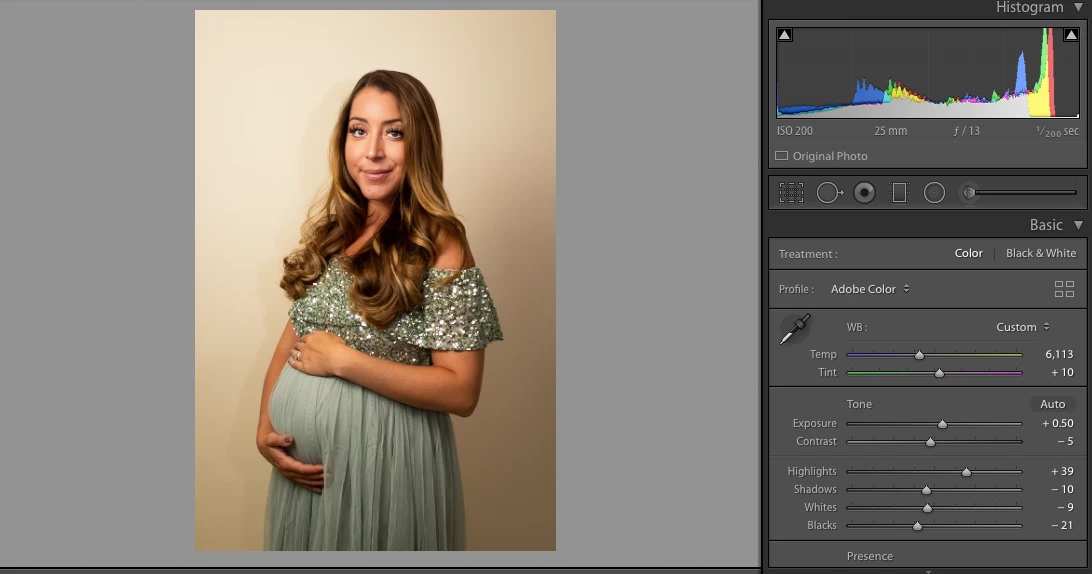
The original was set to 'Adobe Color', after using Photoshop that option is not available and just says 'Color'

2. Temperature and Tint are both changed in the effects panel. And the temperature setting on the original have high numbers 6,113 that I cannot replicate.

3. It changes the crop


I have attached two screengrabs, the much more yellow version is the new one that is incorrect. 


My two current options are:

1. Flatten the colour work to do photoshop edits

2. Try to match photographers colour grade after work


Has anyone encountered this and have a solution?


This topic has been closed for replies.

4 replies

JohanElzenga
Community Expert
Community Expert
August 8, 2020

Is it that Lightroom presets are only created to be used on RAW files, and if you want to do work in Photoshop, you require a different adapted preset to apply that takes the tif file format into account?


It depends on the preset. Your preset should not change the white balance and your preset should not try to apply a profile. Other than that the differences are small and probably not important.

-- Johan W. Elzenga
Just Shoot Me
Legend
August 8, 2020

Short and Simple. The file that you get back from Photoshop is a Completely Different file than you send. 

A New Different File. If you sent a RAW what you get back is either a TIF or a PSD, depending on your settings in the LrC Preferences.

nickw62284179
Participant
August 8, 2020

Thank you for all of the responses - thay are all really helpful.


I am using the most up to date versions of Photoshop and LRC.


You're right that this instance isn't that challenging and I will find a solution in Lightroom here - and the best practice seems to be stay in Lightroom as much as possible. But I'm also thinking about when I do have more complex / creative retouching to do. 


Is it that Lightroom presets are only created to be used on RAW files, and if you want to do work in Photoshop, you require a different adapted preset to apply that takes the tif file format into account?


Regarding the point of importing into Photoshop first, I just tested this and I can't see how this would give a different outcome, as I'm still importing as a .tif and getting the same result?


DdeGannes
Community Expert
Community Expert
August 8, 2020

I am not experienced in the type of work you are doing but just a thought that the option to send the file using the option to send Smart-object Photoshop". See the screen capture.

Also, another thought, is the client and you using the same version of LrC?


See the link for more info.

https://lightroomkillertips.com/advantage-open-smart-object-photoshop/ 


Regards, Denis: iMac 27” mid-2015, macOS 11.7.10 Big Sur; 2TB SSD, 24 GB Ram, GPU 2 GB; LrC 12.5,; Lr 6.5, PS 24.7,; ACR 15.5,; (also Laptop Win 11, ver 24H2, LrC 15.0.1, PS 27.0; ) Camera Oly OM-D E-M1.
JohanElzenga
Community Expert
Community Expert
August 8, 2020

The problem is that you use develop settings from a RAW file and copy these to a TIFF file. A TIFF file has its white balance 'baked in', so any white balance adjustments in Lightroom are additional. That is why you see TEMP +16 and TINT +1. A RAW does not have a white balance yet, so here you set the white balance in degrees Kelvin. That is not the same, so copying these settings between the two images causes the color shift you see. Another thing that can cause differences is the profile. Again these are different for TIFF (which is RGB) and RAW. The best way to solve this is to learn how to do these edits in Lightroom. You do not need Photoshop to adjust a shadow. Lightroom is perfectly capable of doing that too.


The alternative is to not make a virtual copy and not reset the work the photographer did. Send the raw file to Photoshop so its edits are baked into the TIFF file. Then you can make your edits in Photoshop, and on return there is nothing you need to do further. All the edits are applied (but 'baked in', so all Lightroom sliders will be at zero and the original Lightroom edits cannot be changed anymore).

-- Johan W. Elzenga
DdeGannes
Community Expert
Community Expert
August 8, 2020

Thumbs up, Johan,

Regards, Denis: iMac 27” mid-2015, macOS 11.7.10 Big Sur; 2TB SSD, 24 GB Ram, GPU 2 GB; LrC 12.5,; Lr 6.5, PS 24.7,; ACR 15.5,; (also Laptop Win 11, ver 24H2, LrC 15.0.1, PS 27.0; ) Camera Oly OM-D E-M1.