- Home
- Photoshop ecosystem
- Discussions
- Background Eraser not leaving trace, not to transp...
- Background Eraser not leaving trace, not to transp...
Copy link to clipboard
Copied
So I shot against a green screen for some senior portraits (never do it again) and I am in the process of clipping my subjects. I am using the background eraser tool which is clipping nicely but it is leaving a smudge (for lack of a better term) around the entire area I erased. When I paste the clip into my digital background, I can see evidence of the tool. It worked yesterday just fine on test cuts from my son's shots. It has to be a simple setting. I have tried the reset tool and tinkered with tolerance etc.
 1 Correct answer
Hi
With such a nice clean background Select and Mask does a fine job in very little time.
In select and mask use quick select to do the bulk of the selection. Then go round with a small brush (I used 10px 100% hardness and 1% spacing) to paint on the edges of the hair - note this is only the edges and pick up the fine hair.
Output to new layer with mask and do not check decontaminate colours.
Add a new layer clipped to the masked layer and with blending mode set to colour. Paint round the edge usin
...Explore related tutorials & articles
Copy link to clipboard
Copied
It has to be a simple setting. I have tried the reset tool and tinkered with tolerance etc.
Or it has to be that some other technique might do a better job. Can you post your image here for us to see it?
Copy link to clipboard
Copied
I certainly will when I get back home to my PC. At work now. I will post a pre clip and post clip. Appreciate the support.
Copy link to clipboard
Copied
Hi
Can you also show the background you want to the images into. Sometimes the selection technique (particularly when it comes to refining the edge and removing edge colour) will depend on the new background
Dave
Copy link to clipboard
Copied
The background eraser is still an eraser, and something you should NEVER use in Photoshop. Select and Mask is a way better option and click Decontaminate colors to get all the green out... that stuff bleeds everywhere.
Copy link to clipboard
Copied
Double check the Hardness setting of the brush. If the brush is not at 100% Hardness then it will feather the edge. That said, I am not a fan of any tool that erases part of an image. Once pixels are erases, they are gone. A better option is to create a selection and use a layer mask. Try Color Range and then once the Layer Mask is added you can refine the mask.
Copy link to clipboard
Copied
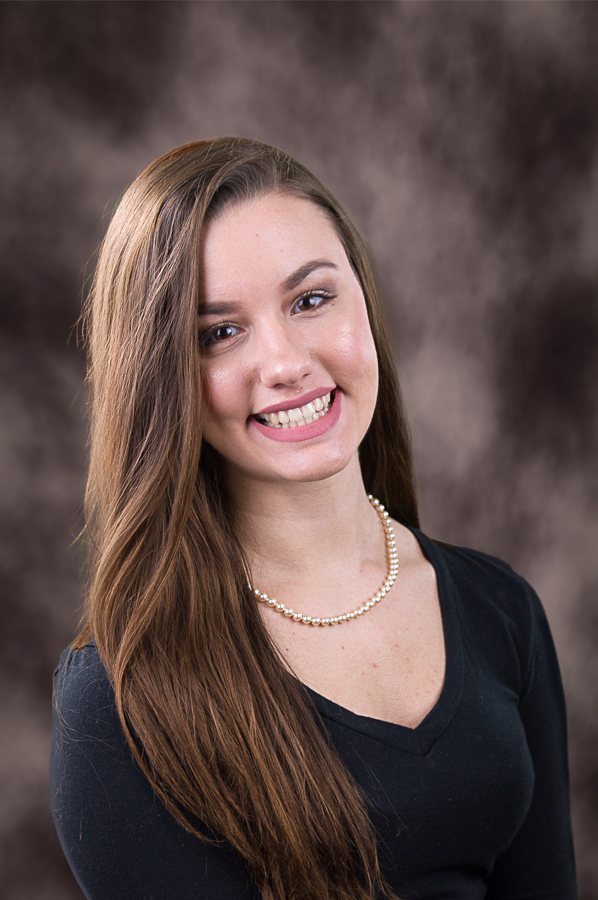
Thank you everyone for the replies. While I have experience in photoshop, I don't even pretend to have scratched the surface of knowing all of its intricacies. With that, as a photographer and frequent user of lightroom, I certainly know better than to destroy an image but all the content I found online about digital backgrounds, the background eraser tool specifically, was used more often than not. With that, I have attached 3 images. The original shot, the background and the edited photo against a blue backdrop which clearly shows the brush strokes. I fussed with the tolerance, I was using a hardness of 100 on the brush settings and even tried a mask but I am afraid my lack of experience in photoshop has left the ugly green bleed in the edited photo. Again, I will never use the green screen again. This is a friend but I do not want to have to call her back to re-shoot. I have successful outdoor photos but shame on me, was trying something new for the yearbook shot and a digital background and did not use a plan b just in case. These are cut down resolutions.
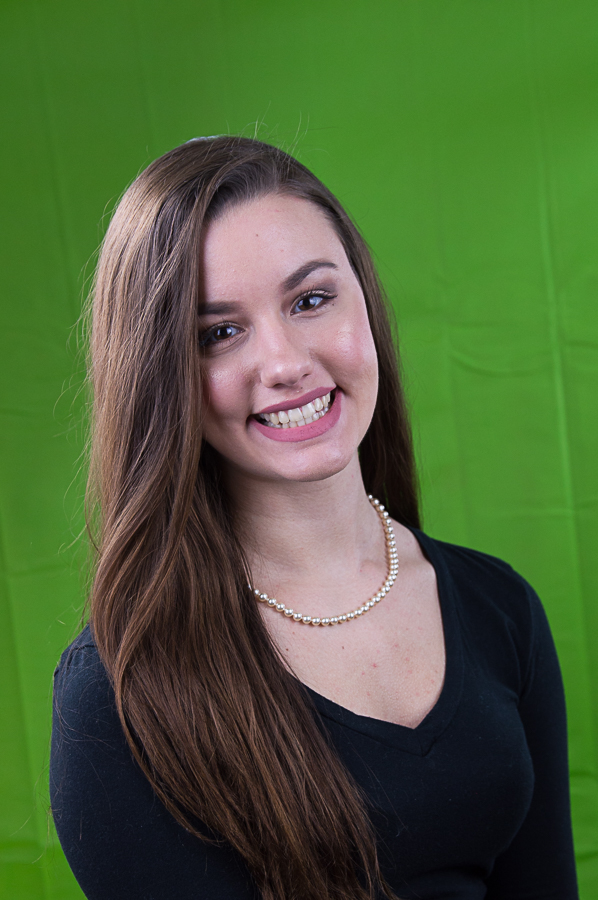

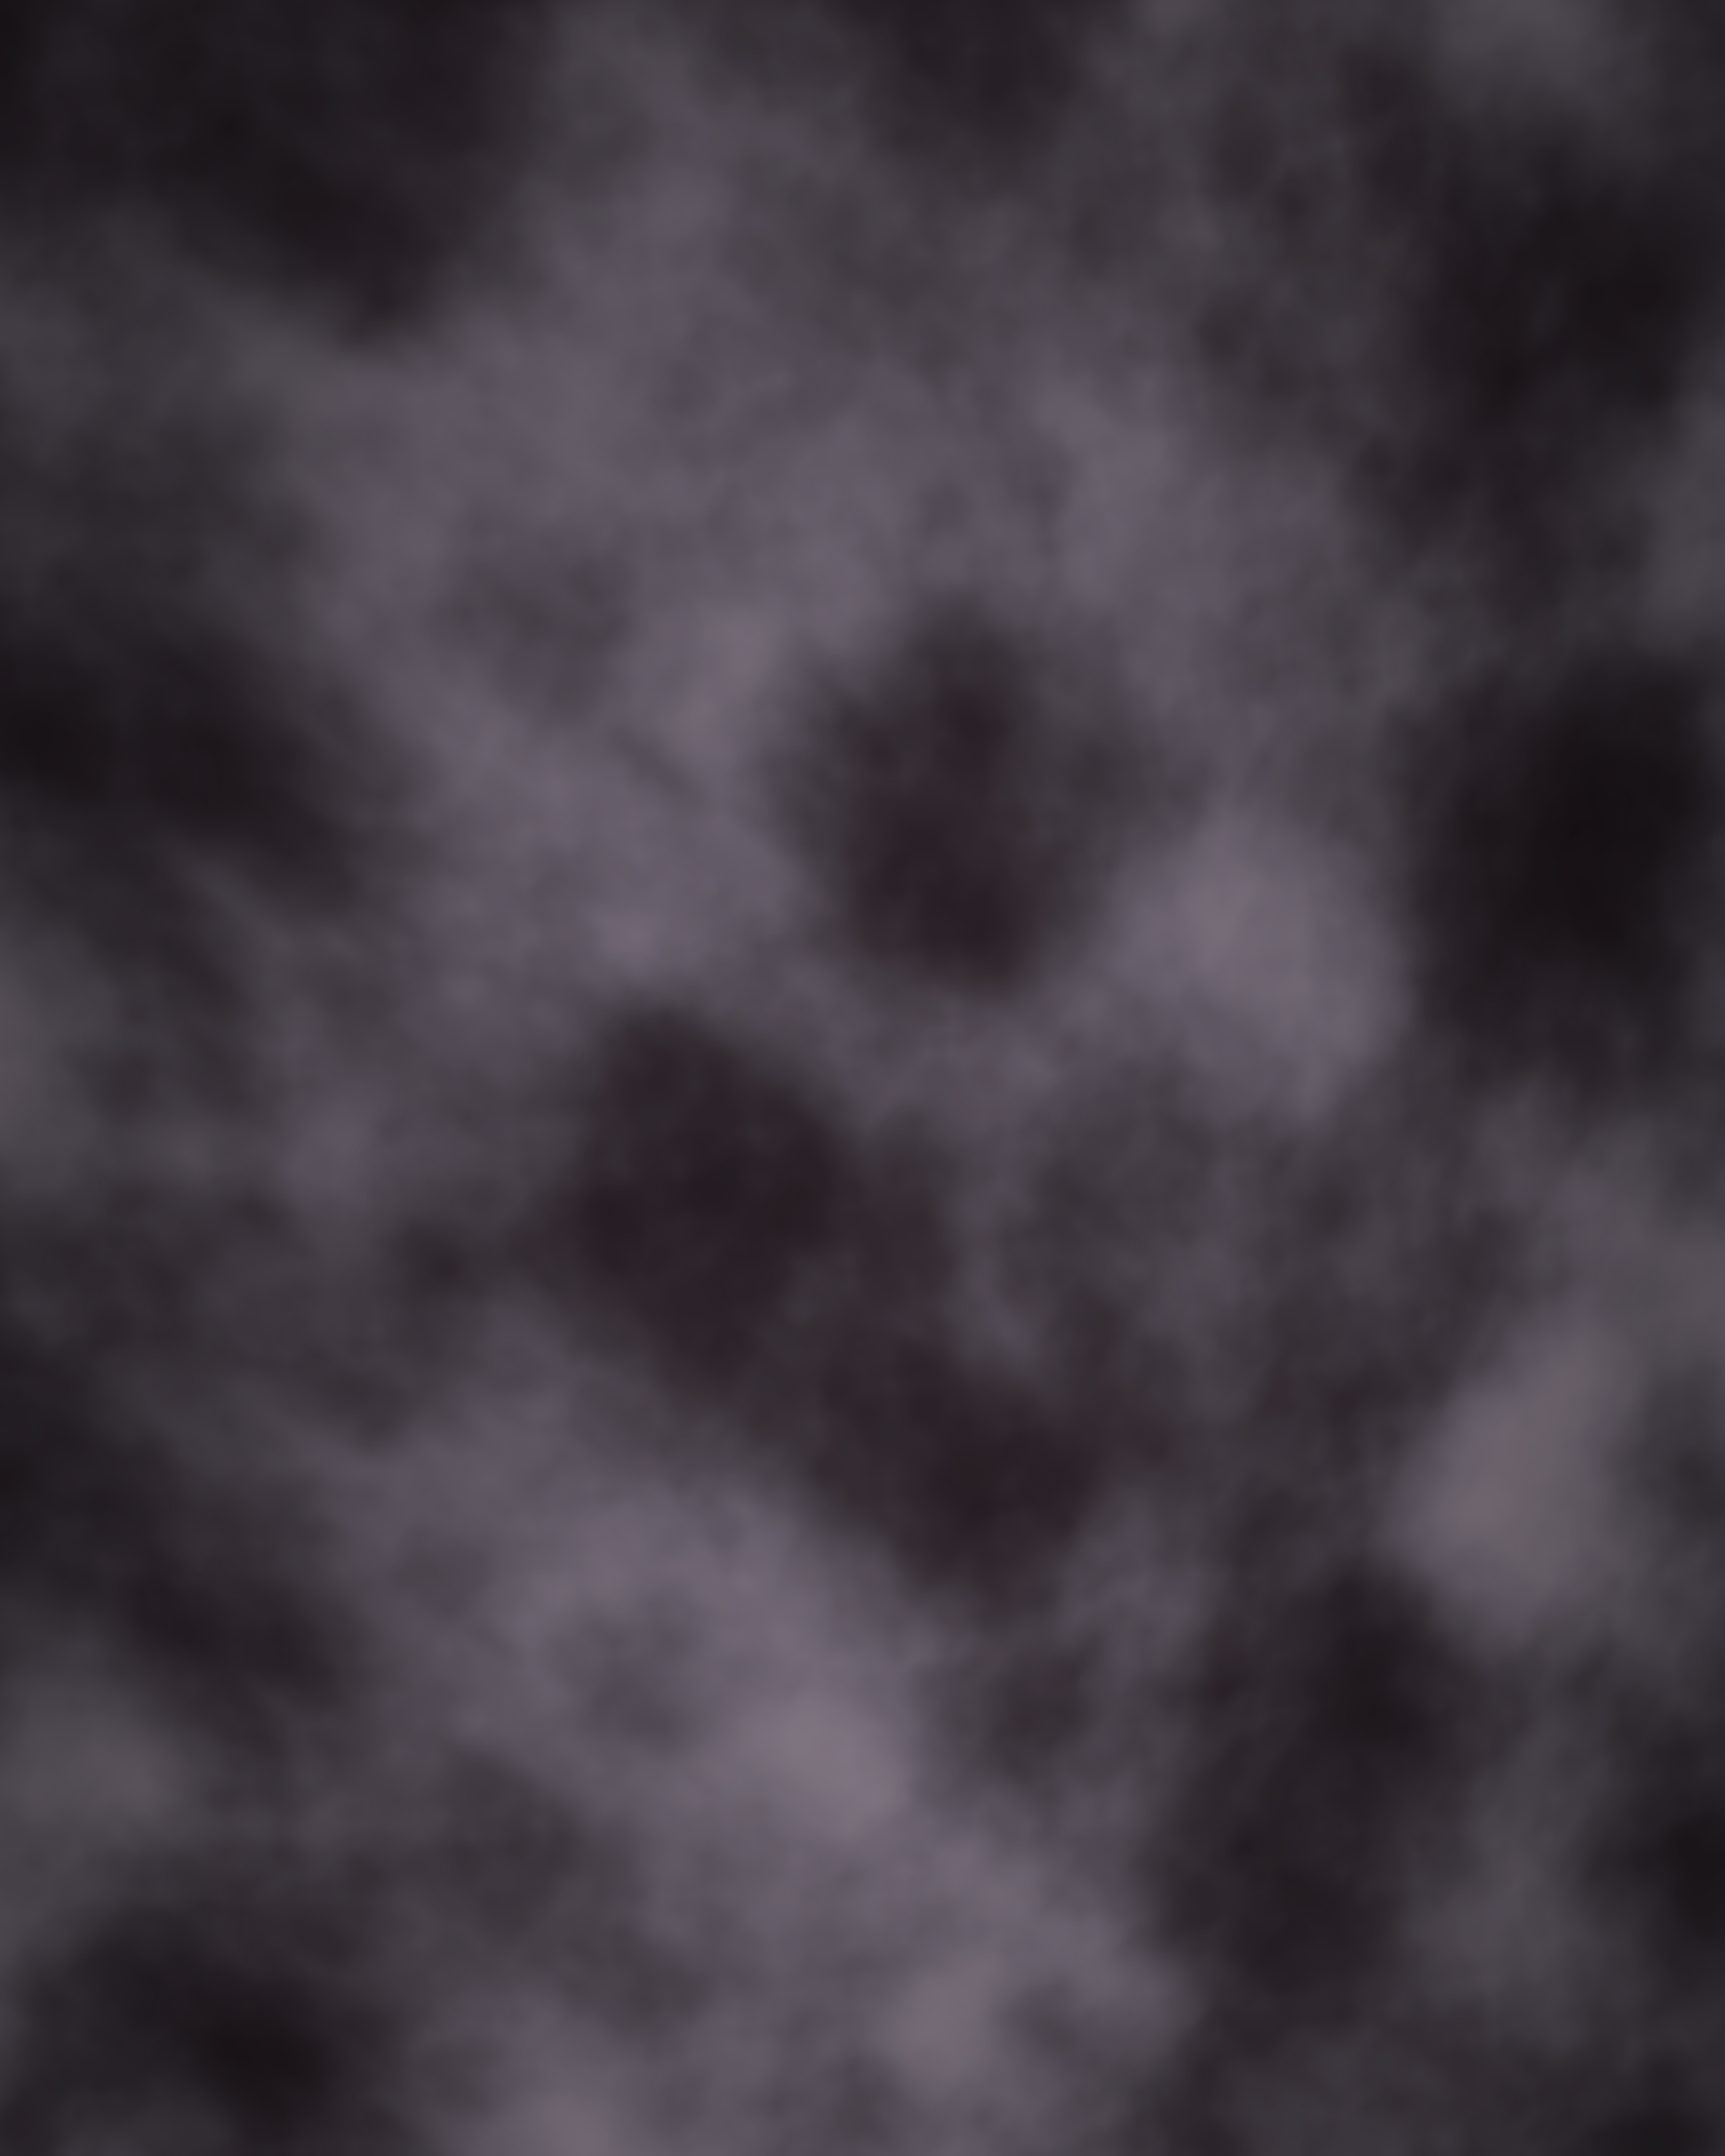
Copy link to clipboard
Copied
Oh, and I have not done any touch up work on this. This is all raw at this point. My main concern being that I cannot get a clean clip.
Copy link to clipboard
Copied
This is done within a minute with Quick Selection tool (select the green background and then inverse selection and hit create mask -button). Then use refine edge from Select-menu, hold down shift-key and select Select and mask. There you can tweak settings and use refine edge brush. That's all.
Copy link to clipboard
Copied
Hi
Green screen shooting is fine, but it it need to be lit the right way, the foreground subject need to be as far away from the background as possible, and lit the right way too. A Google search should give you the right technic for this.
Pierre
Copy link to clipboard
Copied
Hi
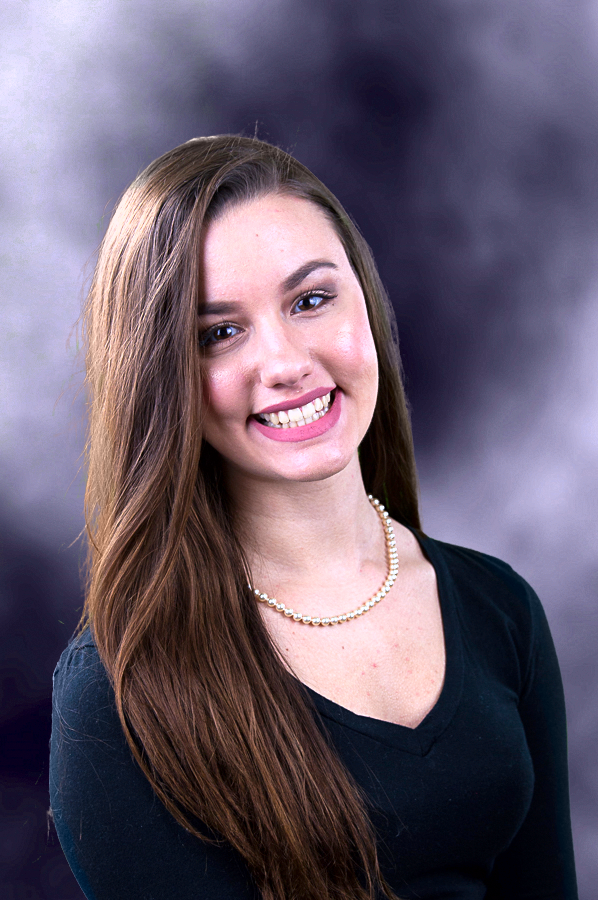
With such a nice clean background Select and Mask does a fine job in very little time.
In select and mask use quick select to do the bulk of the selection. Then go round with a small brush (I used 10px 100% hardness and 1% spacing) to paint on the edges of the hair - note this is only the edges and pick up the fine hair.
Output to new layer with mask and do not check decontaminate colours.
Add a new layer clipped to the masked layer and with blending mode set to colour. Paint round the edge using the same colour as the hair. This will take out the green.
Finally their was a bit of a light edge to the girl's top so I set another layer, clipped to the layer below) set to luminosity and painted the edges of her top with the top colour.
Finally insert your background as a layer.

I also increased the exposure ( the histogram showed it was under) and I warmed it slightly (but that is just me ![]() )
)
Dave
Copy link to clipboard
Copied
This is such a great edit. Pulling my hair out trying to replicate it. Because why, her hair...
Copy link to clipboard
Copied
My approach is different, as I don't care for the quick selection tools. Duplicate the original layer so you have a layer to work on without damaging the original. Change the image mode to L*A*B* then use the blend if slider to eliminate as much as the green as possible.

Then add a blank layer and merge that with the layer with the blend if correction. This will give you a layer with most the green cutout with transparency. Now lock the transparency. You can then use the clone stamp tool or paint brush tool set to color blend mode to paint over the green fringe areas.

Copy link to clipboard
Copied
That's such a nice method Chuck. It's interesting to contrast with Dave's method which seems to bring out finer hair detail, but I'd hate to say which is best as there are strengths in both techniques. With LAB you can really boost the colors far more than in RGB like below.
Copy link to clipboard
Copied
I guess a lot determineso what you're comfortable using. I haven't had a lot of success using the select tools, and find it spend more time trying them than just making other methods like channels. My example was quick and dirty, I wasn't trying to do the best job, just show the steps.
Copy link to clipboard
Copied
I really appreciate everyones efforts and responses. Photoshop has so much to offer and there is always different methods to achieve the same objective. So, I tried them all. The LAB approach which I had moderate success. I was able to reduce the layer to around 115 without starting to damage the remainder of the image. But could not get a satisfactory product with the paint or clone stamp tool. So I settled on the refine edge approach or what is now known as select and mask. So, after some google searches and a couple of you tube videos, I pain stakingly went through and mask then painted and again and again, but could not replicate the success they were having in the videos. And if I am being honest, it is really annoying that they make it look so easy and so damn good. But after several attempts, closing the file and reopening. I feel a little bit better but what is sticking in my craw is the detail work. I cannot make it look natural. It looks as if it a clump of brown. So after I have created my mask and start painting away, how do I tell photoshop not to touch the brown whisps of hair. Again, all of your help is sincerely appreciated.  _.png)
Copy link to clipboard
Copied
Hi
Did you follow the refine edge brush settings I suggested earlier (post 11) and ensure that you only painted on the hair edges.? Also did you ensure that you did not decontaminate colours? Using too large a refine edge brush and using decontaminate colours can result in the issues you are seeing.
Dave
Copy link to clipboard
Copied
I did but again, I am at work and it is very detailed work. Trying to rush through it. I am going to try again when I get home and have a cold one to steady the hand ![]() . So it is safe to assume you were zoomed in rather tight doing very intricate work.?
. So it is safe to assume you were zoomed in rather tight doing very intricate work.?
One thing I will say is when I see this, it makes me nuts. I followed it to the letter, which is the same as your approach and could not replicate the results.
How to Mask Hair Using Photoshop's New "Select and Mask" Feature - YouTube
Copy link to clipboard
Copied
The trouble with some of the instruction videos is that they use a high contrast image - dark hair - light background. Your image against the green was pretty good to be fair but still took a couple of minutes to go round with a small refine edge brush and with zoom at 100%.
One thought though - are you using the latest upgrade (CC2017.0.1). Select and mask has had a few improvements recently.
Dave
Copy link to clipboard
Copied
 When you used the blend if sliders, did you press the alt/opt key to split the sliders to feather the transition?
Copy link to clipboard
Copied
Chuck,
I did not. I missed that part. It did remove almost all of the green regardless but at a certain point, I started to lose the subject. I am back at both methods tonight. I have a 90 minute commute so getting settled in with a cold one is nice. I am going to tweak both right now. I am hell bent on being able to rely on photoshop for my photography and not just lightroom.
-Shawn
Copy link to clipboard
Copied
Chuck, game changer. The split slide pretty much removed all of the green. Very little brush work left to do. Again, probably due to my lack of experience but the only issue I had was the inabilty to save this as a JPEG. I could only save this as a lab quality print such as JPEG 2000 or TIFF which are really high resolution. I have a snippet of it plus the image I converted back to RGB. I also made some curve adjustment and luminosity tweaks based on Dave's comment. I really liked the brown background against her hair.
The RGB first..
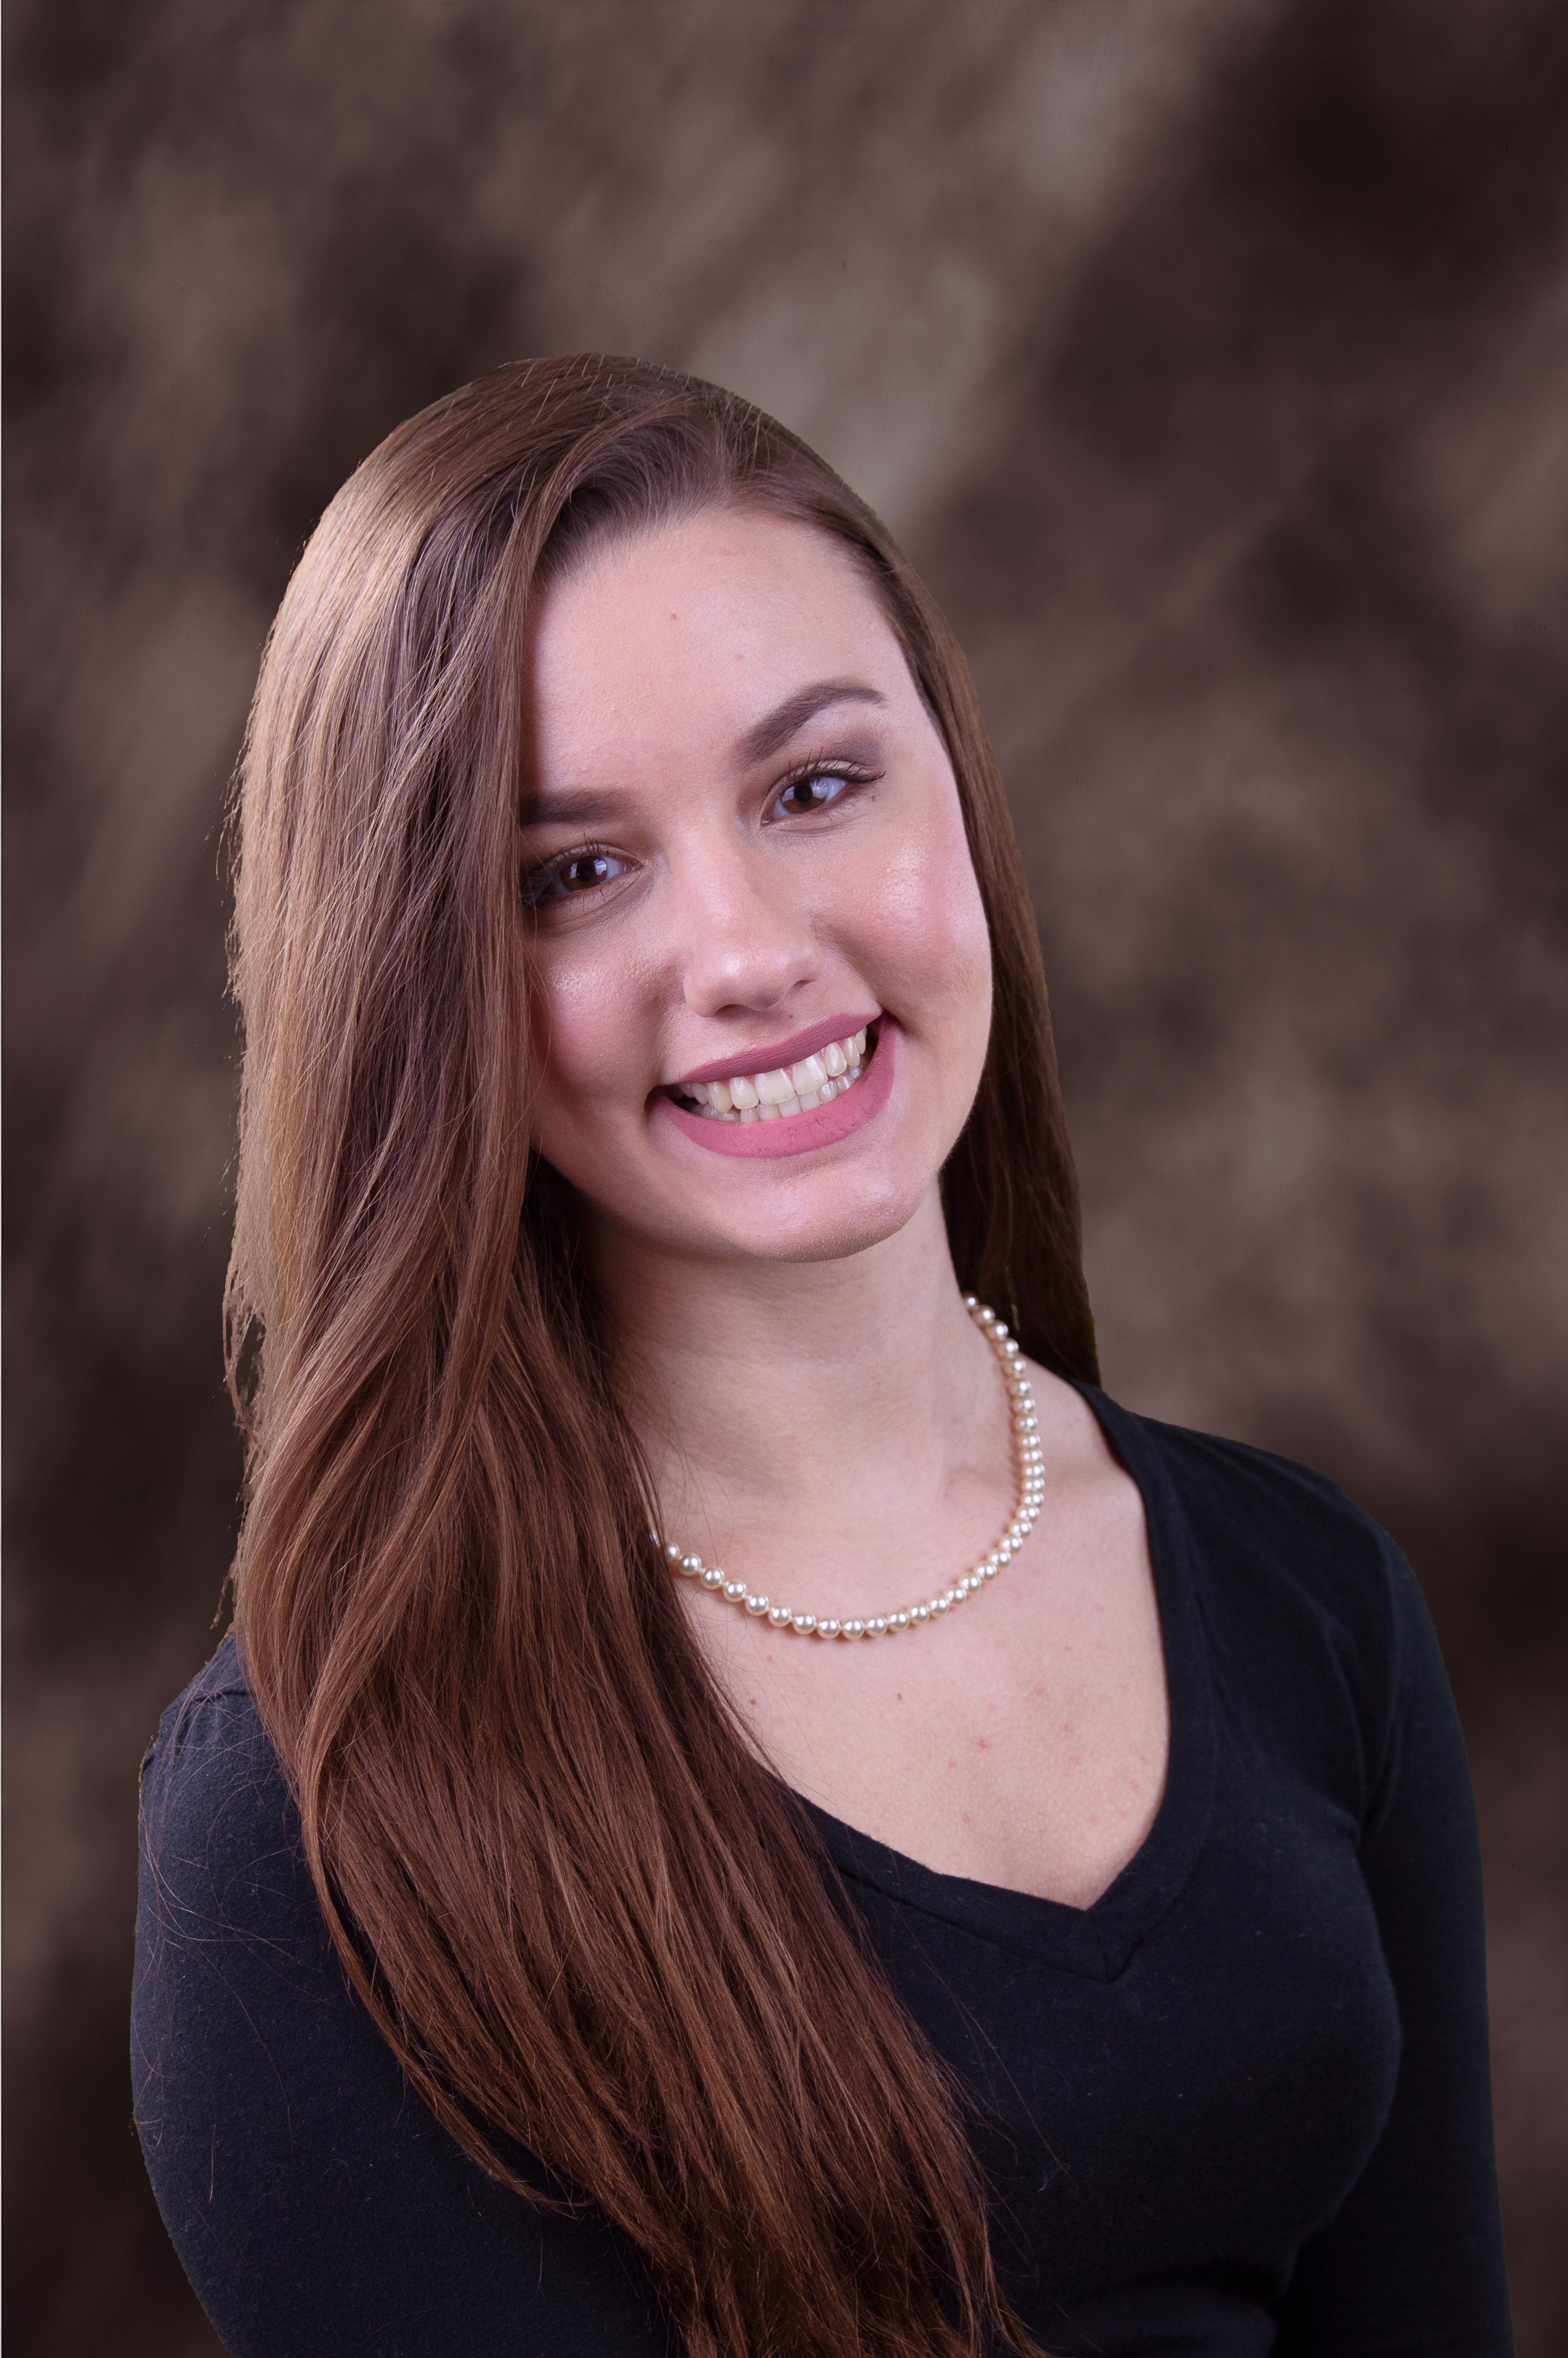
A snippet of the LAN Photo as the reso was way to high to upload here.
 _.png)
EDIT: Upon second look, I did lose some of the finer detail of the strands of hair as I may have gotten a little loose with the slide. But, all in all, I will take it.
So, I do have to ask, what does the background eraser tool not remove all the pixels and leaves the blurs behind. I have so much to learn about how photoshop works.
Copy link to clipboard
Copied
The background eraser tool was designed to sample an area and to not erase parts of the photo that didn't match, kind of a tolerance thing, so since your green screen was a bit uneven in density etc, it only erased parts. It's an old tool, and there are much better ways to remove a big. I took a class years ago, where the instructor had us use it. I thought it was a bit useless back then, and still do.
Copy link to clipboard
Copied
Very few applications other than Photoshop support LAB mode so there is little point in being able to save as a jpeg or png with that colorspace. This is changing a little as the new Affinity Photo supports 16 bit LAB and as it is such a terrific colorspace to use it is only a matter of time before more apps support it. You therefore need to think of LAB as a working space that you convert at the end of your workflow to RGB
Simply change from L*A*B to RGB
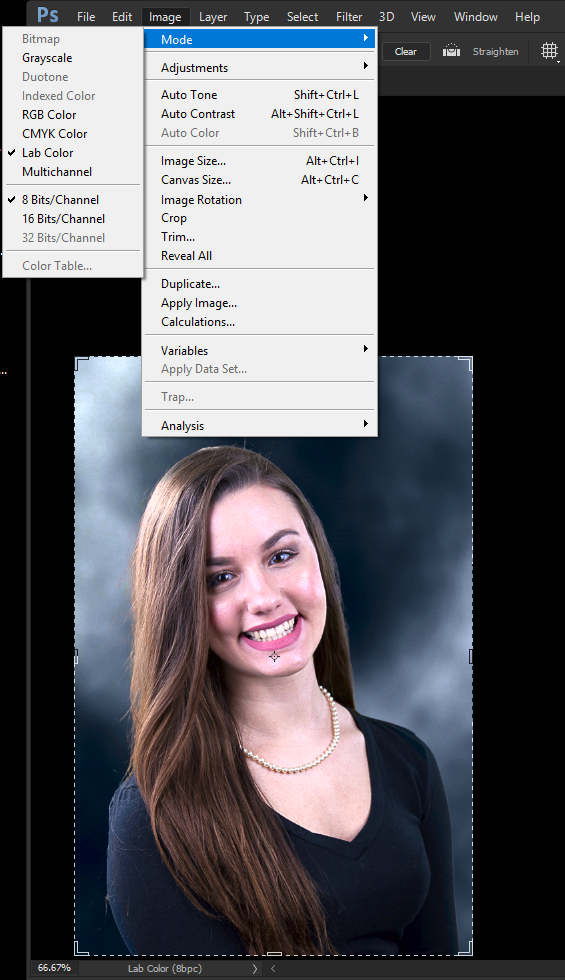
You will then find all the familiar file formats become available
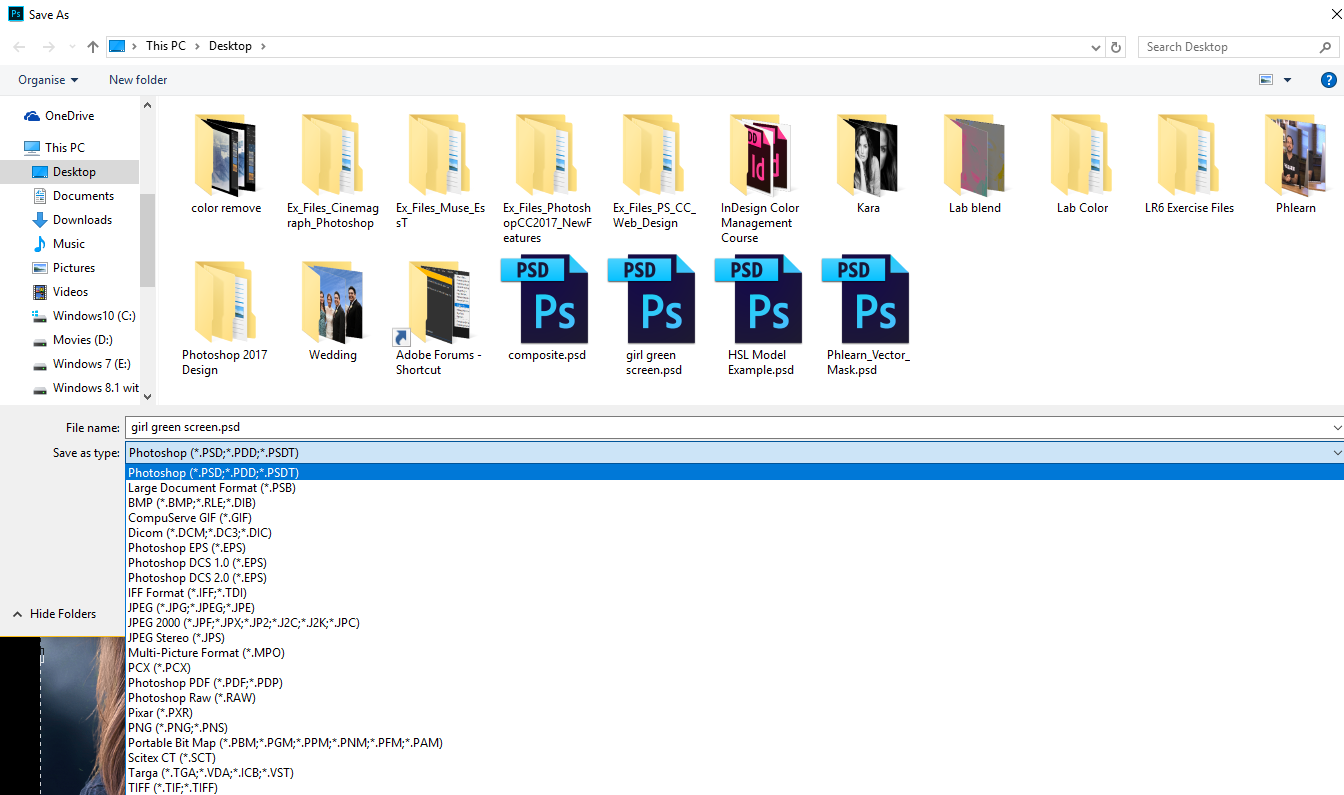
There is a downside though because the L*A*B colorspace is the biggest of all the colorspaces ie sRGB, Adobe RGB (1998) even Prophoto RGB are significantly smaller and this does result in some clipping when converting to RGB. Most people though feel the advantages of L*A*B outweigh the effects of the clipping which can be barely discernible sometimes.
It is important to note that LAB mode doesn't allow the assignment of an embedded profile. As you can see below the relevant box is greyed out in the Save dialog. The reason for this is L*A*B only supports on color profile due to Photoshop supporting only one specific variant of LAB. In RGB many variants of RGB are supported sRGB, Adobe RGB, Prophoto RGB. If you need further explanation Dag Fosse has forgotten more about colorspaces and management than I ever knew and I'm sure he will chip in and help.
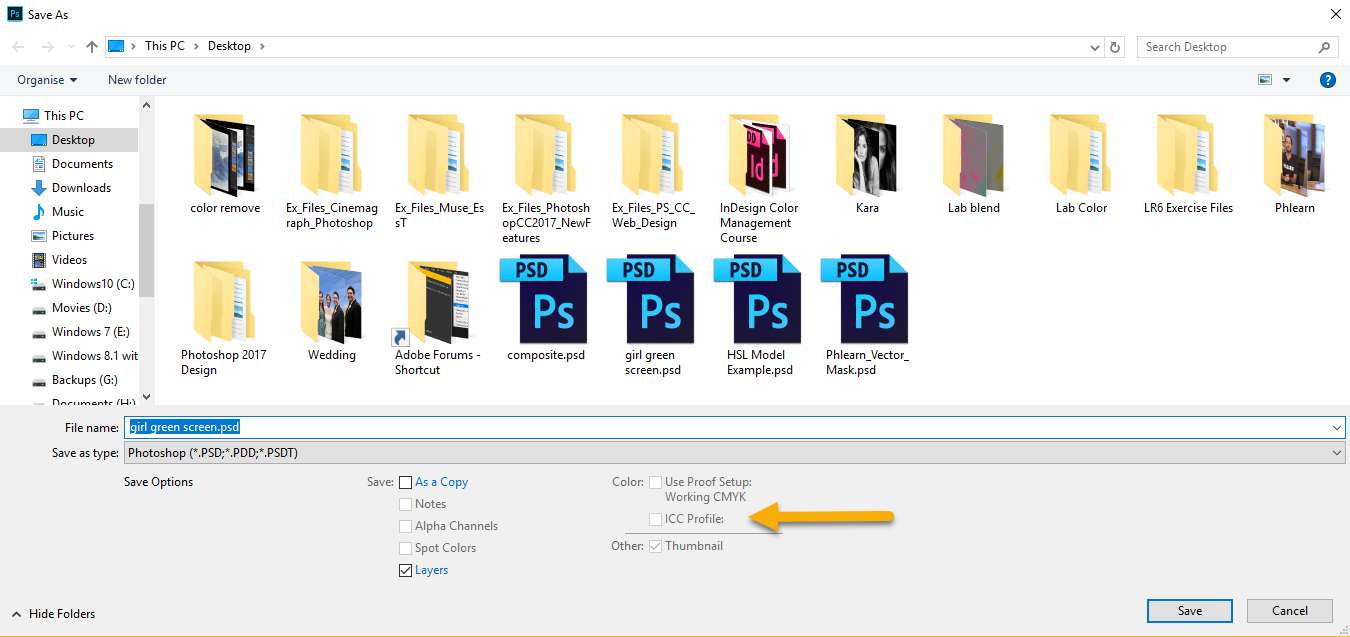
Of course once back in RGB you can save with your preferred color profile embedded as with any other file.
Copy link to clipboard
Copied
You can always make a duplicate files and just convert that to L*A*B, and just create the maskin, then import the mask into the RGB file. I do that all the time also, so I don't tamper with the original file'size color profile.
-
- 1
- 2
Find more inspiration, events, and resources on the new Adobe Community
Explore Now