

- Home
- Photoshop ecosystem
- Discussions
- Batch HDR Merging/Toning Script
- Batch HDR Merging/Toning Script
Batch HDR Merging/Toning Script

Copy link to clipboard
Copied
I've seen a number of different posts on these forums about trying to do this and I never really found a complete and suitable solution. It also has really annoyed me that adobe never implemented this (and it's not possible to do with actions because the action just runs a script and you can't record the HDR toning settings, the dialog always pops up, its in the script). So I finally had some time to get my hands dirty with ExtendScript and I have created a fully featured script complete with UI that allows batch creation of HDR tonned images in photoshop.
The code I got working from various snipets of code I found around the 'net and single stepping through the MergeToHDR.jsx script that is built into photoshop.
This has only been partially tested on photoshop CC on a mac. Hopefully I made it portable enough and it will work on windows and older versions. I don't think the MergeToHDR script has changed much in the last several versions (and that is mainly what I call to do the work) so I think it should work. If you have issues please let me know.
My motivation for this script was coming up with a way to do batch HDR toning for timelapse and so this script's features lean toward using it for that end. I really didn't want to buy another separate program for doing this like photomatix, when I knew it should at least be possible to do in photoshop.
I uploaded the script to github:
https://github.com/davidmilligan/PhotoshopBatchHDR/blob/master/Batch%20HDR.jsx
How to use:
- Drop the script in the '[photoshop folder]/presets/scripts' folder and restart photoshop if it is already running.
- The script should appear as a menu item under File>Automate>Batch HDR...
- A dialog will appear where you specify all the settings for the batch
- Input Section:
- Click browse and select the source folder that contains the images to be merged/toned
- Specify "Number of Brackets" this is how many separate images to group into a single HDR output image (the script will group the images in the source folder in order based on this parameter). You can use a value of 1, which means each image in the source folder is separate and will be toned and output. (I find that many times when shooting RAW, 14 bits is ample to capture the full dynamic of the scene, so I do not waste storage space and shutter acutations using more than one exposure, just make sure to ETTR, also post-processing with this script will be faster)
- If there are other files in your source folder (for example .xmp files) that you need to exclude you can specify a filte. For example: *.cr2
- Typically for timelapse you are using a tripod and do not need to have photoshop align the images, but I provided that capability for anyone who might need it b/c it was easy to enable. Note that enabling this will make the process MUCH slower.
- Toning Section:
- These settings are all the same as the photoshop HDR toning dialog for "Local Adaptation"
- To preview what your toning settings will look like you can select any file(s) in your sequence by clicking "Select File(s)..." under "Preview". The file(s) you select will open and merge (if more than one file). When that's finished you can click the "Update Preview" button to apply the current toning settings and see what they will look like (I can't do the fast, automatic previews like the builtin dialog, sorry - somebody from adobe want to show me how to do this?)
- You can see what the settings will look like at another point in your sequence by clicking the "Select File(s).." button again. (I recommend previewing a shot near the beginning, middle, and end of your sequence)
- The dialog prevents you from using anything in photoshop while its open so I provided a zoom to allow you to zoom in on the preview
- The tone curve you must enter as a comma separated list of points (sorry, ScriptUI is not really adequate to create the graphical histogram overlay for the curves like in the builtin dialog). The points are grouped into x,y pairs so for example: x1,y1,x2,y2,etc. Typically you will start with 0,0 and end with 255,255 (note that 255 is the max, full white). Like the curves tool, x represents the input and y represents the output
- Output Section:
- Click browse and select a folder for the script to save the output files to
- The rest of this section should be self explanitory. NOTE: If you select to output 32bit files, the toning will not be applied, the files will simply be merged into a 32bit HDR image and saved.
- Once you have specified the input and output folders the OK button should be enabled, when you are ready, click OK to start the process
- Go watch a movie or take a nap, this is going to take a while. The script will display a progress window showing you how far along the proces is (the photoshop progress windows may occasionally appear on top of it, I usually just move them up a little so I can see both)
Limitations:
- Only the local adaptation method is supported. It's really the only one I ever use, and I didn't really feel like implementing the other ones, but feel free to modify the script yourself to add this support
- You canot load or save presets from the builtin toning dialog. The format of the preset files is binary and would require reverse engineering of the format and it would be very difficult to read to the files in javascript anyway. If it were xml, it would be much easier, alas it is not. Feel free to grab a hex editor and do this yourself. For now you'll just have to copy all of the values of a preset by hand into the dialog if you want to use a preset. If I have more time this is something I might work on.
- Preview is slow because it has to do the actual full toning, I don't know a way to do the fast real time previews like the builtin dialog.
- I don't think the "Cancel" button on the progress window really works, once running, the script is too busy to register a click, anybody know how I might fix this?
- There may potentially be some ways to improve performance of this script in certain scenarios, IDK, but I'm just glad it works

You're welcome Adobe, you can send me a check at:
[REDACTED]
[REDACTED]
[REDACTED]
Please hit me up with comments/suggestions,
David


Explore related tutorials & articles
 76
Replies
76
76
Replies
76

Copy link to clipboard
Copied
Did you read this thread. How to use the script. The limitations etc. The first thing in this thread. I do not create HDR images so I know nothing about the process.
How to use:
- Drop the script in the '[photoshop folder]/presets/scripts' folder and restart photoshop if it is already running.
- The script should appear as a menu item under File>Automate>Batch HDR...
- A dialog will appear where you specify all the settings for the batch
- Input Section:
- Click browse and select the source folder that contains the images to be merged/toned
- Specify "Number of Brackets" this is how many separate images to group into a single HDR output image (the script will group the images in the source folder in order based on this parameter). You can use a value of 1, which means each image in the source folder is separate and will be toned and output. (I find that many times when shooting RAW, 14 bits is ample to capture the full dynamic of the scene, so I do not waste storage space and shutter acutations using more than one exposure, just make sure to ETTR, also post-processing with this script will be faster)
- If there are other files in your source folder (for example .xmp files) that you need to exclude you can specify a filte. For example: *.cr2
- Typically for timelapse you are using a tripod and do not need to have photoshop align the images, but I provided that capability for anyone who might need it b/c it was easy to enable. Note that enabling this will make the process MUCH slower.
- Toning Section:
- These settings are all the same as the photoshop HDR toning dialog for "Local Adaptation"
- To preview what your toning settings will look like you can select any file(s) in your sequence by clicking "Select File(s)..." under "Preview". The file(s) you select will open and merge (if more than one file). When that's finished you can click the "Update Preview" button to apply the current toning settings and see what they will look like (I can't do the fast, automatic previews like the builtin dialog, sorry - somebody from adobe want to show me how to do this?)
- You can see what the settings will look like at another point in your sequence by clicking the "Select File(s).." button again. (I recommend previewing a shot near the beginning, middle, and end of your sequence)
- The dialog prevents you from using anything in photoshop while its open so I provided a zoom to allow you to zoom in on the preview
- The tone curve you must enter as a comma separated list of points (sorry, ScriptUI is not really adequate to create the graphical histogram overlay for the curves like in the builtin dialog). The points are grouped into x,y pairs so for example: x1,y1,x2,y2,etc. Typically you will start with 0,0 and end with 255,255 (note that 255 is the max, full white). Like the curves tool, x represents the input and y represents the output
- Output Section:
- Click browse and select a folder for the script to save the output files to
- The rest of this section should be self explanitory. NOTE: If you select to output 32bit files, the toning will not be applied, the files will simply be merged into a 32bit HDR image and saved.
- Once you have specified the input and output folders the OK button should be enabled, when you are ready, click OK to start the process
- Go watch a movie or take a nap, this is going to take a while. The script will display a progress window showing you how far along the proces is (the photoshop progress windows may occasionally appear on top of it, I usually just move them up a little so I can see both)
Limitations:
- Only the local adaptation method is supported. It's really the only one I ever use, and I didn't really feel like implementing the other ones, but feel free to modify the script yourself to add this support
- You canot load or save presets from the builtin toning dialog. The format of the preset files is binary and would require reverse engineering of the format and it would be very difficult to read to the files in javascript anyway. If it were xml, it would be much easier, alas it is not. Feel free to grab a hex editor and do this yourself. For now you'll just have to copy all of the values of a preset by hand into the dialog if you want to use a preset. If I have more time this is something I might work on.
- Preview is slow because it has to do the actual full toning, I don't know a way to do the fast real time previews like the builtin dialog.
- I don't think the "Cancel" button on the progress window really works, once running, the script is too busy to register a click, anybody know how I might fix this?
- There may potentially be some ways to improve performance of this script in certain scenarios, IDK, but I'm just glad it works

Copy link to clipboard
Copied
Oh thank you for this, sorry been traveling on a shoot and everything just
came in. I'll look into all of this once I'm at a computer! Thank you again!

Copy link to clipboard
Copied
Thank you for creating this amazing script. I do have one issue with it and it is most likely due to my naming of the files.
I renamed my files from 1234.rw2 to 4_Cresent (1).rw2, (2).rw2 etc....
So when i run the batch it is grabbing them out of order and grabbing 1, 10, 100, 2, 20, 200 as my batch instead of 1,2,3,4,5,6.
Is there a line i can edit in the script to help me out...or is there a way i can rename all my files so that it will not happen. I rename them right away when i am back in the office so i don't misplace them and can easily find the right file via a search if need be.
Thanks in advance.

Copy link to clipboard
Copied
It is the operating system and/or the general system settings which determine how numbers are treated in the sorting order.
Probably the easiest would be to rename the fields, so that a sufficient number of leading zeroes are in the name (such as "001", "002" etc. if the biggest ordinal number is less than 1000).
HTH.
Copy link to clipboard
Copied
It look like the script uses your directory file list to builds lists of groups of files to merge to hdr a current file list array. The current file list is passes to Adobe mergetohdr function in Adobe's merger to hdr pro script that is install in Photoshop. If the groups pass contain the correct files but in the wrong order you could add a routine to sort the array before passing it to mergetohdr. You would need to create the compare function for the sort. Array.prototype.sort() - JavaScript | MDN
Copy link to clipboard
Copied
I got it to work but i do have an issue with workspace vs Camera Raw.
When i manually use the photoshop merge to hdr i have no issues and i create the merge as a 32 bit before editing in ACR
But when i use your script to create any of the 32 bit versions my workspace is completely different vs Camera RAW version. What variable in the script would be cause this as seen by my images below.
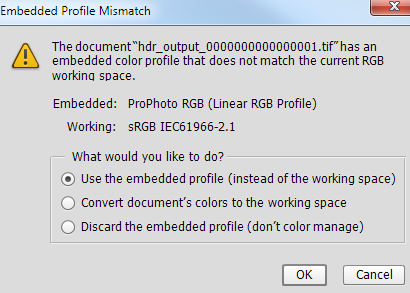
I tried all file version in your GUI and tried all 3 different options when opening in PS. I see that your script is creating the file as a ProPhoto RBG instead of using the photos embeded SRGB. Is there a way to create the hdr using embeded profile instead of the ProPhoto which is most likely the issue. And yes, i have tried all 3 different ways to import from using your embeded phophoto to converting to working color space with no changes to the behavior.
ACR view
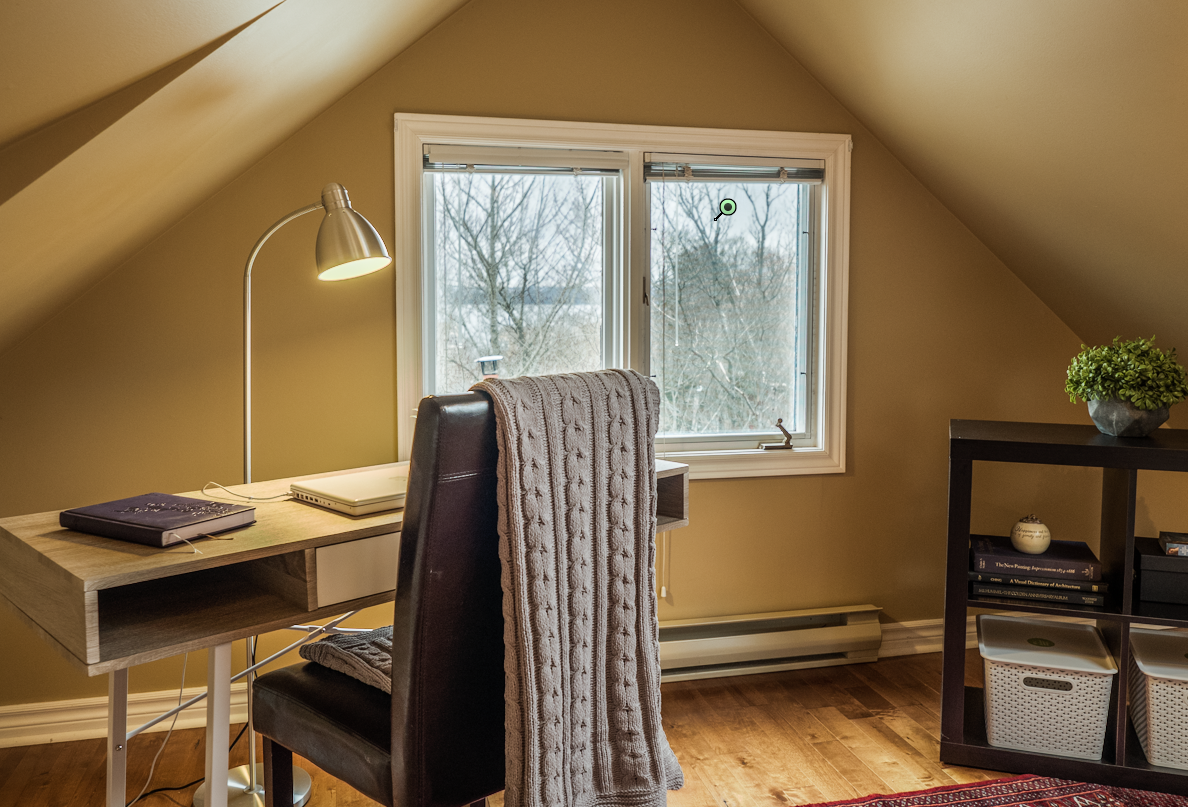
Workspace view

Copy link to clipboard
Copied
Flash_Ghost wrote:
I got it to work but i do have an issue with workspace vs Camera Raw.
When i manually use the photoshop merge to hdr i have no issues and i create the merge as a 32 bit before editing in ACR
But when i use your script to create any of the 32 bit versions my workspace is completely different vs Camera RAW version. What variable in the script would be cause this as seen by my images below.
I tried all file version in your GUI and tried all 3 different options when opening in PS. I see that your script is creating the file as a ProPhoto RBG instead of using the photos embeded SRGB. Is there a way to create the hdr using embeded profile instead of the ProPhoto which is most likely the issue.
If the source image files in your folder are RAW files they have no color space. They are not RGB image files its image is a mosaic of RAW sensor data. Photoshop ACR Plug-in can convert the RAW data into an RGB image in any color space you desire in 8bit or 16bit color depth. Which color space ACR will convert the RAW data into depends on the RAW file ACR settings. If the RAW files have no ACR settings you current ACR Workflow options will be used. What Are your current ACR Workflow settings?

Copy link to clipboard
Copied
My ACR settings are set as follows.

If i were to open the RW2 file directly in PS i am presented with the ACR editor which i usually just hit the 'open object' button. The image will look the exact same in the photoshop workspace as the ACR editor preview. Same thing when using the merge to hdr in photoshop....everything matches up perfectly.
This is why i feel you have logic in your script that is changing something along the way when merging the files.
Copy link to clipboard
Copied
The only thing I saw in his script about color profiles was that it save option in the Tiff and Jpeg file saves functions color profile will be embedded the saved files. Now his script uses Adobe Merge to HDR script which also most like use Adobe Stack mode scripts. All his scripts seem to do is create file list that it passes to Adobe merge to HDR. His script does not even open your image files into Photoshop. It just save the active document that was create by Adobe Merge to HDR. Are you sure yor did not have files in in you source image folder the have ProPhtoRGB profile or RAW file the have ACR setting to sets ProPhotoRGB for the conversion.
There does not seem to be any Color Profile preamater passed to Adobe's merge to hdr just a file list, use alignment and hdr deghosting. It think the ProPhotoRGB files are in you source image files folder.
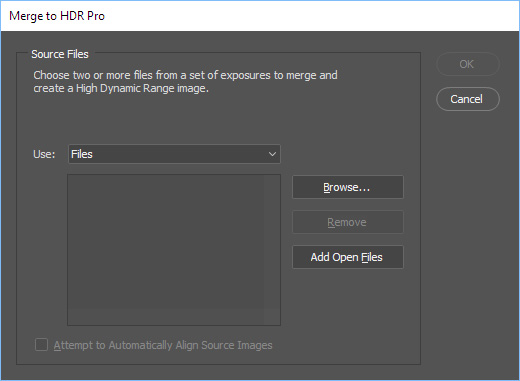
Here is how his script uses Adobe script:
mergeToHDR.mergeFilesToHDR( currentFileList, mergeToHDR.useAlignment, hdrDeghosting );
Copy link to clipboard
Copied
I know it is very bizzare. Same images i have already processed and was using them to test the script out. Been using merge to hdr for hundreds of sets of photos.
Since using my camera i have it set to SRGB since day one. I verified the settings and did a test image today with the same results. The popup while opening up the merged file using the script states that color profile embeded is proPhoto.
I will do some more testing by using align and deghosting which i did not use in the import settings when using the script.
I will keep you posted.
Thanks for taking the time to reply back!
Copy link to clipboard
Copied
If you shoot RAW convert the RAW files into RGB Images in the sRGB color space in 16Bit color depth and save out Tiff file that you verify have embedded sRGB color Profiles the process then sRGB Tiff files with the BATCH merge to HDR script. I can not find any code in that script that would convert image in one color space to some other color space. I see code in Adobe merge to Hdr script that check that image documents have a Color profile that is a valid PS available one,. It dupes the document and checks that document has a color space a good one known by Photoshop and punts if not. The duped document is removed. RAW Files have no color space and RAW converters can convert RAW data into RGB images in any color space. Process convert RGB Image files that you known have sRGB embedded color profiles.

Copy link to clipboard
Copied
You may want to contact the author of that script. They created it years ago. I do not know anything about creating HDR images I have no desire to create them. I just looked ate the script because some one was having a problem with it. All I can write is the script does not seem to do anything but create image lists and pass them to functions in Adobe's Merge to HDR script. Perhaps additional option setting need to be pass along with the file list to get the results you want. However the only option I sell in Merge to HDR script's dialog is a checkbox for attempt to align images. All the the script seem to need is a file list. Now I have no idea if the files in the list must meet some list of requirements. I would not expect that there would be and differences in the results it he used the right Function in Merge to HDR script. The Merge to HDR script is a complex script the uses at lease four other Adobe Photoshop Scripts. It only seems to have one function to be used by other scripts had function to be use from lightroom and Photoshop as well. So I would think the the batch hdr script is using the correct function ant there are only the three parameters. The File list, Alignment and ghosting options. I do not even see a deghosting option in Merge to HDR script's dialog. and I see the script seems to set other merge to hdr settings the are not in the function interface. With your knowledge you many know what they may do.
This is what I see in Merge to HDR script an array and two flags.
// Function to call from scripts
mergeToHDR.mergeFilesToHDR = function(filelist, alignFlag, deghostFlag)
In his batch merge to hdr script I see things you may want or need to change that may effect the way merge to hdr script creates the hdr documents. the seem to be internal setting not in the function interface the the Batch hdr script set to its defaults. Ther is one the seems to be for ACR toning
//default settings:
mergeToHDR.useAlignment = false;
mergeToHDR.useACRToning = false;
mergeToHDR.mergeFilesToHDR( currentFileList, mergeToHDR.useAlignment, hdrDeghosting ); use hdr script
//mergeToHDR.useAlignment = true; this has been commented our
alignCheckBox.value = mergeToHDR.useAlignment;
alignCheckBox.onClick = function() { mergeToHDR.useAlignment = alignCheckBox.value; };
mergeToHDR.outputBitDepth= 32;
mergeToHDR.mergeFilesToHDR( selectedFiles, false, -2 ); use hdr script
Copy link to clipboard
Copied
Figured out what my issue is.
It seems that my workspace 32 bit preview options are out of sync with ACR only when importing a file created with the script in 32bit format.. If i change them to Exposure +0.00 and Gama +1 it is fine and bang on,,,,but it seems that every one of the Tiff files created under the scripts 32 bit causes my preview options to jump all over..sometimes as high as +3 exposure.
I again tested using the same 5 files to merge both using the script and manually using the merge to hdr and sure enough the created files when opening them back up in PS cause my 32 preview options to be jumping around...must be trying to auto adjust exposure.
Is there a way to turn off Preview options or keep them static to match the ACR preview settings?
Copy link to clipboard
Copied
I do not create HDR images and have no idea as to what preview you are referring to. Why is there a Preview in a batch process IMO a Preview kills a batch process it no longer a batch process it requires human intervention to continue the process.
Copy link to clipboard
Copied
In your workspace, if viewing a 32bit image you go under View, 32bit preview and there is where you can adjust the workspace exposure and gamma. Its for 32bit images since no monitor can display 32bit images.
I found this remark online regarding the 32bit images and why their preview (workspace) view is completely different than the ACR view.
"The initial 32-bit preview you see may look too light or too dark because of the differences in bit depth. A 32-bit image will have a tonal range that exceeds the tonal range of a 24-bit monitor making the preview impossible. To compensate for this inevitable problem, Photoshop has provided a preview adjustment feature that re-maps the image values to fall within the range of viewable pixels. These Preview settings are stored within the file and will be applied every time the image is opened in Photoshop. "
So in short..yes, the files created by the script file do contain the exposure and gamma preview settings for PS to use for your workspace. I will see if in the script file there is a way to hard code them to 0 exposure and 1 gamma instead of coming up with its over value that is throwing things off between workspace 32bit preview and the ACR preview.
Copy link to clipboard
Copied
Thank you foe letting me know what you found. I may remember that. I may not I never use 32bit mode I do not create HDR images.

Copy link to clipboard
Copied
Awesome work by everyone involved. Plugged in and voila, it just worked as advertised. Excellent job!!

Copy link to clipboard
Copied
Awesome stuff thx!!!

Copy link to clipboard
Copied
HI, is any updates needed no for CC2018?
I installed it, make my settings and it just go back to PS without doing anything.

Copy link to clipboard
Copied
There's a change from CC2017 to CC2018 in the original script. When you create a 32bpc image, in CC2018 it now insists you go tone your image in ACR after creating the HDR - the "OK" button changes into "Tone in ACR", iirc. So after creating the image, Photoshop will also show ACR. You can cancel that and keep your 32bpc image, or tone it and get a 16bpc image. Personally I want the untoned 32bpc so I can then import them into Lightroom and edit them from there.
Does this have any effect on the Batch HDR script?
Copy link to clipboard
Copied
Other question: is it possible to save HDR images using a specified naming scheme, and specified file format & options?
Personally I want something like _4500101.CR2 ~ _4100105.CR2 to be saved as _4500101-0105.TIF with ZIP compression (rather than RLE, which is usually the default). Can I do that?

Copy link to clipboard
Copied
Hi there
Is there an updated version of this to run with PS CC 2019?
Just that I get this below error msg and as I'm not a coder, I don't know whats going on?
Also the menu selection only appears under File>scripts but not under File>Automate in CC 2019?
Thanks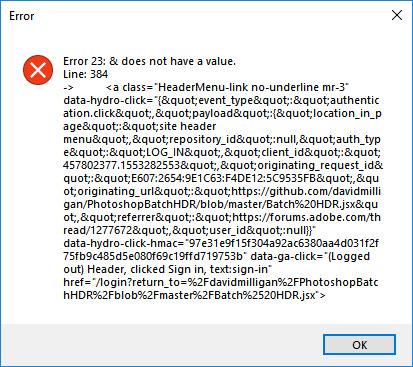

Copy link to clipboard
Copied
The problem is you have not saved the script as PLAIN text. You need to download the file again.

Copy link to clipboard
Copied
This is a common enough problem that I wrote the following blogpost:

Copy link to clipboard
Copied
Hello,
I'm french and not fully fluent so, excuse my mystankes in english grammar.
First of all, thank you very very much for this script. Very nice idea.
Following a error on my Hard disk drive, the script stopped. When I started it again, it started from the begining "hdr_output_0001".
Can you please tell me if it is possible to check the output files and to start from the next one after the last existing file?
I mean :
- My input files are input_0001.nef.
- My last outpout file before the crash is hdr_output_0018.jpeg.
- I work with 5 bracketing files.
Can the script:
- Check the last output file "hdr_output_0018.jpeg"
- Calculate the next one by making "hdr_output_0018.jpeg" +1
- Calculate the input first file to take in account as consequence: input_((0018*5)+1).nef
I've a manual solution:cut/paste in other folder the inputs already merged and start again to 0001 the output in another folder too).
But I think a check before starting could be a plus for this already fantastic script.

Find more inspiration, events, and resources on the new Adobe Community
Explore Now
 AdChoices