

- Home
- Photoshop ecosystem
- Discussions
- Re: Batching Alpha Channel Manipulation On Image S...
- Re: Batching Alpha Channel Manipulation On Image S...

Copy link to clipboard
Copied
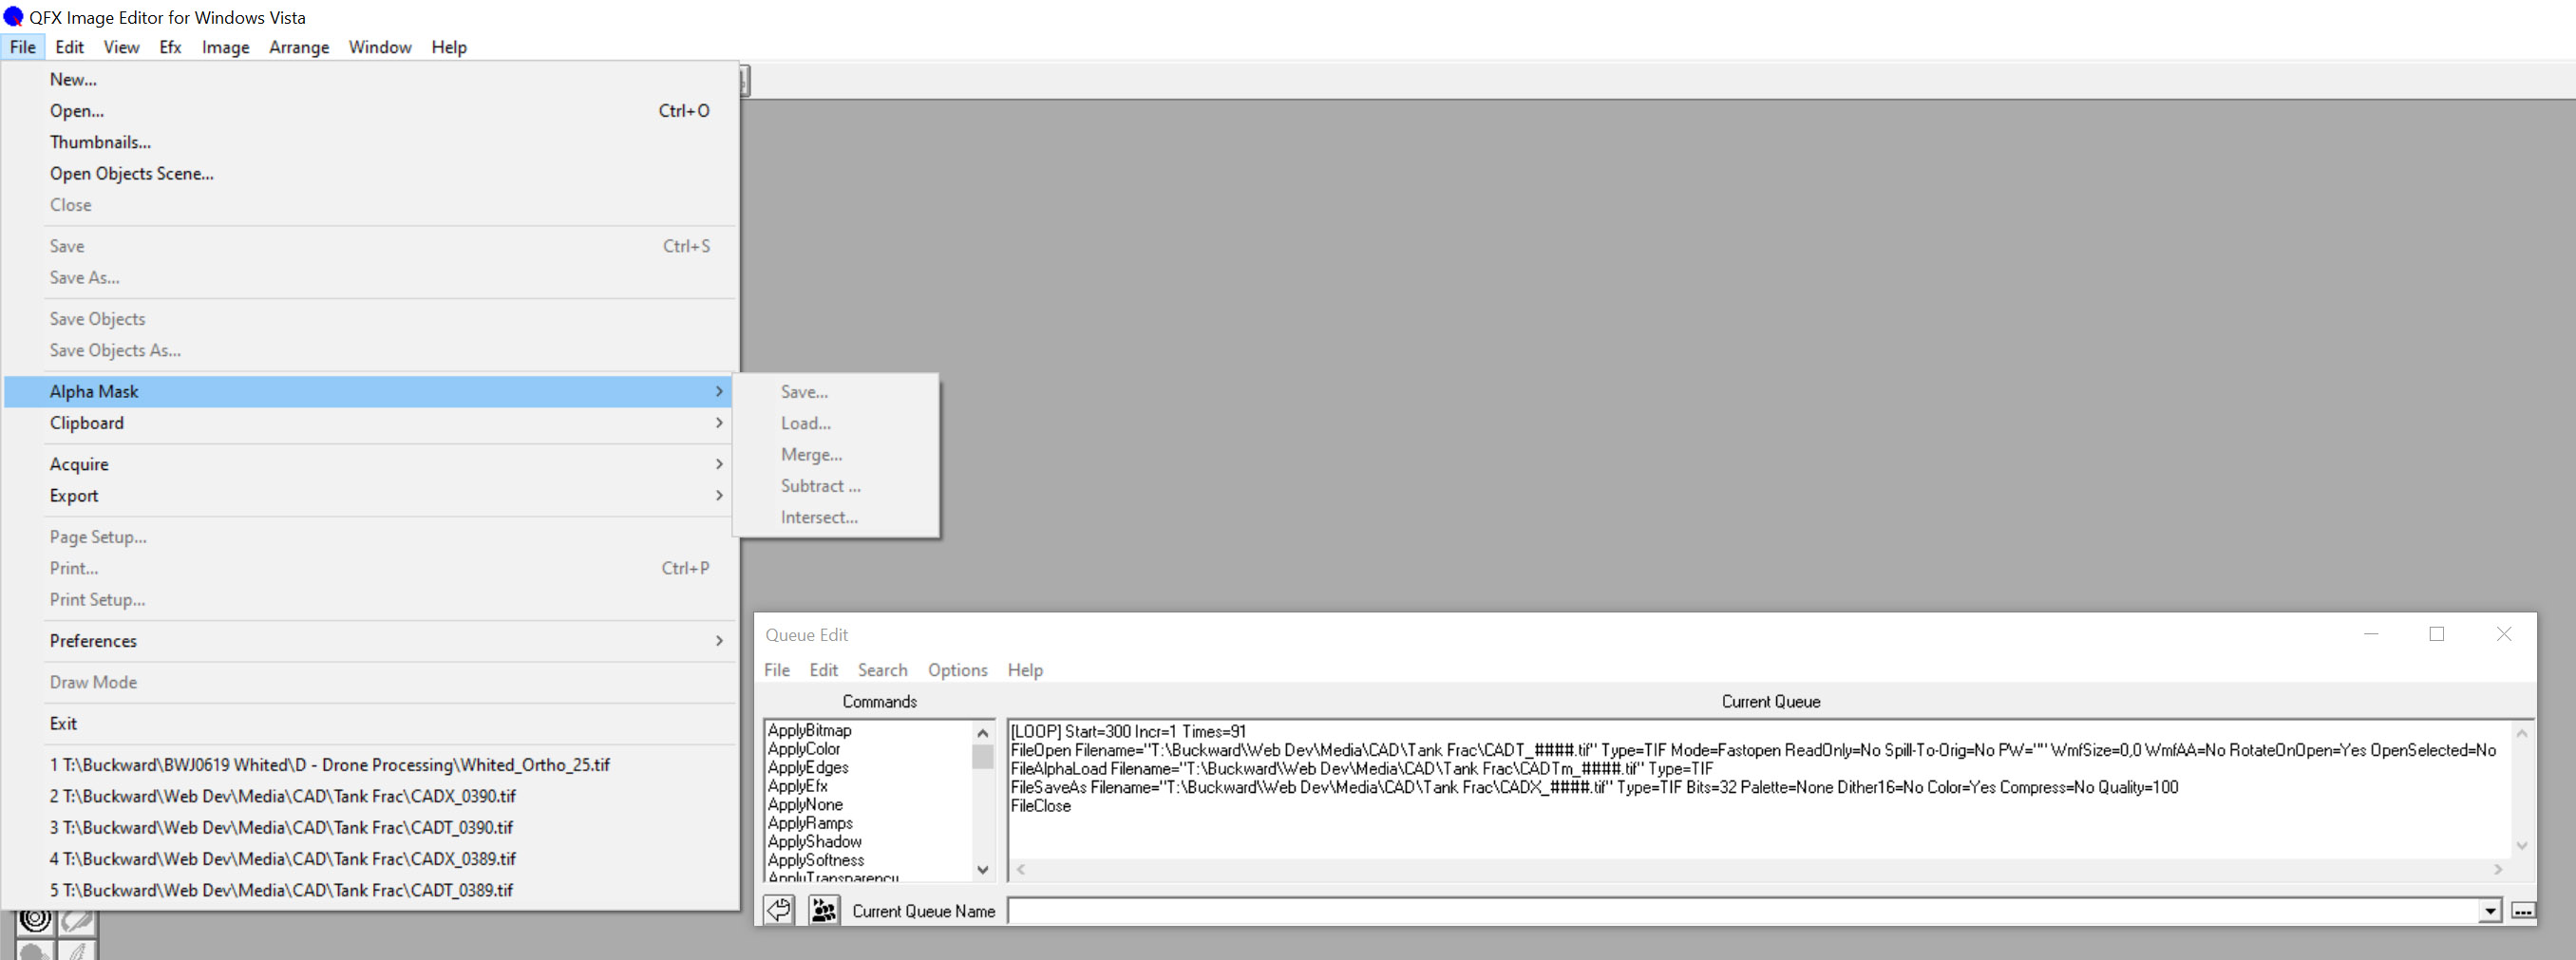
Thanks to this community, I learned how to work on the alpha channel, adding, replacing and performing subtraction calculations between two masks to create a new alpha channel. Now the hard part (at least I think it will be), batching those operations on an image sequence. I've found PS batching to be very difficult in the past, compared to the QFX Queue (see included image).
In the queue seen in the image, with these few lines of script, it opens a file, loads an alpha and saves a new file. If it said FileAlphaSubtract instead of FileAlphaLoad, an 8bit mask image would be boolean subtracted from the existing image. The #### in the script replaces the numerical image sequence with the Start, Inc, Times values. Running the script is blazingly fast. I'm always marveled at how quickly it must be doing these operations AND writting a file to disk.
Now to Photoshop. As an animator compositing my renderings in Premier, I often do one of these two batch operations to an image sequence for use in my composite; add an alpha sequence to an image sequence or subtract an alpha sequence from an image sequence. Say I have Test0000.tif to Test0300.tif. I also have TMask0000.tif to TMask0300.tif. So the PS batching needs to automate what just learnd to do manually. Open an image, open the mask image, copy the mask image, paste it into the alpha channel of the main image, save to a new file, close the open images, repeat for the entire sequence.
Even more difficult, Open an image that already has alpha, open a mask image, added an additional channel in the first image, copy paste the mask image into the additional channel, run Calculations to subtract Aplha 2 from Alpha 1 creating a new channel, delete the Alpha 1 & 2 channels, then saving the file to a new image, and repeat for the entire sequence.
Just a few lines of script in QFX. I have a feeling this is not so simple in PS.
Thanks and best regards.


 3 Correct answers

Why would you want to waste resources with copying and pasting instead of using Calculations straight-up?


You can try the following script.
Images are required to be in three separate folders and are selected by a prompt. A fourth save/output folder can be selected by a prompt.
Example of the folder structure:

Javascript –
/*
Batch Alpha Channel Image Sequence.jsx
Version 1.0 - Stephen Marsh, April 11 2022
https://community.adobe.com/t5/photoshop-ecosystem-discussions/batching-alpha-channel-manipulation-on-image-sequence/td-p/12864593
*/

#target photoshop

if (!app.documents.leThis should work if the Mask-file’s name is the same as the RGB-file’s with »-Mask_« before the numbers.
Edited the Script 2022-04-14:
// insert one channel from file with »-mask_« in otherwise identical name;
// 2022, use it at your own risk;
var theFolder = Folder("/Archiv HD/Pfaffi HD1/pfaffi_privat/photoshop/test/untitled folder 6");
if (theFolder.exists == false) {var theFolder = Folder.selectDialog ("select folder")};
if (theFolder) {
var theFiles = theFolder.getFiles(/\.(tif|psd)$/i)Explore related tutorials & articles
 25
Replies
25
25
Replies
25
Copy link to clipboard
Copied
Please provide a better description of the processes and naming conventions, accompanied by meaningful screenshots (including the pertinent Panels).
By Alpha Channel do you mean a plain non-composite Channel or Transparency?
Your use copy/pasting seems a bit curious as Calculations can include multiple files anyway.
Copy link to clipboard
Copied
Copy link to clipboard
Copied
Sample images and description posted below.
Copy link to clipboard
Copied
@buck-w wrote:
Say I have Test0000.tif to Test0300.tif. I also have TMask0000.tif to TMask0300.tif. So the PS batching needs to automate what just learnd to do manually. Open an image, open the mask image, copy the mask image, paste it into the alpha channel of the main image, save to a new file, close the open images, repeat for the entire sequence.
Even more difficult, Open an image that already has alpha, open a mask image, added an additional channel in the first image, copy paste the mask image into the additional channel, run Calculations to subtract Aplha 2 from Alpha 1 creating a new channel, delete the Alpha 1 & 2 channels, then saving the file to a new image, and repeat for the entire sequence.
Just a few lines of script in QFX. I have a feeling this is not so simple in PS.
Thanks and best regards.
This will take scripting, and yes, it will be more than a few lines of code.
As suggested in the other topic thread... A download link to a file-sharing site would be best, such as your Adobe CC shares, DropBox, OneDrive, GoogleDrive or one of many other services.
At least 2 sets of images would be helpful, as would understanding if you have separate input folders and if file and alpha channel names are consistent.
Copy link to clipboard
Copied
Sample images and descrption posted below.
Copy link to clipboard
Copied
I've set up small series of images that we can work with to try batching in PS. The dropbox direct download link is:
https://dl.dropboxusercontent.com/s/sjqwlw3j63yiabw/PS%20Alpha%20Batch_.zip?dl=0
It is a six frame sequence of a 5 pointed star rotating clockwise. There is also a pentagon inside the star rotating counter-clockwise (the mask for one anyway).
Star0001 to Star0006 is the star without any alpha. This is for the batching of alpha insertion. Star-Mask0001 to Star-Mask0006 in the alpha to be inserted. The screen grab series of Alpha Insert images show me doing this for the first image in the series. It shows; 01 - Adding an alpha channel to the 24bit star image, 02 - Copying the entire 8bit Ngon image, 03 - Pasting that image into the Star images blank alpha channel. Not shown, but obvious, is to save the image to a new 32bit file (Star Comp0001.tif), then close the file. The goal is to batch this process for the entire sequence.
Next, and more complicated, is shown in the Alpha Subtract series of screen grabs. They show; 01 - Opening the 32bit image Star Alpha, which already has it's alpha channel as shown, 02 - Creating a 2nd alpha channel, 03 - Copying the entire 8bit NGon image (selection not shown), 04 - Pasting the Ngon image into the Star image's second alpha channel, 05 - Using Calculations to subtract the Ngon alpha from the Star alpha, 06 - Deleting Alpha 1 & 2 channels with the booleaned alpha channel remaining. Not shown is to save the image to a new 32bit file (Star Comp0001.tif), then close the file. The goal is to batch this process for the entire sequence.
There you have it. I am used to the simplicity of doing this in QFX, however I'd like to up my PS game and be able to do it there.
Thanks for looking at this.
Copy link to clipboard
Copied
Why would you want to waste resources with copying and pasting instead of using Calculations straight-up?
Copy link to clipboard
Copied
I am not a deft user of Photoshop. You know this as you were involved in my previous post where I learned the process of inserting alpha, replacing alpha and subtracting alphas just the day before I made the Batching post (the next step). Asking me why I don't do "X" is like asking a toddler why his calculus is so poor.
I'm happy to know better ways of doing things. Did what you have shown above work only because of the simplicity of the RGB content of my example files? If this was a more realistic and nuanced set of images as rendered in a PBR 3D environment, would what you did even work?
Copy link to clipboard
Copied
I am not a deft user of Photoshop. You know this as you were involved in my previous post where I learned the process of inserting alpha, replacing alpha and subtracting alphas just the day before I made the Batching post (the next step).
Please check that thread again, is there any post of mine?
Did what you have shown above work only because of the simplicity of the RGB content of my example files? If this was a more realistic and nuanced set of images as rendered in a PBR 3D environment, would what you did even work?
Calculations work with open images, so all three images have to be open, but what their image-contents are with regard to »simplicity« is not relevant.
Copy link to clipboard
Copied
Okay, I see you were not in that topic. What is confusing is the "Backstory" link you sent IS to that previous topic I posted, which was just a few days before. Very strange.
Anyhow, I see the point that the Calcs can target anything open, so I don't need to move everything into one image and then operate on that. Definitely smarter.
Copy link to clipboard
Copied
»What is confusing is the "Backstory" link you sent IS to that previous topic I posted, which was just a few days before.«
@Stephen Marsh posted that link, not me.
»All the images would be in the same directory.«
What would the naming convention of the actual rendered images be?
»Star0001«, »Star-Mask_0001«, »NGon-Mask_0001« or different from that?
Copy link to clipboard
Copied
Yeah. Again, you are correct. I need to look closer. His @YoU confused me as to who was saying what.
As a rendered animation sequence, the part before the "_" could be anything. I'd probably do something like PRD0300.tif to PRD0450.tif for the main image, then PRDm#### for it's mask, then who knows for the subtraction images, perhaps PRDx####. And you'll notice there is no "_" in those namings. It's the overall how-to I'm trying to accomplish. Seems like what the files are named wouldn't really matter.
I'm sure you all are wondering why any of this is necessary. In 3D animation, you sometimes need things visible for the render, but you cannot use the mask directly from the renders because some of the 3D objects visible in the render should not be part of the comp. They were necessary to get a correct render (because of things like reflections, ambient occlusion or whatever). So to get a correct alpha for compositing, I render a separate, quick pass forcing pure black and white on objects and rendering the same camera range to an 8bit file sequence. I'll then need to replace the alpha that came with the original render. Or the 8bit sequence needs to be subtracted from the existing alpha in the image. A situation where this may come up is in compositing tricky cross sections or windows into the interior of a 3D object. It may be way too complicated to get the 3D scene set up with a lot of layered nuance hard coded (so-to-speak) in the rendering, so you render it in passes and get to where you need to be in post. And then sometimes you need to monkey with the alpha to get it to comp correctly.
Copy link to clipboard
Copied
Seems like what the files are named wouldn't really matter.
It does if you want to automate the task and put all the files in one folder.
Unless it can be unequivocally determined which of the three groups a file belongs right from the start further input would be necessary, so no full automation.
The »primary« file could be determined by virtue of being RGB, I guess, while the others are grayscale, but that still would not clear the issue up fully.
Copy link to clipboard
Copied
Having an SOP that works with a script that must be followed for it to work is fine with me. I do it myself. My only programming is AutoLisp when I need to automate something in AutoCAD. I've operated on lists is an similar way. This is great. I appreciate the time spent.
not to be greedy, but.....
This was definitely the harder second part of my query. The first part was automating inserting alpha in a 24bit tif then saving the comp tif, and replacing the alpha in a 32bit tif and saving the comp tif. Is that something you would still solve with js or this can be easily solved with actions?
Copy link to clipboard
Copied
Sorry, could you please elaborate?
With the files you posted (»Star…«, »Star-Mask…«, »NGon-Mask…«), what would the result be you are looking for?
Star-Mask added as a Channel to Star?

Maybe a screenshot for the intended result for one example (including the Channels and Layers Panel) would help clarify.
Copy link to clipboard
Copied
Star0001.tif is a 24bit tif. Inserting Star-Mask_0001.tif as Star0001,tif's new Alpha Channel, then saving to say... StarComp0001.tif (32bit) is an example of the first half.
There is another set in the series I included in the zip not shown above. Star-Alpha_0001.tif is a 32bit star image with the proper mask included. It is the exact completed version of the fist part above. Taking that as a start, then replacing it's Alpha 1 channel with NGon-Mask_0001.tif and saving it to say... StarComp0001.tif (32bit) is an example of the second half.
Copy link to clipboard
Copied
This should work if the Mask-file’s name is the same as the RGB-file’s with »-Mask_« before the numbers.
Edited the Script 2022-04-14:
// insert one channel from file with »-mask_« in otherwise identical name;
// 2022, use it at your own risk;
var theFolder = Folder("/Archiv HD/Pfaffi HD1/pfaffi_privat/photoshop/test/untitled folder 6");
if (theFolder.exists == false) {var theFolder = Folder.selectDialog ("select folder")};
if (theFolder) {
var theFiles = theFolder.getFiles(/\.(tif|psd)$/i)
};
////////////////////////////////////
var theRegExp = new RegExp(/\d*\.\D{1,4}$/i);
var theRegExp2 = new RegExp(/\-*mask\_*\d*\.\D{1,4}$/i);
// process files;
for (var m = 0; m < theFiles.length; m++) {
    var thisFile = File(theFiles[m]);
    var thisName = thisFile.name;
    var aName = thisFile.name.replace(theRegExp, "");
    var aSuffix = thisFile.name.match(theRegExp);
// check for name similarities;
    for (var n = 0; n < theFiles.length; n++) {
// except the file itself;
        if (n != m) {
// check the name;
        if (theFiles[n].name.match(theRegExp2, "") != null && theFiles[n].name.replace(theRegExp2, "") == aName && String(theFiles[n].name.match(theRegExp)) == aSuffix) {
                var mask1 = app.open(theFiles[n]);
                var theImage = app.open(File(thisFile));
                doCalculation (mask1.name, mask1.name, "normal", false, false);
// save tif;
                saveCopyAsTif (theImage, theImage.path+"/"+aName+"Comp"+aSuffix);
                mask1.close(SaveOptions.DONOTSAVECHANGES);
                theImage.close(SaveOptions.DONOTSAVECHANGES);
                }
            }
        };
    };
////////////////////////////////////
////// perform calculation //////
function doCalculation (source1, source2, blendMode, invert1, invert2) {
var idcalculation = stringIDToTypeID( "calculation" );
var idchannel = stringIDToTypeID( "channel" );
var idordinal = stringIDToTypeID( "ordinal" );
var idtargetEnum = stringIDToTypeID( "targetEnum" );
var idto = stringIDToTypeID( "to" );
var idlayer = stringIDToTypeID( "layer" );
var idbackground = stringIDToTypeID( "background" );
var iddocument = stringIDToTypeID( "document" );
////////////////////////////////////
var desc4 = new ActionDescriptor();
    desc4.putClass( stringIDToTypeID( "new" ), idchannel );
        var desc5 = new ActionDescriptor();
            var ref1 = new ActionReference();
            ref1.putEnumerated( idchannel, idordinal, idtargetEnum );
            ref1.putProperty( idlayer, idbackground );
            ref1.putName( iddocument, source1 );
        desc5.putReference( idto, ref1 );
        desc5.putBoolean( stringIDToTypeID( "invert" ), invert1 );
        desc5.putEnumerated( idcalculation, stringIDToTypeID( "calculationType" ), stringIDToTypeID( blendMode ) );
        desc5.putDouble( stringIDToTypeID( "scale" ), 1.000000 );
        desc5.putInteger( stringIDToTypeID( "offset" ), 0 );
            var ref2 = new ActionReference();
            ref2.putEnumerated( idchannel, idordinal, idtargetEnum );
            ref2.putProperty( idlayer, idbackground );
            ref2.putName( iddocument, source2 );
        desc5.putReference( stringIDToTypeID( "source2" ), ref2 );
        desc5.putBoolean( stringIDToTypeID( "invertSource2" ), invert2 );
    desc4.putObject( stringIDToTypeID( "using" ), idcalculation, desc5 );
executeAction( stringIDToTypeID( "make" ), desc4, DialogModes.NO );
};
////// save tif //////
function saveCopyAsTif (myDocument, thePath) {
// tif options;
    tifOpts = new TiffSaveOptions();
    tifOpts.embedColorProfile = true;
    tifOpts.imageCompression = TIFFEncoding.TIFFLZW;
    tifOpts.alphaChannels = true;
    tifOpts.byteOrder = ByteOrder.MACOS;
    tifOpts.layers = false;
// save copy;
    myDocument.saveAs((new File(thePath)), tifOpts, true);
};
Copy link to clipboard
Copied
This works GREAT on 24bit images. Thanks!
Copy link to clipboard
Copied
@c.pfaffenbichler wrote:What would the naming convention of the actual rendered images be?
»Star0001«, »Star-Mask_0001«, »NGon-Mask_0001« or different from that?
I tried to get a .match() to work based on four consecutive digits and gave up and decided used separate input folders instead. If you have a solution to filter the open images numerically, I'd love to see it (either snippet or full code).
Copy link to clipboard
Copied
I tried to get a .match() to work based on four consecutive digits and gave up and decided used separate input folders instead. If you have a solution to filter the open images numerically, I'd love to see it (either snippet or full code).
I tinkered a bit and this should get two arrays:
• one of the three names minus number and suffix
• and an array of three arrays (in this case)
if all three groups of images are in the same folder.
var theFolder = Folder("/Archiv HD/test/untitled folder 6");
if (theFolder.exists == false) {var theFolder = Folder.selectDialog ("select folder")};
if (theFolder) {
var theFiles = theFolder.getFiles(/\.(tif|psd)$/i)
};
////////////////////////////////////
var theRegExp = new RegExp(/\d*\.\D{1,4}$/i);
var theBlanks = new Array;
var theArrays = new Array;
for (var m = 0; m < theFiles.length; m++) {
    var thisBlank = theFiles[m].name.replace(theRegExp, "");
    var theCheck = false;
    for (var n = 0; n < theBlanks.length; n++) {
        if (thisBlank == theBlanks[n]) {
            theCheck = true;
            var theIndex = n
        }
    };
    if (theCheck == false) {
        theBlanks.push(thisBlank);
        theArrays.push([theFiles[m]]);
    } else {
        theArrays[theIndex].push(theFiles[m]);
    };
};
alert ("\n"+theBlanks.join("\n\n"));
alert ("\n"+theArrays.join("\n\n"));
Copy link to clipboard
Copied
Thank you for the requested samples and explanation, it is truly helpful. You obviously understand your workflow and the end result, it is hard for me to understand without details.
What I would propose is the following:
1) All three images are opened (Star0001.tif, Star-Mask_0001.tif & NGon-Mask_0001).
2) With the Star0001.tif as the target, Star-Mask_0001.tif would be added as an alpha channel via Calculations. NGon-Mask_0001 would be subtracted directly from the single alpha in Star0001.tif using Apply Image/Subtract.
There is no need to have two alpha channels in the target document if all three docs are open at the same time.
Here it is in an action to illustrate, however, this would need scripting:

As c.pfaffenbichler shows, this is also possible in a single step with all images open, it would depend on whether shades of gray are handled differently than your simplified black & white example.
Are all three sets of files in a single directory, or do you have the files separated into three separate directories? Although both are possible, three separate input folders may allow better control than relying on filename sorting.
EDIT: Here it is using subtract, the same result as from c.pfaffenbichler, but different settings, so possibly no need for 2 steps for a simple black & white input/output:

Copy link to clipboard
Copied
Yes. All the images would be in the same directory.
Copy link to clipboard
Copied
You can try the following script.
Images are required to be in three separate folders and are selected by a prompt. A fourth save/output folder can be selected by a prompt.
Example of the folder structure:
Javascript –
/*
Batch Alpha Channel Image Sequence.jsx
Version 1.0 - Stephen Marsh, April 11 2022
https://community.adobe.com/t5/photoshop-ecosystem-discussions/batching-alpha-channel-manipulation-on-image-sequence/td-p/12864593
*/

#target photoshop

if (!app.documents.length) {

    try {
        var restoreDialogMode = app.displayDialogs;
        app.displayDialogs = DialogModes.NO;

        (function () {
            // Select the secondary alpha folder
            var inputFolder1 = Folder.selectDialog('Select the secondary alpha folder:');
            if (inputFolder1 === null) return;

            // Select the primary alpha folder
            var inputFolder2 = Folder.selectDialog('Select the primary alpha folder:');
            if (inputFolder2 === null) return;

            // Validate the alpha folder selection
            var validateAlphaDirs = (inputFolder2.fsName === inputFolder1.fsName);
            if (validateAlphaDirs === true) {
                alert("Script cancelled as both the alpha input folders are the same!");
                return;
            }

            // Select the image folder
            var inputFolder3 = Folder.selectDialog('Select the image folder:');
            if (inputFolder3 === null) return;

            // Validate the image folder selection
            var validateImageDir = (inputFolder3.fsName === inputFolder1.fsName || inputFolder3.fsName === inputFolder2.fsName);
            if (validateImageDir === true) {
                alert("Script cancelled as the image folder is incorrect!");
                return;
            }

            // Limit the file format input, add or remove as required
            var fileList1 = inputFolder1.getFiles(/\.(tif|tiff)$/i);
            var fileList2 = inputFolder2.getFiles(/\.(tif|tiff)$/i);
            var fileList3 = inputFolder3.getFiles(/\.(tif|tiff)$/i);

            // Force alpha-numeric reverse list sort
            fileList1.sort().reverse();
            fileList2.sort().reverse();
            fileList3.sort().reverse();

            // Select the output folder
            var outputFolder = Folder.selectDialog("Please select the output folder to save to:");
            if (outputFolder === null) {
                alert('Script cancelled!');
                return;
            }

            var counter = 0;
            while (fileList1.length) {
                for (var i = 0; i < 1; i++) {
                    try {
                        app.open(fileList1.pop());
                        app.open(fileList2.pop());
                        app.open(fileList3.pop());
                        alphaCalc(true, 1, 0, true);
                        var docName = app.activeDocument.name.replace(/\.[^\.]+$/, '');
                        var saveFile = File(outputFolder + '/' + docName + '_alpha' + '.tif');
                        saveTIFF(saveFile);
                        while (app.documents.length) {
                            app.activeDocument.close(SaveOptions.DONOTSAVECHANGES);
                        }
                        counter++;
                    } catch (e) {}
                }

                function alphaCalc(invert, scale, offset, invertSource) {
                    var alpha1 = app.documents[1].name;
                    var alpha2 = app.documents[0].name;
                    var s2t = function (s) {
                        return app.stringIDToTypeID(s);
                    };
                    var descriptor = new ActionDescriptor();
                    var reference = new ActionReference();
                    var reference2 = new ActionReference();
                    descriptor.putClass(s2t("new"), s2t("channel"));
                    reference.putEnumerated(s2t("channel"), s2t("ordinal"), s2t("targetEnum"));
                    reference.putProperty(s2t("layer"), s2t("background"));
                    reference.putName(s2t("document"), alpha1);
                    descriptor.putReference(s2t("to"), reference);
                    descriptor.putBoolean(s2t("invert"), invert);
                    descriptor.putEnumerated(s2t("calculation"), s2t("calculationType"), s2t("subtract"));
                    descriptor.putDouble(s2t("scale"), scale);
                    descriptor.putInteger(s2t("offset"), offset);
                    reference2.putEnumerated(s2t("channel"), s2t("ordinal"), s2t("targetEnum"));
                    reference2.putProperty(s2t("layer"), s2t("background"));
                    reference2.putName(s2t("document"), alpha2);
                    descriptor.putReference(s2t("source2"), reference2);
                    descriptor.putBoolean(s2t("invertSource2"), invertSource);
                    descriptor.putObject(s2t("using"), s2t("calculation"), descriptor);
                    executeAction(s2t("make"), descriptor, DialogModes.NO);
                }

                function saveTIFF(saveFile) {
                    tiffSaveOptions = new TiffSaveOptions();
                    tiffSaveOptions.embedColorProfile = true;
                    tiffSaveOptions.byteOrder = ByteOrder.IBM;
                    tiffSaveOptions.transparency = true;
                    tiffSaveOptions.layers = true;
                    tiffSaveOptions.layerCompression = LayerCompression.ZIP;
                    tiffSaveOptions.interleaveChannels = true;
                    tiffSaveOptions.alphaChannels = true;
                    tiffSaveOptions.annotations = true;
                    tiffSaveOptions.spotColors = true;
                    tiffSaveOptions.saveImagePyramid = false;
                    // NONE | JPEG | TIFFLZW | TIFFZIP
                    tiffSaveOptions.imageCompression = TIFFEncoding.TIFFLZW;
                    app.activeDocument.saveAs(saveFile, tiffSaveOptions, true, Extension.LOWERCASE);
                }
            }

            app.displayDialogs = restoreDialogMode;
            app.beep();
            alert('Script completed!' + '\r' + counter + ' files saved to:' + '\r' + outputFolder.fsName);

            // Open the output folder in the Finder or Explorer
            outputFolder.execute();
        }());

    } catch (e) {
        // Restore saved dialogs
        app.displayDialogs = restoreDialogMode;
        alert('Error:' + '\n' + 'If you see this message, something went wrong!');
    }

} else {
    alert('Attention:' + '\n' + 'Please close all open documents before running this script!');
}
Instructions for saving the script here:
https://prepression.blogspot.com/2017/11/downloading-and-installing-adobe-scripts.html
Copy link to clipboard
Copied
Thanks! I need to chew on this for a bit. I can have the different sequences in separate folders if that makes the processing easier.
-
- 1
- 2

Find more inspiration, events, and resources on the new Adobe Community
Explore Now
 AdChoices