• Global community
    • Language:
      • Deutsch
      • English
      • Español
      • Français
      • Português
  • 日本語コミュニティ
    Dedicated community for Japanese speakers
  • 한국 커뮤니티
    Dedicated community for Korean speakers
Exit
0

Best print resolution setups

New Here ,
Jan 03, 2020 Jan 03, 2020

Copy link to clipboard

Copied

I try to find out the best image size setup(s) in Photoshop 2020.

For now my computer is fill up with RAW pictures and big JPG pictures between 12 and 24 mb each picture.


When I am busy to correct my pictures in Photoshop I will also reduce my picture, so that I have a better overview on my iMac screen. I use also an action with a great special framework around my pictures. So that my collection is finished for screen view. 


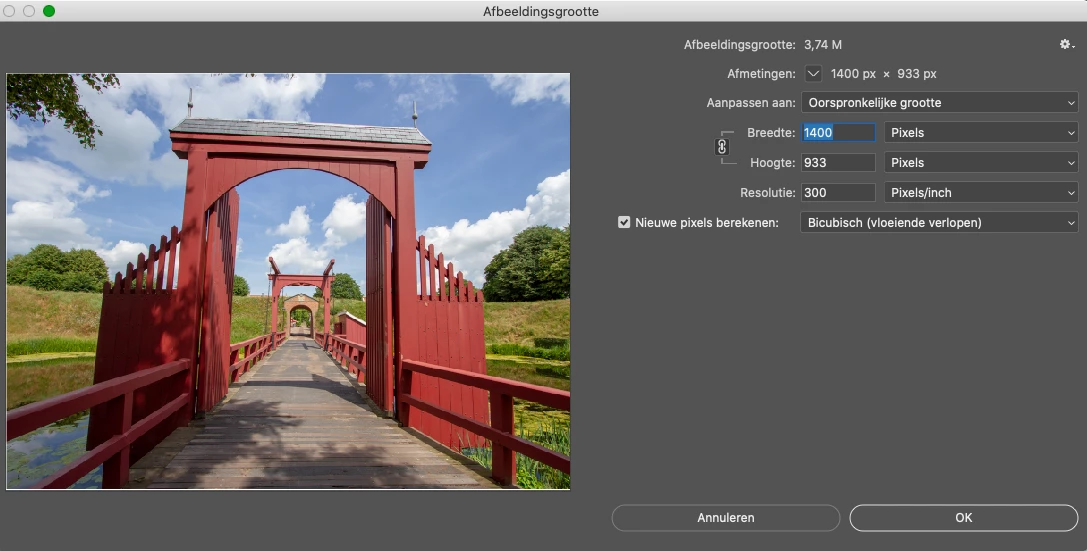
But I will find also the BEST quality setup dimensions and resolution, so that I have also a good print photo. For now, I was busy to change my pictures all the time with the setup in the example picture below. Is this the correct setup, or can somebody support me to give me better examples? I read a lot of tutorials with this topic, but I can not find examples from users when they will save it for both reasons, printing and viewing on the best way. 


Thank you for all your hints and tips (sorry, the screen example is Dutch).


Schermafbeelding 2020-01-03 om 18.13.12.png

Views

5.5K

Translate

Translate

Report

Report
Community guidelines
Be kind and respectful, give credit to the original source of content, and search for duplicates before posting. Learn more
community guidelines
Adobe
Community Expert ,
Jan 03, 2020 Jan 03, 2020

Copy link to clipboard

Copied

Keep the original master file with raw development and any corrective Photoshop work at the original size and all layers intact. Save as PSD/TIFF or PSB.   Don't reduce or enlarge it. That is the copy you will return to to make any copys.


If you need a jpeg at another size for any reason, then go to that master, resise it and export a copy using File > Export > Save for web. Use that export for the purpose you made it, never reopen it and adjust it or resize it again. If you need another copy return to the master file and make a new export.

Don't worry about the size of the master files - disk space is cheap, trying to recover data thrown away in size reduction is impossible.


As to printing, again work from the master copy and in Image Size you can uncheck "resample"  and set the physical size (inches or cm)  to the print requirement. Remember larger prints are viewed at a greater distance, so a reduction in ppi as the physical size increases is not usually an issue.


Dave

Votes

Translate

Translate

Report

Report
Community guidelines
Be kind and respectful, give credit to the original source of content, and search for duplicates before posting. Learn more
community guidelines
Community Expert ,
Jan 03, 2020 Jan 03, 2020

Copy link to clipboard

Copied

The best print image size setup depends on how large you want to print it. The settings you showed can print only a very small photo at 300 pixels per inch, which you will see if you change the units from Pixels to Inches (or cm):


1400x933-print-size.gif


At 300 ppi, your 1400 x 933 pixel example can print at only 4.667 x 3.11 inches, or 11.85 x 7.9 cm. Is that large enough for your purposes?

If you want to create an A4 print at 300 ppi, the image must have 2480 x 3508 pixels. If you are saving images with fewer pixels than that, an A4 print will be lower than 300 ppi.


A4-@300ppi.jpg


If you want to preserve the option to print large or show on high resolution displays, it is best to keep the original files so that the maximum resolution is available when needed. Yes, this does mean photo storage will take up more space. That is why many people, including myself, keep the master set of original photos on external storage, so that all originals can be kept without filling up the computer’s internal storage.


I have some images that were saved at smaller dimensions many years ago to fit the size of displays and printers at that time. Technology advanced, displays gained resolution, and I bought a larger printer. Those old images are now too small. That’s why I keep the original images, so that I can continue to make them look as good as possible on current and future high resolution, large format displays and printers.

Votes

Translate

Translate

Report

Report
Community guidelines
Be kind and respectful, give credit to the original source of content, and search for duplicates before posting. Learn more
community guidelines
New Here ,
Jan 03, 2020 Jan 03, 2020

Copy link to clipboard

Copied

Thank you so much for your quick response. I understand exactly what you mean with the original RAW versions, the same feedback as Dave (first message). And yes, I have a lot of extrenal space here around my iMAC. I need to learn to reduce not the picture 🙂 but I need to reduce my big RAW collection. I go make hard decisions, because, indeed I have a lot of great pictures that I will not lose. 


Thank you for your information! Indeed a save with JPG with this setup, I go from 30 mb to 2 or 3 mb. When I save it with Tiff 32 bit I had 19 mb with the same setup information from my message. 


I know what to do now, but tips and hints are always welcome. 

Votes

Translate

Translate

Report

Report
Community guidelines
Be kind and respectful, give credit to the original source of content, and search for duplicates before posting. Learn more
community guidelines
Community Expert ,
Jan 03, 2020 Jan 03, 2020

Copy link to clipboard

Copied

LATEST

300 ppi is the golden standard for offset presses, but if you have to sacrifice resolution for a larger print size, this may help. https://www.chilliprinting.com/Online-Printing-Blog/print-resolution/


Votes

Translate

Translate

Report

Report
Community guidelines
Be kind and respectful, give credit to the original source of content, and search for duplicates before posting. Learn more
community guidelines