Copy link to clipboard
Copied
Hi guys,
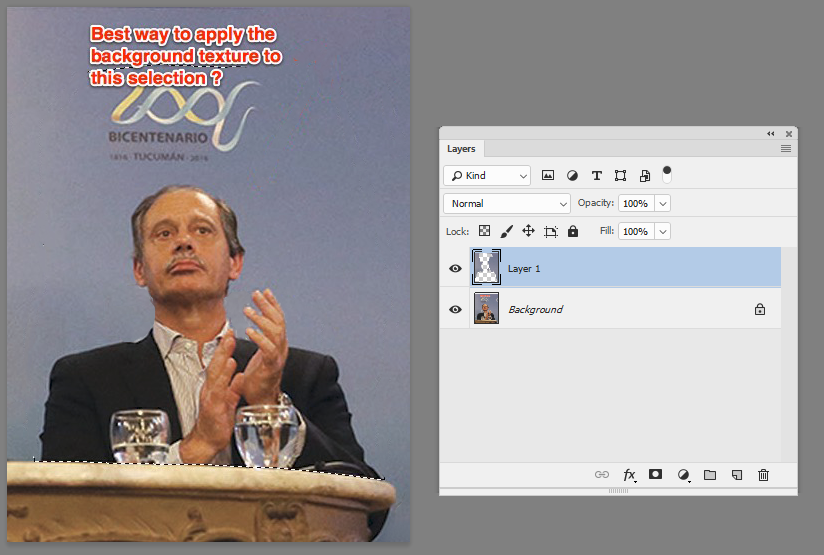
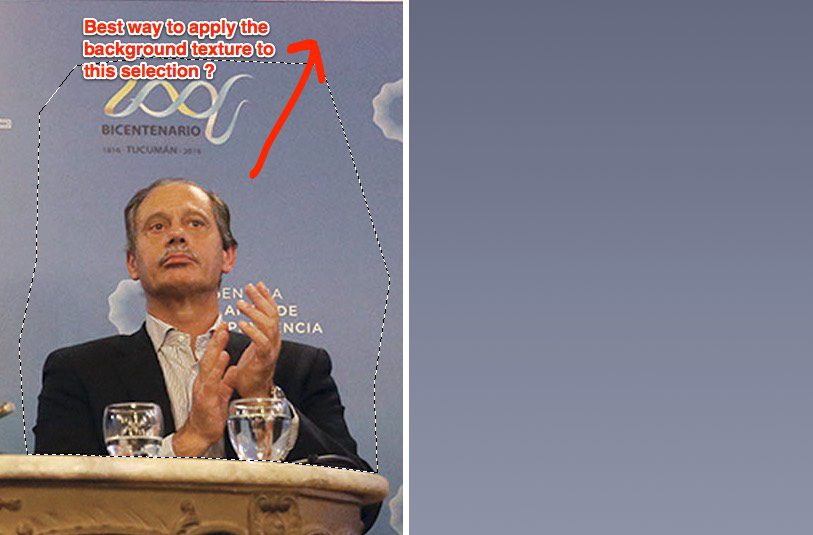
Just for practicing exercise i would like to add this very uniform light blue background to the selection. Why do you think is the best tool? Content Aware, Healing Brush, Clone stamp tool?
If i use Fill with Content Aware it not work uniformly placing parts of the glass and the suit of course. Somewhere i read i could select from which part of the picture i could sample the "content aware reference texture" so i will not include the suite, person and cups.
I know somethings it a try and miss with different alternatives but maybe more experience users would say...i will go with this or that tool or technique for a fast workflow.
Thanks for any tip and advice!
Copy link to clipboard
Copied
You need to select just the area you want to apply the blue to. I do not think adding bend if xxx painting on an empty blended layer would be to able isolate the blending to just the area you want to add the light blue to. What ever you do should be done on a new layer on top so you do not destroy what you have now. You can blend in that layer in and mask off area in it to reveal what you have now.
Copy link to clipboard
Copied
As I understand it, although the current image shows the blue background to have a slight gradation with a tinge of purple mottling, you want to replace that background with a flat color. If that is the case:
Place a layer below the current image layer and fill it with the replacement color.
Add a mask to the image layer and paint in black on the mask or use one of the Selection tools to selectively reveal the color in the layer below.
Copy link to clipboard
Copied
Are you just trying to get rid of those edge objects?
If so make a selection of the background as shown and copy it to a new layer (Ctrl+J)
Now on that new layer select the unwanted parts and use Content Aware Fill
Done
Dave
Copy link to clipboard
Copied
Thanks for the good info guys 😉
Sorry about my English by the way.
I was trying to clone the background on a different layer to delete or hide the man and the cup of water. I would like to keep the same texture that the background has, not a flat color. Sometimes when there is a bit of gradient in the background because of the light is not as easy to clone. There are subtle differences in tone and light. I was wondering if i could select the source of the texture and maybe use content aware o maybe clone it with a softer brush.
Thanks again!
This is my new take on the clonning process...is not that bad...but i can see a slight difference of tone. I definitely have to improve my clonning technique. Since you are more experienced user you could suggest how to do a better clonning procedure. 😉
Copy link to clipboard
Copied
Following my original post: Rather than a flat tone for the bottom layer, you can create a Gradation in the chosen color that is either as subtle as the one pictured here or use Curves or Levels to tweak the degree of change in tone value.
A Suggestion: You may want to create a similar gradation and keep it among your files for future use, so that you don't have to recreate it again for other work. The one above is from a file created for a different purpose (Edit. > Fill. Blending mode set to Color) with a slight change in contrast.
Copy link to clipboard
Copied
As Norman has said, it is too straight forward a background to try and rescue from an existing image. Just make it from scratch. I wouldn't even bother making a custom gradient. Just sample the foreground and background colours from the original, and run the gradient.
Something I might do in a case like this, is to make the canvas a good bit larger than it needs be, and make the gradient oversize. Then place the new foreground on the layer above, and Free Transform and move the gradient so that it perfectly fits and produces the effect you want. You can do almost the same by applying the gradient behind the foreground object layer, but you can't shape it that way.
Copy link to clipboard
Copied
Thanks to both of you 😉
By the way, since the original image have some grain or noise since it shoot with interior light or low light condition i guess i should add some grain to the gradient to make it more realistic with the overall scene. Which do you think is the best way to go here for reproducing the natural grain of a low light photo?
Cheers,
Find more inspiration, events, and resources on the new Adobe Community
Explore Now