Exit
  • Global community
    • Language:
      • Deutsch
      • English
      • Español
      • Français
      • Português
  • 日本語コミュニティ
    Dedicated community for Japanese speakers
  • 한국 커뮤니티
    Dedicated community for Korean speakers
1

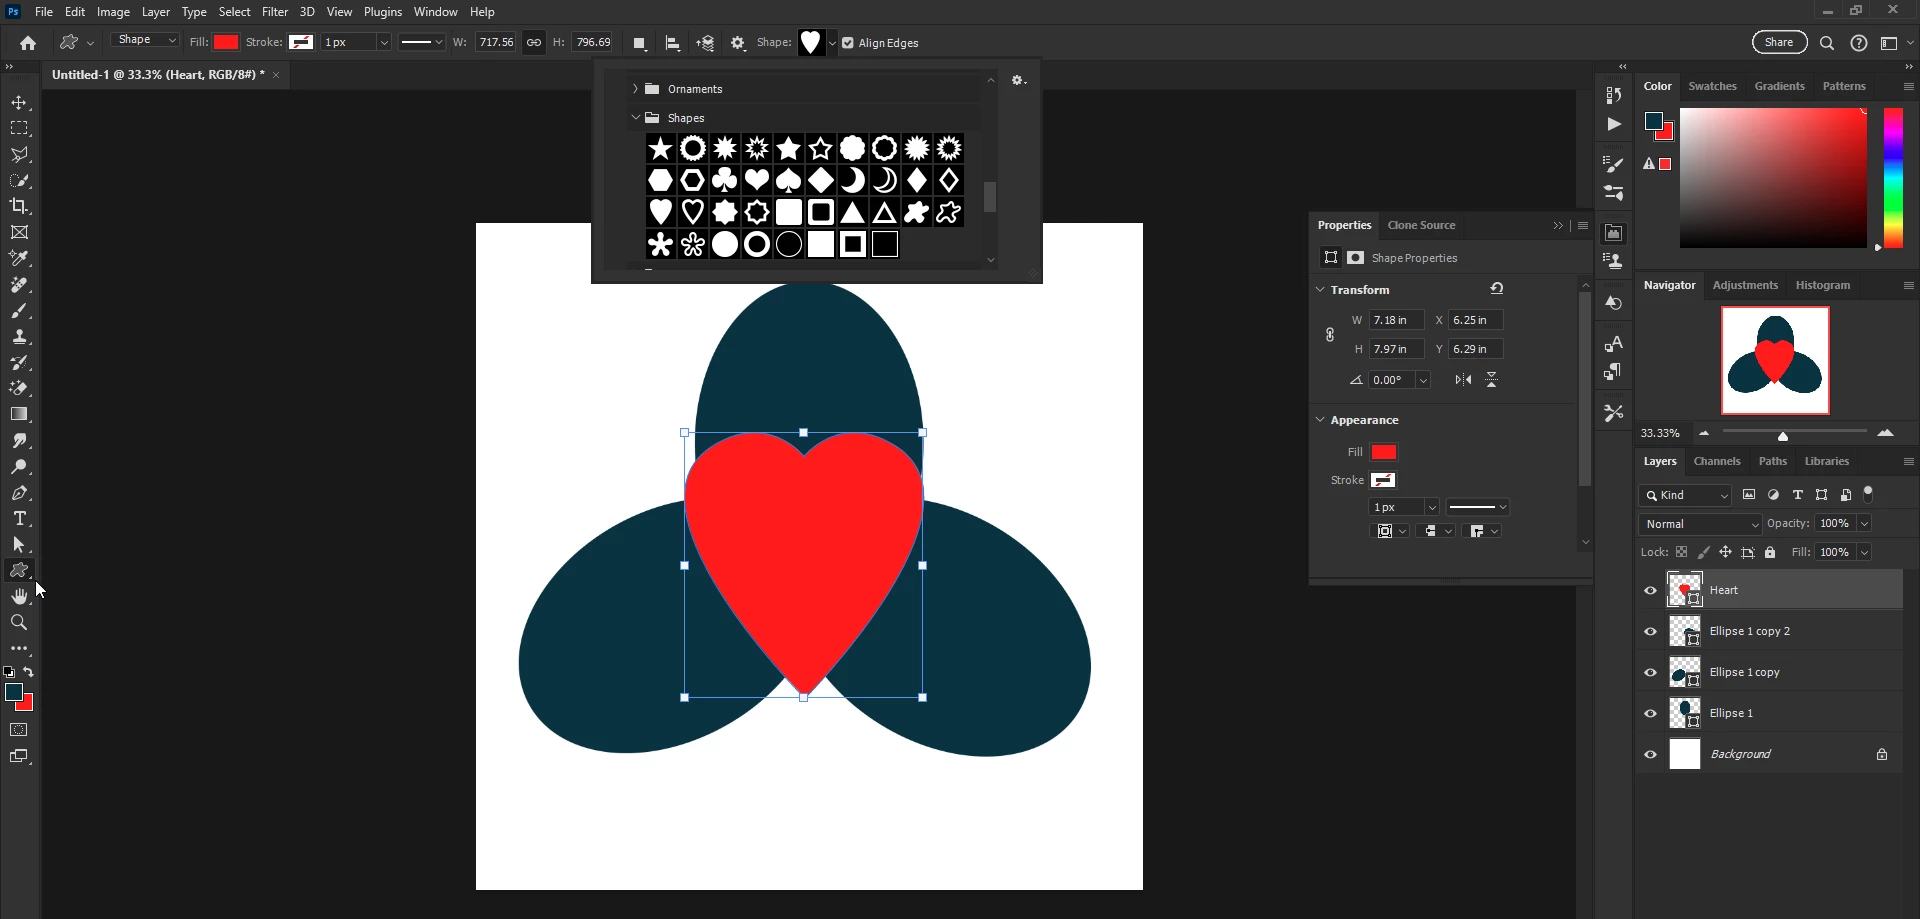
better advice on how to make this symbol

Explorer ,
Oct 03, 2023 Oct 03, 2023

I am trying to make this. I am all thumbs, and recently learned trace. I thought about getting it prefect and setting up 3 of them 160 degrees apart, but there has to be an easier way to do this. Woud you guys mind sharing some steps. This also helps me learn. I thought it was a celtic symbol, but its not the "knot". I also tried searchig in glyphs, but came up empty.

Cheers.

TOPICS
macOS
311
Translate
Report
Community guidelines
Be kind and respectful, give credit to the original source of content, and search for duplicates before posting. Learn more
community guidelines

correct answers 1 Correct answer

Community Expert , Oct 03, 2023 Oct 03, 2023

Hi @nelsonmason, there are different of ways to approach this, depending on your end use intentions. Illustrator is typically preferred for vector graphics. But in Photoshop, you could easily create from scratch using the Ellipse Tool and the Custom Shape Tool to achieve that design, as seen in my quick example here. Hope that's helpful!


JEL_0-1696352176230.pngexpand image

Translate
Adobe
Community Expert ,
Oct 03, 2023 Oct 03, 2023

Hi @nelsonmason, there are different of ways to approach this, depending on your end use intentions. Illustrator is typically preferred for vector graphics. But in Photoshop, you could easily create from scratch using the Ellipse Tool and the Custom Shape Tool to achieve that design, as seen in my quick example here. Hope that's helpful!


JEL_0-1696352176230.pngexpand image

Translate
Report
Community guidelines
Be kind and respectful, give credit to the original source of content, and search for duplicates before posting. Learn more
community guidelines
Explorer ,
Oct 03, 2023 Oct 03, 2023

Cool. Adjusting ellipses and using the heart graphic. I have some minor illustrator experience, I wil play in there to get a vector line and jusat make the line as wide as I need it.


Thanks!

Translate
Report
Community guidelines
Be kind and respectful, give credit to the original source of content, and search for duplicates before posting. Learn more
community guidelines
Community Expert ,
Oct 03, 2023 Oct 03, 2023

I can't help myself from adding my two cents worth, which is mainly about workflow.


I have an Action that creates a new Guide layout with two columns and two rows which effectively gives me guides that intersect at the centre of the document, so to create your graphic I would run that Action, and drag the grid zero/zero point to that intersection. In this instance, that was not entirely necessary, but I like to have a precise reference for distributing image elements.

image.pngexpand image

Create your first ellipse with the shape tool. Grab its lower handle and drag to the guide intersection.  You can check it is in the right place from its X coordinate in the Options Bar which should be 0.00

image.pngexpand image


Copy the ellipse (Ctrl J).   Ctrl T to start the Free Transform procees but  _Before_  we enter a value for the angle, we need to accurately position the shapes 'Reference Point'.  Note you may need to turn it on in Preferences Tools, but you can also Alt drag to make the Reference Point visible.


I mentioned above that in this case you didn't strictly need to reposition the grid zero x zero loction, because as well as position the Reference Point at 0,0 (by entering that value in the X: and Y: fields, you could simply select the center bottom point on the grid to the left of the X: in the screen shot below.  With that done, make the angle 120°


image.pngexpand image


Copy that layer, and use Free Transform again.  We are going to use Flip Horizontal (by right clicking inside the shape)

Use Alt click to position the reference Point close to the centre line.  You can see I was not terribly accurate with my placement, but we just need to adjust the X: value to 0.00 and it will be perfectly located.  Flip Horizontal, and you are done.


image.pngexpand image


Open the Shapes panel and use the search bar to look for Heart.  It will only search for groups that are in the main panel area, so use the pop out menu and choose Legacyt Shapes and More if you don't already have them

image.pngexpand image


Add your heart. Use Ctrl A to select all. Select the Move tool, and use the Align tools in the Options bar to centralise the heart.

image.pngexpand image


Some of the above was more than was needed, but it gives you the tools to use going forward.  The grid zero zero relocation can be vital when doing Transform Step and Repeat as each step magnifies the error.  Making a clock face is an example when this might come into play.

Translate
Report
Community guidelines
Be kind and respectful, give credit to the original source of content, and search for duplicates before posting. Learn more
community guidelines
Explorer ,
Oct 04, 2023 Oct 04, 2023

Sorry to reach out here for something so dumb, but can you help me fill this shape with a color? I did some reading and just had to give up. When I drew the heart, I was given options in the properties box to add a stroke and fill color. For the ellipse I was just concentrating on getting my shape the way I wanted it. When I go back and try to fill, I can't do it. I have tried to add an adjustment layer, ect, but I can't get anything to work. I don't want to redraw yet, becasue I got so lucky the first time using the bezier handles. If you look at the pic, you can see the options I have on properties tab, and there is no stroke or fill adjustment that I can seem to get to. Thanks!

Translate
Report
Community guidelines
Be kind and respectful, give credit to the original source of content, and search for duplicates before posting. Learn more
community guidelines
Explorer ,
Oct 04, 2023 Oct 04, 2023

I am an idiot. I just saw the fill and stroke properties on the top of the tool bar. But, the fill has some translucency and I can see the grid, so I have to get it 100 percent opaque. Maybe I will sole that before a reply. Thanks for everything. This software isn't easy for a newbie non-artist. 


Translate
Report
Community guidelines
Be kind and respectful, give credit to the original source of content, and search for duplicates before posting. Learn more
community guidelines
Community Expert ,
Oct 04, 2023 Oct 04, 2023
LATEST

@nelsonmason, keep at it, you're doing great. We all had to start somewhere! And thanks for a great step-by-step, @Trevor.Dennis! Yes, if you open the properties panel (as seen in my screenshot), it will show you how to apply the fill and stroke to the layer shape you are on. As for the grid showing through, if you added the grid to the background layer, you can turn that layer off if it's showing through when you are done placing everything.

Translate
Report
Community guidelines
Be kind and respectful, give credit to the original source of content, and search for duplicates before posting. Learn more
community guidelines