Exit
  • Global community
    • Language:
      • Deutsch
      • English
      • Español
      • Français
      • Português
  • 日本語コミュニティ
  • 한국 커뮤니티
0

Can I easily and automatically fix contrast and color on a 35mm scan that contains sprocket holes?

Explorer ,
Apr 04, 2024 Apr 04, 2024

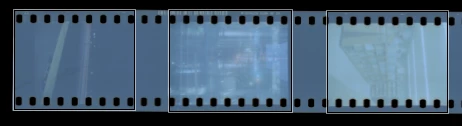
I often prefer to scan film including the sprocket holes, especially when the image bleeds over the perforations a little bit, as in this example:


by default 2024-04-03 at 11.05.33.png


The raw results from the scanner are usually very bland. Whenever I scan without perforations, I fix this by using Auto Tone/Contrast/Color in Photoshop, which is fast and gives acceptable results.

But when I scan with the perforations, using these commands does not work, probably because of the perforations throwing off the way the program perceives the image.


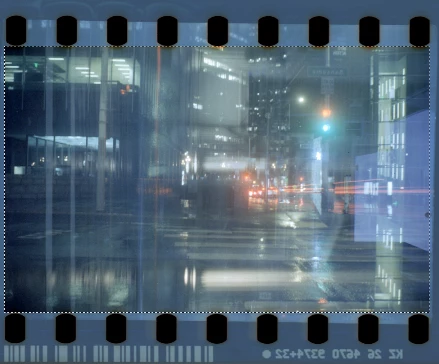
Inside the dotted selection, the correction provides a proper result:


by default 2024-04-04 at 00.09.57.png


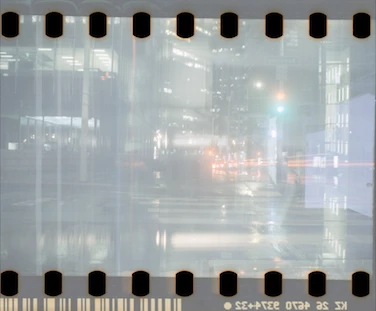
However when applied to the whole scan (including perfs), the Auto commands do not produce a good result:


by default 2024-04-04 at 00.13.50.png


I wish I could "sample" part of the image that I want to fix automatically, and then apply this to the rest of the image.

I prefer not to create presets or actions but would rather use an auto feature, since I use different film stocks all the time.

I am sure that if I selected the exposed parts and deselected the perforations and edge markings, the Auto commands would work a bit better, but I am trying to find a quick way to balance these scans and restore the dullness that the scan produced. I'm open to try a new app if one does what I'm looking for.


I'm generally using CS6 on a 2013 iMac.

How can I balance these scans out?

TOPICS
macOS
708
Translate
Report
Community guidelines
Be kind and respectful, give credit to the original source of content, and search for duplicates before posting. Learn more
community guidelines

correct answers 1 Correct answer

Explorer , Apr 05, 2024 Apr 05, 2024

Someone helped me on a different website, so I am going to reply to my own question in case it can help people in the future.

1 - Select a part of the image that doesn’t have sprockets (rectangle)

2 - Layers Panel > Create adjustment layer > Curves

3 - Click Alt on the keyboard and the Auto button in the new Curves panel

4 - Select “Enhance per channel contrast” then OK

5 - Right-click on the Adjustment Layer in the Layers and Disable it

6 - Flatten the image

Translate
Adobe
LEGEND ,
Apr 04, 2024 Apr 04, 2024

Scan to TIFF and open in Camera RAW. Select the area inside the perfs, apply auto correct, then remove the crop. You'll need to work completemy inside ACR to do this.

Translate
Report
Community guidelines
Be kind and respectful, give credit to the original source of content, and search for duplicates before posting. Learn more
community guidelines
Explorer ,
Apr 04, 2024 Apr 04, 2024

Ok this is what my version of camera raw looks like in the version of photoshop I have

https://imgur.com/a/fzbK6dK

Translate
Report
Community guidelines
Be kind and respectful, give credit to the original source of content, and search for duplicates before posting. Learn more
community guidelines
Community Expert ,
Apr 04, 2024 Apr 04, 2024
 

 I prefer not to create presets or actions but would rather use an auto feature, since I use different film stocks all the time.


By @fabriced60698984


For setting the tonal range, an action should be workable for different film if the auto adjustment is consistent.

Translate
Report
Community guidelines
Be kind and respectful, give credit to the original source of content, and search for duplicates before posting. Learn more
community guidelines
Explorer ,
Apr 05, 2024 Apr 05, 2024
LATEST

Someone helped me on a different website, so I am going to reply to my own question in case it can help people in the future.

1 - Select a part of the image that doesn’t have sprockets (rectangle)

2 - Layers Panel > Create adjustment layer > Curves

3 - Click Alt on the keyboard and the Auto button in the new Curves panel

4 - Select “Enhance per channel contrast” then OK

5 - Right-click on the Adjustment Layer in the Layers and Disable it

6 - Flatten the image

Translate
Report
Community guidelines
Be kind and respectful, give credit to the original source of content, and search for duplicates before posting. Learn more
community guidelines