 Adobe Community
- Home
- Photoshop ecosystem
- Discussions
- Re: Can I import an Apple color library into PHoto...
- Re: Can I import an Apple color library into PHoto...

Copy link to clipboard
Copied
Hello.
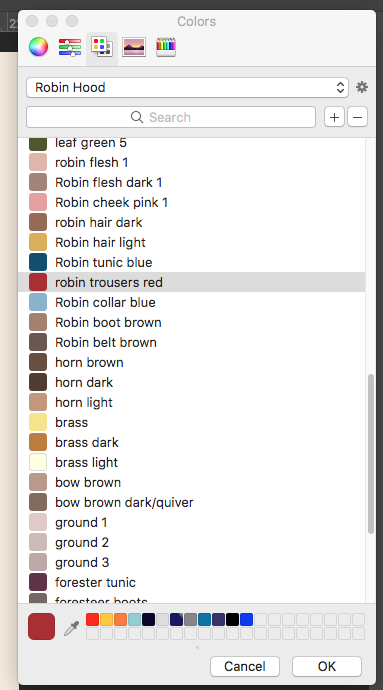
I am using Photoshop CC 2017 on Mac OSX 10.12.1. In Photoshop Preferences I can choose to Apple Color Picker instead of Adobe. With that in mind, can I import Apple color libraries I created before I started to use Photoshop? I have attached an image showing a library I previously created for making Robin Hood drawings. Is there a way I can import that color library into Photohop CC so that it is permanently available inside Photoshop?. At the moment, appears when I click the color swatch button in the tools panel, then disappears when I click ok to use a selected color. Is there a way to keep it permanent, like the Adobe Swatches panel.?
Grateful for any advice.


 1 Correct answer
Do you currently use CC Libraries? You might consider creating a Robin Hood CC Library and it will be accessible not only in Photoshop but across multiple desktop and mobile applications. You can read more about creating and using cc libraries here. Adobe Creative Cloud Libraries
Explore related tutorials & articles
 9
Replies
9
9
Replies
9
Copy link to clipboard
Copied
Do you currently use CC Libraries? You might consider creating a Robin Hood CC Library and it will be accessible not only in Photoshop but across multiple desktop and mobile applications. You can read more about creating and using cc libraries here. Adobe Creative Cloud Libraries
Copy link to clipboard
Copied
Thanks to cmgap and gener7.
with your assistance, I have discovered how to create libraries of named colors in Photoshop CC. The secret was not to think in terms of the Swatches panel at all! - but to work within the library panel. I have discovered how easy it is to create a desired color, make it the foreground color, Add that foreground color to a newly created color library in the library panel, then simply replace the color number (which i am not interested in) with a name you will remember. A bonus of creating the color library in the library panel is that the swatch icons display really well. I think much nicer looking than in the swatches panel. I now know i can create as many color libraries as I need, all in the library panel, which will always be there for, as you say, use across other programs etc. What had been a major problem for me (as I am used to working only with colors I create and name, which was easy in Apple software), is now totally resolved.
Many thanks for your advice.
Copy link to clipboard
Copied
That's really great to hear toymaker1. CC libraries are a huge time saver on so many levels. I can't imagine working without them now.

Copy link to clipboard
Copied
There is a utility that will convert clr to ase Release Release 0.2 · ramonpoca/ColorTools · GitHub It's free of charge.
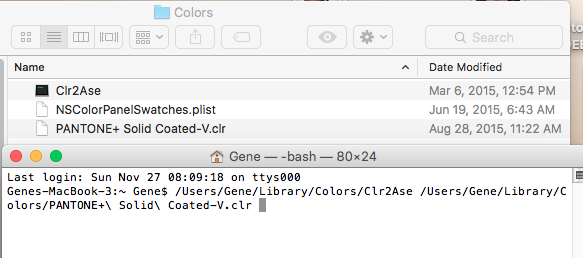
It is weird. I place the clr2ase file from the zip package into ~/Library/Colors where I see my Apple .clr files (color picker swatch file)
I open Terminal, first drag clr2ase into the window, then drag the custom Apple .clr following it as shown in the screengrab.
After I press enter, it will place the .ase file into (of all places), my user home directory. ~/PANTONE+ Solid Coated-V.ase You can move it elsewhere. I have not yet figured how to adjust that.

Copy link to clipboard
Copied
After I press enter, it will place the .ase file into (of all places)
gener7 – unless you specify a specific output directory and/or perhaps filename and extension, the current logged in user’s folder will be the output location (this is common for many command line programs such as ExifTool).
/Users/Gene/Library/Colors/Clr2Ase /Users/Gene/Library/Colors/PANTONE+\ Solid\ Coated-V.clr
So, try this:
/Users/Gene/Library/Colors/Clr2Ase /Users/Gene/Library/Colors/PANTONE+\ Solid\ Coated-V.clr /Users/Gene/Library/Colors/PANTONE+\ Solid\ Coated-V.ase
or perhaps:
/Users/Gene/Library/Colors/Clr2Ase /Users/Gene/Library/Colors/PANTONE+\ Solid\ Coated-V.clr /Users/Gene/Library/Colors/
So try dragging your /Users/Gene/Library/Colors/ folder to the end of the command line after you have dragged and dropped the application and source directory into Terminal.app (separating all three drag and drops with a word space of course if required).
Copy link to clipboard
Copied
Thanks Stephen,
I had just downloaded the kit and was not too familiar with what I needed to do.
No, for some reason it ignores the destination path and drops the ase in my home directory. Must have tried a dozen times.
The documentation is not giving me a clue.
Gene
Copy link to clipboard
Copied
I am pretty new to CLI based apps too. I would try putting a copy of the application in the following path:
(Macintosh HD) /usr/local/bin/
Then open up Terminal.app
Then type in:
Clr2Ase
Followed by a space, then drag the input directory/file and the output directory file into Terminal.
Copy link to clipboard
Copied
I'm making progress.
Clr2Ase "namethatcolor.clr" will drop the .ase in the Colors directory where the command is. Apparently the quotes are required.
I've emailed the author for further help. I'll post if/when I get an answer.
Gene
Copy link to clipboard
Copied
And here is the reply for choosing the target directory when converting Apple Color Picker file to an Adobe .ase:
Open Terminal
cd ~/Desktop (target directory)
Then go to the ~/Library/Colors directory and drag both the Clr2Ase and then namethatcolor.clr into the Terminal window and adding the quotes:
Genes-MacBook-3:Desktop Gene$ /Users/Gene/Library/Colors/Clr2Ase "/Users/Gene/Library/Colors/namethatcolor.clr"
Ase file is written to the Desktop in this example.
Gene

 AdChoices