- Home
- Photoshop ecosystem
- Discussions
- Re: class photo composite: make all photos same si...
- Re: class photo composite: make all photos same si...
class photo composite: make all photos same size
Copy link to clipboard
Copied
How do I make all photos in a class composite the same size?
Explore related tutorials & articles
Copy link to clipboard
Copied
File > Scripts > Image Processor.
Use Select folder to batch the files from, and check Resize to Fit.

If you are using Windows, I tend to use Irfanview in preference to Image Processor, as it has more options
IrfanView - Official Homepage - one of the most popular viewers worldwide
Copy link to clipboard
Copied
I think I am beyond the point of resizing the folders in the folder. They are all 4x5 size. I have them all (30) on different layers on a background, however they are all slightly different sizes by looking at the grid. Is there a way to select all the layers and make them all the same size using free transform or something?
Copy link to clipboard
Copied
I 'think' our JJMack 's scripts might have a routine that will do that. John will get a notification of being mentioned in this thread, and no doubt pop by when he gets a chance.
If you resize the files to the same size, then File > Automate > Contact Sheet II will do the job. It's several years since I used it, but if you turn off Use Auto Spacing and set the gaps to zero, Turn off Captions,m and uncheck Flatten layers you'll be most of the way there. I am guessing about the spacing, so you might have to experiment with that, and you need to leave it layered so you can fine tune position if required.

I just checked and it was 2007 when I last used it to produce this montage. I overlapped the images so I could mask out-of-frame elements.

Copy link to clipboard
Copied
For up the 53 Images you can use a Photo collage template and my scripts to populate the template. Template are very easy to create and you how good or elaborate is up to your creativity. Images can be any size the will be resized and fitted by the scripts.
For more than 53 Images you can layout the images the size you want ina a document. With the Paste Image Roll Script in the Photo collage toolkit. No template is required. You just specify the paper size and tile size and if you want white space the size of the white space. The Collage scripts can stamp file names on images. The Paste Image Coll can not. The Toolkit link Free Photoshop Photo Collage Toolkit
Here is a video of a Collage populating script in action. http://www.mouseprints.net/old/dpr/Populate911_720p.mp4
Paste Image Roll Doc Paste Image Roll script and Picture Package support documentation
The script http://www.mouseprints.net/old/dpr/PasteImageRoll.jsx
Copy link to clipboard
Copied
From Photoshop: Open the pictures and crop with fixed size crop, save or save as. This is my least prefered option for this kind of work.
From Bridge: Select and open the pictures in Camera RAW and use a fixed ratio crop on all the files. You can crop all the files in one operation, but you need probably to review each file to get the crop adjusted. You can use the save option to "batch"-save the files. I always apend a "-m" for modified to the file name. Working like this gives you a non-destructive workflow.
In InDesign: create your page layout and import the uncropped files into the frames. You can resize and move the picture as you wish, without a problem. You can then export as PDF or any other useful format. I personally would prefer this option.
Copy link to clipboard
Copied
I have already placed the cropped photos on a new background. Some are larger or smaller than the size I want them. Is there a way to select them all, by layers perhaps, and size them all the same? Or should I have done that prior to placing them in the new document?
On Wed, Dec 7, 2016 at 10:58 AM, Abambo<forums_noreply@adobe.com> wrote:
class photo composite: make all photos same size created by Abambo in Photoshop General Discussion - View the full discussion From Photoshop: Open the pictures and crop with fixed size crop, save or save as. This is my least prefered option for this kind of work.
From Bridge: Select and open the pictures in Camera RAW and use a fixed ratio crop on all the files. You can crop all the files in one operation, but you need probably to review each file to get the crop adjusted. You can use the save option to "batch"-save the files. I always apend a "-m" for modified to the file name. Working like this gives you a non-destructive workflow.
In InDesign: create your page layout and import the uncropped files into the frames. You can resize and move the picture as you wish, without a problem. You can then export as PDF or any other useful format. I personally would prefer this option.
If the reply above answers your question, please take a moment to mark this answer as correct by visiting: https://forums.adobe.com/message/9186599#9186599 and clicking ‘Correct’ below the answer
Replies to this message go to everyone subscribed to this thread, not directly to the person who posted the message. To post a reply, either reply to this email or visit the message page: Please note that the Adobe Forums do not accept email attachments. If you want to embed an image in your message please visit the thread in the forum and click the camera icon: https://forums.adobe.com/message/9186599#9186599
To unsubscribe from this thread, please visit the message page at , click "Following" at the top right, & "Stop Following"
Start a new discussion in Photoshop General Discussion by email or at Adobe Community
For more information about maintaining your forum email notifications please go to https://forums.adobe.com/thread/1516624.
This email was sent by Adobe Community because you are a registered user. You may unsubscribe instantly from Adobe Community, or adjust email frequency in your email preferences |
Copy link to clipboard
Copied
They are on Layers? Select and mask!


Copy link to clipboard
Copied
It makes no difference what Size images you have a script can resize and fit images to any size image you need. Your Image files will not be changes. They will just be used to as the source of the images you want to create. The new images file create will have your image they will be like center crops of your source images that have the correct aspect ratio for the images that you want and these virtual centered crops will be resized to the size image you want.
Copy link to clipboard
Copied
JJMack wrote:
The new images file create will have your image they will be like center crops of your source images that have the correct aspect ratio for the images that you want and these virtual centered crops will be resized to the size image you want.
I fear that with portraits, automatic cropping can only be a suboptimal solution.
Copy link to clipboard
Copied
Abambo wrote:
I fear that with portraits, automatic cropping can only be a suboptimal solution.
It depends on you actual use of the composite.
If the layout is for the web or a collage to hang you should layout images should have a similar orientation as the tiles being laid out for Landscape to Portrait and Portrait to Landscape cropping does not result acceptable composition. You should do Landscape to Landscape, Portrait to Portrait and Panorama to Panorama.
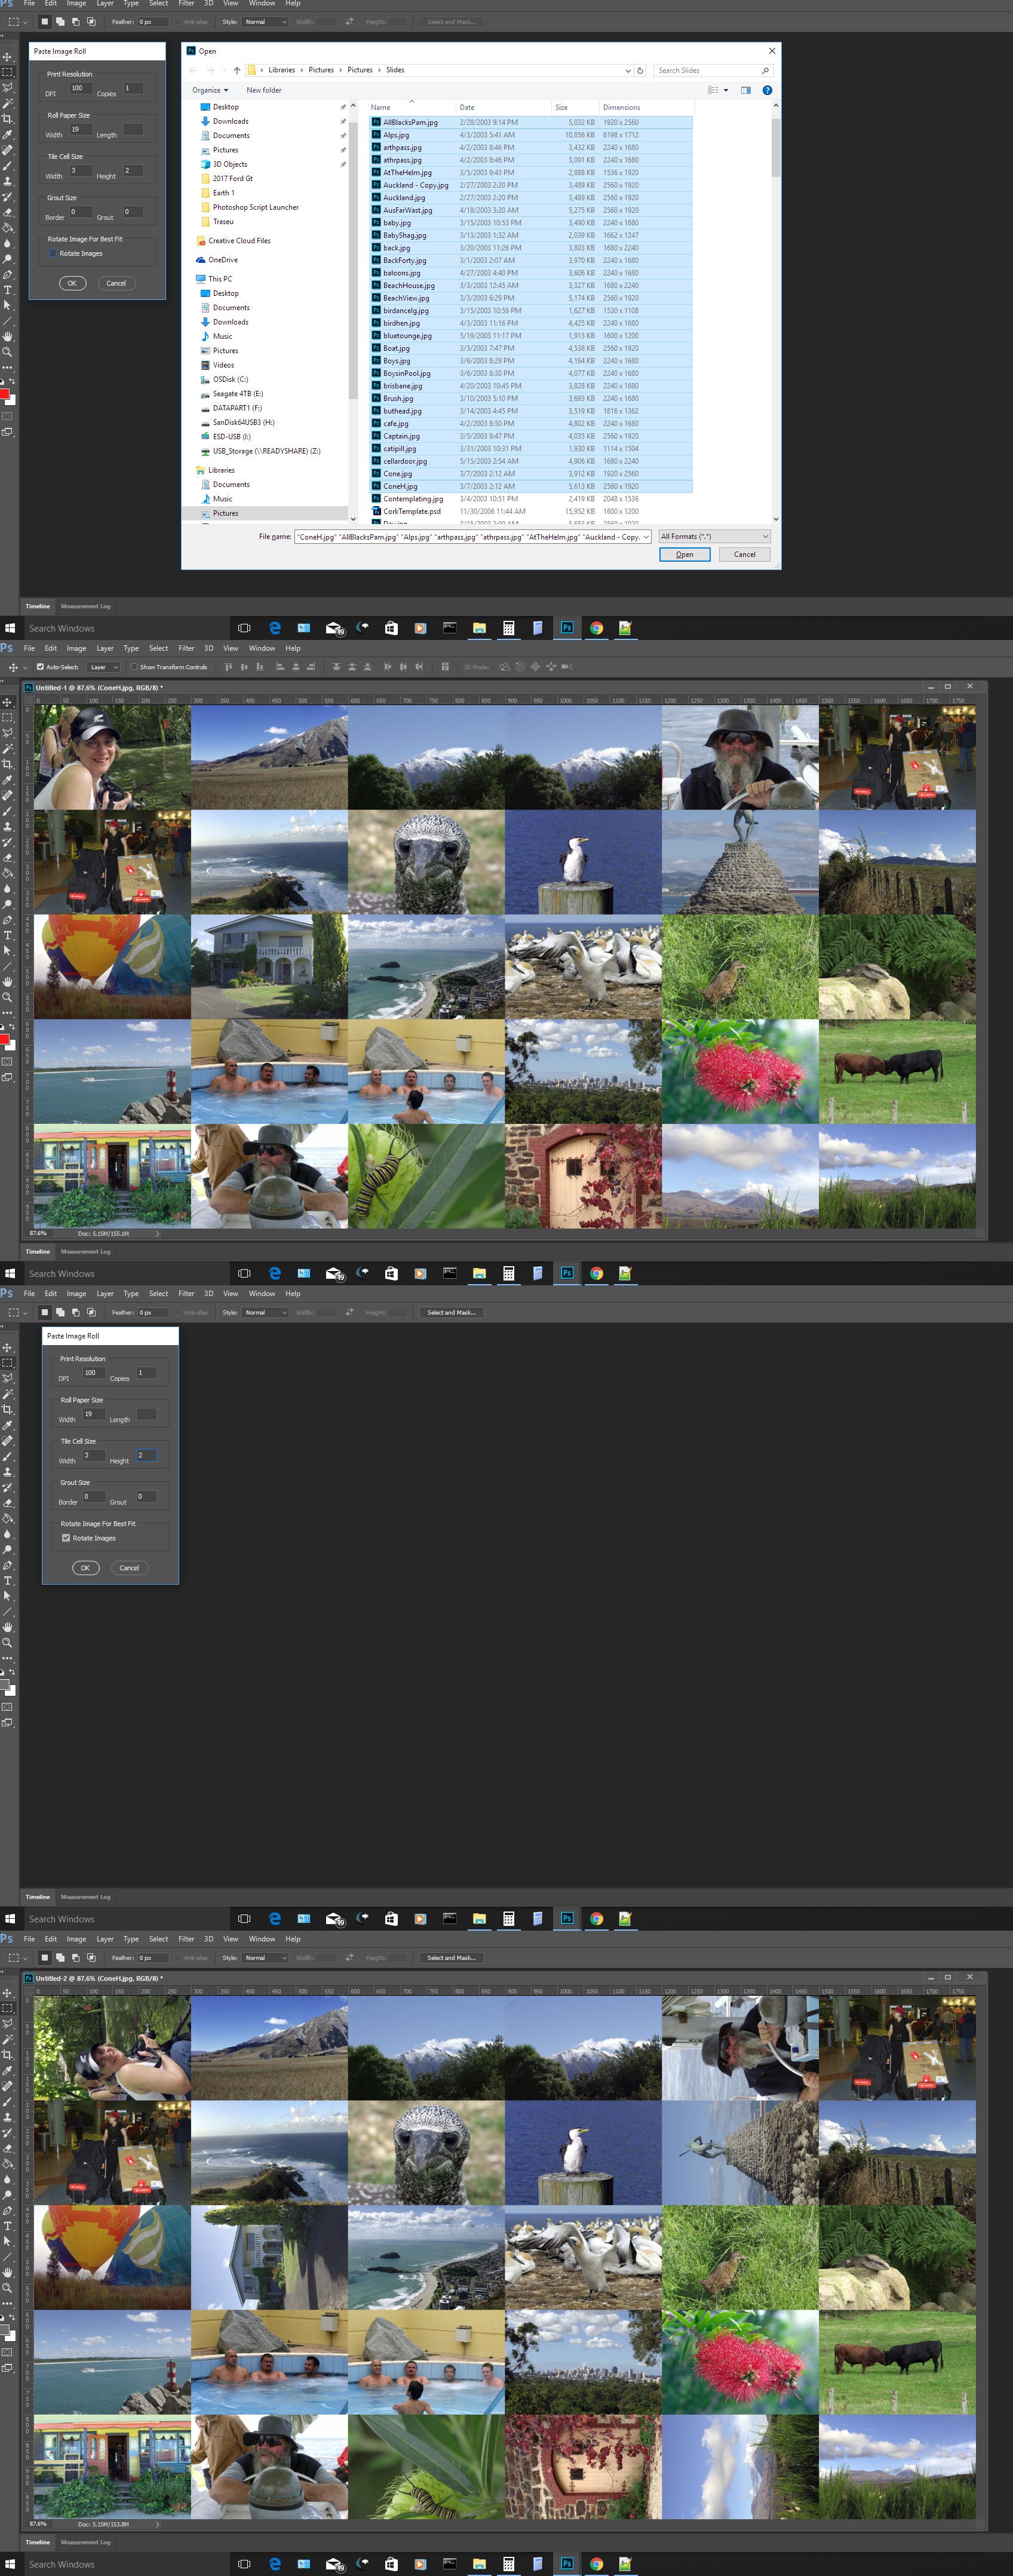
However for printing where you will cut and separate the printed images. A script can rotate images to watch the layout tiles orientation. You can print a Portrait and Landscape mix. Here I show both ways using the same set of image you can see the bad composition when image are not rotated. Where that are OK when rotation is used.
I just set 100DPI and set with 19" with 3:2 tiles The result will be a layout 1800px wide with 300x200 landscape tiles.

Copy link to clipboard
Copied
Thank you so much!
On Wed, Dec 7, 2016 at 11:27 AM, JJMack<forums_noreply@adobe.com> wrote:
class photo composite: make all photos same size created by JJMack in Photoshop General Discussion - View the full discussion It makes no difference what Size images you have a script can resize and fit images to any size image you need. Your Image files will not be changes. They will just be used to as the source of the images you want to create. The new images file create will have your image they will be like center crops of your source images that have the correct aspect ratio for the images that you want and these virtual centered crops will be resized to the size image you want.
If the reply above answers your question, please take a moment to mark this answer as correct by visiting: https://forums.adobe.com/message/9186658#9186658 and clicking ‘Correct’ below the answer
Replies to this message go to everyone subscribed to this thread, not directly to the person who posted the message. To post a reply, either reply to this email or visit the message page: Please note that the Adobe Forums do not accept email attachments. If you want to embed an image in your message please visit the thread in the forum and click the camera icon: https://forums.adobe.com/message/9186658#9186658
To unsubscribe from this thread, please visit the message page at , click "Following" at the top right, & "Stop Following"
Start a new discussion in Photoshop General Discussion by email or at Adobe Community
For more information about maintaining your forum email notifications please go to https://forums.adobe.com/thread/1516624.
This email was sent by Adobe Community because you are a registered user. You may unsubscribe instantly from Adobe Community, or adjust email frequency in your email preferences |
Copy link to clipboard
Copied
Adams Studio wrote:
Or should I have done that prior to placing them in the new document?
That's correct. If you read my post well, I crop and resize the pictures BEFORE placing them, except for using InDesign (and may be also Illustrator), where I can do this task very easily in InDesign. InDesign is made for this task of Page setting.
Copy link to clipboard
Copied
Thank you so much for your help!
On Wed, Dec 7, 2016 at 11:40 AM, Abambo<forums_noreply@adobe.com> wrote:
|
class photo composite: make all photos same size
created by Abambo in Photoshop General Discussion - View the full discussion
Find more inspiration, events, and resources on the new Adobe Community
Explore Now

