ASilva
Inspiring
August 17, 2019
해결됨

Dashed Line - Thickness from Small to Big o vice versa

  • August 17, 2019
  • 8 답변들
  • 7657 조회

Hi there, as the title of the discussion sugests im here to try and get some help on how to create a dashed line that goes from a big thickness to a small one, ive tryed asking on discord chat's no luck, teachers dont reply ... and i cant stay stuck on Creative CV that im making just cuz i want to know if it is possible or not to create what im trying to create.

Anyhow ... this is my life line ... so i hope i can get some help or definite reply that this cant be done.

Im going to give examples of what im trying to acomplish so it can be simpler ti you guys and girls

Example:

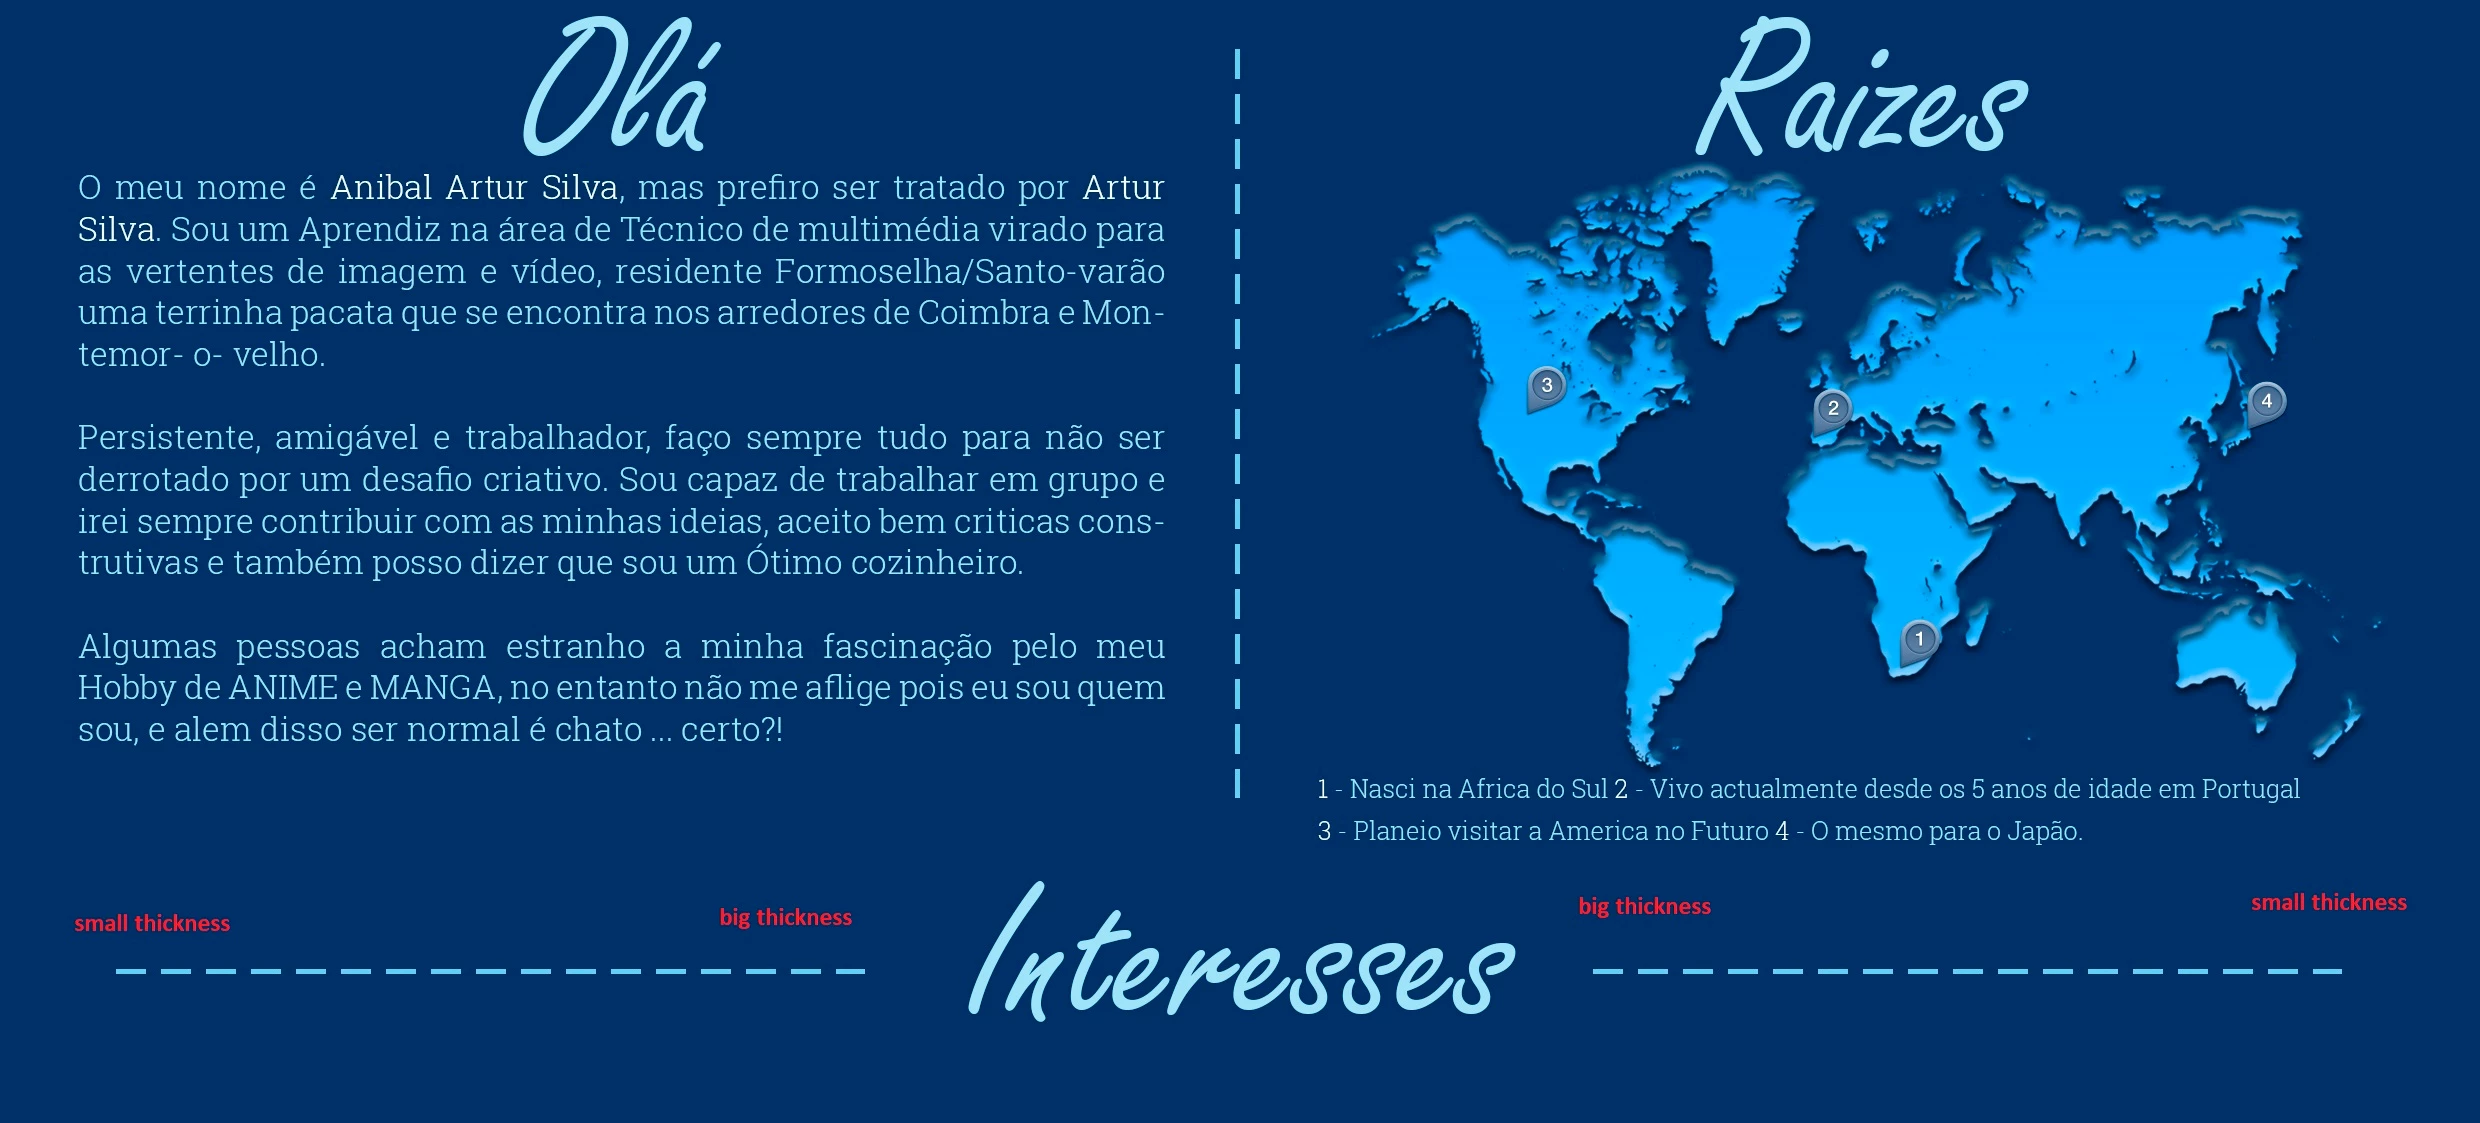
As u can see i can do normal dashed lines fine, but i wated to give an effect on the title below, with a horizontal dashed line that went as the red letter on the image say, and thats my problem i just cant figure out how to change the thickness of  the dashed lines to give that effect.

Can some one help me please ??

Regards ASilva

PS: if there is already a place where this was already replyed ... please let me know cuz i didnt find it.

이 주제는 답변이 닫혔습니다.
최고의 답변: Lumigraphics

No need to close it, you found a way that works. Other people might find this discussion useful.

I might have created a dashed line set to the widest desired size, then masked it which is really easy to do and is all editable later.

8 답변

lucask23112798
Participant
March 24, 2022

Might be a bit late but this seems very easy to do. Consider these stroke settings.

lucask23112798
Participant
March 24, 2022

Sorry, forgot to say this is in Illustrator, but use it as a Smart Clip in Photoshop and it's really flexible.


D.A.R
Legend
August 21, 2019

ASilva
ASilva작성자
Inspiring
August 21, 2019

WoW that was exactly the effect i wanted to give i just wasn't able to get, that made me go another route ... i think im going to try and replicate that on my project and see how it looks cuz from ur Tutorial it look awesome ... it was so simple im amazed by the fact i didnt reminded to create it like that ... im so noob sometimes.

Anyways thanks a lot once again

ASilva
ASilva작성자
Inspiring
August 20, 2019

Also i want to thank people for trying to help but this is turning to not what i want i tried doing some of the exmples, not counting the code ones cuz i dont know how and where the code works on PS. Also Illustrator didnt try that ither cuz i dont have that

Any how ... i kinda opted to go a diferent route on my desing and just use 3 simple lines that im going to show u

Once again i say thank for the people that tryind to help ... but i opted to go with this.

Regards ASilva

PS: How does one close the discusion ?

Legend
August 20, 2019

No need to close it, you found a way that works. Other people might find this discussion useful.

I might have created a dashed line set to the widest desired size, then masked it which is really easy to do and is all editable later.

ASilva
ASilva작성자
Inspiring
August 17, 2019

damn alll these replys are making me confused specialy the code ones ... dont understand squat of that ... anyway im gona try and do what i can using rectangle and circles shapes ... see to see if i can give it the effect i want.

O i might just do a huge dashed shape, then create a shape for the effect i want a do a cliping mask and see how it looks.

Any how thaks for trying to help guys

Inspiring
August 19, 2019

Assumed, the thickness of the line varies continuously from large to small

(opposed to a stepwise variation), I would use a Postscript programm, like this:

Save as textfile *.eps and load by Photoshop in mode RGB, e.g. with 144ppi, with anti aliasing.

Note: the original text is not garbled.

Download the file here:

http://docs-hoffmann.de/dottrapezoid.eps

Best regards --Gernot Hoffmann

%!PS-Adobe-3.0  EPSF-3.0

%%BoundingBox:  0 0 500 85

%%Creator:      Gernot Hoffmann

%%Title:        dotted trapezoid

%%CreationDate: August 18 / 2019

/mm  {2.834646 mul} def

% trapezoid         

/xa  10 mm def      % left

/ya  15 mm def

/xe 170 mm def      % right

/ye  15 mm def

/ha  10 mm def      % half height left   

/he   3 mm def      % half height right

% dots and gaps

/N   10 def         % number of dots

/g    6 mm def      % gap width

/h   ha 2 mul def   % gap height

%d=((xe-xa)-(N-1)g)/N % dot width

/d xe xa sub N 1 sub g mul sub N div def

/e   d g add def    % distance of dots

/trapezoid

{newpath            

xa ya ha sub moveto

xe ye he sub lineto

xe ye he add lineto

xa ya ha add lineto

closepath

fill

} def

0.9 0.9 0.9 setrgbcolor

% trapezoid          % can be enabled for test

newpath                 % outer clipping path, b-box      

0   0 moveto

500 0 rlineto

0  85 rlineto

500 neg 0 rlineto

0  85 neg rlineto

/x xa d add def

/y ya ha sub def

1 1 N                % inner clipping path, gaps

{pop

x y moveto

g 0 rlineto

0 h rlineto

g neg 0 rlineto

0 h neg rlineto

/x x e add def

} for

eoclip

0.0 0.6 0.4 setrgbcolor  % 1.0<-->255

trapezoid

showpage

Chuck Uebele
Community Expert
Community Expert
August 17, 2019

You can try this script. you need to set the sizes you want, and a starting selection for the height of the dashed lines and how long you want it. It would be best to do this on a separate layer then transform your results to fit.

var oldPref = app.preferences.rulerUnits;//stores old measurement preferences so that they can be reset when the script is done.

app.preferences.rulerUnits = Units.PIXELS;

var startingSize = 70//set starting size of dash

var minSize = 2//set minimum size of dash, just so they don't get too small

var dimStep = .95//set how much the dash decreases in size with each step

var dashSpace = 10//set space between dashes

var selArray = new Array();

var doc = activeDocument;

var selBounds = doc.selection.bounds;

var top = selBounds[1];

var bottom = selBounds[3];

var selW = doc.selection.bounds[2]-doc.selection.bounds[0];

var selH = doc.selection.bounds[3]-doc.selection.bounds[1];

var startD = doc.selection.bounds[0];

var endD = startD+startingSize;

var dashSize = startingSize

while (endD< selBounds[2] && dashSize> 1){

//for(var i=0;i<3;i++){

    selArray = new Array([startD,top],[endD,top],[endD,bottom],[startD,bottom]);

    doc.selection.select(selArray);

    fillForeground ();

    startD = endD + dashSpace;

    dashSize *=dimStep

    endD = startD + dashSize

    }

selArray = new Array([selBounds[0],top],[selBounds[2],top],[selBounds[2],bottom],[selBounds[0],bottom]);

doc.selection.select(selArray);

app.preferences.rulerUnits = oldPref;

function fillForeground(){

       var idFl = charIDToTypeID( "Fl  " );

        var desc2 = new ActionDescriptor();

        var idUsng = charIDToTypeID( "Usng" );

        var idFlCn = charIDToTypeID( "FlCn" );

        var idFrgC = charIDToTypeID( "FrgC" );

        desc2.putEnumerated( idUsng, idFlCn, idFrgC );

        var idOpct = charIDToTypeID( "Opct" );

        var idPrc = charIDToTypeID( "#Prc" );

        desc2.putUnitDouble( idOpct, idPrc, 100.000000 );

        var idMd = charIDToTypeID( "Md  " );

        var idBlnM = charIDToTypeID( "BlnM" );

        var idNrml = charIDToTypeID( "Nrml" );

        desc2.putEnumerated( idMd, idBlnM, idNrml );

    executeAction( idFl, desc2, DialogModes.NO );

    }

Bojan Živković11378569
Community Expert
Community Expert
August 17, 2019

Here are my $0.02 If you know thickness of line then do the following - you can also record action after first step in case that you change mind about thickness:

  1. Draw first dash using Rectangle tool.
  2. With shape layer in the Layers panel selected Press Alt/Opt + Ctrl/Cmd + T what will enter free transform with copy.
  3. Use arrow key -> to nudge shape into position, that should be copy of original or first shape created in step 1.
  4. Confirm on Enter/Return.
  5. Press Alt/Opt + Shift + Ctrl/Cmd + T as many times as needed what will create new dash every time and move it for the same increment as you did in step 3.

Ups, it appears that I didn't understand what is your problem, please ignore my answer although it can be used successfully with addition to change dash thickness in addition to move it in step 3. The next step would be to copy all layers and rotate them so you have from thin to thick.

Semaphoric
Community Expert
Community Expert
August 17, 2019

You could stroke a path with a square Brush, with Roundness set to Fade in Shape Dynamics:


Chuck Uebele
Community Expert
Community Expert
August 17, 2019

That is not possible with the current tools in PS. The only way I can see to work around this would be to write a script that creates rectangle shapes in a line and reduced the horizontal width with each placement.

Chuck Uebele
Community Expert
Community Expert
August 17, 2019

One rather tedious option would be to use a grid script that I created that can set guides at a progressive distance then draw rectangles between those guides. Then move one of the end shapes and distribute the shapes to create spaces.

ASilva
ASilva작성자
Inspiring
August 17, 2019

what about brushes or shapes for photoshop with the effect i want ?? do u think there are shapes or brushes like that ??

Anyways i think i might just try and create the effect by hand one square or circle at a time.