- Home
- Photoshop ecosystem
- Discussions
- Re: Directly setting the crop size in pixels
- Re: Directly setting the crop size in pixels
Copy link to clipboard
Copied
 1 Correct answer
The following script will create a rectangular selection at the width and height entered into the prompts. By default, it is drawn at the upper left (0x 0y).
You can then position the marquee where you wish to crop, then use Image > Crop.
At least you will get your desired size, I hope that this helps!
// Create Rectangular Selection from Prompts.jsx

#target photoshop

    (function () {

        /* Width Input */
        // Loop the input prompt until a number is entered
var orExplore related tutorials & articles
Copy link to clipboard
Copied
If I understand your question, you can consider using
image -> canvas size,
Copy link to clipboard
Copied
Hi Mohammad,
Canvas size doesn't provide the necessary level of control.
Yes, you can of course set the specific pixel dimensions, but you cannot choose which portion of the image you want to retain, other than centre, top left etc anchoring.
Think of it like this. Let us say I have an array or grid of icons in a 1000x1000 pixel image each icon is 100x100 pixels so 10 rows of 10 icons. Let us now imagine that I need to crop to just a single icon. Sure I can set the height and width of the crop but the border doesn't change and I have to spend valuable time fighting the trackpad or graphics tablet going backwards and forwards between 98x98 and 101x101 pixels before I get lucky and hit 100x100.
I hope it's obvious that getting close and resizing is not an option as I'll get the edge of the adjacent icon in my resized image. If I could just enter the dimensions and get the border to snap to that exact size it would be so much faster.
I know also, that in my example above, I could zoom in close on the icon in question and it would be an easy task to acomplish. But today I needed to take exactly 3000 specific pixels out of a 6000x4000 image. Yes, I could zoom but it's extra time on a workaround.
Cheers Shaun
Copy link to clipboard
Copied
I think that you'll need to use the Rectangular Marquee Selection tool [m] and draw out your crop area, then use the Image > Crop command. I appreciate that part of the issue is easily drawing a crop or marquee to the desired pixel sizes when using a trackpad.
Copy link to clipboard
Copied
Hi Stephen,
Thanks and yes it is all about that issue of getting the exact size. It is possible with zooming in to increase the precision with which you can drag out a crop or selection but it is a faffy workaround.
I was hoping for a simple, yeah just hold shift or whatever when you enter the crop dimmensions.
Cheers, Shaun
Copy link to clipboard
Copied
The following script will create a rectangular selection at the width and height entered into the prompts. By default, it is drawn at the upper left (0x 0y).
You can then position the marquee where you wish to crop, then use Image > Crop.
At least you will get your desired size, I hope that this helps!
// Create Rectangular Selection from Prompts.jsx

#target photoshop

    (function () {

        /* Width Input */
        // Loop the input prompt until a number is entered
        var origWidth;
        while (isNaN(origWidth = prompt("Selection width in pixels:", "100")));
        // Test if cancel returns null, then terminate the script
        if (origWidth === null) {
            alert('Script cancelled!');
            return
        }
        // Test if an empty string is returned, then terminate the script
        if (origWidth === "") {
            alert('A value was not entered, script cancelled!');
            return
        }
        // Convert decimal input to integer
        var widthToInteger = parseInt(origWidth);

        /* Height Input */
        // Loop the input prompt until a number is entered
        var origHeight;
        while (isNaN(origHeight = prompt("Selection height in pixels:", "100")));
        // Test if cancel returns null, then terminate the script
        if (origHeight === null) {
            alert('Script cancelled!');
            return
        }
        // Test if an empty string is returned, then terminate the script
        if (origHeight === "") {
            alert('A value was not entered, script cancelled!');
            return
        }
        // Convert decimal input to integer
        var heightToInteger = parseInt(origHeight);

        /* Call the Rectangular Selection Function */
        setRectSel(0, 0, heightToInteger, widthToInteger);

        /* Set Rectangular Selection Function */
        function setRectSel(top, left, bottom, right) {
            var c2t = function (s) {
                return app.charIDToTypeID(s);
            };
            var s2t = function (s) {
                return app.stringIDToTypeID(s);
            };
            var descriptor = new ActionDescriptor();
            var descriptor2 = new ActionDescriptor();
            var reference = new ActionReference();
            reference.putProperty(s2t("channel"), s2t("selection"));
            descriptor.putReference(c2t("null"), reference);
            descriptor2.putUnitDouble(s2t("top"), s2t("pixelsUnit"), top);
            descriptor2.putUnitDouble(s2t("left"), s2t("pixelsUnit"), left);
            descriptor2.putUnitDouble(s2t("bottom"), s2t("pixelsUnit"), bottom);
            descriptor2.putUnitDouble(s2t("right"), s2t("pixelsUnit"), right);
            descriptor.putObject(s2t("to"), s2t("rectangle"), descriptor2);
            executeAction(s2t("set"), descriptor, DialogModes.NO);
        }

        /* Select the Rectangular Marquee Selection tool */
        (r = new ActionReference()).putClass(stringIDToTypeID('marqueeRectTool'));
        (d = new ActionDescriptor()).putReference(stringIDToTypeID('target'), r);
        executeAction(stringIDToTypeID('select'), d, DialogModes.NO)

    })
    ();
https://prepression.blogspot.com/2017/11/downloading-and-installing-adobe-scripts.html
Copy link to clipboard
Copied
That is neat, I like, thank you.
As you will see I'm rather new here. I want to give you credit, but I'm not sure whether to mark as the correct answer. It is a workable solution, just not what I'd expected. What do you think ?
Cheers, Shaun
Copy link to clipboard
Copied
There can be multiple correct answers, so if a better one comes along you can mark that as correct as well.
Copy link to clipboard
Copied
An updated version of the previous script with a proper GUI:
// Create Rectangular Selection from ScriptUI.jsx

#target photoshop

(function () {
    // Create ScriptUI dialog
    var dlg = new Window('dialog', 'Rectangular Selection');
    dlg.orientation = 'column';
    dlg.alignChildren = 'left';

    // Origination X group
    var xGroup = dlg.add('group');
    xGroup.add('statictext', undefined, 'X (px):');
    var xInput = xGroup.add('editnumber', undefined, 0);
    xInput.characters = 8;

    // Origination Y group
    var yGroup = dlg.add('group');
    yGroup.add('statictext', undefined, 'Y (px):');
    var yInput = yGroup.add('editnumber', undefined, 0);
    yInput.characters = 8;

    // Width group
    var widthGroup = dlg.add('group');
    widthGroup.add('statictext', undefined, 'W (px):');
    var widthInput = widthGroup.add('editnumber', undefined, 100);
    widthInput.characters = 8;

    // Height group
    var heightGroup = dlg.add('group');
    heightGroup.add('statictext', undefined, 'H (px):');
    var heightInput = heightGroup.add('editnumber', undefined, 100);
    heightInput.characters = 8;

    // Buttons
    var buttonGroup = dlg.add('group');
    buttonGroup.alignment = 'center';
    var cancelBtn = buttonGroup.add('button', undefined, 'Cancel');
    var okBtn = buttonGroup.add('button', undefined, 'OK');

    // Input validation and action
    okBtn.onClick = function () {
        var xVal = xInput.value;
        var yVal = yInput.value;
        var widthVal = widthInput.value;
        var heightVal = heightInput.value;

        if (
            xVal === undefined || yVal === undefined ||
            widthVal === undefined || heightVal === undefined ||
            xVal === "" || yVal === "" ||
            widthVal === "" || heightVal === ""
        ) {
            alert("Please fill in all fields.");
            return;
        }

        dlg.close(1);

        // Call the Rectangular Selection Function
        setRectSel(
            yVal,
            xVal,
            yVal + heightVal,
            xVal + widthVal
        );

        // Select the Rectangular Marquee Selection tool
        var r = new ActionReference();
        r.putClass(stringIDToTypeID('marqueeRectTool'));
        var d = new ActionDescriptor();
        d.putReference(stringIDToTypeID('target'), r);
        executeAction(stringIDToTypeID('select'), d, DialogModes.NO);
    };

    cancelBtn.onClick = function () {
        dlg.close(0);
        // alert('Script cancelled!');
        return;
    };

    dlg.center();
    var result = dlg.show();
    if (result != 1) return; // Cancelled

    // Set Rectangular Selection Function
    function setRectSel(top, left, bottom, right) {
        var c2t = function (s) {
            return app.charIDToTypeID(s);
        };
        var s2t = function (s) {
            return app.stringIDToTypeID(s);
        };
        var descriptor = new ActionDescriptor();
        var descriptor2 = new ActionDescriptor();
        var reference = new ActionReference();
        reference.putProperty(s2t("channel"), s2t("selection"));
        descriptor.putReference(c2t("null"), reference);
        descriptor2.putUnitDouble(s2t("top"), s2t("pixelsUnit"), top);
        descriptor2.putUnitDouble(s2t("left"), s2t("pixelsUnit"), left);
        descriptor2.putUnitDouble(s2t("bottom"), s2t("pixelsUnit"), bottom);
        descriptor2.putUnitDouble(s2t("right"), s2t("pixelsUnit"), right);
        descriptor.putObject(s2t("to"), s2t("rectangle"), descriptor2);
        executeAction(s2t("set"), descriptor, DialogModes.NO);
    }
})();Copy link to clipboard
Copied
An alternative way
1. Drag out a rectangle with the rectangular marquee tool (size doesn't matter)
2. Select > Transform Selection and type in the size you want in the options bar e.g 100 x 100 px into W and H
3. Drag the rectangle to where you want it
4. Image > Crop
Dave
Copy link to clipboard
Copied
That works too Dave and was my first thought, however, when I recorded it into an action the resize is recorded in a % and not as a fixed px value. The end result should be the same though.
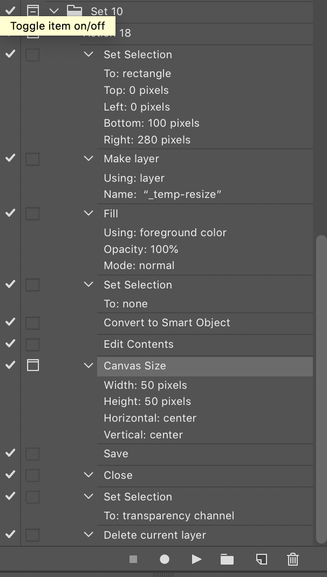
EDIT: It is possible to create an action that does use an explicit pixel size...
Find more inspiration, events, and resources on the new Adobe Community
Explore Now
