Exit
  • Global community
    • Language:
      • Deutsch
      • English
      • Español
      • Français
      • Português
  • 日本語コミュニティ
  • 한국 커뮤니티
0

Filling area to match 'metal reflection' from another area

New Here ,
Feb 17, 2017 Feb 17, 2017

Hi,

I spend a lot of time photographing and editing watches. Some of these watches have a lot of chrome around the bezel which pick up reflections of everything around.

Sometimes, I will cut out an area of the watch bezel that is free from reflections and paste it over the area that I am trying to repair, stretching it and then using a mask to feather it and go around the edges to make it fit but is there a better way?

Screen Shot 2017-02-17 at 13.52.40.png

For instance. What is the best way to replicate the smooth white 'metallic' surface indicated by the top arrow and 'paint' it over the area of the bottom arrow, so that the whole bezel has the same smooth looking metallic reflection all the way around?

I know it's best to shoot in a light tent for product photos, but for these types of lifestyle shots that isn't always practical.

Any help would be greatly appreciated.

Thanks

Best wishes

Louis

394
Translate
Report
Community guidelines
Be kind and respectful, give credit to the original source of content, and search for duplicates before posting. Learn more
community guidelines
Adobe
Community Expert ,
Feb 17, 2017 Feb 17, 2017

Hi

The trouble with taking that flat white and applying it elsewhere is that it takes the chrome look out and the bezel just looks flat.

Have you considered selectively blurring some of the unwanted detail?

Below is just the blur tool on a duplicate layer

Or, to take it a bit further, paint on an additional layer with colours picked up from the watch.

My preference is just the slight blur - but that is just me

Dave

Translate
Report
Community guidelines
Be kind and respectful, give credit to the original source of content, and search for duplicates before posting. Learn more
community guidelines
New Here ,
Feb 17, 2017 Feb 17, 2017

Hey Dave,

Thanks for taking the time to reply. I did add some blur selectively yes, but may not have done it in the same way you have done above?


How did you use a mask for just the blur tool on that duplicate layer? Whilst I have used photoshop for over 10 years, I have only really started to use masks in the last 3 months

With the painted example, did you select the bezel with pen tool or similar, create a new layer with the selection and they paint over it?

And how do you stop the paintbrush bleeding outside of the selected area (so the paint stays within the boundaries of what you have selected).

Apologies for the school-boy level questions

Louis

Translate
Report
Community guidelines
Be kind and respectful, give credit to the original source of content, and search for duplicates before posting. Learn more
community guidelines
Community Expert ,
Feb 17, 2017 Feb 17, 2017

No problem with questions

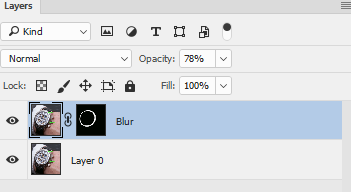
As you spotted I used a mask to stop the blur (or the paint) bleeding into the adjacent area. A mask shows the layer where the mask is white and makes the layer transparent where the mask is black.

So in each case I duplicated the layer - masked it then brushed it with the blur tool/paint brush. Finally adjusting the opacity of the layer so the original showed through a little of the detail.

To make the mask - I could have carefully gone round with the pen tool but in this case I chose much faster way.

I used the elliptical marquee tool to make a rough circle.

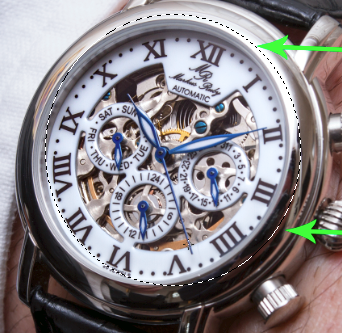
Obviously that did not match the bezel so I then went to the menu "Select - Transform Selection" and dragged the handles around to fit the ellipse to the outside of the bezel

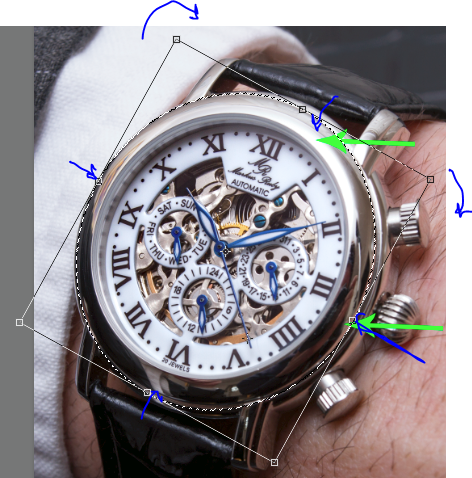
Next, I went to menu "Layer - Layer Mask - Reveal Selection".

Next I made a new selection, again using the elliptical marquee tool and then "Select-Transform Selection" to fit the inner edge of the bezel.

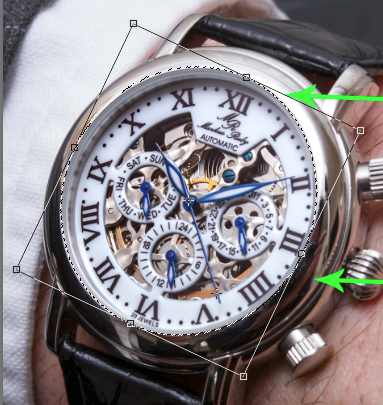
Finally I clicked on the mask and used Edit - Fill - Black

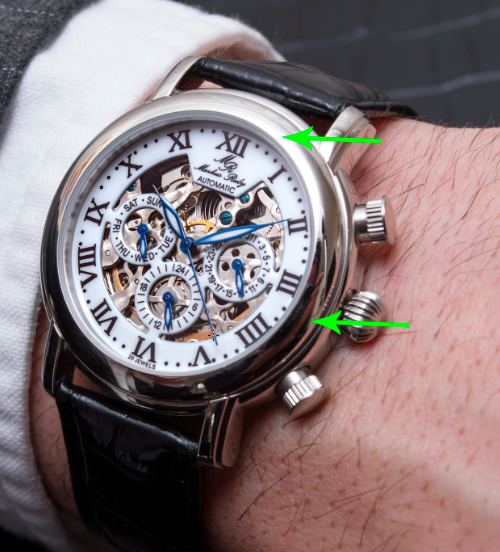
This filled the inner part of the mask with second selection leaving the mask as below :

I hope that helps you

Dave

Translate
Report
Community guidelines
Be kind and respectful, give credit to the original source of content, and search for duplicates before posting. Learn more
community guidelines
New Here ,
Feb 17, 2017 Feb 17, 2017
LATEST

Wow, thanks for the detailed response.

Using the elliptical has always bugged me as I used to try and drag the handles once I used the tool, which simply adjusted whatever the tool had just cut out. I couldn't work out how to adjust the size and shape of the ellipse before you wanted it to cut out the selected area, this has made things so much easier!


Thanks again for your response. I will have a play with these methods and see if I can improve the reflections.

All the best

Translate
Report
Community guidelines
Be kind and respectful, give credit to the original source of content, and search for duplicates before posting. Learn more
community guidelines