- Home
- Photoshop ecosystem
- Discussions
- Re: Fixing an severely overexposed photo
- Re: Fixing an severely overexposed photo
Fixing an severely overexposed photo
Copy link to clipboard
Copied
I have a series of digital photos where the aperture setting was mistakenly set resulting in a series of severely overexposed wedding photos. I wish to correct these with Photoshop CC (2017 Release) or Photoshop Elements 15 however the Automatic repair are not adequate. Subjects are wearing too light of clothing and the outdoor background is lit via sunlight so it is washed as well. Any suggestions on how I could proceed to restore some of these will be appreciated. Regards.
Explore related tutorials & articles
Copy link to clipboard
Copied
There is really nothing you can do to restore blown highlights in an image. There just isn't any data in the file to restore. If these are RAW images, you can correct the overexposure to some degree in Camera Raw or Lightroom.
Copy link to clipboard
Copied
One thing to try is making one or more layers with duplicates of the image, and set the blending mode of them to Multiply.
Copy link to clipboard
Copied
Unedited Adjustment Layers set to that Blend Mode achieve the same result but allow for easier touch-up of the original Layer and should result in »leaner« files.
Copy link to clipboard
Copied
As https://forums.adobe.com/people/Chuck%20Uebele said you should go back to the RAW files.
Can you provide one as an example?
Copy link to clipboard
Copied
Here is an example of what I am working with. I am attempting to get the individuals restored as my priority. If the entire image can be restored that would be great both the peoples are the main subject in these photos so I am attempting to develop a method of recovering them for the 30 or so images I have rthis issue with. Thanks for any advice or help you can provide.
Regards
Copy link to clipboard
Copied
whtrose wrote
Here is an example of what I am working with.
Regards
You don't need to use the forum widget to upload an image. Just copy to the clipboard, and paste directly into your post.
Copy link to clipboard
Copied
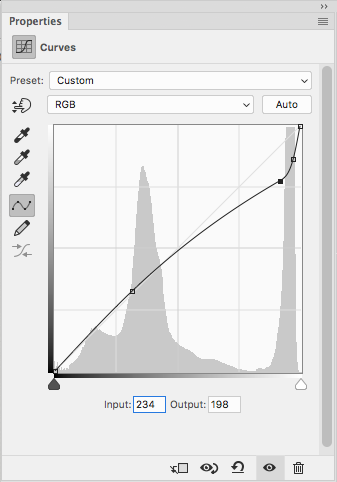
If there's any detail there, you may get somewhere with a Curves Adjustment Layer (see screenshot as a rough example). But bear in mind that increasing contrast in one part of the tonal scale with a steep section of a curve, is at the expense of the contrast in the shallower/flatter sections.

Copy link to clipboard
Copied
Clone detail in from another image, or rebuild the damaged area with paint brush and texture. You would need to show us a specific image in order to get a meaningful answer.
Copy link to clipboard
Copied
I disagree with a couple of people. I am an artist and a digital matte painter. That being said I have a few trick ideas for ya. You can take another photo of said person in the color and lighting you need. (seems like a bit of work to go through) You can also paint over in another layer in PS and use the adjustment layer, such as overlay, dark mode, and many others. It all comes down to what you want to do with the colors in your photo. Hope this helps a bit. Just play around with it a little and you'll get it. Good luck.
Copy link to clipboard
Copied
Matte painting is fascinating and interesting. I'd love to see some of what you do and where it is used.
I'm remembering some of the mattes used in the Star Wars movies where gaps in the matte, away from the main action, showed video to make the matte and scene look real. The first three Star Wars movies predated Photoshop even, so all hand painted back then. Is your's one of the skills threatened by Ai?
Copy link to clipboard
Copied
I disagree with a couple of people...You can take another photo of said person in the color and lighting you need. (seems like a bit of work to go through)
By @Vanderhoof Studios
As the original post from 2017 was event photography at a wedding, this may be somewhat hard to do 7 years later!
By @Stephen Marsh
Baby Shower party photos? 😉
Find more inspiration, events, and resources on the new Adobe Community
Explore Now

