- Home
- Photoshop ecosystem
- Discussions
- Re: Gradients Not Exporting As Viewing In Preview
- Re: Gradients Not Exporting As Viewing In Preview
Gradients Not Exporting As Viewing In Preview
Copy link to clipboard
Copied
Hello everyone!
Im having massive trouble with gradient maps, i have a client that needs this poster for music event, and i broke some ground with an aesthetic im trying to acomplish.
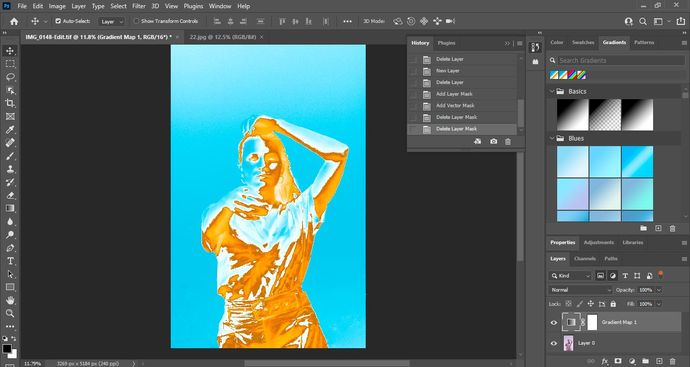
Firstly the gradient i applied doest export as i viewed it, i applied an adjustment layer gradient map to a photo i imported from lightroom as i was editing the photo.
Here is what i want it to look like, BEFORE i apply either an Export, Flatten, or Layer Merge.
The second image is basically when i do any of the three processess mentioned before.
I cant complete this project unless i get the results of the first image, whatever the cost, i know it sounds dramatic but its really important for me so any advice from someone expirenced with these problems, would be massively apprecaiited .
Explore related tutorials & articles
Copy link to clipboard
Copied
Please post screenshots taken at View > 100% of the layered and the flattened image.
Viewing layered images with Adjustment Layers for example at anything other than 100% can lead to inaccurate previewing, in particular grainy images.
Copy link to clipboard
Copied
Also include the Properties Panel in the screenshots so one can see the Gradient.
Copy link to clipboard
Copied
This is most likely a very noisy/grainy image?
In that case you must view at 100% to get an accurate adjustment/blending preview.
In Photoshop, 100% has nothing to do with size. It means that one image pixel is represented by exactly one screen pixel. This 1:1 screen mapping is crucial.
For performance reasons, adjustment/blending previews are calculated based on the on-screen image. Zoomed out, that means the math isn't done on the actual image pixels, but on a lot of intermediate blurred pixels, the result of the on-screen downsampling.
When you commit the adjustment, it's performed on the full image data, pixel for pixel. So you may get a different result, but this time it's correct.
So first check in View > 100%, and then come back.
Copy link to clipboard
Copied
This is most likely a very noisy/grainy image?
And as the OP »imported from lightroom« they should hopefully have the opportunity to process it again without that much noise.
Copy link to clipboard
Copied
Hello!
Thank you both for looking at my problem and actually replying, its greatly appreciatted!
Here are the screen shots at 100% beforer and after "Flattening" and the properties tab for layers and the gradient adjustment layer.
Do you think there is any hope for me to get it to look like one of my first picutres?
I really need this mettalic chrome terminator 2 look.
Copy link to clipboard
Copied
As long as you judge your adjustments at 100%, like above - then that's how the final result will look. That's always the correct appearance.
Copy link to clipboard
Copied
@c.pfaffenbichler @D Fosse
Okay so i went away and had a good patient think what to do.
First of all in lightroom i removed sharpening which was at +30, and i brought down the clarity a bit.
I also pumped noise reduction and colour noise reduction to max, so i got a very hazy smooth image, because i thought about what you said about the noise/grain.
Experimenting some more at 100% view i managed to figure it out, because like you said its accurate at that size for rendering effecieny reasons, etc.
I put the gradient map back on at 100% and Voila it works, even when i flatten the image, i even managed to push it even further and put a black paper texture ontop, set tthe blending option to overlay and i have such a good peice of content for the portfolio.
With your guidance guys ive progressed a little bit further in my graphic design career, i really appreiciatte your acumalted knowledge and patience.
For anyone reading this having trouble with gradient maps for abstract definition, use my case for future reference!
Check the noise! and go 100% view! ESPECIALLY if your viewing a DSLR image thats 4K!
Copy link to clipboard
Copied
Good to read you found a solution.
This issue seems to pop up on this Forum every once in a while; so to the Forum regulars it seems »old hat« but it is naturally a big and unpleasant surprise for anyone who comes up against it for the first time.
There used to be the possibility to make a trade-off performance-wise and set the Cache Levels to 1 to get a more accurate preview at all magnifications but that was broken somewhere between Photoshop CS2 and Photoshop CC 2017.
Find more inspiration, events, and resources on the new Adobe Community
Explore Now


