• Global community
    • Language:
      • Deutsch
      • English
      • Español
      • Français
      • Português
  • 日本語コミュニティ
    Dedicated community for Japanese speakers
  • 한국 커뮤니티
    Dedicated community for Korean speakers
Exit
2

Greenscreen glow effect aka green edge

Community Beginner ,
Nov 06, 2017 Nov 06, 2017

Copy link to clipboard

Copied

Hello Folks!

I hope you will help me. I am having problems with removing greenscreen from picture. The original picture is like this:

GS1.jpg

and after editing with quick selection tool and refine edge tool I got this:

GS2.jpg

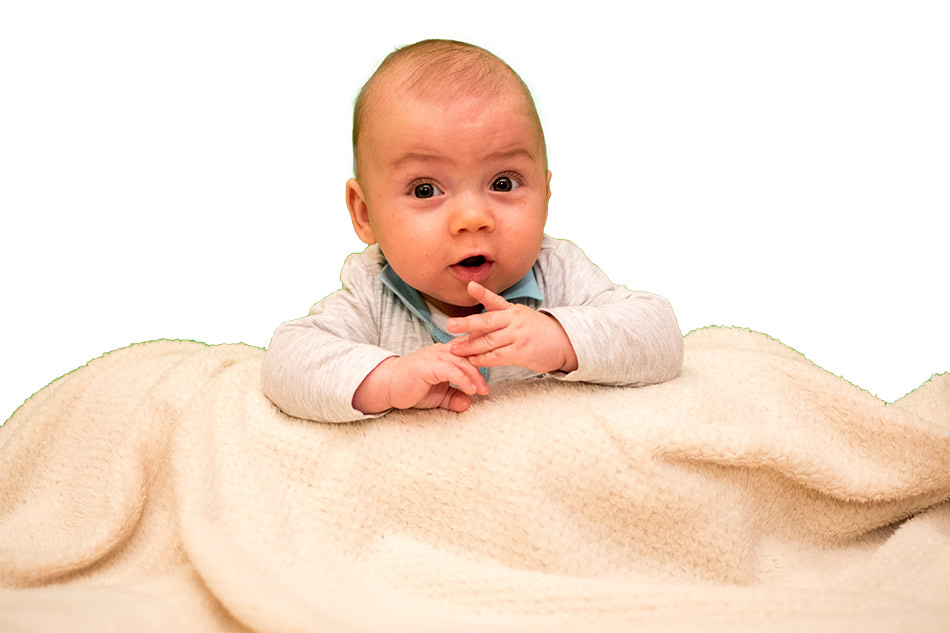
The question is, how do I get rid off this green glow effect, but I dont want to lose details, like shift edge feature. Thanks for your sugestions and advices.


Steven

Views

34.4K

Translate

Translate

Report

Report
Community guidelines
Be kind and respectful, give credit to the original source of content, and search for duplicates before posting. Learn more
community guidelines

correct answers 1 Correct answer

Community Expert , Nov 06, 2017 Nov 06, 2017

Look at my quick and dirty trial:

2017-11-06_23-31-03.png

for the green cast on the baby's face: do the same with hue and keep close to the place where you want to take away the cast.

Votes

Translate

Translate
Adobe
Enthusiast ,
Nov 06, 2017 Nov 06, 2017

Copy link to clipboard

Copied

Since you have your selection already made, I would go to select> Refine edge and play with some adjustment until you get a result you are happy with.

In the future, a quick way to cut out a green screen would be to use the color range tool under the select drop down. Once you have selected color range, Use the eyedropper tool that appears, hold down the SHIFT key while clicking and dragging around the green areas you need to remove, ideally the background in the popup color range box should become white. If you think you’ve removed too much, hold down the ALT key and click on the area where you want to deselect. Click OK when you are happy with the selection

Votes

Translate

Translate

Report

Report
Community guidelines
Be kind and respectful, give credit to the original source of content, and search for duplicates before posting. Learn more
community guidelines
Community Beginner ,
Nov 06, 2017 Nov 06, 2017

Copy link to clipboard

Copied

But with this I also remove details, like hairs, etc?

Votes

Translate

Translate

Report

Report
Community guidelines
Be kind and respectful, give credit to the original source of content, and search for duplicates before posting. Learn more
community guidelines
Community Expert ,
Nov 06, 2017 Nov 06, 2017

Copy link to clipboard

Copied

Look at my quick and dirty trial:

2017-11-06_23-31-03.png

for the green cast on the baby's face: do the same with hue and keep close to the place where you want to take away the cast.

ABAMBO | Hard- and Software Engineer | Photographer

Votes

Translate

Translate

Report

Report
Community guidelines
Be kind and respectful, give credit to the original source of content, and search for duplicates before posting. Learn more
community guidelines
Community Beginner ,
Nov 06, 2017 Nov 06, 2017

Copy link to clipboard

Copied

This works like a charm! Thanks

Votes

Translate

Translate

Report

Report
Community guidelines
Be kind and respectful, give credit to the original source of content, and search for duplicates before posting. Learn more
community guidelines
Community Expert ,
Nov 07, 2017 Nov 07, 2017

Copy link to clipboard

Copied

If you get your lightning correct, you will avoid that green reflection on the baby's face. It's probably a question of distance.

You may also try davescm​'s receipt. That too looks promising. My solution is destructive (alters the original image), his solution is reversible.

ABAMBO | Hard- and Software Engineer | Photographer

Votes

Translate

Translate

Report

Report
Community guidelines
Be kind and respectful, give credit to the original source of content, and search for duplicates before posting. Learn more
community guidelines
Community Expert ,
Nov 06, 2017 Nov 06, 2017

Copy link to clipboard

Copied

Hi

1. Put a new empty layer directly above the masked image layer.

2. Set the blending mode of that empty layer to color

3. Alt click on the border between the empty layer and masked layer in the layers panel. A small down arrow will appear to indicate the new layer is clipped to the masked layer below

4. Take a soft brush and click with the Alt key to pick up colour from the head. Brush over the edge - onto the new empty layer. The green colour will change to the head colour. The clipping mask will prevent you painting over the edge. Work round the edges - alt clicking to change colour where needed.

Dave

Votes

Translate

Translate

Report

Report
Community guidelines
Be kind and respectful, give credit to the original source of content, and search for duplicates before posting. Learn more
community guidelines
New Here ,
Dec 02, 2019 Dec 02, 2019

Copy link to clipboard

Copied

I have tell you thanks your solution or trick is the easiest and best tried it and it was perfect so big thank you.

kevin

Votes

Translate

Translate

Report

Report
Community guidelines
Be kind and respectful, give credit to the original source of content, and search for duplicates before posting. Learn more
community guidelines
New Here ,
Feb 28, 2020 Feb 28, 2020

Copy link to clipboard

Copied

This comment is a huge dealbreaker for me. Thank you so much Dave. You're a genious.

Votes

Translate

Translate

Report

Report
Community guidelines
Be kind and respectful, give credit to the original source of content, and search for duplicates before posting. Learn more
community guidelines
New Here ,
Jun 29, 2020 Jun 29, 2020

Copy link to clipboard

Copied

Dave, you are amazing! I've tried so many methods and yours is just mind blowing. Thanks!

Votes

Translate

Translate

Report

Report
Community guidelines
Be kind and respectful, give credit to the original source of content, and search for duplicates before posting. Learn more
community guidelines
New Here ,
Jul 19, 2020 Jul 19, 2020

Copy link to clipboard

Copied

Thank you so much Dave, you're a genius my friend. I've been searching for a solution to this for a long time!

Votes

Translate

Translate

Report

Report
Community guidelines
Be kind and respectful, give credit to the original source of content, and search for duplicates before posting. Learn more
community guidelines
New Here ,
Feb 04, 2021 Feb 04, 2021

Copy link to clipboard

Copied

Thank you so much for this Dave.

Votes

Translate

Translate

Report

Report
Community guidelines
Be kind and respectful, give credit to the original source of content, and search for duplicates before posting. Learn more
community guidelines
New Here ,
Sep 03, 2021 Sep 03, 2021

Copy link to clipboard

Copied

Thank you!!!!

Votes

Translate

Translate

Report

Report
Community guidelines
Be kind and respectful, give credit to the original source of content, and search for duplicates before posting. Learn more
community guidelines
Explorer ,
Aug 30, 2022 Aug 30, 2022

Copy link to clipboard

Copied

Wow, that worked GREAT! Thanks!

Votes

Translate

Translate

Report

Report
Community guidelines
Be kind and respectful, give credit to the original source of content, and search for duplicates before posting. Learn more
community guidelines
New Here ,
Aug 31, 2022 Aug 31, 2022

Copy link to clipboard

Copied

LATEST

You are a God Sir 🙂

Votes

Translate

Translate

Report

Report
Community guidelines
Be kind and respectful, give credit to the original source of content, and search for duplicates before posting. Learn more
community guidelines
New Here ,
Apr 20, 2021 Apr 20, 2021

Copy link to clipboard

Copied

Guy, I think these articles can help you with this problem as well - https://greenscreenstock.com/blog/

Votes

Translate

Translate

Report

Report
Community guidelines
Be kind and respectful, give credit to the original source of content, and search for duplicates before posting. Learn more
community guidelines