• Global community
    • Language:
      • Deutsch
      • English
      • Español
      • Français
      • Português
  • 日本語コミュニティ
    Dedicated community for Japanese speakers
  • 한국 커뮤니티
    Dedicated community for Korean speakers
Exit
0

Guide Lines for Print Sizes Action?

Community Beginner ,
Mar 20, 2019 Mar 20, 2019

Copy link to clipboard

Copied

Hi there,

I was wondering if there was an action or script that could product guide lines based on 4x6, 5x7, 8x10 print sizes?  I would like to have this because I do a lot of sports composites with text and graphics and produce packages with wallets, 4x6, 5x7, 8x10.  Having the guide lines would allow me to ensure that none of the elements end up off the paper when the printers produce the actual printwork. 


Right now I am using a .png that I created as an overlay layer that I can turn off but an actual action with guide lines would be more time efficient and precise.


Anyone able to help?


--Tim

TOPICS
Actions and scripting

Views

3.1K

Translate

Translate

Report

Report
Community guidelines
Be kind and respectful, give credit to the original source of content, and search for duplicates before posting. Learn more
community guidelines
Adobe
Community Expert ,
Mar 20, 2019 Mar 20, 2019

Copy link to clipboard

Copied

I have read entire thread and I am still not sure are you satisfied with answers or not? I have idea how you can solve problem using action but I will need more information's to give you advice or to record action.

Idea for action: create template file with guidelines. Template file should be maximum dimensions that you expect to have. Action can convert layer with image to Smart Object, or template can be created using Smart Object Layer. Edit Smart Object content and place or paste image which you want to use. Action steps depend on what you decide to use: place command or open image, copy to clipboard then edit SM object and paste. Both methods should work just fine although placing image is probably more difficult because you must consider default options when placing images and some additional step(s) and changes in Preferences may need to be done to place image with actual pixel dimensions. After updating content of Smart Object layer you will have what you want. The next step can be to duplicate document then to trim it if there is extra space around image or even to use Reveal command if you cannot figure out what is biggest dimension you will have to work with.

Another option that you have is to work with template and to use Image > Variables and Data Sets. Define Pixel Replacement variable for layer with image and set Method to As Is. Use manual method to import image. Importing image into template cannot be automated with action as far as I know, the rest after importing image into templte can be automated: duplicate document, trim/reveal all as needed and that should do the job.

Votes

Translate

Translate

Report

Report
Community guidelines
Be kind and respectful, give credit to the original source of content, and search for duplicates before posting. Learn more
community guidelines
Community Expert ,
Mar 21, 2019 Mar 21, 2019

Copy link to clipboard

Copied

Bojan Živković wrote

Idea for action: create template file with guidelines. Template file should be maximum dimensions that you expect to have. Action can convert layer with image to Smart Object, or template can be created using Smart Object Layer. Edit Smart Object content and place or paste image which you want to use. Action steps depend on what you decide to use: place command or open image, copy to clipboard then edit SM object and paste. Both methods should work just fine although placing image is probably more difficult because you must consider default options when placing images and some additional step(s) and changes in Preferences may need to be done to place image with actual pixel dimensions.

I like that and was thinking along the same lines. You could simply create a vector-based template using Photoshop shape tools, and just place that file. It didn't take long to work this out, and I think I resolved the resizing issue that Bojan mentioned so that it works right with different images, in one quick step that can easily be recorded as an Action if you want.

Conrad-Chavez-Aspect-ratio-framer-placed.gif

You can make this even simpler by skipping the Place Linked dialog box step, by simply Alt-dragging the template from the desktop and dropping it into the Photoshop document. (Dragging is the same as the Place Embedded command, while Alt-drag (Option-drag on Macs) is the same as Place Linked.)


It just doesn't get any simpler than a single drag-and-drop that resizes itself.


There are two things that must be set up for this to work.


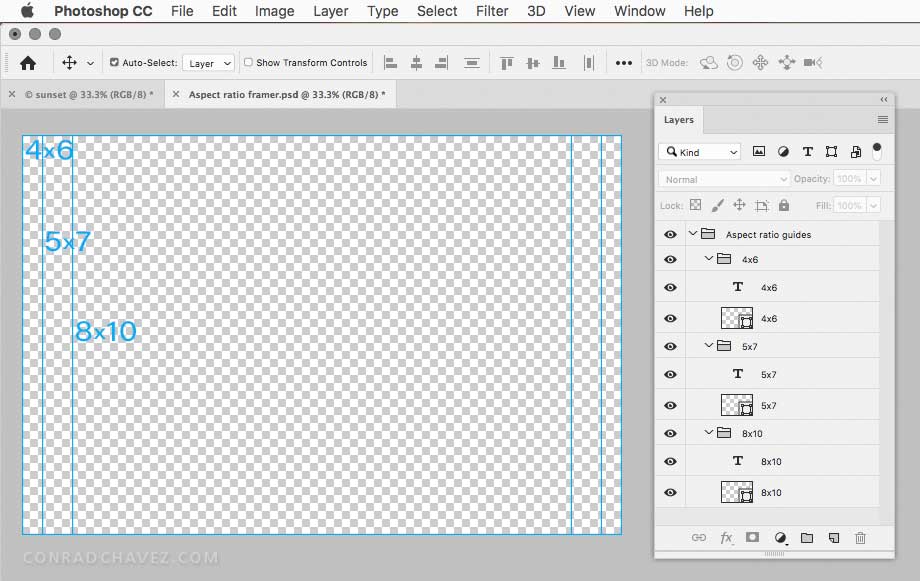
1. Create an aspect ratio guide template. The Image Size must be larger than the largest image that you use it with (I'll explain why soon). Use the vector shape tools in Photoshop so that it's resolution-independent, unlike a PNG. This is what my quick-and-dirty one looked like:

Aspect-ratio-guides-template.jpg


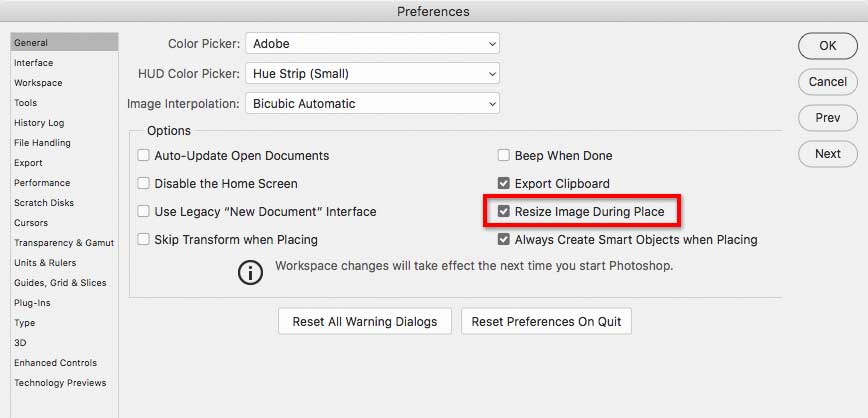
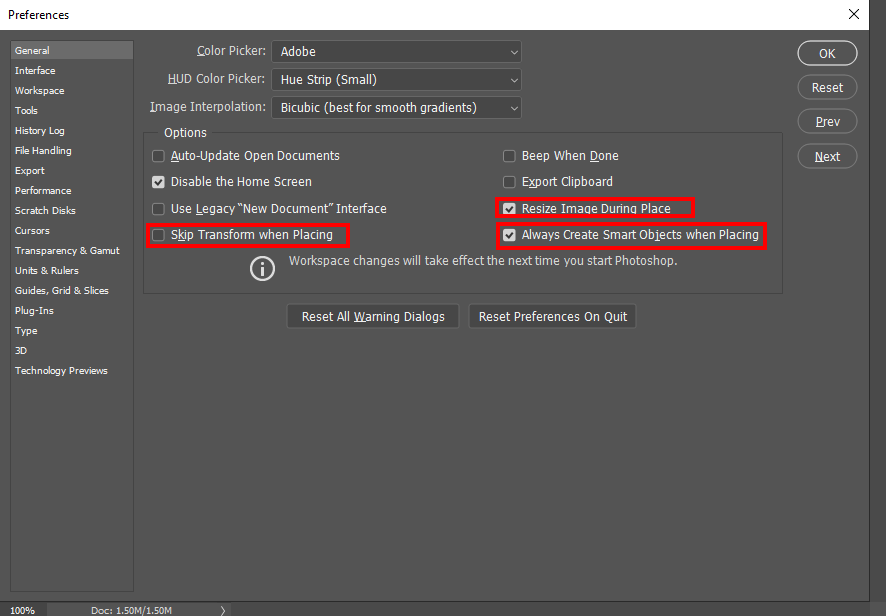
2. In Photoshop preferences, General pane, make sure the Resize Image During Place option is selected. This ensures that the oversized template will always be scaled down to fit the Image Size of the document as it's being placed. This is why the template size must be larger than your largest image size, so it will always be scaled down to fit no matter what the size of the document is. A smaller template size doesn't work because Resize Image During Place only scales down to fit, not up.

Photoshop-Preferences-General.jpg

That's it, no programming needed.

Votes

Translate

Translate

Report

Report
Community guidelines
Be kind and respectful, give credit to the original source of content, and search for duplicates before posting. Learn more
community guidelines
Community Beginner ,
Mar 22, 2019 Mar 22, 2019

Copy link to clipboard

Copied

Conrad C​  are you willing to post the aspect ratio guide template that you that you showed in your post above (reply #20)?  That would be very helpful.  Thanks!

Votes

Translate

Translate

Report

Report
Community guidelines
Be kind and respectful, give credit to the original source of content, and search for duplicates before posting. Learn more
community guidelines
Community Expert ,
Mar 22, 2019 Mar 22, 2019

Copy link to clipboard

Copied

You need to be careful with Place it will resize image files and may also scale smart object layer created to fit on canvas. If your PSD with the overlay document does not has the same aspect ratio size and resolution of the document you place it into  the overlay lines will most likely not be where you want then to be.   Most user that use Photoshop and use Place do not know how place works and are mislead by the Photoshop Place preferences. Place drove me to drink till I work out how Place worked.  I do not know which Adobe junior programmer implemented  place. I like toe have it out with them....

Dose checking  Skip Transform when placing mean the image will not be resized or transformed?  Does uncheck resize image During Place mean the image will not be resized?  Does Always Create Smart Object when Placing work yes I think that one  does work as worded.  However the first two place preferences are just plain misleading.  Every Smart object layer has an associated transform.  Are place image always resized if resized during place is checked? No.  The preference has nothing to do with image being resized or not.  For reasons unknown to me Image are degraded by resizing if the document Print resolution is not the same print resolution of the image file being placed.   I also never tested what resize during place if does if tour are not creation smart object layers for I always want and create smart object layers during place.    What I do know about what Resize during Place does is.  If the Smart Object layer created is larger than the document canvas. Resize during Place will adjust the Smart Object Layer associated transform to scale the smart object layer to fit on canvas. The Smart object is still larger then canvas size but its being scaled so is scaled version is on canvas.

JJMack

Votes

Translate

Translate

Report

Report
Community guidelines
Be kind and respectful, give credit to the original source of content, and search for duplicates before posting. Learn more
community guidelines
Community Expert ,
Mar 22, 2019 Mar 22, 2019

Copy link to clipboard

Copied

timd94211753  wrote

Conrad C are you willing to post the aspect ratio guide template that you that you showed in your post above (reply #20)?

Sure. I uploaded it to my Creative Cloud Files area so you can download it:

Aspect ratio framer.PSD


It should be easy to customize as long as you're familiar with how to edit shape layers & paths in Photoshop.


I added a note in the Photoshop document, containing the instructions mentioned here in case the template gets passed around to people who haven't seen this thread.


IMPORTANT: JJMack's reply contains excellent supporting information that I agree with. To make sure the template works as intended, in the General pane of Photoshop preferences, make sure the three preferences highlighted by JJMack are set as indicated:

  • Resize Image During Place: On
  • Skip Transform When Placing: Off
  • Always Create Smart Objects When Placing: On

Votes

Translate

Translate

Report

Report
Community guidelines
Be kind and respectful, give credit to the original source of content, and search for duplicates before posting. Learn more
community guidelines
Community Beginner ,
Mar 23, 2019 Mar 23, 2019

Copy link to clipboard

Copied

LATEST

Conrad C that is very helpful.  I can definitely use it.  Thank you very much!

Votes

Translate

Translate

Report

Report
Community guidelines
Be kind and respectful, give credit to the original source of content, and search for duplicates before posting. Learn more
community guidelines