• Global community
    • Language:
      • Deutsch
      • English
      • Español
      • Français
      • Português
  • 日本語コミュニティ
    Dedicated community for Japanese speakers
  • 한국 커뮤니티
    Dedicated community for Korean speakers
Exit
0

Help on creating a script to Save current state of the file into multiple file sizes with a user specified filename

Community Beginner ,
Sep 02, 2016 Sep 02, 2016

Copy link to clipboard

Copied

Hi all - first foray into Photoshop scripting - have no idea what I'm doing.

Have this script that I want to write that will definitely boost my productivity threefolds

Basically I want the script to ( in order of execution )

  1. Prompt the user for a desired filename for the exported file(s)
  2. Resizes the current file into the sizes below
    • 700x350
    • 600x315
    • 400x200
    • 260x160
    • 175x158
    • 166x160
    • 165x165
  3. Saves the file into the sizes specified above to different folders with the filename that the user specified in the beginning
  4. Extra: the ability to decide specific filetypes for any of the sizes above

Any kind of help / hint / code snippets would be very much appreciated!

TOPICS
Actions and scripting

Views

514

Translate

Translate

Report

Report
Community guidelines
Be kind and respectful, give credit to the original source of content, and search for duplicates before posting. Learn more
community guidelines
Adobe
Community Expert ,
Sep 02, 2016 Sep 02, 2016

Copy link to clipboard

Copied

Download the Image Processor Pro plug-in scipt and install it. With it you should be able to do that.  You will need to record the actions to crop the images to the different aspect ration you  listed or fit the image to the areas listed and add  canvas to fill the aspect ratios mismatches.  You can add the actions to Image Processing Pro process.

700x350 2:1

600x315 120:63

400x200 2:1

260x160 13:8

175x158 175:158

166x160 83:80

165x165 1:1

JJMack

Votes

Translate

Translate

Report

Report
Community guidelines
Be kind and respectful, give credit to the original source of content, and search for duplicates before posting. Learn more
community guidelines
Enthusiast ,
Sep 02, 2016 Sep 02, 2016

Copy link to clipboard

Copied

If you don't need crop, you can use assests generator (CC only).

Create image assets from layers in Photoshop

Wrap everthing into artboard and name artboard like this:

700x350 Ellipse_4.jpg, 600x315 Ellipse_4b.png, 400x200 Ellipse_4c.png,260x160 Ellipse_4d.jpg, 175x158 Ellipse_4e.png, 166x160 Ellipse_4f.png, 165x165 Ellipse_4g.png

And you can also place file into different folders.

700x350 folder-A/Ellipse_4.jpg, 600x315 folder-B/Ellipse_4b.png

Then turn generator on and every changes are automaticaly done on the fly.

Your script could just simply rename artboard. Thats all.

var variable = prompt();

app.activeDocument.activeLayer.name = "200x200 "+ variable+".jpg, 100x100 "+variable+".png";

Votes

Translate

Translate

Report

Report
Community guidelines
Be kind and respectful, give credit to the original source of content, and search for duplicates before posting. Learn more
community guidelines
Community Beginner ,
Sep 05, 2016 Sep 05, 2016

Copy link to clipboard

Copied

Crop would be a very good addition - will the solution differ greatly on whether I need / not need Crop?

Votes

Translate

Translate

Report

Report
Community guidelines
Be kind and respectful, give credit to the original source of content, and search for duplicates before posting. Learn more
community guidelines
Community Expert ,
Sep 05, 2016 Sep 05, 2016

Copy link to clipboard

Copied

If you need the different Aspect Ratio images files you need to crop the images to the correct aspect ratios or you need to size the images to fit within the canvas sizes you need and add any missing canvas. Photoshop can do both of these things no addition are needed. You do not need to use Photoshop generator plug-in.

What ever you use you need to create different aspect ration images if you need those exact sizes.  The images will not have the same content if you crop. If you size to fit they will have the same content however, some or all of the images will have two borders on opposite sides of the image.

JJMack

Votes

Translate

Translate

Report

Report
Community guidelines
Be kind and respectful, give credit to the original source of content, and search for duplicates before posting. Learn more
community guidelines
Community Beginner ,
Sep 05, 2016 Sep 05, 2016

Copy link to clipboard

Copied

Thanks for your replies JJMack​ - yes, I was aiming for the cropped version of the images if they are not with the same aspect ratio.

Attached below are the images that I've generated manually from the original 700x350 size.

seven-ways-to-stay-warm-now-that-winter-is-officially-seriously-here.jpg 
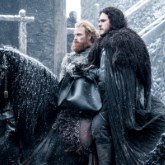
( This will be the 165x165 )

seven-ways-to-stay-warm-now-that-winter-is-officially-seriously-here.jpg 
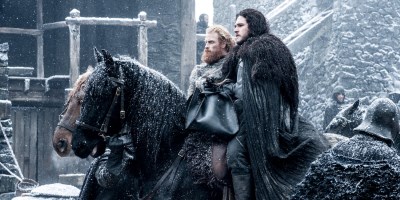
( This will be the 400x200 )

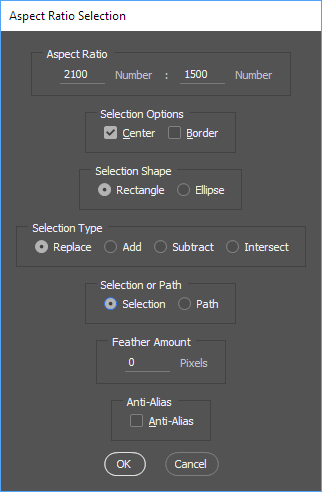
So when the target resolution is not the same aspect ratio, the image should first:

  1. Be centered on the canvas,
  2. Resized to the height of the canvas before the crop ( so that it will somewhat fill in the correct space )
  3. Cropped and then saved to the target folder

Votes

Translate

Translate

Report

Report
Community guidelines
Be kind and respectful, give credit to the original source of content, and search for duplicates before posting. Learn more
community guidelines
Community Expert ,
Sep 05, 2016 Sep 05, 2016

Copy link to clipboard

Copied

LATEST

If you re-read my first append what you want to do is easily done using the Image processor Pro plug-in script to Size your images and save the image file types you want with the names you want where you want them.  You need to record Aspect Ratio crop action that you include in the processing so the images will have the correct aspect ratio for  the resize the script will do after it uses your actions to crop you images to the correct aspect ratio.  These Crop actions are very easy to record using my Plug-in script Aspect Ratio Selection. The actions have only two steps.

Step 1 menu File>Automate>Aspect Ratio Selection.   In the Dialog you enter the aspect ratio you want. The type of selection you want and that you want it centered.  The scrip will make the selection according to the image orientation.  If you enter 3 and 2 as the ratio values. If the image is a has a portrait orientation the aspect ratio selection set will be 2:3 aspect ratio if it is not a portrait the aspect ratio set will be 3:2.  The Plug-in script records the dialog setting use recording the action into the action step.  When the Action is used the plug-in script will bypass displaying its dialog and use the recorded settings.

Step 2 menu Image>Crop.

Crafting Actions Package UPDATED Aug 10, 2014 Added Conditional Action steps to Action Palette Tips.
Contains

Example
Download

JJMack

Votes

Translate

Translate

Report

Report
Community guidelines
Be kind and respectful, give credit to the original source of content, and search for duplicates before posting. Learn more
community guidelines