

- Home
- Photoshop ecosystem
- Discussions
- Re: Help with large .psb 64-layer file
- Re: Help with large .psb 64-layer file
Help with large .psb 64-layer file

Copy link to clipboard
Copied
Hi All, I'm hoping someone here can help me with this!
I have a large 64-layer .psb, with each layer visible, the result looking like a 64-box matrix (or chessboard). Each layer has a high resolution image in it which comes from it's own separate .psd What I want to do is replace each layer's content with a new file (I have 64 source files ready to go).
I have two questions:
- Will I need to step in to each layer of the .psb, delete the existing content, open the new .psd, and copy & paste it into the now empty .psb layer, and repeat x 63 times? Or is there a way that I can automate this?
- Can the .psb layers contain linked RAW files such that if I want to adjust one of the .psb layers, I need only open the RAW file in ACR and make my adjustments there?
I would be really grateful for your help on this, as I am a total newbie to scripting etc.
Many thanks in advance!


Explore related tutorials & articles
 22
Replies
22
22
Replies
22

Copy link to clipboard
Copied
Using Smart Objects with Layer Masks might make the replacement easier.
Copy link to clipboard
Copied
Can the .psb layers contain linked RAW files such that if I want to adjust one of the .psb layers, I need only open the RAW file in ACR and make my adjustments there?
Which version of Photoshop do you use?
In Photoshop CC there is a Camera Raw (Smart) Filter, previously (not sure from which version on) one could place RAW files as Smart Objects (File > Place).
Copy link to clipboard
Copied
thank you c.p
I use CS6, and I think you are suggesting to use smart objects for non-destructive editing reasons - good idea. However I am not too familiar with layer masks, please can you elaborate on how I would use them in this case?
Copy link to clipboard
Copied
I recommend them because »Replace Conten« allows for easily switching in different images.
The Layer Masks would serve to keep the images restricted to an intended portion of the canvas (a field of the »checkerboard«).
Copy link to clipboard
Copied
c.p thank you, that makes sense. Do I understand you correctly in that if I do this, there would simply be one layer with 64 masks? Also please can you explain to me how to divide a large canvas into equal size 'layer mask' pieces - a grid of 64 squares in this case?
Copy link to clipboard
Copied
Do I understand you correctly in that if I do this, there would simply be one layer with 64 masks?
You need a Smart Object for each different image.
Have I misunderstood your original post and each Layer does have the same image content?
Please post a screenshot.
Also please can you explain to me how to divide a large canvas into equal size 'layer mask' pieces
Several approaches are feasible, I would go with a Scripting one, I guess.
What are the image dimensions in pixels?
Copy link to clipboard
Copied
c.p - yes your understanding is correct - each layer/mask has different content. The .psb (the 'canvas') dimensions in pixels is 25104 x 25104. So each of the 64 squares on the canvas is 3138 x 3138.
Copy link to clipboard
Copied
How are the Layers structured – left to right and top to bottom or …?
Please post a screenshot with the Layers Panel visible.
Copy link to clipboard
Copied
apologies c.p, the layers are structured exactly as with chess notation - please see here:
I also attach the layer structure from the .psb:

I have 8 layer folders representing each row from bottom to top. Within each folder, I have 8 layers labelled as per chessboard notation.
So, the bottom row from left to right is: a1, b1, c1... h1.
Second rowleft to right: a2, b2, c2 ... h2.
And so on to the top right square which is h8.
I hope this explains it.
Copy link to clipboard
Copied
This should convert the Layers to Smart Objects and add the Layer Masks.
Then loading different content into each Smart Object could be done manually or via a dedicated other Script.
// 2013, use it at your own risk;
#target photoshop
if (app.documents.length > 0) {
// set to pixels;
var originalRulerUnits = app.preferences.rulerUnits;
app.preferences.rulerUnits = Units.PIXELS;
var myDoc = app.activeDocument;
// collect the layers;
var theLayers = collectPixelLayers(myDoc, []);
// add layer masks;
var theSide = Math.round(myDoc.width/8);
var theX = 0;
var theY = 0;
var counter = 0;
for (var n = theLayers.length - 1; n >= 0; n--) {
var thisLayer = theLayers
; myDoc.activeLayer = thisLayer;
app.activeDocument.selection.select([[theX, theY], [theX + theSide, theY], [theX + theSide, theY + theSide], [theX, theY + theSide]], SelectionType.REPLACE, 0, false);
addLayerMask();
theX = theX + theSide;
counter++;
if (counter == 8) {
theX = 0;
theY = theY + theSide;
counter = 0;
};
};
// reset;
app.preferences.rulerUnits = originalRulerUnits;
};
////// function collect all layers //////
function collectPixelLayers (theParent, allLayers) {
if (!allLayers) {var allLayers = new Array}
else {};
for (var m = theParent.layers.length - 1; m >= 0;m--) {
var theLayer = theParent.layers
; // apply the function to layersets;
if (theLayer.typename == "ArtLayer") {
if (theLayer.kind == LayerKind.NORMAL && theLayer.isBackgroundLayer == false) {
var theLayer1 = smartify (theLayer);
allLayers.push(theLayer1)
}
}
else {
allLayers = (collectPixelLayers(theLayer, allLayers))
// this line includes the layer groups;
// allLayers.push(theLayer);
}
};
return allLayers
};
////// function to smartify if not //////
function smartify (theLayer) {
app.activeDocument.activeLayer = theLayer;
// make layers smart objects if they are not already;
if (theLayer.kind != LayerKind.SMARTOBJECT) {
var id557 = charIDToTypeID( "slct" );
var desc108 = new ActionDescriptor();
var id558 = charIDToTypeID( "null" );
var ref77 = new ActionReference();
var id559 = charIDToTypeID( "Mn " );
var id560 = charIDToTypeID( "MnIt" );
var id561 = stringIDToTypeID( "newPlacedLayer" );
ref77.putEnumerated( id559, id560, id561 );
desc108.putReference( id558, ref77 );
executeAction( id557, desc108, DialogModes.NO )
return app.activeDocument.activeLayer
}
else {return theLayer};
};
////// add layer mask //////
function addLayerMask () {
var idMk = charIDToTypeID( "Mk " );
var desc168 = new ActionDescriptor();
var idNw = charIDToTypeID( "Nw " );
var idChnl = charIDToTypeID( "Chnl" );
desc168.putClass( idNw, idChnl );
var idAt = charIDToTypeID( "At " );
var ref99 = new ActionReference();
var idChnl = charIDToTypeID( "Chnl" );
var idChnl = charIDToTypeID( "Chnl" );
var idMsk = charIDToTypeID( "Msk " );
ref99.putEnumerated( idChnl, idChnl, idMsk );
desc168.putReference( idAt, ref99 );
var idUsng = charIDToTypeID( "Usng" );
var idUsrM = charIDToTypeID( "UsrM" );
var idRvlS = charIDToTypeID( "RvlS" );
desc168.putEnumerated( idUsng, idUsrM, idRvlS );
executeAction( idMk, desc168, DialogModes.NO );
// unlink;
// =======================================================
var idsetd = charIDToTypeID( "setd" );
var desc10 = new ActionDescriptor();
var idnull = charIDToTypeID( "null" );
var ref3 = new ActionReference();
var idLyr = charIDToTypeID( "Lyr " );
var idOrdn = charIDToTypeID( "Ordn" );
var idTrgt = charIDToTypeID( "Trgt" );
ref3.putEnumerated( idLyr, idOrdn, idTrgt );
desc10.putReference( idnull, ref3 );
var idT = charIDToTypeID( "T " );
var desc11 = new ActionDescriptor();
var idUsrs = charIDToTypeID( "Usrs" );
desc11.putBoolean( idUsrs, false );
var idLyr = charIDToTypeID( "Lyr " );
desc10.putObject( idT, idLyr, desc11 );
executeAction( idsetd, desc10, DialogModes.NO );
};
Copy link to clipboard
Copied
wow - that looks comprehensive. As I said I am a newbie to scripting - I am guessing I copy and paste that code into a text file and save it with a type of extension, and then put it somewhere so that it will show up in a menu in PS? Please can you outline what to do with it?
I am very grateful for this help, what a great forum/community!
Copy link to clipboard
Copied
Paste the text into a new file in ExtendScript Toolkit (part of Photoshop’s installation, Applications/Utilities/Adobe Utilities/ExtendScript Toolkit CS…) and save it as a jsx-file into Photoshop’s Presets/Scripts-folder.
After restarting Photoshop the Script should be available under File > Scripts and can be assigned a Keyboard Shortcut directly, recorded into an Action, (from CS4 on) be used in a Configurator-Panel or started from ExtendScript Toolkit directly.
Copy link to clipboard
Copied
Have you been able to convert the Layers to Smart Objects with Layer Masks with the Script?
Copy link to clipboard
Copied
I started running the script on the file a while ago - it's chewing through it layer by layer, and appears to be working. It will be a while before it's finished, but of course I'll let you know... thanks so much for your help so far.
Copy link to clipboard
Copied
The Script uses Document Object Manager code for a lot of the stuff, Action Manager code would be faster, but it’s less easy for me …
Copy link to clipboard
Copied
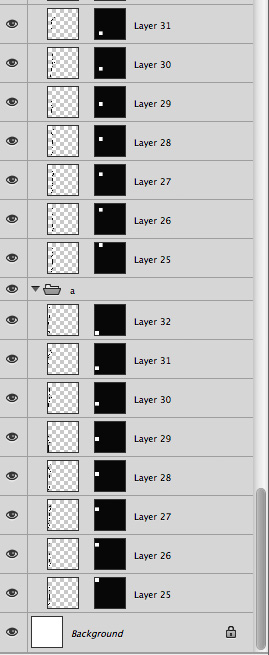
Hi c.p - ok the script finished after about 2-3 hours, and, while it seems to have put smart objects and masks in each of the layers, the canvas just appears blank. Before running the script, all the grid squares were populated with individual images (on each of the layers). Please see attached screen shot:
From the file size, it would appear that the images are still there, but I do not know why they are not visible?
Copy link to clipboard
Copied
If you set the display larger in the »Layer Panel Options« you might notice that I misunderstood and started from the top instead of the bottom, so the Layer Masks are in reverse order vertically.
Copy link to clipboard
Copied
ah thank you I see exactly what you mean now. So, for example, the mask for a8 is actually in the place for a1, a7 for a2 and so on. Basically, the a, b, c etc. is in the right order, but the rows are in the wrong order. Row 1 should be row 8, row 2 should be row 7 and so on. What should I change in the script to fix this?
Copy link to clipboard
Copied
Could you please provide a lores of your file or a screenshot with larger Layers Panel icons?
Anyway, the following adaption (without the SO part) gets me this.
The functions you can take from the old code.
But please run a test on a low res version before attemprting the full res version again.
if (app.documents.length > 0) {
// set to pixels;
var originalRulerUnits = app.preferences.rulerUnits;
app.preferences.rulerUnits = Units.PIXELS;
var myDoc = app.activeDocument;
// collect the layers;
var theLayers = collectPixelLayers(myDoc, []);
// add layer masks;
var theSide = myDoc.width/8;
var theX = myDoc.width - theSide;
var theY = myDoc.height - theSide;
var counter = 0;
for (var n = theLayers.length - 1; n >= 0; n--) {
var thisLayer = theLayers
; myDoc.activeLayer = thisLayer;
app.activeDocument.selection.select([[theX, theY], [theX + theSide, theY], [theX + theSide, theY + theSide], [theX, theY + theSide]], SelectionType.REPLACE, 0, false);
addLayerMask();
counter++;
theY = theY - theSide;
if (counter == 8) {
theX = theX - theSide;
theY = myDoc.height - theSide;
counter = 0;
};
};
// reset;
app.preferences.rulerUnits = originalRulerUnits;
};
Copy link to clipboard
Copied
Can you provide a lores version of the original file?

Copy link to clipboard
Copied
1. I think you would be better off just converting the layers to smart objects with your new images manually. I know is seems like a lot of work but so would be writing and testing a script you may only use once.
2. Photoshop does not support linked files. You can embed a file in a smart object but that is a copy of the file that is now stored inside the document's file. For any changes in the Photoshop document you have to edit in Photoshop. If you place a raw file in a document then later edit that original file in ACR the Photoshop document will not be updated. Smart object layers are not like placed linked object in InDesign.
Copy link to clipboard
Copied
Thanks Michael,
I understand your point about linked files. However is there no way to even automate the task of replacing the files in the layers? As I understand it, all that would change between each of the 64 times is:
(a) the .psd file to open - these could be numbered in sequence 1 through 64.
(b) the .psb layer to paste the copied .psd image onto.
and then of course a 'save file' command for the .psb each time.

Find more inspiration, events, and resources on the new Adobe Community
Explore Now
 AdChoices