- Home
- Photoshop ecosystem
- Discussions
- Re: How do I achieve this liquidy/melting effect i...
- Re: How do I achieve this liquidy/melting effect i...
Copy link to clipboard
Copied
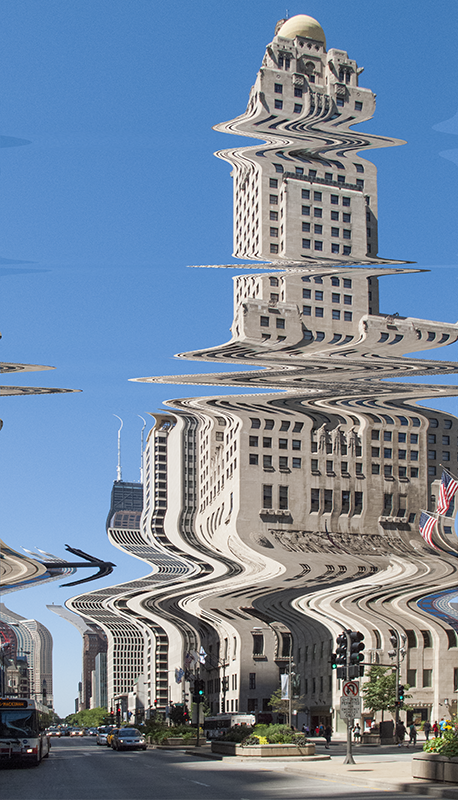
How do i get this exact glitchy effect? Without making it blurred?
Thank you,
Aditi

 1 Correct answer
First make sure you are using a high res image. This is something you should always start out with. Something that has a good size and rougly 300dpi or so. Remember after you create the effect, you can always scale it down.
Plus this will help if you are creating posters, postcard invitations, etc. Or whatever.
Select the desired image. Then under filters choose the Liquidfy Filter...
Top tool is what you want.... this is called the Forward Warp Tool.
Then adjust the Size, Pressure and Densit
...Explore related tutorials & articles
Copy link to clipboard
Copied
First make sure you are using a high res image. This is something you should always start out with. Something that has a good size and rougly 300dpi or so. Remember after you create the effect, you can always scale it down.
Plus this will help if you are creating posters, postcard invitations, etc. Or whatever.
Select the desired image. Then under filters choose the Liquidfy Filter...
Top tool is what you want.... this is called the Forward Warp Tool.
Then adjust the Size, Pressure and Density.
I do not think it will ever look prefertly crisp. But having a high res image that is good size will help you keep it look smoother.
Something you have to play with as without havnig the exact image I can not guess-timate which size, pressure and density you need to create what you want. However, it is a fun tool to play around with and find out the solution.
Copy link to clipboard
Copied
THAT IS PERFECT!
Just tried it . I had tried Liquify before but i guess I used the wrong tool within it.
Thank you so much ![]()
Copy link to clipboard
Copied
We all learn... even the ACPs.... The cool thing about Photoshop... is no matter how long you have been using it... you can learn something new...
For me I love learning new tools and techniques!
Glad I could help!!!!!
Copy link to clipboard
Copied
Filter > Distort > Displace with an appropriate Displacement Map might be another option.
Copy link to clipboard
Copied
Then there's the Stone-age Filter > Distort > Shear, if you can get past the super fiddly interface. It is probably best to make a selection across the width of the image, and just the height of the area you want to affect.

Unfortunately. Adobe seem to have removed the Default button in the Cloud version, so you need to manually drag the control points off the grid to get back to a straight line ![]()
[EDIT} Okay. it is there after all - if you press Control, the Cancel button changes to Default.


