

- Home
- Photoshop ecosystem
- Discussions
- Re: How do I batch watermark a logo onto varying h...
- Re: How do I batch watermark a logo onto varying h...

Copy link to clipboard
Copied
I would like to watermark a logo on a batch folder of photos, but the photos are different heights (but same width). If I use text in Photoshop it's not a problem, but if I use my logo the Action places it in different positions depending on the height of the photo. What I am looking for is a way to have the logo placed in a relative position to the bottom right corner of the photo. Say, 25px from the bottom and 0px from the right. I am unsure of how to achieve this relative placement.


 1 Correct answer
There's a classic Russell Brown tutorial that might help you. It was created for Photoshop CS2, but the technique is applicable to later versions of Photoshop too.
Go to: http://www.russellbrown.com/tips_tech.html , and scroll down till you see this:

Explore related tutorials & articles
 53
Replies
53
53
Replies
53
Copy link to clipboard
Copied
There's a classic Russell Brown tutorial that might help you. It was created for Photoshop CS2, but the technique is applicable to later versions of Photoshop too.
Go to: http://www.russellbrown.com/tips_tech.html , and scroll down till you see this:


Copy link to clipboard
Copied
You may well want to look into more accompliahed Watermarking techniques, but for your immediate problem adding
• Select All
• Align right
• Align bottom
• nudge left
to your Action might suffice.

Copy link to clipboard
Copied
c.pfaffenbichler wrote:
• Select All
• Align right
• Align bottom
• nudge left
to your Action might suffice.
Because the print width is the same the same size font will work well and be align well like appended and even make your 25 pixel nudge left and up after the select all do a select>Modift Selection>Contract in the dialog 25px Then do the Layer>Align Layers to selection>bottom edge etc without the end nudge left
Copy link to clipboard
Copied
JJMack, I understood the OP to say that she wants to insert a graphic, her logo, as a watermark.
juliew1589 wrote:
I would like to watermark a logo on a batch folder of photos, but the photos are different heights (but same width). If I use text in Photoshop it's not a problem, but if I use my logo the Action places it in different positions depending on the height of the photo.
Copy link to clipboard
Copied
Align layers to selection does not discriminate graphic layer text layer smart object layer shape layer all can be aligned.
I have posted this many time my crafting actions package. It takes knowledge, understanding and some experance recording actions to craft actions well. Scripting while much more powerful it takes a lot more knowledge learning and is work they are programs that need to be design coded and debuged. My sample action set in my crafting actions package contains a sample watermarking that show you how to add water marks layers three way that are scaled to document size. A text Layer, A shape Layer and a custom logo layer. I also save the sample action set as a text file and added coment in it on its operation. Still a newbie willnot fulley undestand what going on in that action.
Crafting Actions Package
Contains
- Action Actions Palette Tips.txt
- Action Creation Guidelines.txt
- Action Dealing with Image Size.txt
- Action Enhanced via Scripted Photoshop Functions.txt
- CraftedActions.atn Sample Action set includes an example Watermarking action
- Sample Actions.txt Photoshop CraftedActions set saved as a text file.
- 12 Scripts for actions

Copy link to clipboard
Copied
JJMack wrote:
Align layers to selection does not discriminate graphic layer text layer smart object layer shape layer all can be aligned…
I realize that, JJMack. What threw me off was your mentioning "Fonts" and "Fonts Size" in this context.
Copy link to clipboard
Copied
station_two wrote:
I realize that, JJMack. What threw me off was your mentioning "Fonts" and "Fonts Size" in this context.
I mention Font size because they are also doing a text watermark and if they are using an action only because all images have the same print width will the recorded font size work. When you choose a font you choose a size good for the current document size. If you run that action on a document that has a much different print size the watermark text size would not be a good size. If you want to have a watermarking action that will work any size image you need to do some scaling. It a bit trickey. Actually My action had to resort to using a run twice script I wrote. First run to save the original print resolution so I could scale all inages to the same print width so the font size I picked when recording tha action would work on any size image. Running the script a second time would retreive the saved print resolution and scale the image back to its original size.
Copy link to clipboard
Copied
Thanks all, the Russell Brown tutorial was good and other advice has been helpful - especially using Align right edges & Align bottom edges.
However I notice that the particularly short images (not very high) end up with a slightly smaller watermark. I am not sure why this is. The width of all images is made the same. Attached screen grab shows some examples of the results, as well as the action I created.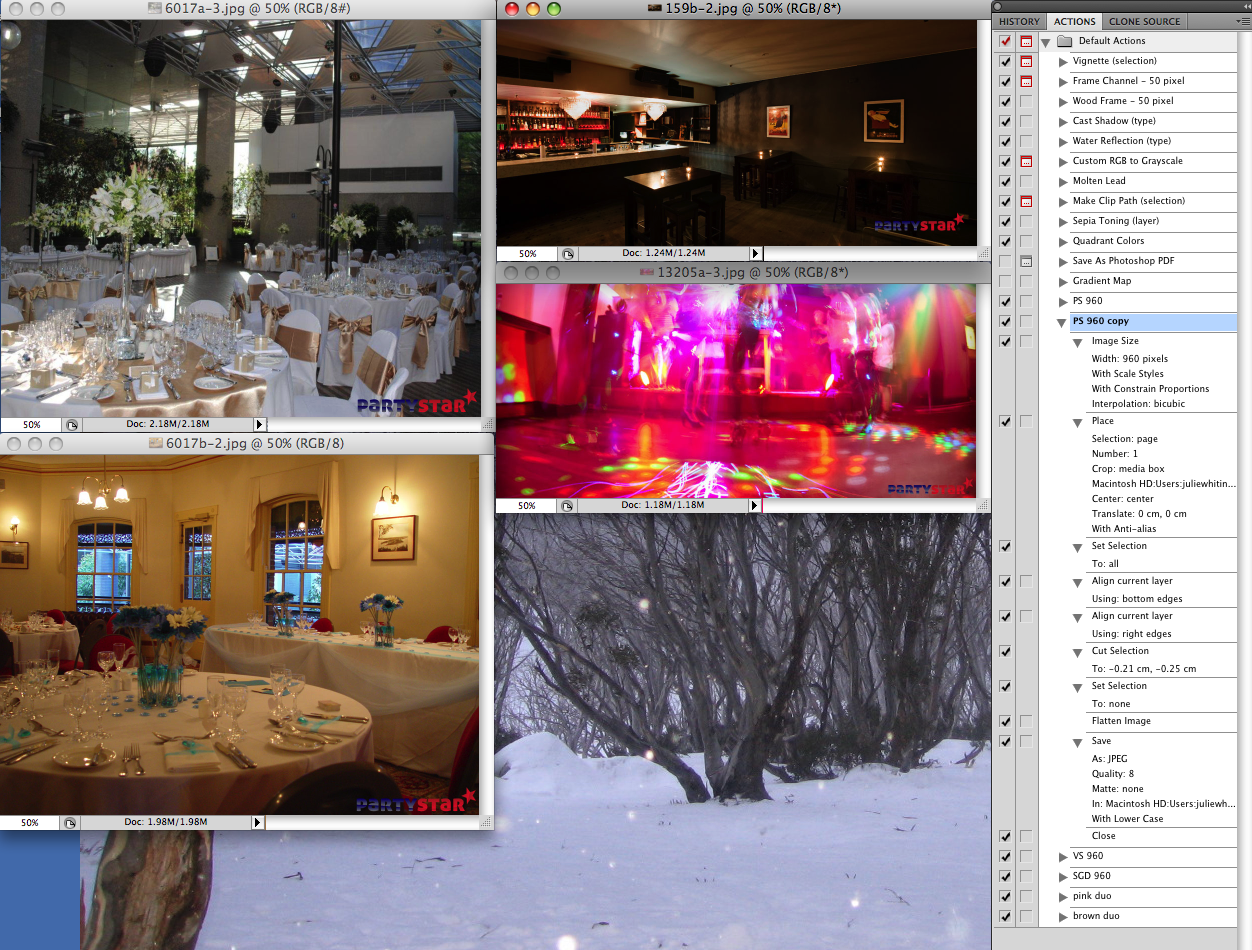
Copy link to clipboard
Copied
Sorry, here is the action again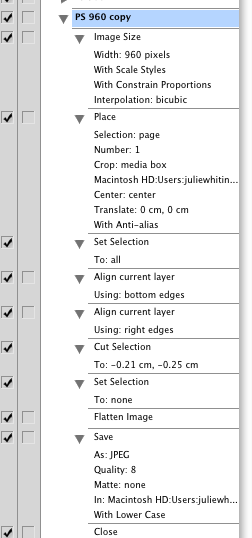

Copy link to clipboard
Copied
Check the ppi of the docs into which the logo is being placed. I think you'll find that they are different, resulting in different scaling of the logo. To place the logo pixel-for-pixel, the logo and the destination need to have the same ppi.
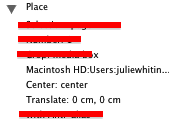
About the Place step in your Action...
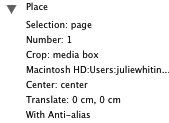
If the logo is to be the same size and position in each doc, consider preparing a logo file containing only the logo and at the required size before running a batch. That allows your Place step to be simpler and reduce opportunity for unexpected results...
Copy link to clipboard
Copied
conroy2009 wrote:
Check the ppi of the docs into which the logo is being placed. I think you'll find that they are different, resulting in different scaling of the logo. To place the logo pixel-for-pixel, the logo and the destination need to have the same ppi.
About the Place step in your Action...
If the logo is to be the same size and position in each doc, consider preparing a logo file containing only the logo and at the required size before running a batch. That allows your Place step to be simpler and reduce opportunity for unexpected results...


The document needs to have the same resolution the pixel size does not matter.
Notice that place just has the placement spot the upper left cornor 0 0 no resize. Where my action uses a script to record the documents print size Dpi. The action then changes the print dpi so all documents have a 8" width the action the places in the logo to the upper left cornor sizing it for the 8" width and makes it a smart object layer that has an embeded raster layer, aligns it to the bottom left cornor. The action then runs the script a second time that retrives the recorded original print dpi resolution and restores the document to the print size,
Both image and logo were sacled to a known width then the document was returned to its original scale.
Copy link to clipboard
Copied
JJ, I have to applaud your success in finding an exceedingly convoluted method to perform the simple task of placing a fixed size logo in the corner of an image.
Copy link to clipboard
Copied
Some things are not possible in actions using only photoshop function steps and inserting stops and menu items. Scripting is not easy and not for the common user. I'm a hacker and a lazy one at that. That is why I hacked together some utility scripts to be used in actions. Though I can hack scripts it a big chore for me. I don't know javascript and I can not type. I'm very error prone... Actions are easy....
Copy link to clipboard
Copied
JJMack wrote:
Some things are not possible in actions using only photoshop function steps and inserting stops and menu items. [...] Actions are easy....
Actions are easy (compared to scripting), and in the case of the OP's task, a simple Action is all that's required when care is taken to give the images the same ppi, which can be done in the step of resizing to 960 px width. I see nothing wrong with doing things the easy way.
Copy link to clipboard
Copied
conroy2009
all that's required when care is taken to give the images the same ppi, which can be done in the step of resizing to 960 px width.
Dose not change the resolution but sure does mess with the image quality most likely reduce the image quality badly. An image can have a 960 pixel width and any resolution you want. When ever you resample interpolate an image you loose some image quality. So your action will not always work correctly unless you change your resize step to also set the dpi resolution as you have seen it fail. You can scale an image to any size without changing the images pixel size by not resampling and just change the print dpi. My action does not change the image size in any way your destroyes the image's size. When you resample an image not a single original pixel remains. A whole new image replaces the image you had it has lost quality and is a different pixel size.
Copy link to clipboard
Copied
JJMack wrote:
conroy2009
all that's required when care is taken to give the images the same ppi, which can be done in the step of resizing to 960 px width.
Dose not change the resolution but sure does mess with the image quality most likely reduce the image quality badly. An image can have a 960 pixel width and any resolution you want. When ever you resample interpolate an image you loose some image quality. So your action will not always work correctly unless you change your resize step to also set the dpi resolution as you have seen it fail. You can scale an image to any size without changing the images pixel size by not resampling and just change the print dpi. My action does not change the image size in any way your destroyes the image's size. When you resample an image not a single original pixel remains. A whole new image replaces the image you had it has lost quality and is a different pixel size.
This discussion is descending into absurdity. The OP wants to resize images to 960 px width. My point was that the ppi can be set in the resizing step of the Action, which will ensure consistent size of a placed logo.
I was fully aware that resampling an image changes the pixels of an image, thanks.
Copy link to clipboard
Copied
The OP wants a logo 25 px up and 0 px to the right nowhere did he ask for his images to be resized in size and quality reduced
I would like to watermark a logo on a batch folder of photos, but the photos are different heights (but same width). If I use text in Photoshop it's not a problem, but if I use my logo the Action places it in different positions depending on the height of the photo. What I am looking for is a way to have the logo placed in a relative position to the bottom right corner of the photo. Say, 25px from the bottom and 0px from the right. I am unsure of how to achieve this relative placement.
Copy link to clipboard
Copied
JJ, I didn't invent the resizing. You've failed to notice that the images have to be resized to 960 px width before a logo is placed.
Copy link to clipboard
Copied
No he been trying thing like from russell brown web site that does a resize he also found he still has a size problem because he failed to set the dpi. He does not understand all that is happening. As I wrote some thing are not possible just using recorded Photoshop Function steps and inserting stops and menu items. Russell Brown action is flawed he is now pushing a PhotoShop Panel that uses a Photoshop script. You need to use some locic to watermark any size image with watermaks sized for the image. Its not an easy action thing.
In his first opening append he did not ask for his images to be reduced in size and quality....
Copy link to clipboard
Copied
JJMack wrote:
No he been trying thing like from russell brown web site that does a resize he also found he still has a size problem because he failed to set the dpi.
Even if no resizing is required, the Resize Image command can still be used to simply change the ppi without changing pixels.
You need to use some locic to watermark any size image with watermaks sized for the image. Its not an easy action thing.
Where does the OP say that the differently sized images should have varying size of logo?
Copy link to clipboard
Copied
conroy2009 wrote:
Even if no resizing is required, the Resize Image command can still be used to simply change the ppi without changing pixels.
Where does the OP say that the differently sized images should have varying size of logo?
"Even if no resizing is required, the Resize Image command can still be used to simply change the ppi without changing pixels."
Yes it can and that is exactly what my action does however it also changes the resolution back to the original resolution at the end so that the images is not changed in pixel size and it print resolution is also not changed. This is not possible in an action just using recorded Photoshop Function steps. I had to resort to using some scripting
"Where does the OP say that the differently sized images should have varying size of logo?"
The OP doesn't ask for this but that is what he needs. He just state the all images have the same width. He does not state all images have the same resolution. You can have images that are 10" wide that have a 300Dpi resolution, some with a 200Dpi resolution and some with a 72Dpi resolution. He did not explicitly state all images were some number of pixel wide and have the same resolution.
So if he has different resolution 10" wide images and wants a 2" wide logo he needs a 2" 300Dpi logo a 2" 200dpi logo and a 2" 72dpi Logo.
I think your missing a fundamental thing that Photoshop does when you ( Paste an Image, Or duplicate a layer, or Place a image ) most of the time into a different document is that it matches the source pixels to the destinations resolution. That the new layer will be smaller then or larger then or the same size as the destination documents canvas size. I wrote most of the time because Place by default make an exception to this when the new layer would extend outside the canvas Place will scale the source document. You can change this behavior so place will work like paste and duplicate by changing the Photoshop Preferences and un-check "Resize Images During Place" however there seems to be a bug in Photoshop the keeps on checking the preference so you better set the option the step before you use place in an action.
So what my action does is to scale all documents to have a 8" print width after having uses a script to record the current print DPI resolution. Scaling the image to have a 8" print size will set the correct DPI resolution could be anything. Then the action places in the logo during the place operation the logo transform was used to move the logo to the upper left corner and to constrain resize it width to 20% of the documents 8" width no matter what the DIP resolution is. The width of the logo will be 1/5 the 8" width and its height will be constrained as to not distorted the logo. At this point in time the smart object embedded object can be any supported image file types. I have had problems resizing these layers later after the action ends so I rastersize the smart object layer to a normal layer then convert the layer to a smart object so the embedded object is a normal layer. The action then aligns the logo. When all is done the original print resolution is restored and all images appear to have the same size logo.
Copy link to clipboard
Copied
JJMack wrote:
conroy2009 wrote:
Even if no resizing is required, the Resize Image command can still be used to simply change the ppi without changing pixels.
Where does the OP say that the differently sized images should have varying size of logo?
[...]
I think your missing a fundamental thing that Photoshop does when you ( Paste an Image, Or duplicate a layer, or Place a image ) most of the time into a different document is that it matches the source pixels to the destinations resolution. That the new layer will be smaller then or larger then or the same size as the destination documents canvas size. I wrote most of the time because Place by default make an exception to this when the new layer would extend outside the canvas Place will scale the source document. You can change this behavior so place will work like paste and duplicate by changing the Photoshop Preferences and un-check "Resize Images During Place" however there seems to be a bug in Photoshop the keeps on checking the preference so you better set the option the step before you use place in an action.
I do not think that I miss fundamentals of the Place command. In fact, in several of my recent posts, I've informed others of what Photoshop does with the Place command without anyone informing me of having missed fundamentals. I will be most grateful for any corrections to what follows.
1. Photoshop honours the physical size (e.g. inches/cm) of the object that is being placed except in the situation of the next sentence. When the object being placed would be larger than the canvas and the preference to "Resize Image During Place" is enabled, the object will be resized (i.e. downscaled) to fit the canvas.
2. If there is a current selection then Photoshop centres (or almost centres - see 3 below) the placed object's bounding rectangle (BR) on the centre of the the current selection's BR except when the selection's BR is entirely outside the canvas. If the selection's BR is entirely outside the canvas or there is no selection then Photoshop centres the placed object's BR at the centre of the document window. Be careful to note that the centre of the document window is not necessarily coincident with the centre of the canvas.
3. Photoshop will fit a placed object's BR to fit the pixel grid. If a dimension of the placed object's BR, after scaling to honour its physical size, is an even number of pixels when that dimension of the destination is an odd number of pixels, or vice versa, the placed object's BR geometrical centre will either be mid-pixel or the destination's centre will be mid-pixel, therefore the placed object's BR centre and the destination centre will differ in that dimension by the distance of a half-pixel as a result of fitting the placed object to the pixel grid.
Copy link to clipboard
Copied
I give up your missing something basic about size pixel size and document resolution. A document has both when you deal with size you need to handle both, If you wish to resample images and loose image quality so be it do what you want.
Copy link to clipboard
Copied
JJMack wrote:
I give up your missing something basic about size pixel size and document resolution. A document has both when you deal with size you need to handle both, If you wish to resample images and loose image quality so be it do what you want.
Maybe I'm failing to communicate clearly. Maybe you're failing to understand me. Neither of these scenarios, nor the two combined, mean that I miss something basic.
I've never stated that I wish to resample anything, and I certainly have no desire to reduce image quality. The OP may want to resize and resample some images, judging by the screenshot of their Action, though. I only told the OP how to put a constant size of logo on a batch of images, regardless of the image size.

 AdChoices