

- Home
- Photoshop ecosystem
- Discussions
- Re: How do I create a feathered square similar to ...
- Re: How do I create a feathered square similar to ...

Copy link to clipboard
Copied
I am coming to this with good familiarity in Illustrator. I am learning Photoshop.
After I use the rectangle tool initially I am then not able to edit its size. Also, it seems to become a mask, which is an element I don't really understand. When I apply some feathering it seems to happen inside and outside the extents of the box.
In Illustrator I can easily create a square, choose a fill color, and feather the edges. The feathering happens WITHIN the shape extents.
How can I do a similar thing in Photoshop?
Thanks,
Mark


 1 Correct answer

Take the rectangle tool and draw a rectangle. After that goto the top menu -> SELECT-> FEATHER. Shortcut (ctrl+Alt+D), and than give the value according to your work.
Explore related tutorials & articles
 34
Replies
34
34
Replies
34
Copy link to clipboard
Copied
Let's see. When you use the rectangle tool you can create three different entities: a shape layer, a path or an area of filled pixels. You seem to be using the default, which is a shape layer. After you create the rectangle hit Ctrl + T to free transform that shape, which you can do by pulling on the corners or sides.
You can also create a rectangle by using the rectangular marquee tool. Draw your shape and then you can hit Alt + Backspace to fill with the foreground color. While not the same feather function as in Illustrator, you can next click on the Refine Edge button in the control area at the top of the window. In the resulting dialog box you have feather and contract/expand sliders which you can use to create your effect (in CS3 & CS4 ) - Radius also has an efect. With preview checked you can tune your effect. When you like it click OK and your modified selection is shown. Hit Ctrl + J to put that selection on a new layer. Turn the visibility of the original layer off and you will see your feathered rectangle. Other ways to work can be devised as well, but I hope this gets you started
Paulo

Copy link to clipboard
Copied
Just to amplify what Paulo said, the three options for the Rectangle and other shape tools are in the Options bar at the top. (If you don't see it, turn it on via the Window menu – it's vital for all work.)

If you forget what they are, the Tool Tips will tell you.

Copy link to clipboard
Copied
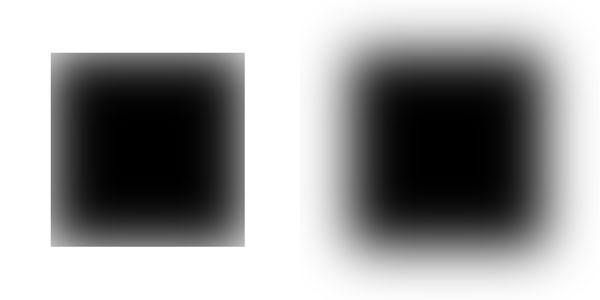
if you mean something like this then just make a selection, fill it with black and then, with the selection still active go to Filter->Blur->Gaussian Blur

Copy link to clipboard
Copied
Take the rectangle tool and draw a rectangle. After that goto the top menu -> SELECT-> FEATHER. Shortcut (ctrl+Alt+D), and than give the value according to your work.
Copy link to clipboard
Copied
Thank you for your response.
I see that Photoshop and Illustrator use different methods. Photoshop feathers the edge centered on the line and Illustrator feathers the edge within the line.
I prefer the Illustrator method.
Mark

Copy link to clipboard
Copied
Yes, PS does feather a selection using the edge as the 50% opacity point. The opacity tapers (gaussian) to 100% inwardly at a distance of 2.7 radii and to 0% outwardly at a distance of 2.7 radii. You can change that to go from 0% at the edge to 100% at 5.4 (2x2.7) radii inwardly from the edge by reducing the size of the selection rectangle by 5.4 radii in length and width and centering the smaller rectangular selection within the original rectangle. The same feathering algorithm applied to the smaller selection gives the result you seek on the larger rectangle. Since you get to choose the feather radius, you can control the depth of the inward gradation.

Copy link to clipboard
Copied
It's the weekend, George!
You can take your propeller-powered beanie off now!!!


Copy link to clipboard
Copied
<LOL> But the on/off switch has failed. The propellor is still whirling, and I gotta add a couple of points.
First, the blurring suggested by Zeno is not equivalent to feathering. It alters color values, not opacities. The background never shows through, even partially, with blurring.
Second, feathering via Select>Refine Edge suggested by Paulo is basically the same as feathering via Select>Modify. Both set opacity to 50% at the selection edge. but Modify tapers off in 2.7 radii inward and outward, while Refine Edge does it in one radius. Shrinking the selection to get zero opacity at the edge works in both cases. Shrink width and height 5.4 radii using Modify feathering, and shrink it 2 radii using Refine Edge feathering.
Copy link to clipboard
Copied
First,
the blurring suggested by Zeno is not equivalent to feathering. It
alters color values, not opacities. The background never shows through,
even partially, with blurring.
What are you talking about? feathering and gaussian blur are the same thing. Adding a 10 pixel feather to a selection is the same as adding a 10 pixel gaussian blur to the same selection while in quick mask mode and so yes, the background does show through and no, the colors aren't altered.
Second, feathering via Select>Refine Edge suggested by Paulo is basically the same as feathering via Select>Modify. Both set opacity to 50% at the selection edge. but Modify tapers off in 2.7 radii inward and outward, while Refine Edge does it in one radius.
That's the same feathering command. They blur in both direction it's just that when using Refine Edge you get a preview which is a big bonus
Copy link to clipboard
Copied
"...What are you talking about? feathering and gaussian blur are the same thing. Adding a 10 pixel feather to a selection is the same as adding a 10 pixel gaussian blur to the same selection while in quick mask mode and so yes, the background does show through and no, the colors aren't altered..."
I understand your reaction because what's really happening is not obvious. To see what I'm talking about you must be working on a layer with transparent background. Otherwise the opacity changes will not be visible. I would ask you, then, to follow the steps below:
Open a new document, convert the background to a layer.
Create a 600 x 600 px square, fill it with black, select it
Filter > Blur> Radius 50 pixels
Select > Inverse > Delete
Activate the Info Palette and have it show opacity as well as RGB values
Drag the cursor across an edge of the square
Note that opacity remains at 100% at all cursor positions, but RGB values change
Open a new document, convert the background to a layer.
Create a 600 x 600 px square, fill it with black, select it
Select > Modify > Feather, set feather radius to 50 px
Select > Inverse > Delete
Activate the Info Palette and have it show opacity as well as RGB values
Drag the cursor across an edge of the square
Note that opacity tapers from 0 to 100% from a point outside the edge to an equi-distant point inside, while RGB values stay constant
These are TOTALLY different effects. When you move the square over a different background, that background shows through where the opacity has been lowered (transparency increased), wheresas it does not show through at all for the blurred-edge square.
Copy link to clipboard
Copied
My suggestion to the O.P. would be to just do what he needs to do in Illustrator—since he knows how in that application—and bring it into Photoshop.
I can't believe I'm going to type this because I obsess over the tiny nuances, but— sometimes it's not about knowing every little nuance of a procedure, but getting work done as efficiently as possible.
Copy link to clipboard
Copied
Phos,
I'm also surprised at you. I'm addressing a FUNDAMENTAL process, not a "tiny little nuance". One is so very much more equipped to apply a feature properly and with imagination when the basic concept is understood. End of sermon.
Copy link to clipboard
Copied
What you are trying to describe is happening because you have the background layer active in one instance while not in the other, it has nothing to do with the feather or gaussian blur commands. If you have a feathered square on its own layer with the background layer visible, you will see the RGB values changing when you mouse over the blurred areas. But if you disable the background layer you will see the opacity change while the RGB values remain the same
Your example fails because in the first instance you still have the selection active which limits the effect of the gaussian blur filter
Copy link to clipboard
Copied
But, Zeno, the background ihas been disabled in BOTH instances, yet the resultant RGB and opacity profiles differ for the blurring and feathering cases.
Copy link to clipboard
Copied
i said background but any layer would have sufficed.
Create a 600 x 600 px square, fill it with black, select it
That there is your problem.Look, on the left is a square blurred while it is still selected while on the right it was blurred with the same amount without it being selected
Copy link to clipboard
Copied
I very much appreciate knowing the fundamentals.
I'm using Photoshop CS4 64-bit
I click the Rectangle Tool and select Shape Layers
I draw a rectangle over a photo
On the Layers panel I set "Normal" Opacity to "100%" and Fill to "100%"
I double-click the "left" icon in the layers list to set color to black
At this point:
1. I can set the Feather in the Masks panel. This is not ideal for me because I want to control the perimeter and feather within that, plus for some reason when I save and open the file later my settings for the feather are at "0".
2. When I go into the Filter menu and use the bluring tool, I get control of the perimeter, but later don't have control of the bluring.
3. When I go into the Select menu, both "Refine Edge" and "Modify" are grayed out and I can't use them.
What would the steps be to draw the shape and control the feathering WITHIN that shape?
Copy link to clipboard
Copied
3. When I go into the Select menu, both "Refine Edge" and "Modify" are grayed out and I can't use them.
those are only selectable when you have an active selection
What would the steps be to draw the shape and control the feathering WITHIN that shape?
Make a square on a new layer, go to Filter->Convert for Smart Filters, Ctrl+click on the layer thumbnail of the layer with the square to load it as a selection and then apply the Gaussian Blur filter. If you want to change the feather amount just double click Gaussian Blur filter from the Smart Filters stack
Copy link to clipboard
Copied
One last question:
The feathering values that I set in the Mask panel don't save. Why is this?
Copy link to clipboard
Copied
it does get saved, just make sure that you select the layer/vector mask that you applied the feather to
Copy link to clipboard
Copied
I don't think I understand this.
On the layer in question I have a Layer thumbnail linked to a Layer mask thumbnail. I click on the Layer mask thumbnail until the vector mask is active in the Masks panel. I leave the density at 100% and set the feather to 2px and this does indeed feather my box.
When I save the file and then reopen the file my feather settings are back to zero.
Copy link to clipboard
Copied
the Layer Mask and Vector Mask have seperate feathering settings, maybe you aren't selecting the mask that has the feathering applied.
Copy link to clipboard
Copied
Who would have thought that a basic question about creating a rectangle would lead to a rather good discussion? We are not done yet, perhaps, since while Marks's specific question was answered his intent may have been more creative in nature and little was offered toward that end.
So Mark if you are interested in more than just a feathered rectangle you might try instead adding a layer style to a simple rectangle. If not, then ignore the following.
Open your photo file. Using the rectangle tool draw your rectangle as a shape layer. At the bottom of the layers panel click on the Fx button (add a layer style). In the resulting dialog box choose any of the effects, but for starters consider bevel and emboss. Play with the settings and you will wind up with many interesting rectangles. Or, you can check out some presets by hitting the styles button in the controls area at the top of the window and cycle through those possibilities.
Paulo
Copy link to clipboard
Copied
Paulo,
Thanks for the tip.
I have been following and trying all of the methods stated in this discussion and it gives me a sense of how powerful Photoshop is. However, I have to admit that Photoshop seems quite a bit more complicated than Illustrator and I am dealing with things like selecting, understanding layers, and why some modifications don't save for me.
I have to say that the Illustrator method of feathering seems way easier: draw the shape choose feather and set pixels for feathering WITHIN my shape.
Copy link to clipboard
Copied
A1 Leasing,
I can't comment on AI since I do not use it, but responders here agree that your need to keep the feathering internal, though possible in PS, is best addressed in AI. By default, PS splits the feathering inwardly and outwardly from a mid-opacity edge setting. It seems to me that the PS feathering algorithm is a better choice for general usage, wherein the user wishes to move the selection to a new background and avoid harsh transitions at the edges. If you just want to grade-off to the edge, use a vignette.
-
- 1
- 2

 AdChoices