Beenden
  • Globale Community
    • Sprache:
      • Deutsch
      • English
      • Español
      • Français
      • Português
  • 日本語コミュニティ
  • 한국 커뮤니티

How do I put a lightning bolt through a letter?

Gast
May 31, 2018 May 31, 2018

I want to take the lightning bolt image shown below and put it through the inner circle/hole in the letter O so that it actually looks like it is going through the hole. So the upper part of the bolt needs to be behind the upper part of the letter O and the bottom part of the of the bolt needs to be above the bottom part of the letter O.

lightning-bolt-md.png

How can I accomplish this? I've tried to slice the image into 2 parts but It doesn't seem to be working. I'm using Photoshop CC version 19.1.4. Any help would be appreciated. Thanks.

4.3K
Übersetzen
Melden
Community-Richtlinien
Seien Sie freundlich und respektvoll, geben Sie die ursprüngliche Quelle der Inhalte an und suchen Sie vor dem Absenden Ihres Beitrags nach Duplikaten. Weitere Informationen
community guidelines

correct answers 1 richtige Antwort

Community Expert , May 31, 2018 May 31, 2018

To create the layer mask, just click on the mask icon at the bottom of the layer panel. Do this before you make your selection. Then select the text layer with the "O." Then ctrl/cmd-click on the text layer icon in the layer panel. That will create your selection. Then you can click on the layer mask in the layers panel and use the black brush to hide the parts of the bolt that you don't want to show.

Übersetzen
Adobe
Enthusiast ,
May 31, 2018 May 31, 2018

you would not want to use the slice tool in this instance.

You will want to look at this tutorial on masking - https://www.youtube.com/watch?v=mqqVmGxvHaY

Übersetzen
Melden
Community-Richtlinien
Seien Sie freundlich und respektvoll, geben Sie die ursprüngliche Quelle der Inhalte an und suchen Sie vor dem Absenden Ihres Beitrags nach Duplikaten. Weitere Informationen
community guidelines
Gast
May 31, 2018 May 31, 2018

thanks for the video link, but it seems kind of confusing especially when it does not apply to my case.

Übersetzen
Melden
Community-Richtlinien
Seien Sie freundlich und respektvoll, geben Sie die ursprüngliche Quelle der Inhalte an und suchen Sie vor dem Absenden Ihres Beitrags nach Duplikaten. Weitere Informationen
community guidelines
Community Expert ,
May 31, 2018 May 31, 2018

Put your bolt above your letter "O". Add a layer mask to the bolt layer. Ctrl/cmd-click on the "O" layer thumbnail to make a selection.

Using a black brush, paint on the bolt layer mask to hide the areas you want hidden.

Übersetzen
Melden
Community-Richtlinien
Seien Sie freundlich und respektvoll, geben Sie die ursprüngliche Quelle der Inhalte an und suchen Sie vor dem Absenden Ihres Beitrags nach Duplikaten. Weitere Informationen
community guidelines
Gast
May 31, 2018 May 31, 2018

I'm really confused. I put the bolt above the letter, but how do I create the layer mask? under the Layer > Layer Masks >  Hide All and Reveal All are the only options available and the other options are grayed out.  I selected reveal all, but I'm stuck on the step where you say to ctrl click on the letter layer to make a selection? I tried that, but nothing happens. No selection lines show up around the letter. What am I doing wrong? Thanks.

Übersetzen
Melden
Community-Richtlinien
Seien Sie freundlich und respektvoll, geben Sie die ursprüngliche Quelle der Inhalte an und suchen Sie vor dem Absenden Ihres Beitrags nach Duplikaten. Weitere Informationen
community guidelines
Gast
May 31, 2018 May 31, 2018

Thank you both for your input. I'll try both suggestions and see how it goes and report back. Thanks again.

Übersetzen
Melden
Community-Richtlinien
Seien Sie freundlich und respektvoll, geben Sie die ursprüngliche Quelle der Inhalte an und suchen Sie vor dem Absenden Ihres Beitrags nach Duplikaten. Weitere Informationen
community guidelines
Community Expert ,
May 31, 2018 May 31, 2018

To create the layer mask, just click on the mask icon at the bottom of the layer panel. Do this before you make your selection. Then select the text layer with the "O." Then ctrl/cmd-click on the text layer icon in the layer panel. That will create your selection. Then you can click on the layer mask in the layers panel and use the black brush to hide the parts of the bolt that you don't want to show.

Übersetzen
Melden
Community-Richtlinien
Seien Sie freundlich und respektvoll, geben Sie die ursprüngliche Quelle der Inhalte an und suchen Sie vor dem Absenden Ihres Beitrags nach Duplikaten. Weitere Informationen
community guidelines
Gast
Jun 01, 2018 Jun 01, 2018
AKTUELL


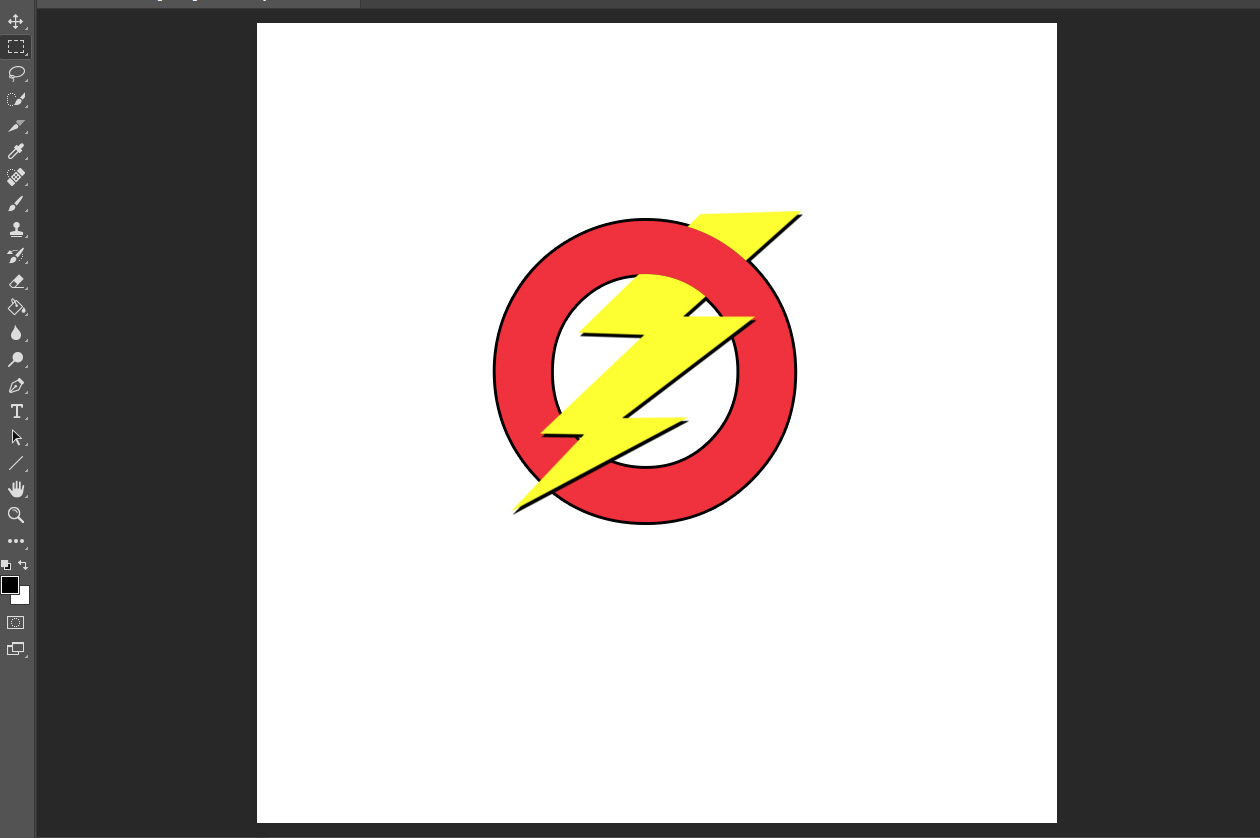
Awesome. That works now, but if the letter has a 3 pixel black stroke, it erases that also along with the bolt in the upper part of the letter O. How can I solve that problem? Here is a pic: [update] Nevermind, I just expanded the selection by going to Select > Modify > Expand and expanding it by 3 pixels. Now it's fine, although it still leaves a hairline of a white space between the drop shadow of the bolt and the black stroke. In any case, thanks for your help.

Untitled-2.jpg

Übersetzen
Melden
Community-Richtlinien
Seien Sie freundlich und respektvoll, geben Sie die ursprüngliche Quelle der Inhalte an und suchen Sie vor dem Absenden Ihres Beitrags nach Duplikaten. Weitere Informationen
community guidelines