

- Home
- Photoshop ecosystem
- Discussions
- Re: How do I put a thin 1px rectangle around an im...
- Re: How do I put a thin 1px rectangle around an im...

Copy link to clipboard
Copied
Using Photoshop CS5, can someone tell me how I put a thin 1px rectangle around an existing image
For example, imagine I have an image that 500px wide and 200 px high
I want a 10px gap all around and then I want the thin rectangle
What would the proper way of doing this?
Importantly, the image will be a PNG, so I want the gap around the image to be transparent
I'm planning to have on a black background, so want my rectangle to be a white line
+ is Photoshop the correct application to use to do this?
Thanks in advance
Omar


 1 Correct answer
Hi Omar.
Actually, maybe I was missing something. I don't think the Border option was available back when I made similar actions. This option will get rid of some of the kludge factor. Anyway, I'm on CS3. Both Border & Contract options are available. The Border option merges 2 steps into 1. Contract 1px & Invert Selection is replaced by Border 1px.
New and slightly improved:
4. Select Canvas
5. Menu>Select>Modify>Border: 1px.
6. Fill with white.
See if that works.
Lee
Explore related tutorials & articles
 13
Replies
13
13
Replies
13

Copy link to clipboard
Copied
Is this the same as a 1 pixel wide white line?
Why not use a ruler and just draw it in. If you hold shift key and click on 2 points a straight line will be drawn between them.
There are probably more elegant ways, but this is quck and simple.
Copy link to clipboard
Copied
never thought of that 
but: it does not to be precise - exactly 10px on the outer all around
is there anyway of drawing a rectanle with no filling precisely?
thanks
Copy link to clipboard
Copied
Hi Omar.
You can't go wrong with Kurts suggestion. But could get tedious on multiple images.
There are multiple ways to accomplish this in Ps. Here is another that is suitable for automation, in case you have more than one image.
1. Duplicate Layer (Ctrl+J) - Isolates image for following step.
2. Canvas Size (Ctrl+Alt+C) : Relative, centered. W:+22, H=+22 - Creates expanded canvas.10px(gap) + 1px (stroke)= 11px, times 2 to cover the top and bottom & both sides.
3. Delete background layer-Leaves the image over the expanded transparent canvas.
The following steps apply the stroke at the perimeter.
4. Select Canvas (Ctrl+A)
5. Contract Selection: 1px
6. Invert selection (Ctrl+Shft+I) Now you have 1 px selection at the perimeter of the image.
7. Fill selection with white.
This should leave your image, a 10px transparent gap, then a 1px white stroke on one layer. Ready to export as Png.
I don't know about elegant, but this is a pretty mainstream approach that works for one image or recorded as an action.
FWIW.
Peace,
Lee
Copy link to clipboard
Copied
thanks lee
i had something like this in mind - but wasnt sure how best to do
i'm with u in all the steps, apart from:
5. Contract Selection: 1px
how do i do this?
i like the method - and i'll use a lot
but it seems to be a bit of a hack ?
Copy link to clipboard
Copied
Hi Omar.
5. Contract Selection: Menu>Select>Modify>Contract
You could set this up a little more simply if all the images were the same size. But this approach will add 10px of transparency and a 1px stroke to any size image.
I'm not smart enought to do a "hack". But I don't mind kludging. But hack, kludge, or stroke of genius, it doesn't matter. Record it as an action, set you actions to Button Mode, and one click does it. Or you can run the action on dozens of images in a batch.
If you find a more elegant solution, get back to us.
Peace,
Lee
Copy link to clipboard
Copied
thanks lee
i love the solution
automation: yes your method is awesome because i can automate for ANY sized image
small problem still though...
after doing ctrl a, i don't have the option to contract by 1px
the only option available from the menu is border
i'm pretty sure i've followed your instructions word for word
let me know if there's something obvious i might be missing
thanks
Copy link to clipboard
Copied
Hi Omar.
Actually, maybe I was missing something. I don't think the Border option was available back when I made similar actions. This option will get rid of some of the kludge factor. Anyway, I'm on CS3. Both Border & Contract options are available. The Border option merges 2 steps into 1. Contract 1px & Invert Selection is replaced by Border 1px.
New and slightly improved:
4. Select Canvas
5. Menu>Select>Modify>Border: 1px.
6. Fill with white.
See if that works.
Lee
Copy link to clipboard
Copied
lee: u are absolutely awesome
thanks a million!
see the pretty pictures i've now made:
absolutely damn awesome!!!!!
omar
Copy link to clipboard
Copied
Hi Omar.
Very nice results!
Automation one of the best things Ps has going for it. Well worth spending a little time investigating its potential. Which is awesome.
Me, not so much. But I do appreciate a pat on the head as much as the next dog.
Glad to help.
Peace,
Lee
Copy link to clipboard
Copied
lee... i'm really happy with the results
only a small thing though: the outline sint 1px
i only noticed that afterwards
se the following 2 pics below
the first was created using ur method
the second was created by a longer manual process: say we have 100 x 100 pic. create a new pic with transparent background of 122 x 122. now create a white blank pic of 120 x 120 size. copy the white and put into 122x122. no from the layers menu, add a 1px stroke. now flatten. now erase the white - u now have the required outline!. create a new pic with transparent background of size 122x122. copy and paste both th eoriginal pic and new outline pic. hey presto, 50 steps later, u have what i wanted.
problem is it's 50 steps
i like ur solution. this can be automated. the second solution can't be automated: BUT it gives the 1px outline i wanted!
let me know what u think
thanks
first pic:
second pic:
Copy link to clipboard
Copied
Hi Omar.
Border is the problem. From the Help files:
For example, a border width of 20 pixels creates a new, soft-edged selection that extends 10 pixels inside the original selection border and 10 pixels outside it.
(Italics mine.)
Apparently, Border is designed to remove halos. Hence the soft selection. See below. Note the row of semi transparent pixels. Oops!
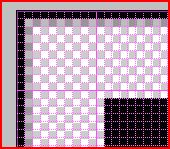
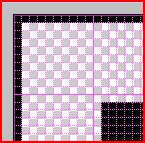
Below is the result using my original suggestion, Contract 1px, Invert Selection, Fill. This yields a clean 1px border.
Try the original recipe and see what you get.
Lee
Copy link to clipboard
Copied
Here's something to get your creative thoughts flowing in possibly another direction...
Set the background color to the color you want for the border. Then ensure you have a Background layer and run Image - Canvas Size, and expand the canvas by 2 pixels in each dimension, keeping the orientation selector centered. Voila, an exact 1 pixel border of the background color.
There are probably other ways as well..
-Noel
Copy link to clipboard
Copied
Hi Noel.
Happy New Year!
Omar is looking for 10 pixels of transparency between the perimeter of the photo and the 1px border. I think.
Lee

Find more inspiration, events, and resources on the new Adobe Community
Explore Now
 AdChoices