

- Home
- Photoshop ecosystem
- Discussions
- Re: how do you target highlights only using adjust...
- Re: how do you target highlights only using adjust...

Copy link to clipboard
Copied
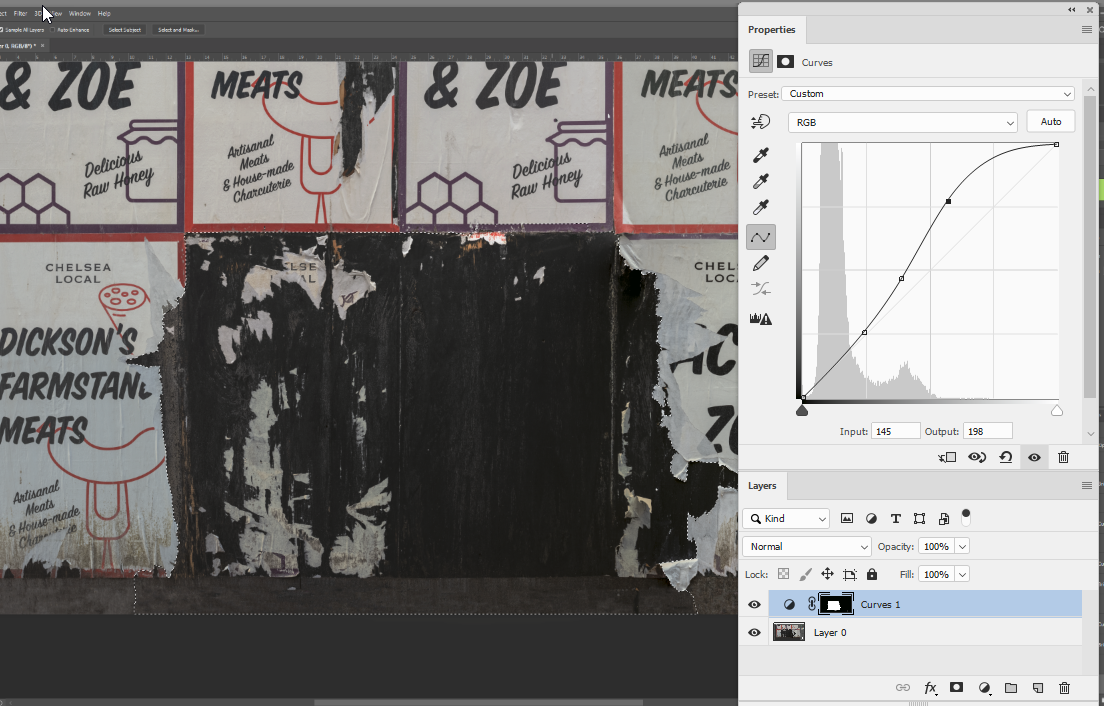
I am working with adjustment layers and want to lighten the torn white pieces of paper only within the marching ants in the screen shot below. I haven't figured out how to do that. Can anyone help? Thanks.


 1 Correct answer

That is what Photoshop's Luminous selection does. And like any selection you can adjust it using other Photoshop tools. You are selecting shadows and highlight. Inverting the selection basically switched from Highlight to Shadows. The Selection is like a gray scale of your image. Shortcut Ctrl+Alt+2 or Ctrl+Click on the RGB channel or click the first icon the dotted circle in the bottom of the channel palette. Add it as a layer mask to select Highlights and shadows. Adjust the layer m
...Explore related tutorials & articles
 12
Replies
12
12
Replies
12
Copy link to clipboard
Copied
Use a luminosity selection. Ctrl+J Dupe the area to Layer. or if multiple layers are involver Shift+Ctrl+C Ctrl+V Copy Merge Paste. Then set a luminosity selection and adjust the new top layer. Clip any adjustment to that layer

Copy link to clipboard
Copied
Thanks. Well this appears to be a fairly complex tool from a quick youtube search. Nothing as straightforward as targeting highlights or shadows using the ACR filter. But I am always for new learning, so will check it out.
Copy link to clipboard
Copied
That is what Photoshop's Luminous selection does. And like any selection you can adjust it using other Photoshop tools. You are selecting shadows and highlight. Inverting the selection basically switched from Highlight to Shadows. The Selection is like a gray scale of your image. Shortcut Ctrl+Alt+2 or Ctrl+Click on the RGB channel or click the first icon the dotted circle in the bottom of the channel palette. Add it as a layer mask to select Highlights and shadows. Adjust the layer mask using adjustments like Curves and Level.
To isolate your selection I created a layer from your selection Ctrl+j and added a luminosity mask Ctrl+Alt+2 then click on the add layer mask icon in the layers palette. Then I Adjusted the mask to select highlights more and the shadows less Ctrl+L or M. Then added a level adjustment layer I clipped the the new layer to brighten the torn paper selected by the luminosity mask. Its not very hard to do getting it right takes practice
If you converted the CTRL+J layer to a smart object layer you may be able to use ACR as a smart filter and use its shadow and highlights adjustment. However you may have more control over shadows and highlights via luminosity masking. There always seems to be more than one way to do something using Photoshop.
Copy link to clipboard
Copied
I did not know you could turn a layer inside a multi-layered document where there were also adjustment layers into a smart object. That is awesome. I love Camera Raw Filter and though I have started to see the benefits of adjustment layers prefer using the filter. So that's what I did and it worked great. But I'm excited about playing with the luminosity tool also. Thanks JJMack!!!

Copy link to clipboard
Copied
Use 'Bend if' in the Layer Styles. Open the Layer Styles dialog for the Adjustment layer, and drag the left slider of the Underlaying Layer to the right. Hold down the Alt-key to split the slider into two halves. In this example the adjustment layer only works in full on pixels that have a brightness of 230 or higher. Between 200 and 230 is the transition zone, so you don't get weird artefacts.

Copy link to clipboard
Copied
Thanks, but nothing happened after I held down Alt and clicked to split the slider in half. Was I supposed to do something else to lighten the highlights?
Copy link to clipboard
Copied
Splitting the sliders doesn’t lighten the highlights. Your adjustment layer should lighten the image. Setting the sliders this way makes sure that the adjustment layer only targets the highlights. It’s like adding a mask.

Copy link to clipboard
Copied
With the selection made add a curve adjustment layer (which will be masked to your selection). Then just lift the upper end of the curve
Dave
Copy link to clipboard
Copied
But I just want to lighten the whites. This seems to be bringing up exposure for the blacks too. I know it shouldn't be that way, because the top of the graph is dealing with highlights, and the bottom of the graph is dealing with shadows, or at least that's what I thought.
Copy link to clipboard
Copied
bartonlew wrote
But I just want to lighten the whites. This seems to be bringing up exposure for the blacks too. I know it shouldn't be that way, because the top of the graph is dealing with highlights, and the bottom of the graph is dealing with shadows, or at least that's what I thought.
You can set a curve to alter the light areas and leave the darks alone. Just add extra points to the curve to keep the darker end unchanged.
Dave

Copy link to clipboard
Copied
s
Since you want to use an Adjustment Layer:
1. Choose Adjustment Layer > Threshold
2. Move the slider all the way to the right. The area will go completely black
3. Slowly move the slider to the left to take in the image's only the whitest area
4. Choose the Magic Wand with the Options bar Contiguous Unchecked
5. Click on a white area
6. Turn off the Adjustment Layer to reveal the marching ants on the image
Copy link to clipboard
Copied
Ummm .... okay, but stop there? With the marching ants at no. 6? The whites are looking grayer than before. I wanted them whiter.

Find more inspiration, events, and resources on the new Adobe Community
Explore Now
 AdChoices