


Copy link to clipboard
Copied
Hi
Is there a way on turning any picture/image into a mask in PS?
I have looked for a tutorial in YouTube & Google search but can not seem to find one?
Help, thanks in advance!
Julie


 1 Correct answer

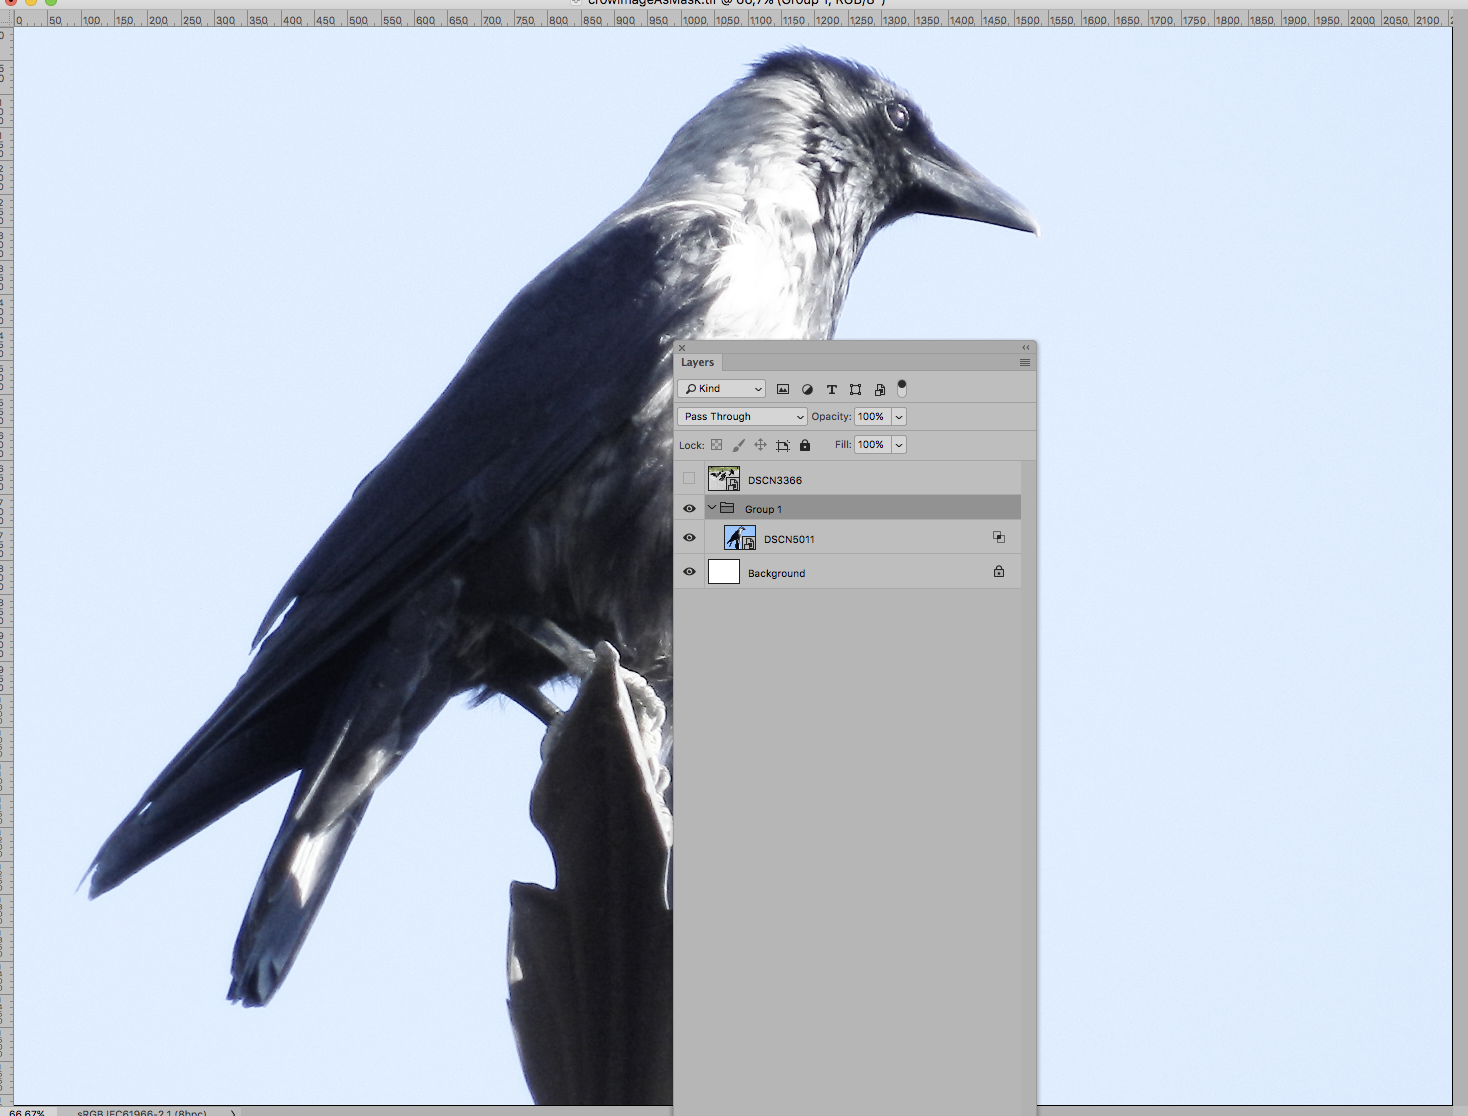
You're welcome, Julie. Here is an example of using an image as a mask in order deal with an extreme luminance range. It was a technique that was used before the HDR feature was added to Photoshop and it still comes in handy now and then.
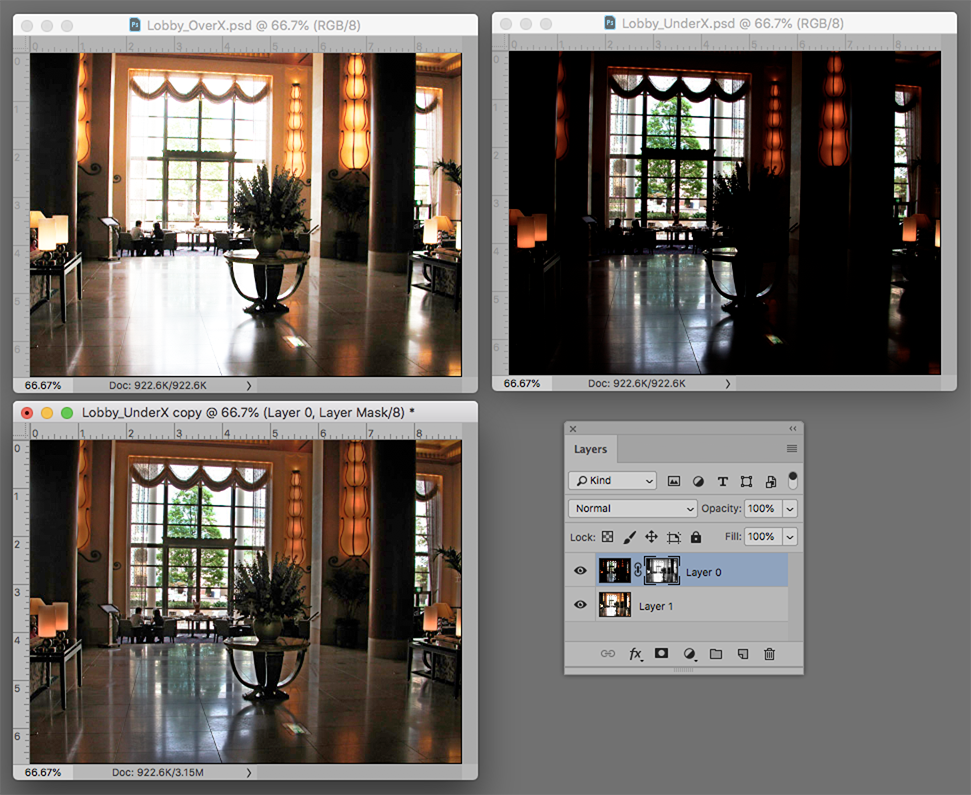
The top pair are original images; one to capture the low end of the luminance scale, the other to capture the high end.
As the Layers panel shows, the images where stacked in register, then bottom image was used as the basis for a mask that was applied to the top
...Explore related tutorials & articles
 14
Replies
14
14
Replies
14

Copy link to clipboard
Copied
Hi
1. Make the picture you want to see as the mask visible (i.e. turn on layers as required)
2. Ctrl+ Click (Cmd+Click on Mac) on the RGB channel in the Channels panel to load the image as a selection
3. Go to the layer you want to mask and use Layer >Layer Mask>Reveal selection (or hide selection) as appropriate.
If adding an adjustment layer then adding it after step 2, once the selection is made, will automatically add the mask
Dave
Copy link to clipboard
Copied
Hi Dave
Thank you so much for your reply & help, its much appreciated!
Ok this is the picture I took myself & I would like to turn into a mask to use in Photoshop as follows:
Do I just make it greyscale & then save it as a jpg to then use as I would a mask?
Thanks & I will await your reply!
Julie
Copy link to clipboard
Copied
No need to make it grayscale - just open it as a layer in the document - make the mask using the steps above then turn the layer visibility off (or delete the layer if you will not use it again).
Dave

Copy link to clipboard
Copied
save it as a jpg
Why would you degrade the image without necessity?
jpg employs lossy compression and therefore damages images.
What do you want to do with the Mask?
And have you read davescm ’s post? At no point did he mention converting the whole image to grayscale.
Copy link to clipboard
Copied
Thank you so much to you both: davescm & c.pfaffenbichler, much appreciated.
I will give this ago. 
Thanks for the tip as I did not know that:
jpg employs lossy compression and therefore damaged images.
Julie
Copy link to clipboard
Copied
Consider this, as well:
1. Open the image
2. Select > All followed by Edit > Copy
3. Add a mask by clicking on the Mask symbol at the bottom of the Layers panel
4. Option-click on the mask. The image area becomes white.
5. Edit > Paste. Done.
Copy link to clipboard
Copied
Thank you norman.sanders 
Copy link to clipboard
Copied
You're welcome, Julie. Here is an example of using an image as a mask in order deal with an extreme luminance range. It was a technique that was used before the HDR feature was added to Photoshop and it still comes in handy now and then.

The top pair are original images; one to capture the low end of the luminance scale, the other to capture the high end.
As the Layers panel shows, the images where stacked in register, then bottom image was used as the basis for a mask that was applied to the top image.
Important: When this technique is used, the final step is to blur the mask slightly to blend the images more effectively.
Copy link to clipboard
Copied
Hi norman.sanders & c.pfaffenbichler
Thank you to you both for your kind reply's!
I am quite new to Photoshop only been using it since beginning of year so have lots to learn/understand etc lol.
I am not quite sure what you both mean, so sorry!
Julie
Copy link to clipboard
Copied
What exactly do you want to mask with the image?
Please post a screenshot of the file open in Photoshop including the Layers Panel.
Copy link to clipboard
Copied
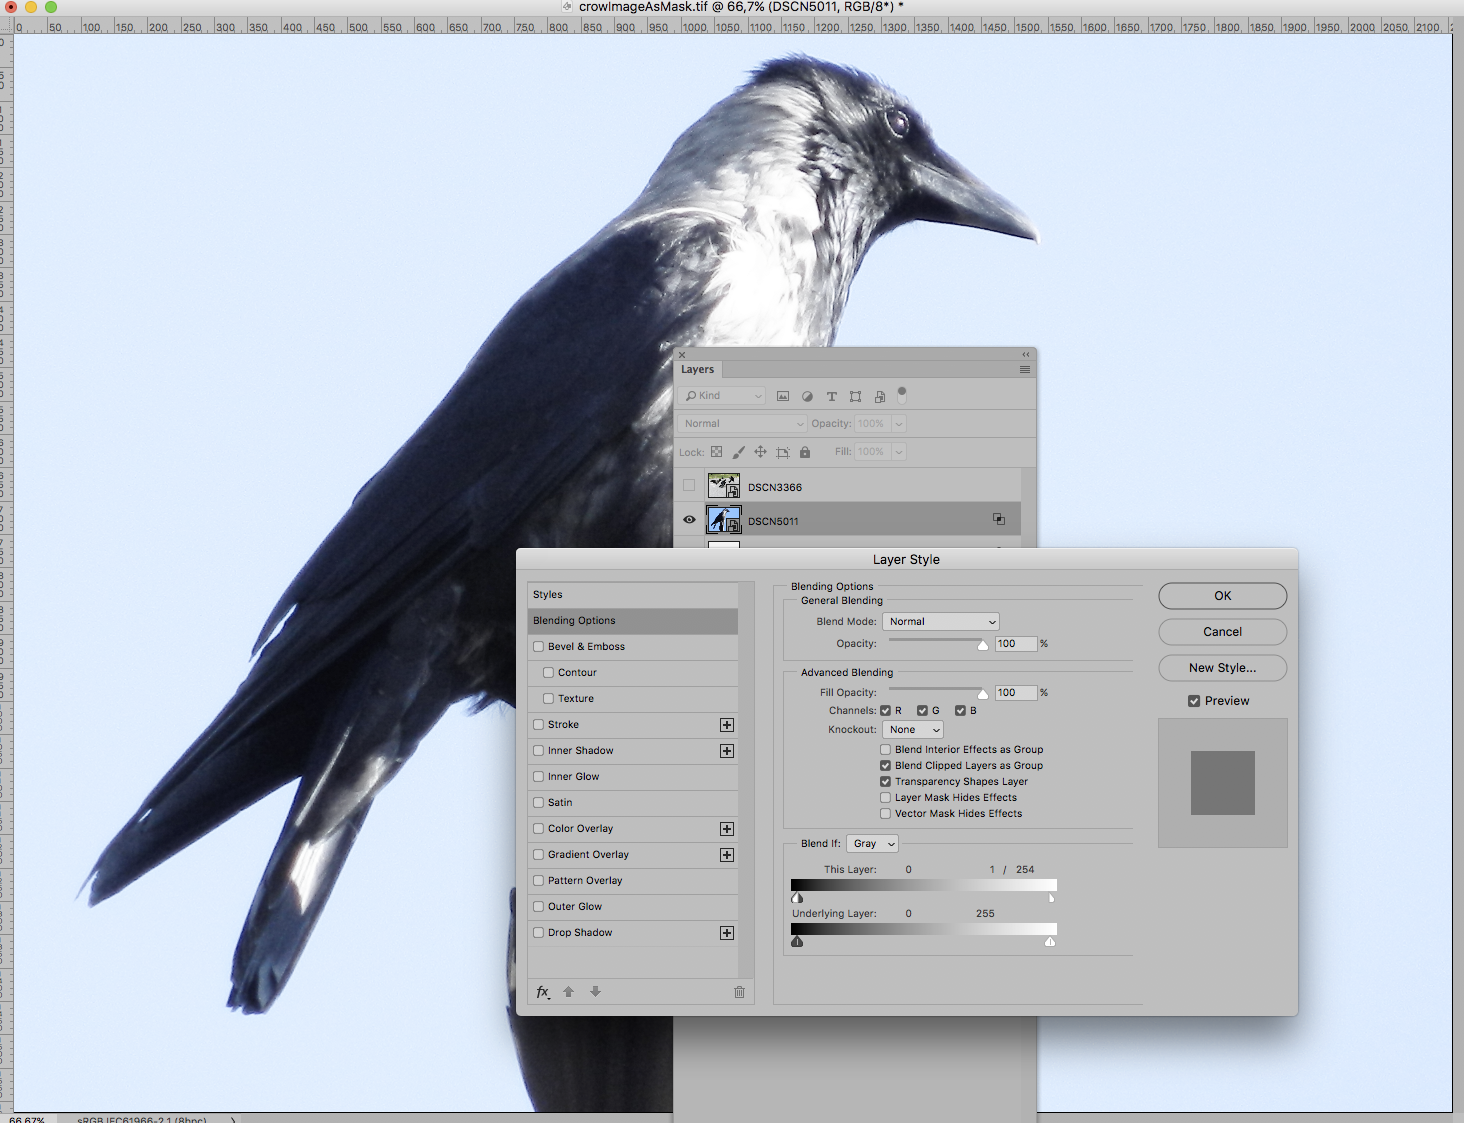
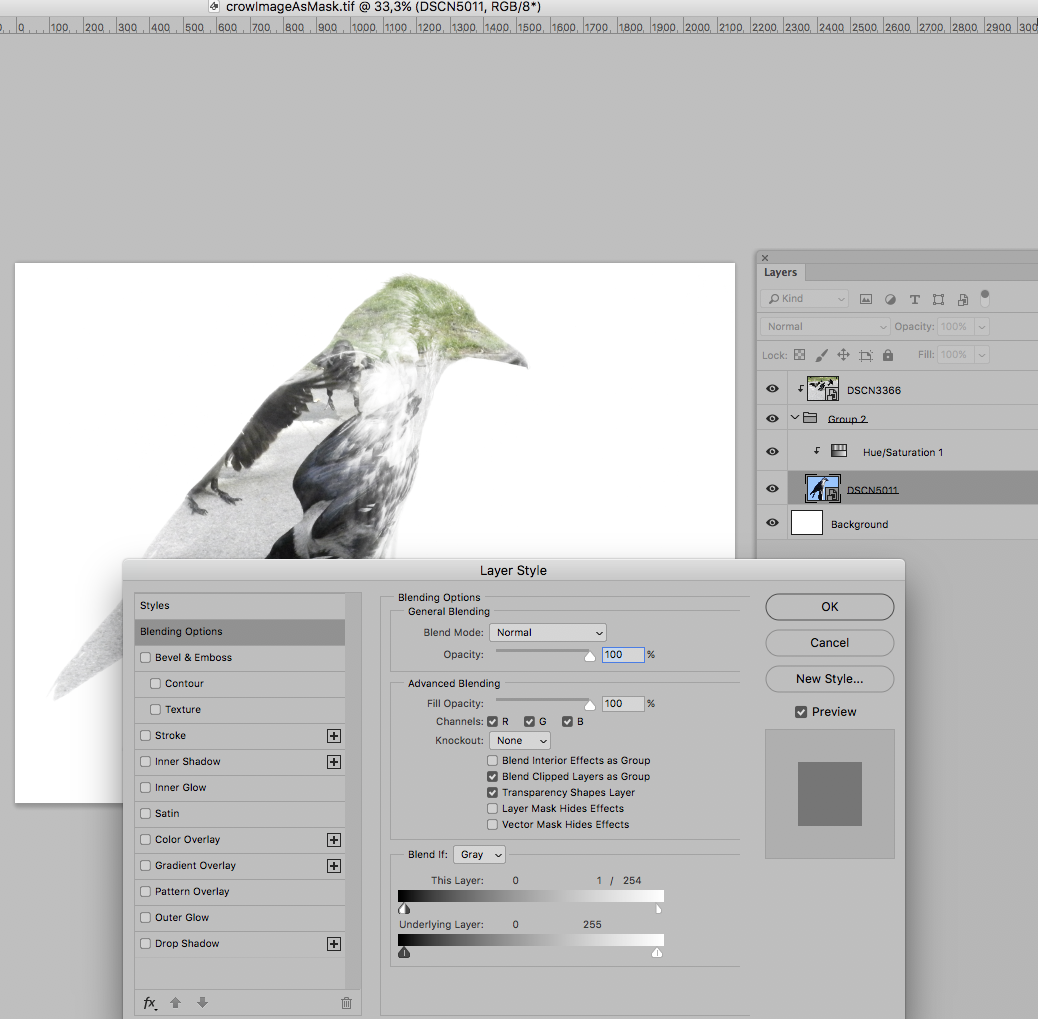
By alt-click-dragginging one can split the Blend if-handle (in this case the white one for »This Layer«).

Copy link to clipboard
Copied
Thanks c.pfaffenbichler
I am new to this so I will need to look into this more, I am a newbie lol.
Julie
Copy link to clipboard
Copied
Good for you that you are willing to learn.
I would say the method I showed is more complicated than norman.sanders ’s and the advantages it offers may not be worth the trouble in many cases.
Copy link to clipboard
Copied
One option to use a full color image as a mask is to use its Blend if settings and Clipping Mask another image to a Group containing it.
That way one can still use Adjustment Layers (inside a Smart Object or on the Layer).

 AdChoices