• Global community
    • Language:
      • Deutsch
      • English
      • Español
      • Français
      • Português
  • 日本語コミュニティ
    Dedicated community for Japanese speakers
  • 한국 커뮤니티
    Dedicated community for Korean speakers
Exit
0

How to get reverse a transparent color shape

Guest
Mar 13, 2017 Mar 13, 2017

Copy link to clipboard

Copied

I wanted to point out something particular on a map I have, so I circled the area and put a transparent colored circle around it. But, of course, I goofed up and saved the map with the damn color cast on it, ruining my only original. Is there any easy way to get rid of it or do I have to hand color and restore it?accident.jpg

Views

3.8K

Translate

Translate

Report

Report
Community guidelines
Be kind and respectful, give credit to the original source of content, and search for duplicates before posting. Learn more
community guidelines
Adobe
Community Expert ,
Mar 13, 2017 Mar 13, 2017

Copy link to clipboard

Copied

Hi

Try this

1. Add a layer above the map. Set the blending mode to color. Get a brush and Alt-Click elsewhere on the map to pick up the background colour. Paint over the circle.

2. Add a second layer. Set the blending mode to luminosity. Paint with the same brush. Right click on that layer and, under blending options,  set blend if as below :

3. Add a third layer and set blending mode to color. Paint back in the green colour.

It may not be perfect but it will get you close :

I hope that helps you

Dave

Votes

Translate

Translate

Report

Report
Community guidelines
Be kind and respectful, give credit to the original source of content, and search for duplicates before posting. Learn more
community guidelines
Enthusiast ,
Mar 13, 2017 Mar 13, 2017

Copy link to clipboard

Copied

Did you actually write over the original, or create a photoshop file with the same name? Usually when you save in photoshop it creates the photoshop file. You may be able to look in your "history" in photoshop and undo the work, but not if you closed the file already. If none of this works I know of no other way except to manually fix fix the circle

Votes

Translate

Translate

Report

Report
Community guidelines
Be kind and respectful, give credit to the original source of content, and search for duplicates before posting. Learn more
community guidelines
Contributor ,
Mar 13, 2017 Mar 13, 2017

Copy link to clipboard

Copied

I did it a little differently.

1. Sampled Light Background.

2. Desaturated Image.

3.  Selected Circled Area.

4. Used curves to reduce until it blended into the Background.

5. Created new Layer and filled with previously sampled area, set to multiply.

6. Added another layer set to multiply and fill with Green Color.

7. Flattened and adjaccident1.jpgusted with curves to match.

Votes

Translate

Translate

Report

Report
Community guidelines
Be kind and respectful, give credit to the original source of content, and search for duplicates before posting. Learn more
community guidelines
Engaged ,
Mar 13, 2017 Mar 13, 2017

Copy link to clipboard

Copied

LATEST

And I did it differently. 🙂

layers.PNG

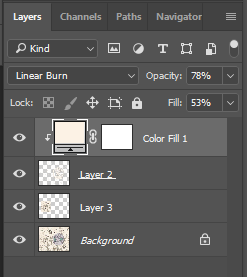
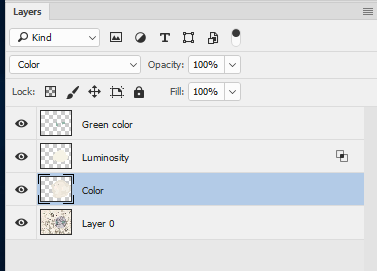
Using the Magic Wand with "Contiguous" unchecked, clicked on the lavender at a low tolerance (5 by 5 Average, 10) and duplicated the selection onto a new layer (Layer 2). (It also selected some bits outside the circle but it doesn't matter.)

Went back to the Background layer, selected an area outside the circle with the Marquee tool, and duplicated that onto a new layer (Layer 3).

Image > Adjustments > Match Color...  Focusing on Layer 2, used accident.jpg as the "Source" and layer 3 for "Layer." Left the adjustments at their defaults. This got Layer 2 into the ballpark.

Sampled a beige area on the Background with the Eyedropper (#f9f2e5), then clipped a Solid Color adjustment layer to Layer 2 using that color, changed the blend mode to Linear Burn and dropped the opacity to 53% which seems about right.

accident cleanup.png

Votes

Translate

Translate

Report

Report
Community guidelines
Be kind and respectful, give credit to the original source of content, and search for duplicates before posting. Learn more
community guidelines