

- Home
- Photoshop ecosystem
- Discussions
- Re: How to got layer dimensions (with transparent ...
- Re: How to got layer dimensions (with transparent ...

Copy link to clipboard
Copied
Hi to everybody, this is my first post.
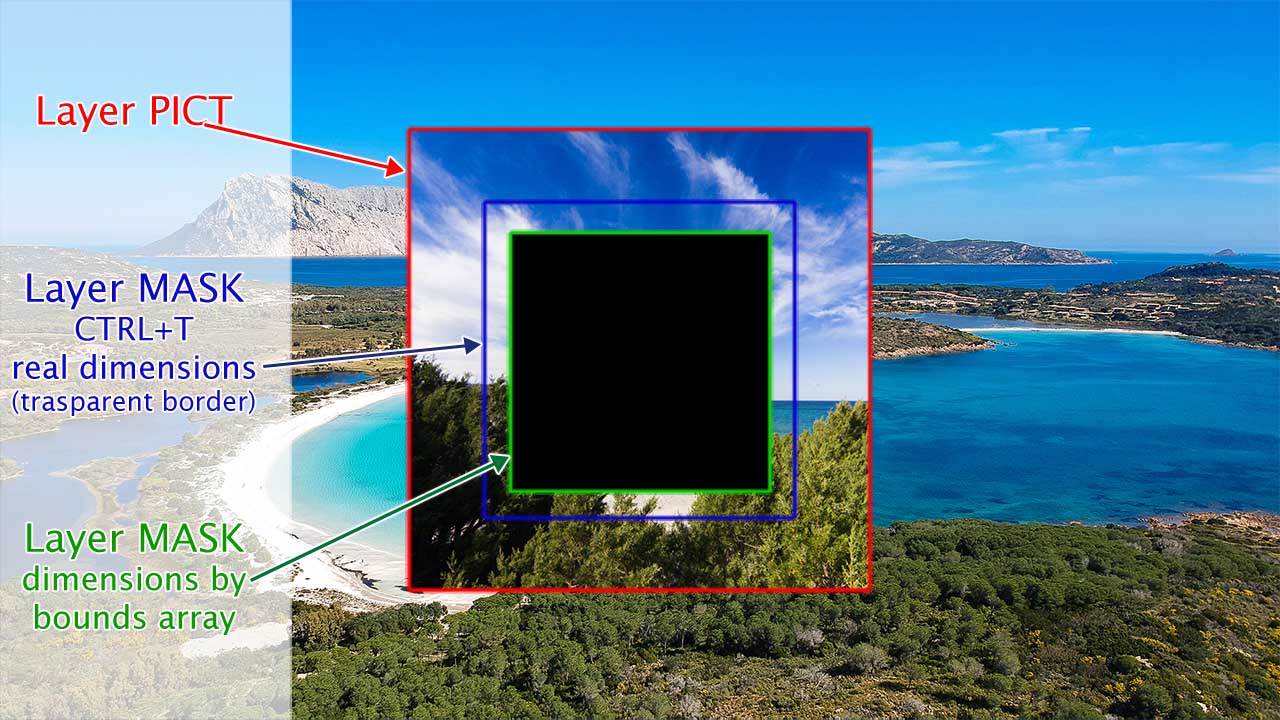
I need to know the really dimensions of a layer with border trasparent for resize it to same dimensions of other layer.
well, if use the bounds datas, i got the dimensions of the pixels, but not the really dimensions of the layer.
With this script i would like resize the "mask" layer and the "frame" layer to the same size of the picture layer, but like i work with transform command (CTRL+T).
there are anybody know how to do?
Thanks
G.
--- Script ---
var doc = app.activeDocument
var thisLayer = doc.activeLayer;
// got the group of layers
var thisGroup = thisLayer.parent;
//main layer (photo)
var thisPict = thisGroup.layers[2];
var ThisPictBounds = thisPict.bounds;
var thisPictW = ThisPictBounds[2].as('px')-ThisPictBounds[0].as('px');
var thisPictH = ThisPictBounds[3].as('px')-ThisPictBounds[1].as('px');
//mask layer
var thisMask = thisGroup.layers[1];
var ThisMaskBounds = thisMask.bounds;
var thisMaskW = ThisMaskBounds[2].as('px')-ThisMaskBounds[0].as('px');
var thisMaskH = ThisMaskBounds[3].as('px')-ThisMaskBounds[1].as('px');
// frame layer
var thisFrame = thisGroup.layers[0];
var ThisFrameBounds = thisFrame.bounds;
var thisFrameW = ThisFrameBounds[2].as('px')-ThisFrameBounds[0].as('px');
var thisFrameH = ThisFrameBounds[3].as('px')-ThisFrameBounds[1].as('px');
// rename all layers
thisPict.name = thisGroup.name + '>' + 'Pict';
thisMask.visible = false;
thisMask.name = thisGroup.name + '>' + 'Mask';
thisFrame.name = thisGroup.name + '>' + 'Frame';
// resize mask and frame layers
thisMask.resize ((thisPictW/thisMaskW)*100,(thisPictH/thisMaskH)*100, AnchorPosition.MIDDLECENTER);
thisFrame.resize ((thisPictW/thisFrameW)*100,(thisPictH/thisFrameH)*100, AnchorPosition.MIDDLECENTER);
// ### example ###
// thisMaskW = 489 (974 - 485 ) >> Real width layer dimension usig CTRL+ T command
// thisMaskH = 316 (519 - 203) >> Real height layer dimension usig CTRL+ T command
// thisMaskW = 258 (769 - 511 ) >> Pixel width dimension got by bouds data
// thisMaskH = 259 (492 - 233) >> Pixel height dimension got by bouds data
// How got real layer dimension?


 1 Correct answer

Explore related tutorials & articles
 14
Replies
14
14
Replies
14
Copy link to clipboard
Copied
Badly understood the question and your picture.
Perhaps using your "boundsNoMask" property for the layer for the AM version of the code will help.
Or for the DOM version you can set the layer's "layerMaskDensity" property to zero and take the bounds of the layer at that moment.

Copy link to clipboard
Copied
If you step back and look at how Photoshop works may may find a way to handle what you want to accomplish. You problems seem to be with Transparent boarders an Image file that supports transparency can present to automation. I have never found a perfect way to deal with the problems that manifest itself in two. A layer bounds is rectangle that side are horizontal and vertical boundaries of the pixels in the layer. A layer does not have pixels outside its bounds a layer does not have transparent borders a layer can have transparency that is within it bounds. Image Files on the other hand has a Canvas Size and larger then layers. So it is posible that an Image file is a image with transparent borders for its canvas size cab be larger then image lyers bounds on all four sizes.
This presents quite a problem when it come to automating things like Photo Collages and Mockups. You need to use things like Place and Copy and Paste. Place renders pixels for the object files and uses those pixels for the layers content for the smart object layer. The layer will not have transparent borders is as though Place Trimmed the Image files transparent borders. If you open an image files that is an image with transparent borders the image in Photoshop image window will have transparent boarders but the layer does not. So if you do a select all the Full canvas will be selected if you do a Copy or Copy merge all selected Pixels will be copied to the clipboard. The pixels in the clipboard will not have transparent borders. So Paste will not paste in a layer with transparent borders. Layers do not have transparent boarders.
In my mockup scripts I address the Copy Paste issue when I replace object via editing the Smart object. However if the Replace Content option is used to replace object content. Replace Content uses Photoshop Place so all Photoshop Place issues are not address. Photoshop Place issues are outside of my control.
It is easy to address the transparent border issue by preprocessing the image to make them have sudo transparent borders. I simple add two pixels that are gray 1% opacity to the top left canvas corner and one into the bottom right canvas corner.
Copy link to clipboard
Copied
If you like, I uploaded the files with the example of the work I should get to this address.
I made two small recordings of the work I do and I would like to automate and work on the script I have developed.
http://www.goldhookmarinaservice.it/helpme.zip
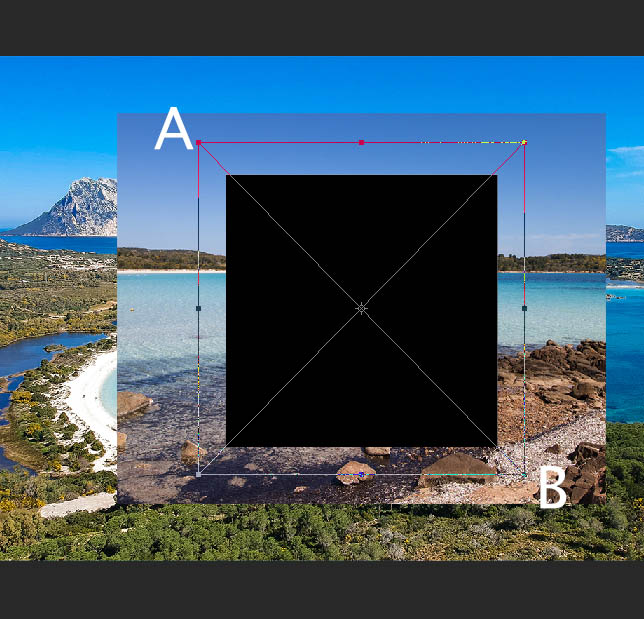
Currently the MASK layer uses only the visible pixels to create the mask in the PICT layer. Alternatively, I could modify the files I use for the mask, turning them into grayscale, without trasparent parts. This way I can resize the two levels to the same size. But the problem would remain in the FRAMES, this level has transparent margins that I can't modify.
The only solution is to understand how to find the coordinates of points A and B in this image, that is the vertices of the level when pressing CTRL + T.
Copy link to clipboard
Copied
The script you show does not do the place images as you use of Photoshop on either of your videos. Place is also has issues you have to deal with when scripting it use. Place may resize the file image because of differences in file print resolution when creating the smart object layer. Place may also scale the smart object layer created to fit on canvas. If you are not careful you may not gets the correct size of the object because Photoshop has scaled the layer to fit on canvas. you will get the scaled size not the actual image size. When I first start scripting Photoshop Collage back when CS2 was released Selection Bounds had a bug and did not work I had to develop a work around that bug. And place drove me up the wall till I figured our what Adobe was actually doing. IMO the resizing Adobe does when print resolution does match is a major problem and degrades your image quality. I feel you need to script Place amd find out how it works and then come up with a design that will crerate the composite you want to crerate.
Copy link to clipboard
Copied
If you are recording a series of actions, there is an application that translates the steps into a script.
In this way I can try to understand how Photoshop handles the CTRL + T command activity and what commands are they that make the vertex of the level I'm transforming into the level that interests me.
Because I can't find documentation of how to execute commands anywhere.
Copy link to clipboard
Copied
Copy link to clipboard
Copied
the script in this post is the solution... GOOD!
Copy link to clipboard
Copied
I found a script that translates the actions into scripts. WOW.
I created two identical actions that transform two different images to be used to create the mask in the photo like i'm doing and i want to automatize.
Translated the actions into script, I got these two results:
function FIRST(enabled, withDialog) {
if (enabled != undefined && !enabled)
return;
var dialogMode = (withDialog ? DialogModes.ALL : DialogModes.NO);
var desc1 = new ActionDescriptor();
desc1.putEnumerated(cTID('FTcs'), cTID('QCSt'), sTID("QCSAverage"));
var desc2 = new ActionDescriptor();
desc2.putUnitDouble(cTID('Hrzn'), cTID('#Pxl'), 0);
desc2.putUnitDouble(cTID('Vrtc'), cTID('#Pxl'), -1);
desc1.putObject(cTID('Ofst'), cTID('Ofst'), desc2);
desc1.putUnitDouble(cTID('Wdth'), cTID('#Prc'), 148.543689320388);
desc1.putUnitDouble(cTID('Hght'), cTID('#Prc'), 145.569620253165);
executeAction(sTID('transform'), desc1, dialogMode);
};
function SECOND(enabled, withDialog) {
if (enabled != undefined && !enabled)
return;
var dialogMode = (withDialog ? DialogModes.ALL : DialogModes.NO);
var desc1 = new ActionDescriptor();
desc1.putEnumerated(cTID('FTcs'), cTID('QCSt'), sTID("QCSAverage"));
var desc2 = new ActionDescriptor();
desc2.putUnitDouble(cTID('Hrzn'), cTID('#Pxl'), -0.5);
desc2.putUnitDouble(cTID('Vrtc'), cTID('#Pxl'), 0);
desc1.putObject(cTID('Ofst'), cTID('Ofst'), desc2);
desc1.putUnitDouble(cTID('Wdth'), cTID('#Prc'), 146.031746031746);
desc1.putUnitDouble(cTID('Hght'), cTID('#Prc'), 109.52380952381);
executeAction(sTID('transform'), desc1, dialogMode);
};
desc1.putUnitDouble(cTID('Wdth'), cTID('#Prc') ... AND ... desc1.putUnitDouble(cTID('Hght'), cTID('#Prc')...
are the scaling percentage (i think)
What mean these commands?
desc2.putUnitDouble(cTID('Hrzn'), cTID('#Pxl'), 0); desc2.putUnitDouble(cTID('Vrtc'), cTID('#Pxl'), -1);
desc2.putUnitDouble(cTID('Hrzn'), cTID('#Pxl'), -0.5); desc2.putUnitDouble(cTID('Vrtc'), cTID('#Pxl'), 0);
JJMack if it were not possible to automate this procedure, I give up
Copy link to clipboard
Copied
What you want to do can most likely be automated with a Photoshop Script. It can not be automated with an Actions because action can not use logic to calculate what the resizing values should be used. Action are Photoshop steps with fixed hard recorded values and names etc. Scripts made by converting Action also have Hard cedes step settings. However, you can edit these converted action steps and change the hard settings into variables and add logic to calculate what settings should be used to set these variables.
You also need to design a sequences of steps the will produce the composite you want.. You video showed files being placed in or dropped in as smart object layers that involved a place transform to size and position the image. None of that was in your script. Your script seem to be set process a layer group created by your manual process and depends on the group to be the document active layer and have three layers in it the are in a particular order and have known content. The problem is you using layer bounds of Smart object layers the may have been scaled by Place and Place may also have reside the image content degrading it. If the smart Object layer has been scaled by Place the bounds is that of the scaled layer not the actual size of the actual image object. Place is a very strange beast.
You may want to look at some of my scripts.
Photo Collage and Mockup Toolkit
Photoshop scripting is powerful and I believe this package demonstrates this. Here is a video showing a 5 image collage PSD template being populated with images
The package includes four simple rules to follow when making Photo Collage Template PSD files so they will be compatible with my Photoshop scripts.
- Size the photo collage templates for the print size you want - width, height and print DPI resolution.
- Photo collage templates must have a Photoshop background layer. The contents of this layer can be anything.
- Photo collage templates must have alpha channels named "Image 1", "Image 2", ... "Image n".
- Photo collage templates layers above the background layers must provide transparent areas to let the images that will be placed below them show through.
There are eighteen scripts in this package they provide the following functions:
- HelpPhotoCollageToolkit.jsx - Online Help
- TestCollageTemplate.jsx - Used to test a Photo Collage Template while you are making it with Photoshop.
- CollageTemplateBuilder.jsx - Can build Templates compatible with this toolkit's scripts.
- LayerToAlphaChan.jsx - Used to convert a Prototype Image Layer stack into a template document.
- InteractivePopulateCollage.jsx - Used to interactively populate Any Photo Collage template. Offers most user control inserting pictures and text.
- ReplaceCollageImage.jsx - use to replace a populated collage image Smart Object layer with an other image correctly resized and positioned.
- ChangeTextSize.jsx - This script can be used to change Image stamps text size when the size used by the populating did not work well.
- PopulateCollageTemplate.jsx - Used to Automatically populate a Photo Collage template and leave the populated copy open in Photoshop.
- BatchOneImageCollage.jsx - Used to Automatically Batch Populate Collage templates that only have one image inserted. The Collage or Image may be stamped with text.
- BatchMultiImageCollage.jsx - Used to Automatically Batch Populate Any Photo Collage template with images in a source image folder. Easier to use than the interactive script. Saved collages can be tweaked.
- PasteImageRoll.jsx - Paste Images into a document to be print on roll paper.
- BatchPicturePackage.jsx - Used to Automatically Batch Populate Any Photo Collage template with an image in a source image folder. Images Rotates for best fit.
- BatchPicturePackageNoRotate.jsx - Used to Automatically Batch Populate Any Photo Collage template with an image in a source image folder.
- PopulatePicturePackage.jsx - Used to Automatically populate a Photo Collage template Fill with the same single image and leave the populated copy open in Photoshop.
- PCTpreferences.jsx - Preferences Use in several of the above scripts. Edit this file to change default settings and add layer styles.
- BatchReplaceOneObject.jsx - Used to populate simple Mockup templates. Simple Mockup have one rule the top layer must be a Smart Object Layer it contents will be replaced and a Jpeg file saved.
- BatchUpdateSmartObject.jsx - Used to populate simple Mockup templates like BatchReplaceOneObject script but can update more than a single smart object layer.
- BatchMockupTemplates.jsx - Used to populate mutiple Mockup Template that need to be populated eith the same replacement image objects.
Mockup Support Added
I created my Photoshop Photo Collage Toolkit nine years ago and Avoided supporting Templates that used Smart Object layers to warp, to add perspective, to rotate, add any distortion to images. Because replacement Image file needed to have exactly the same Aspect Ratio, Size and Print resolution as the Object in the Template's smart object layers object. Lately there have been some threads in Adobe Photoshop scripting forums dealing with updating/populating products Mockups Templates that have prototype smart object layers that need to be updated to create the output mockup files. These were good threads and prompted me to do some thinking.
So like my Photo Collage Template design has four simple rules. I came up with four simple rules for Mockup templates. I find that I can easily modify Photo Collage Templates and Mockup Template files I download from the web so they comply with my Photo Collage Template rules or my Simple Mockup Template rules. Mockup templates may be far from simple the only simple part is they are easy to update. So I have add support to my Photo Collage Toolkit to support Mockup templates.
Simple Mockup Templates Four Rules
- Simple Mockup Templates Only the Smart Object Layer on the top of the Template layers stack will be updated then a Jpeg file saved.
- Only Photoshop Objects are support in the top smart objects layers. That is they can not be Object File that are not supported by Photoshop like Camera RAW Files or Illustrator file like .ai, .svg.
I suggest these objects should be PSD or PSB that Photoshop creates. Avoid using PNG objects in Mockup template. For when replace content is used to replace .png objects within a .psd template which has your png's object the replace content operation is very slow. - The first None Smart Object Layer near the top of the layer stack Marks the end of Smart Object Layers the will be updated. Lower Smart Object Layers only update if they share top layers objects.
- The Replacement Image Collection need to be in sub folders named obj0, obj1, obj2, .... objN. Each folder must contains the same number of replacement Image files.
For Details and Download use this link Documentation and Examples
Copy link to clipboard
Copied
Wouldn't it be better to create topic where you post this long list of scripts of you collage once and then just put a link to? I remember it is in many places on this forum, however usable for people it could be nicer to make dedicated topic for, thx !
Copy link to clipboard
Copied
I understand your opinion mine is different than yours. Why should users have to follow link to other threads then return to the thread they were reading. Its much easier for them to read the breif discription then just scroll past a long list if they have no interest from the breif discription.
Copy link to clipboard
Copied
Then you can make same list on your website instead in other theard 
Copy link to clipboard
Copied
Of course that list come from my web site copy and paste work quite nicely in threads on this web site.
Copy link to clipboard
Copied
Okey, paste it under single post of you then and encourage others to do the same 

Find more inspiration, events, and resources on the new Adobe Community
Explore Now
 AdChoices