- Home
- Photoshop ecosystem
- Discussions
- Re: How to make path behind anamation
- Re: How to make path behind anamation
How to make path behind animation
Copy link to clipboard
Copied
I have a simple key frame animation of a caricature moving on the screen. I would like to have it leave a trail of its path of movement. How do I do this in Photoshop?
Thx
D
Explore related tutorials & articles
Copy link to clipboard
Copied
Off the top of my head, one way would be to make a layer for each head. (ctrl-j) can be used to create the new layer with the head copied in that layer. place each head in the proper location and set the opacity to 0.
Then use opacity to make the head visible once the original layer passes that head.
Copy link to clipboard
Copied
What I'm trying to do is have the moving character leave a trial or path behind it as it moves. just like the image below.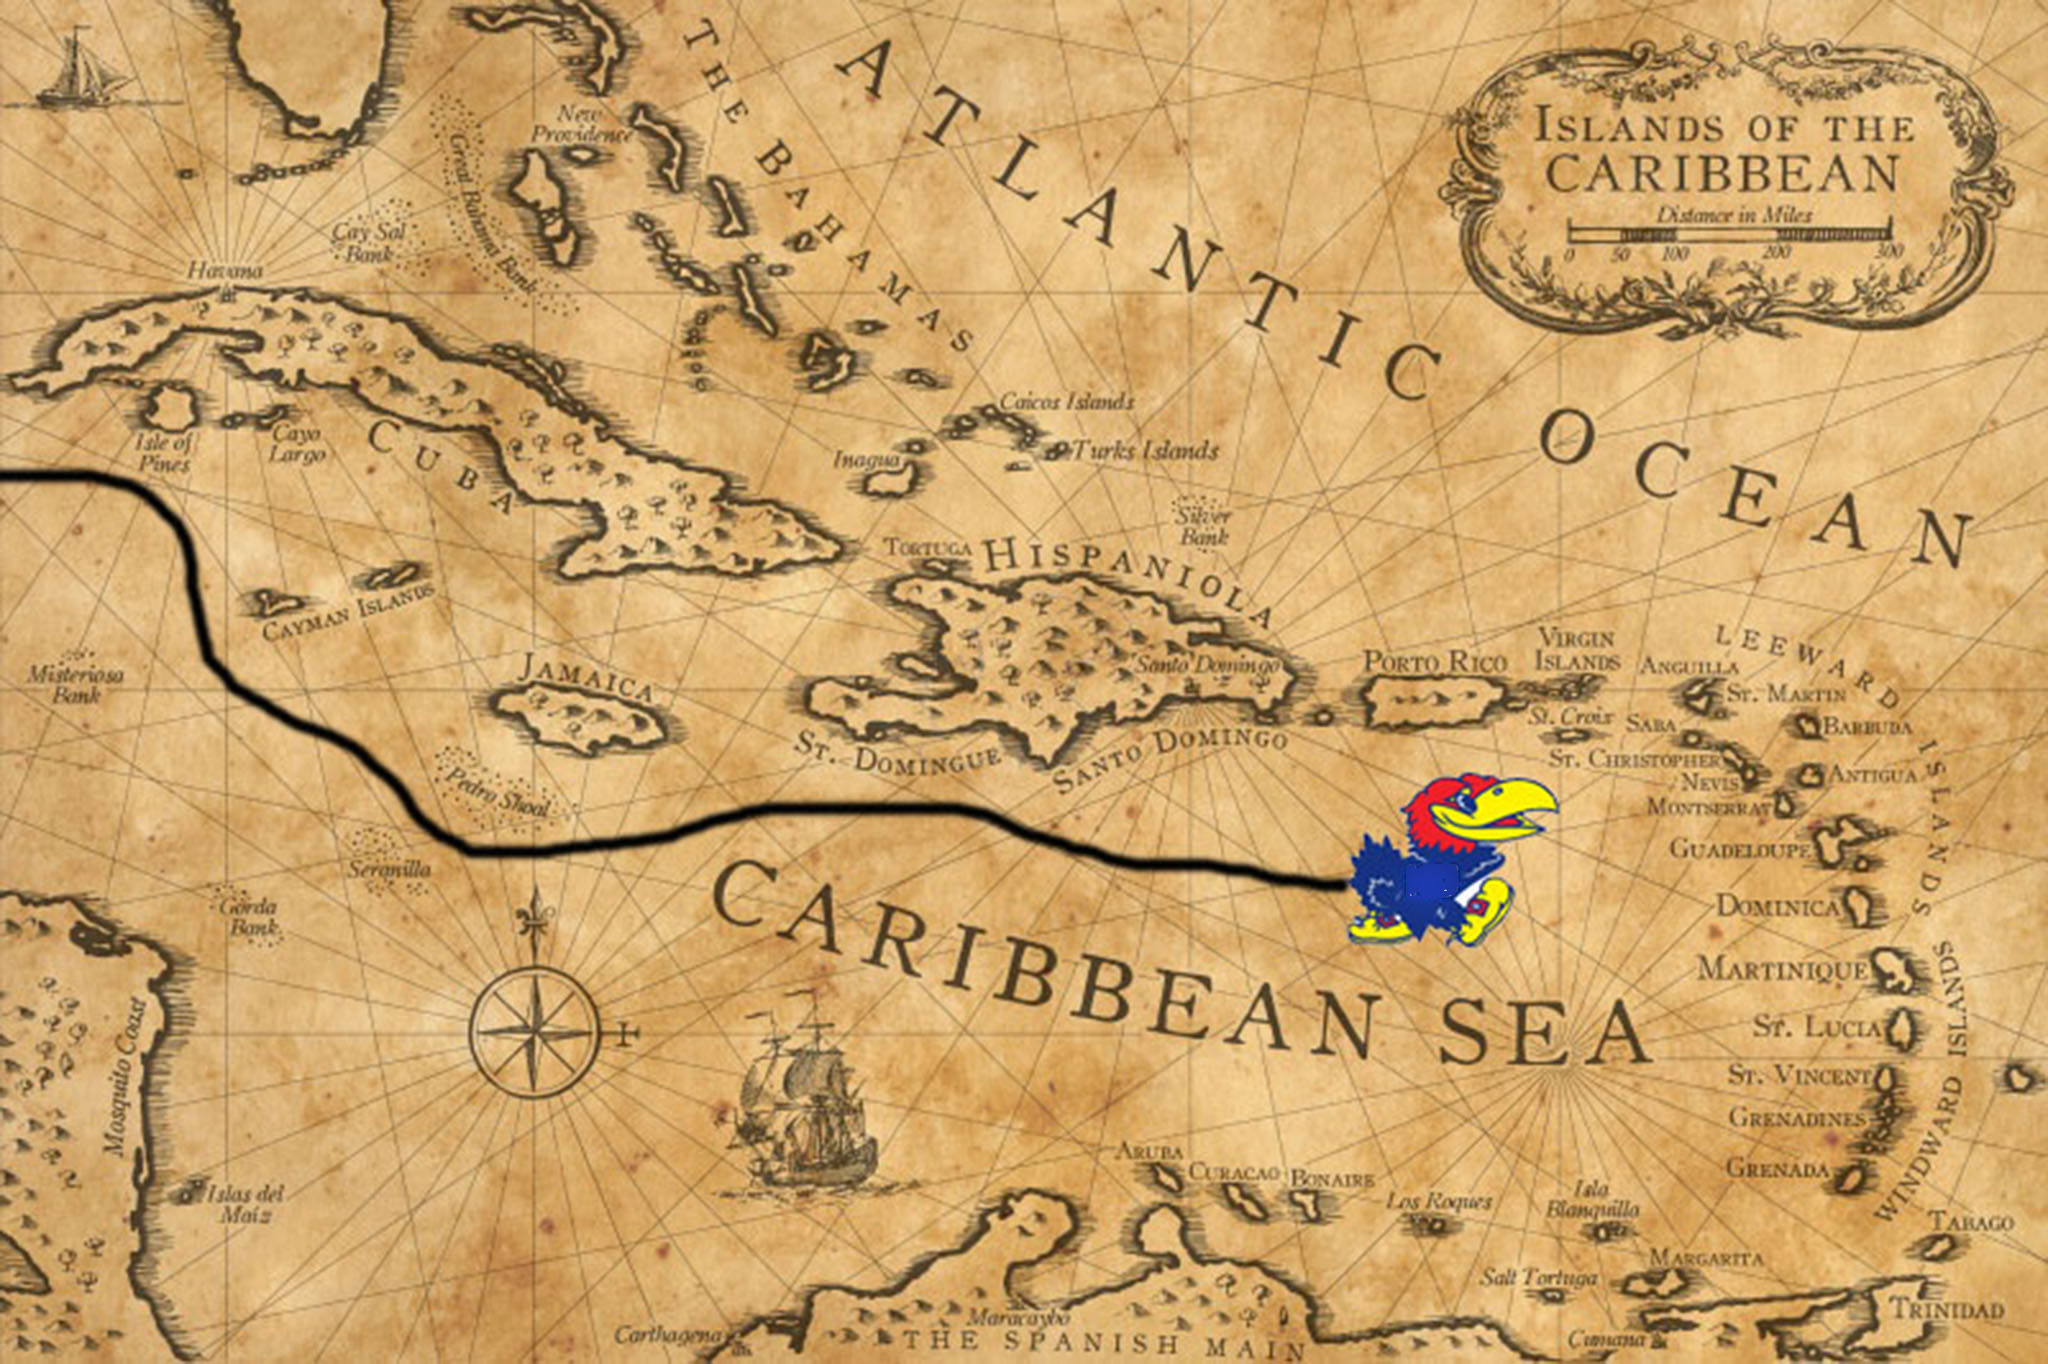
Copy link to clipboard
Copied
Ah, extending the line. I thought you wanted a ghost trail of heads.
That maybe easier to do in After effects. You create the entire line with points or anchors to represent the length of the line at that time. Then After effects will draw the line to each points that will coincide with a key frame.
In photoshop you could use frame animation and copy the line to all frames, then in each frame extend the line. This would be quicker by clearing the frames and doing the work in layers then create the frames from layers.
Copy link to clipboard
Copied
Hi!
Another way you can create a trail, is to use a layer mask.
Create the trail layer and draw the trail. Add a layer mask to the Trail layer, and set the mask to black so the entire image is hidden.
As you move the figure across the screen, add a new frame in your animation panel, and in the Layer's panel, paint white in the mask along the trail to reveal the line to the location of your figure. Continue to do this--moving the figure, adding a frame of animation and painting with white on the mask layer to reveal the line up to your figure-- until your image finishes on the other side.
Using shorter strokes while painting and adding many frames will give you smoother movement as the line grows.
Let me know if you have any questions! I hope that helps.
Michelle
Copy link to clipboard
Copied
Good idea, actually that was the method used in flash. Moving the mask escaped me. Masks are great for covering and revealing as they can move independently from the image on the same layer.
Copy link to clipboard
Copied
Thanks. Yes--I've done it in Flash and Image Ready too! I think it will give the effect that's desired. I'd love to see it when it's done!
Michelle
Copy link to clipboard
Copied
I have made the trial layer and added a mask with color set to black and "0" opacity but the image is not blacked out. I tried applying mask and making a clipping mask but still not getting the image to go to all black? what I'm I missing?
Dave
Copy link to clipboard
Copied
Don't change the opacity. It is not needed for a mask. That is what the mask if for. To paint the area that will be transparent or opaque.
Copy link to clipboard
Copied
Yes--the opacity of the mask should be 100% black so all of the layer is hidden.
Copy link to clipboard
Copied
I only get the image to turn to all black when I have the "refine Edge" window open? There must be some thing I'm not getting in this process?
I have attached a photo of wear I'm at now.
Thx
D
Copy link to clipboard
Copied
Hi
Your screenshot shows you do not have any mask. It is hard to see but if the layer with black trail on it is the one you have called paths then select that layer and use menu Layer - Layer Mask - Hide All
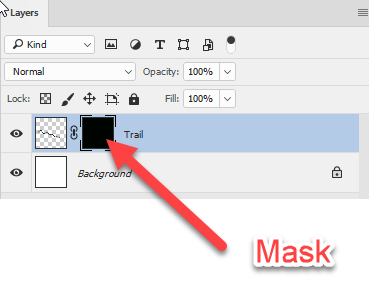
Dave
Copy link to clipboard
Copied
Thanks got that. So now I want the path to be reveled behind the jayhawck as it moves from left to right across the map. I have moved from frame to frame reveling the path but when I restart the animation all the bath is reveled?
thx
D
Copy link to clipboard
Copied
Hi
You need to draw a white rectangle in the mask. Unlink the mask from the layer then with the mask selected use the move tool to position that rectangle in each frame in the same way as you would position the other object

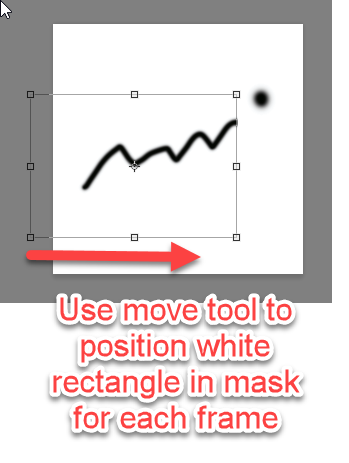

Dave
Copy link to clipboard
Copied
Do I use the rectangle marques tool or the rectangle tool? I have tried both.
Copy link to clipboard
Copied
I just used the rectangle marquee tool and, with the mask selected, filled it with white. After that it was just positioning the mask.
Dave
Copy link to clipboard
Copied
ok, but how do I resize it? And how dose it stay with each frame for animation?
Copy link to clipboard
Copied
You don't resize it. You make the rectangle big enough to reveal all of the path but then just move the mask so the white rectangle on the mask reveals more and more of the underlying layer with each frame
I've shrunk my Photoshop window so that you can see the elements over a few frames.
First frame :

Next Frame (Frame 2):
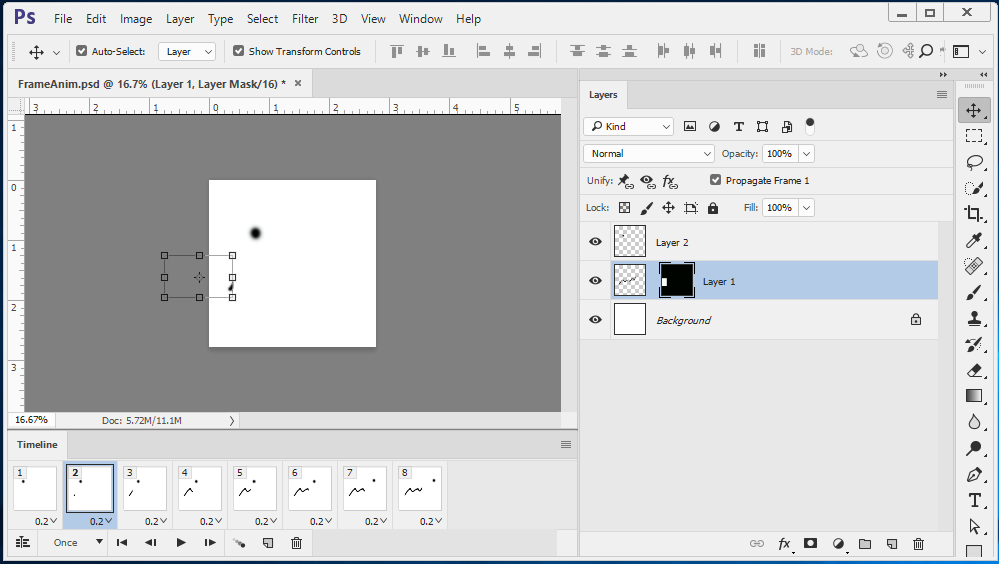
Next frame (frame 3):
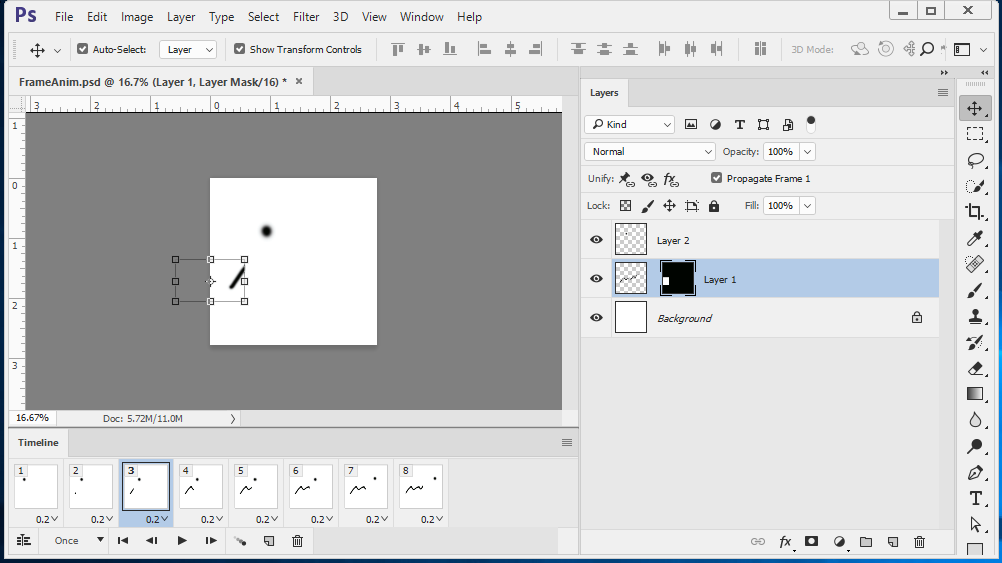
Next frame (frame 4):

......etc
Dave
Copy link to clipboard
Copied
That is a really good idea. If you create the white-filled rectangle (in the mask but unlinked from the layer) and then move it off the screen to the left to start, then as you advance in frames you move the rectangle to the right. I think that would be much cleaner than drawing it.
Michelle
Copy link to clipboard
Copied
Ok, so I do that and [lay back on the time line and the mask affect is only on the last frame? Will this work correctly after export
Thx
D
Copy link to clipboard
Copied
Hear are my steps:
1. Create a "hind all" mask on the "path" layer.
2. Make rectangle with "marquee tool" with that covers all the path.
3. Fill with "white", path now not visible.
4. Detach mask from layer.
5. Move rectangle to start point for path.
6. Move to next frame in animation.
7. Move rectangle, and now the only the reveled path section is moving.
?
D
Copy link to clipboard
Copied
Hi
Step 3 sounds wrong
When you fill the rectangle on the mask with white , that should reveal the path (not hide it). On a mask - black hides the layer - white reveals it.
Can you show a screenshot please
Dave
Copy link to clipboard
Copied
Actually step three is correct. You have to FIRST fill the mask layer with black, then create the white rectangle, unlink it from the layer, AND THEN MOVE IT off of the screen at the starting point. Then when you move to the next frame of animation, you move the white rectangle; advance a frame, move the rectangle, and so on. The white rectangle when moved along the path in each frame will reveal the line.
Michelle
Copy link to clipboard
Copied
mglush wrote
Actually step three is correct. You have to FIRST fill the mask layer with black, then create the white rectangle, unlink it from the layer, AND THEN MOVE IT off of the screen at the starting point. Then when you move to the next frame of animation, you move the white rectangle; advance a frame, move the rectangle, and so on. The white rectangle when moved along the path in each frame will reveal the line.
Michelle
I know the steps, I described the steps in my previous posts.
However on creating the rectangle at step 3 it should reveal the path layer not hide it. In his description daveo58 said that after filling with white the path layer is "not now visible". Hence something looks wrong. A screenshot should show us what the issue is.
Dave
Copy link to clipboard
Copied
I have a correction to make! I tried it with the mask on the layer itself and ran into a couple of problems! So, I did it a little differently and it works. See the link below to my dropbox file.
I added a layer on top of the image, and filled it with my background (which in this case was white) and then I added the a layer mask. I then created a black rectangle on the mask and unlinked it from the top layer. I moved it completely off the screen to the left (so that it was not visible at all) and then advanced two frames and ADDED A KEYFRAME and then moved the mask into the work area. Repeat: Add a couple of frames, ADD A KEYFRAME and then move the mask. I think one of the problems you were having was that you may have been advancing frames but forgetting to add a keyframe before you changed your content.
I also realize that you are working with a photo background. One thing you could do is duplicate it and move it to above the line layer and follow the same steps.
I've uploaded a file to dropbox called Test3.mp4:
And here is a screenshot of my work area:
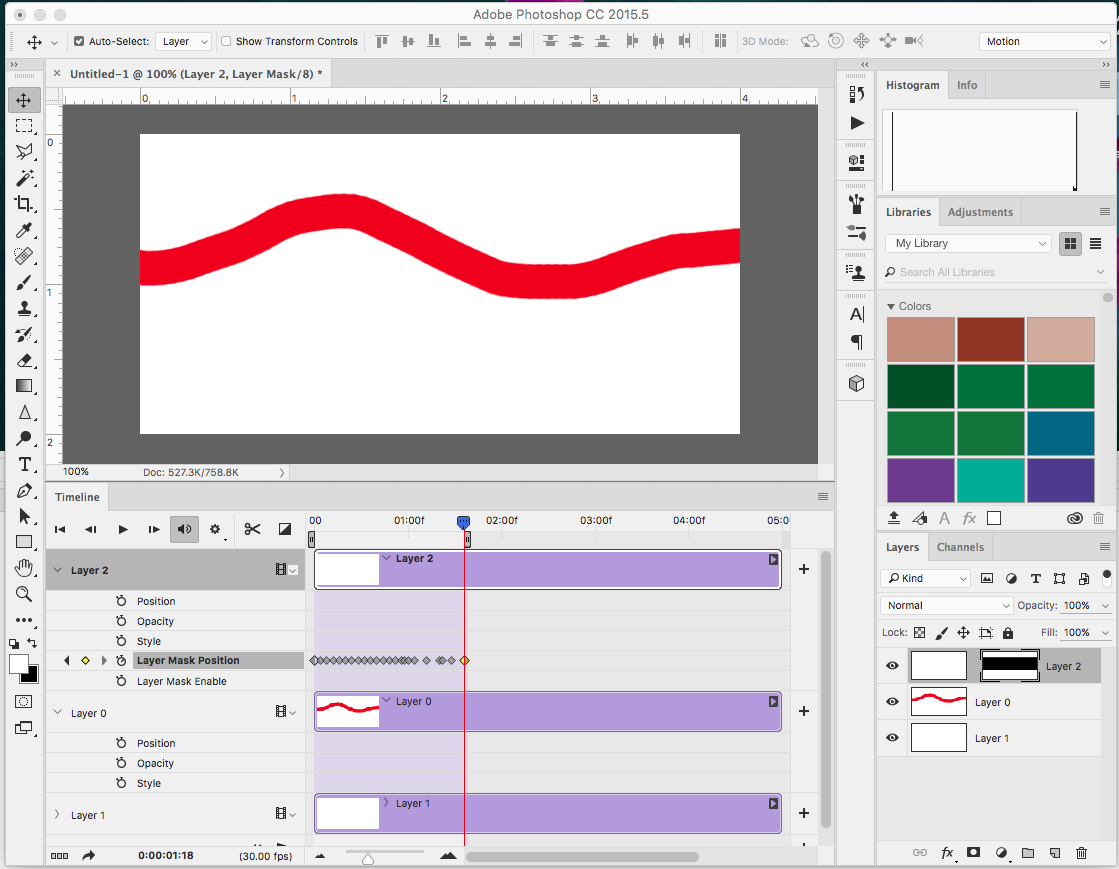
Let us know if this works for you too or if you have any other questions!
Michelle
-
- 1
- 2
Find more inspiration, events, and resources on the new Adobe Community
Explore Now