- Home
- Photoshop ecosystem
- Discussions
- How to resize an image inside a selection!
- How to resize an image inside a selection!
How to resize an image inside a selection!
Copy link to clipboard
Copied
Good afternoon guys, everyone salutes you!
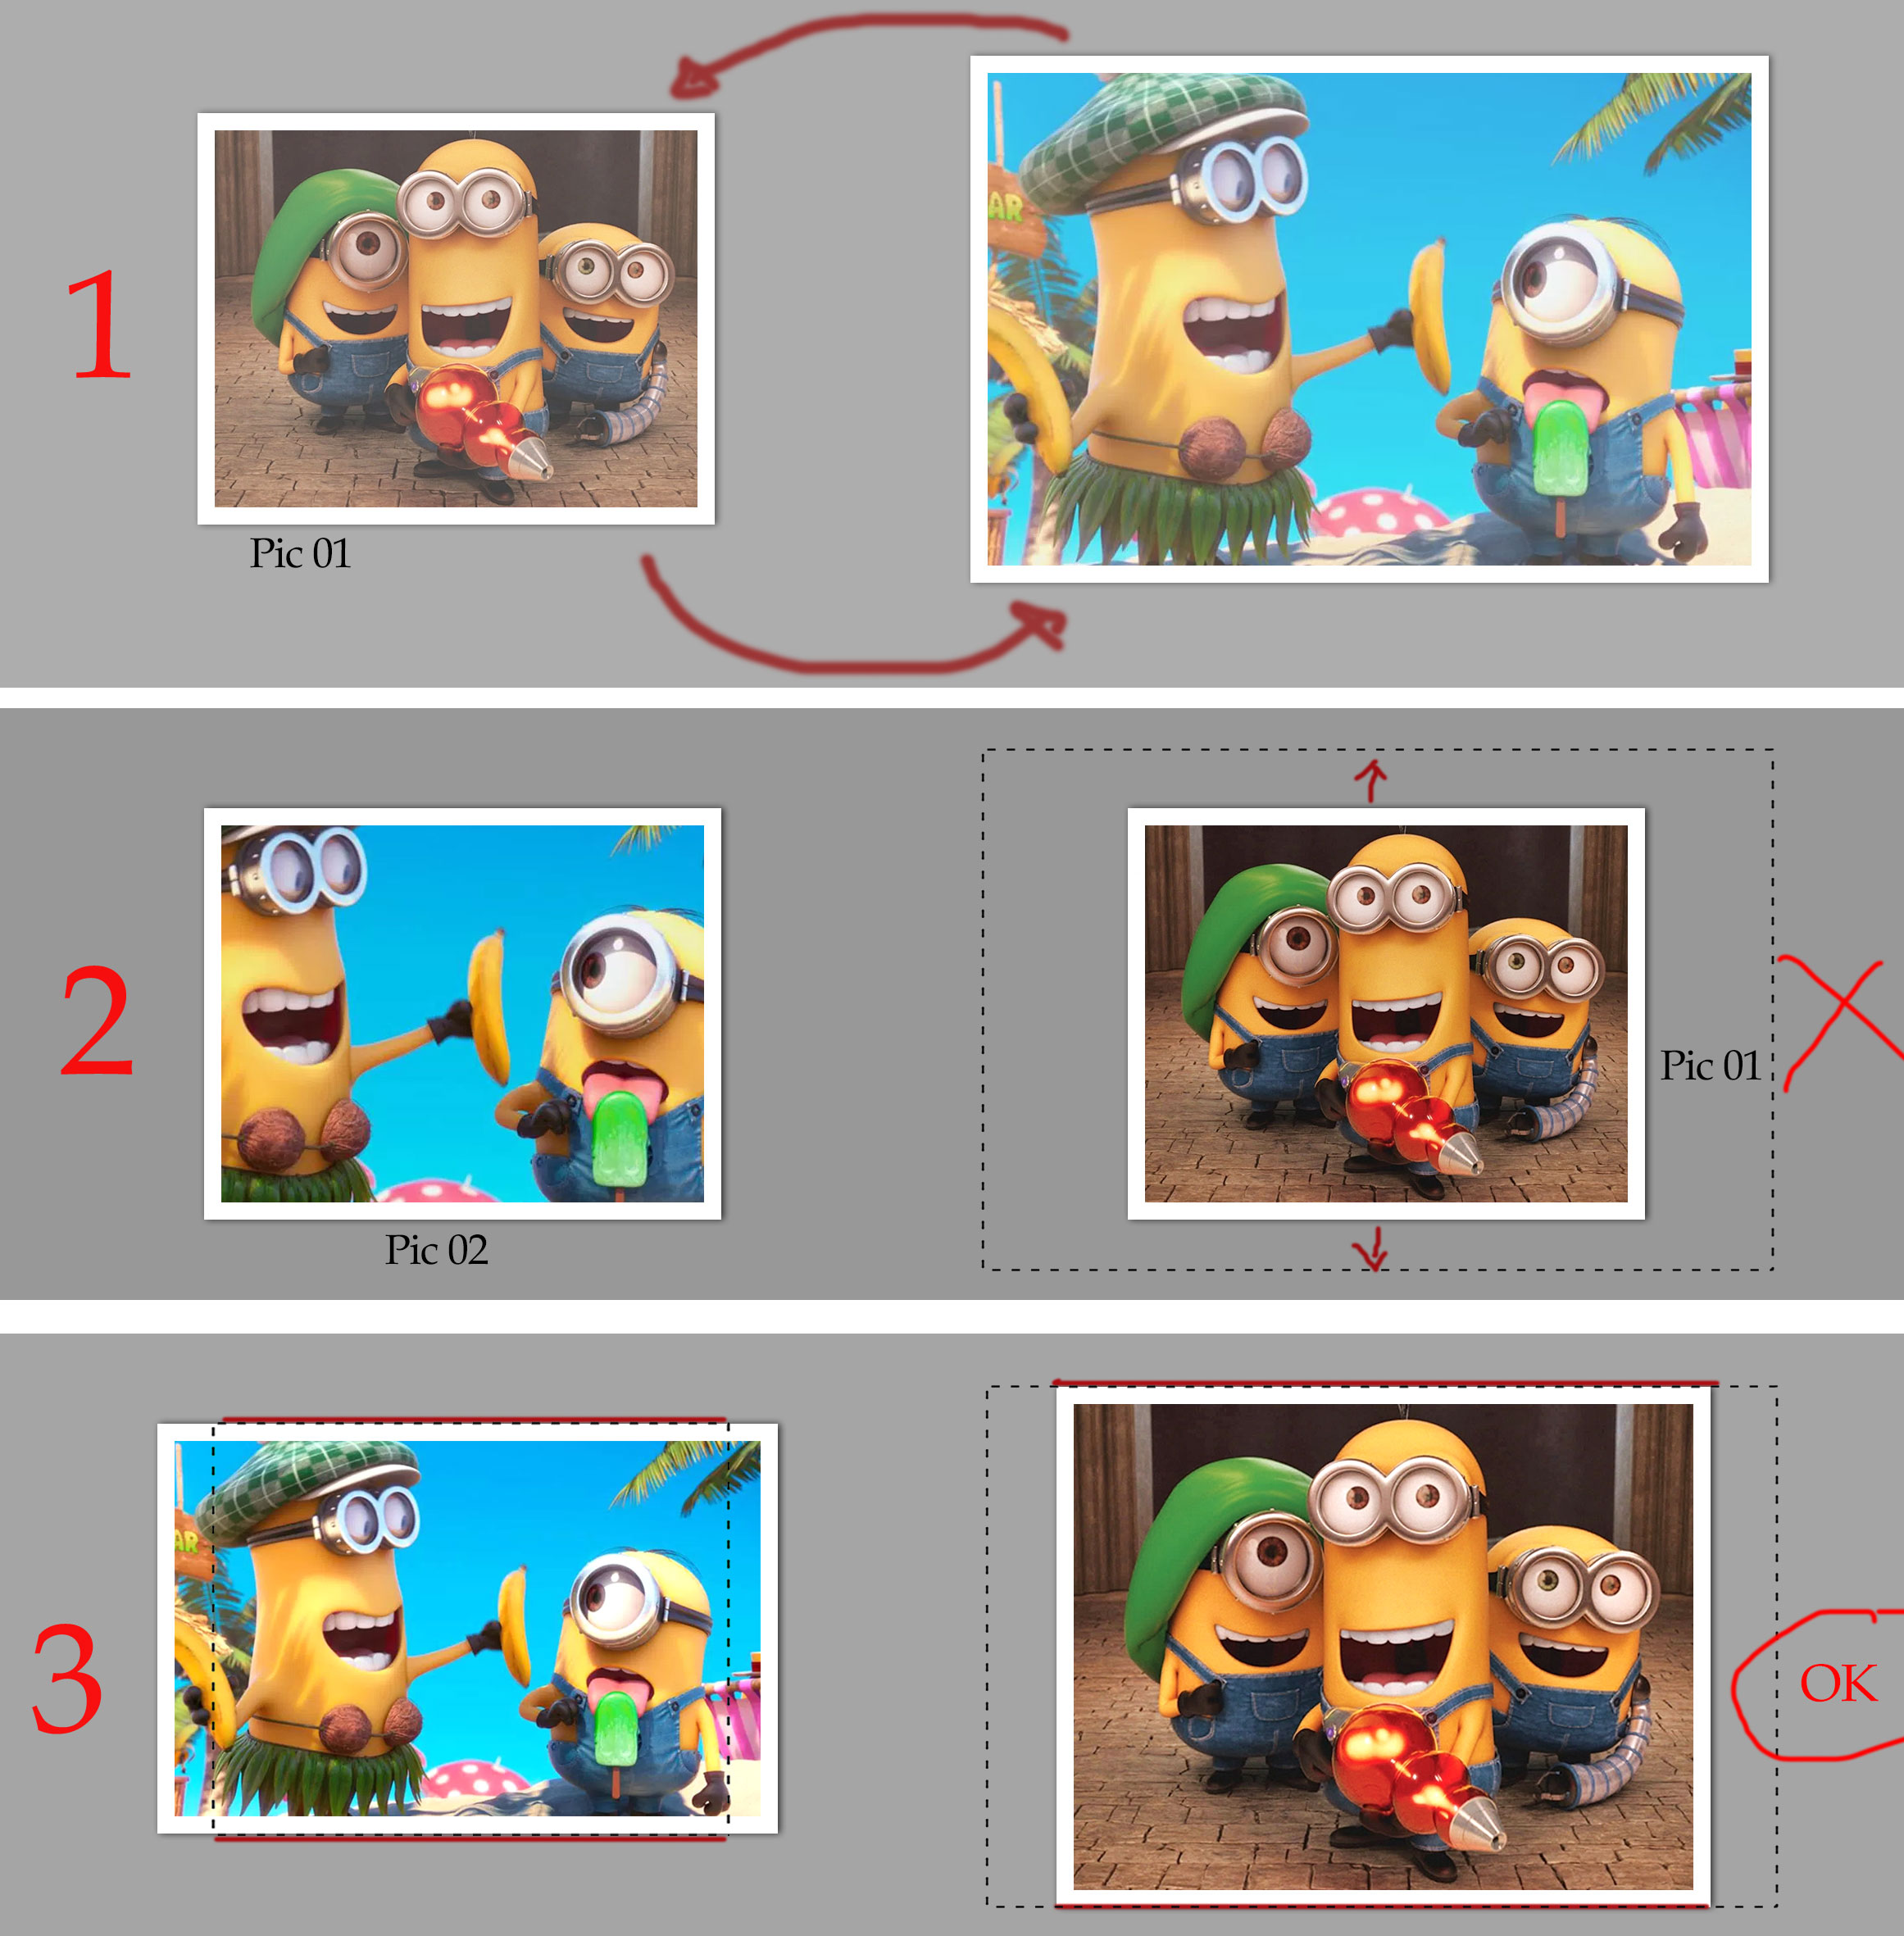
It would be possible for a script to resize an image within a selection based on height so that the image does not distort, thus maintaining the same aspect ratio. Is that I created an action to exchange two images inside the document, however there is not cool when they are images of different sizes and with this script, I can solve this problem. Thank you!

Explore related tutorials & articles
Copy link to clipboard
Copied
Remembering that the script is to resize in the selection based on its height, respecting the same proportion, only that!!
Copy link to clipboard
Copied
If you have a selection you can fit an image to that area in at least two way. One way is to resize the image to fit with in the selection bounds the other was is to insure the resize image fills the selection bounds. In ant case the resize image needs to be masked by the selection for a selection can have any shape, have feathering and ever have none contiguous areas like the second selection you show number 3. I prefer to fill the selected area bounds as shown in this video http://www.mouseprints.net/old/dpr/Populate911_720p.mp4

Copy link to clipboard
Copied
mauricior6328708 wrote:
Remembering that the script is to resize in the selection based on its height, respecting the same proportion, only that!!
It can not only be the height for there are two aspect ratios involved to fit an image to a rectangle area it will either be as exact fit resize or the resize will be fitted to the width or height that would depend on the two aspect ratios evolved. The Images aspect ratio and the selection area aspect ratio.
As in your exanple 3 the left image is not fitted within the selection. You can of course only take into account the selection height, as shown in #3 without masking Resize side by side image like shown could wind up overlapping when both images have a wide aspect ratio. Both will exceed the selections width. If selected aras are near each other.
As I wrote I prefer to fill the selection area and mask the resized image to that area.
Keep in mind images and selection area should have the same type of orientation. Landscape into portrait area or Portrait into Landscape do not fair well the virtual center crop compositions most likely will not be acceptable.
Copy link to clipboard
Copied
Got it!
I'm looking for another way using smart object ... Any news I come back and report the result. Thank you!
Copy link to clipboard
Copied
I use placed smart object layer so the smart object rendered pixels are my image full size images pixels the Smart object image will resize well. Using Smart object layer does not change the way one would resize images.
Replacing the content of a smart object is a good way to create templates for Picture packages. For you can have all smart object layers sharing a single object. You replace the single placed image object and all image location contents change and the smart object replacement is resized for each area by the smart object layers associated transform that does not get replaced. The only restriction is the replacement image need to have the same size as the original placed image.
Placing in image files create heavyweight Smart object layers. If I am doing something like laying out many image in a document I will paste in resized raster images layers.
http://www.mouseprints.net/old/dpr/PasteImageRoll.html
Copy link to clipboard
Copied
Here's a script I wrote a while back to deal with various ways of scaling to fit a selection.
app.preferences.rulerUnits = Units.PIXELS
app.preferences.typeUnits = TypeUnits.PIXELS
var scriptName = "NinjaScript FitSelection";
var scriptVersion = "0.1";
function boundsToSize (inBounds)
{
return [inBounds[2] - inBounds[0], inBounds[3] - inBounds[1]];
}
function boundsToPivot (inBounds)
{
return [(inBounds[2] + inBounds[0])/2, (inBounds[3] + inBounds[1])/2]
}
function fitScale()
{
activeDocument.activeLayer.resize(sizeSL[0]/sizeAL[0]* 100, sizeSL[1]/sizeAL[1]* 100)
activeDocument.activeLayer.translate (pivotSL[0] - pivotAL[0] , pivotSL[1] - pivotAL[1])
}
function fitWidth()
{
activeDocument.activeLayer.resize(sizeSL[0]/sizeAL[0]* 100, sizeSL[0]/sizeAL[0]* 100)
activeDocument.activeLayer.translate (pivotSL[0] - pivotAL[0] , pivotSL[1] - pivotAL[1])
}
function fitHeight()
{
activeDocument.activeLayer.resize(sizeSL[1]/sizeAL[1]* 100, sizeSL[1]/sizeAL[1]* 100)
activeDocument.activeLayer.translate (pivotSL[0] - pivotAL[0] , pivotSL[1] - pivotAL[1])
}
function fitInside()
{
var inSize = Math.min(sizeSL[0]/sizeAL[0]* 100, sizeSL[1]/sizeAL[1]* 100);
activeDocument.activeLayer.resize(inSize, inSize)
activeDocument.activeLayer.translate (pivotSL[0] - pivotAL[0] , pivotSL[1] - pivotAL[1])
}
activeDocument.suspendHistory("NS_FitSelection", "main();")
function main()
{
try
{ activeDocument.selection.bounds}
catch(e)
{ alert ("Error, no selection made"); return;}
sizeAL = boundsToSize(activeDocument.activeLayer.bounds);
sizeSL = boundsToSize(activeDocument.selection.bounds);
pivotAL = boundsToPivot(activeDocument.activeLayer.bounds);
pivotSL = boundsToPivot(activeDocument.selection.bounds);
dialogFitSelection();
}
function dialogFitSelection()
{
var thisDialog = new Window("dialog", scriptName + " v" + scriptVersion);
thisDialog.orientation = 'column';
thisDialog.alignChildren = 'center';
thisDialog.alignment = 'center';
var groupOptions = thisDialog.add("group");
var radioFitInside = groupOptions.add("radiobutton", undefined, "Fit Inside");
radioFitInside.value = true;
var radioFitScale = groupOptions.add("radiobutton", undefined, "Fit Stretch");
var radioFitHeight = groupOptions.add("radiobutton", undefined, "Fit Height");
var radioFitWidth = groupOptions.add("radiobutton", undefined, "Fit Width");
var groupButtons = thisDialog.add("group");
myOkButton = groupButtons.add("button", undefined, "Ok",{name: "ok"});
myOkButton.onClick = function()
{
if (radioFitInside.value) fitInside();
if (radioFitScale.value) fitScale();
if (radioFitWidth.value) fitWidth();
if (radioFitHeight.value) fitHeight();
thisDialog.close();
}
myCancelButton = groupButtons.add("button", undefined, "Cancel",{name: "cancel"});
myCancelButton.onClick = function()
{
thisDialog.close();
}
thisDialog.center();
var result = thisDialog.show();
}
Copy link to clipboard
Copied
There is a nasty bug in Photoshop scripting that I reported to Adobe. Adobe acknowledged they can reproduce the problem but Adobe does not fix it. Every version of Photoshop I have tested has the bug. This bug bite the script you posted. If you suspend history state recording. Have an active selection and resize/move a layer Photoshop will back up a one history state prior to when you suspended history state recording. Your script also seems to have other problem. It does not seem to resize smart object layers correctly. Here is the nasty bug report on file.
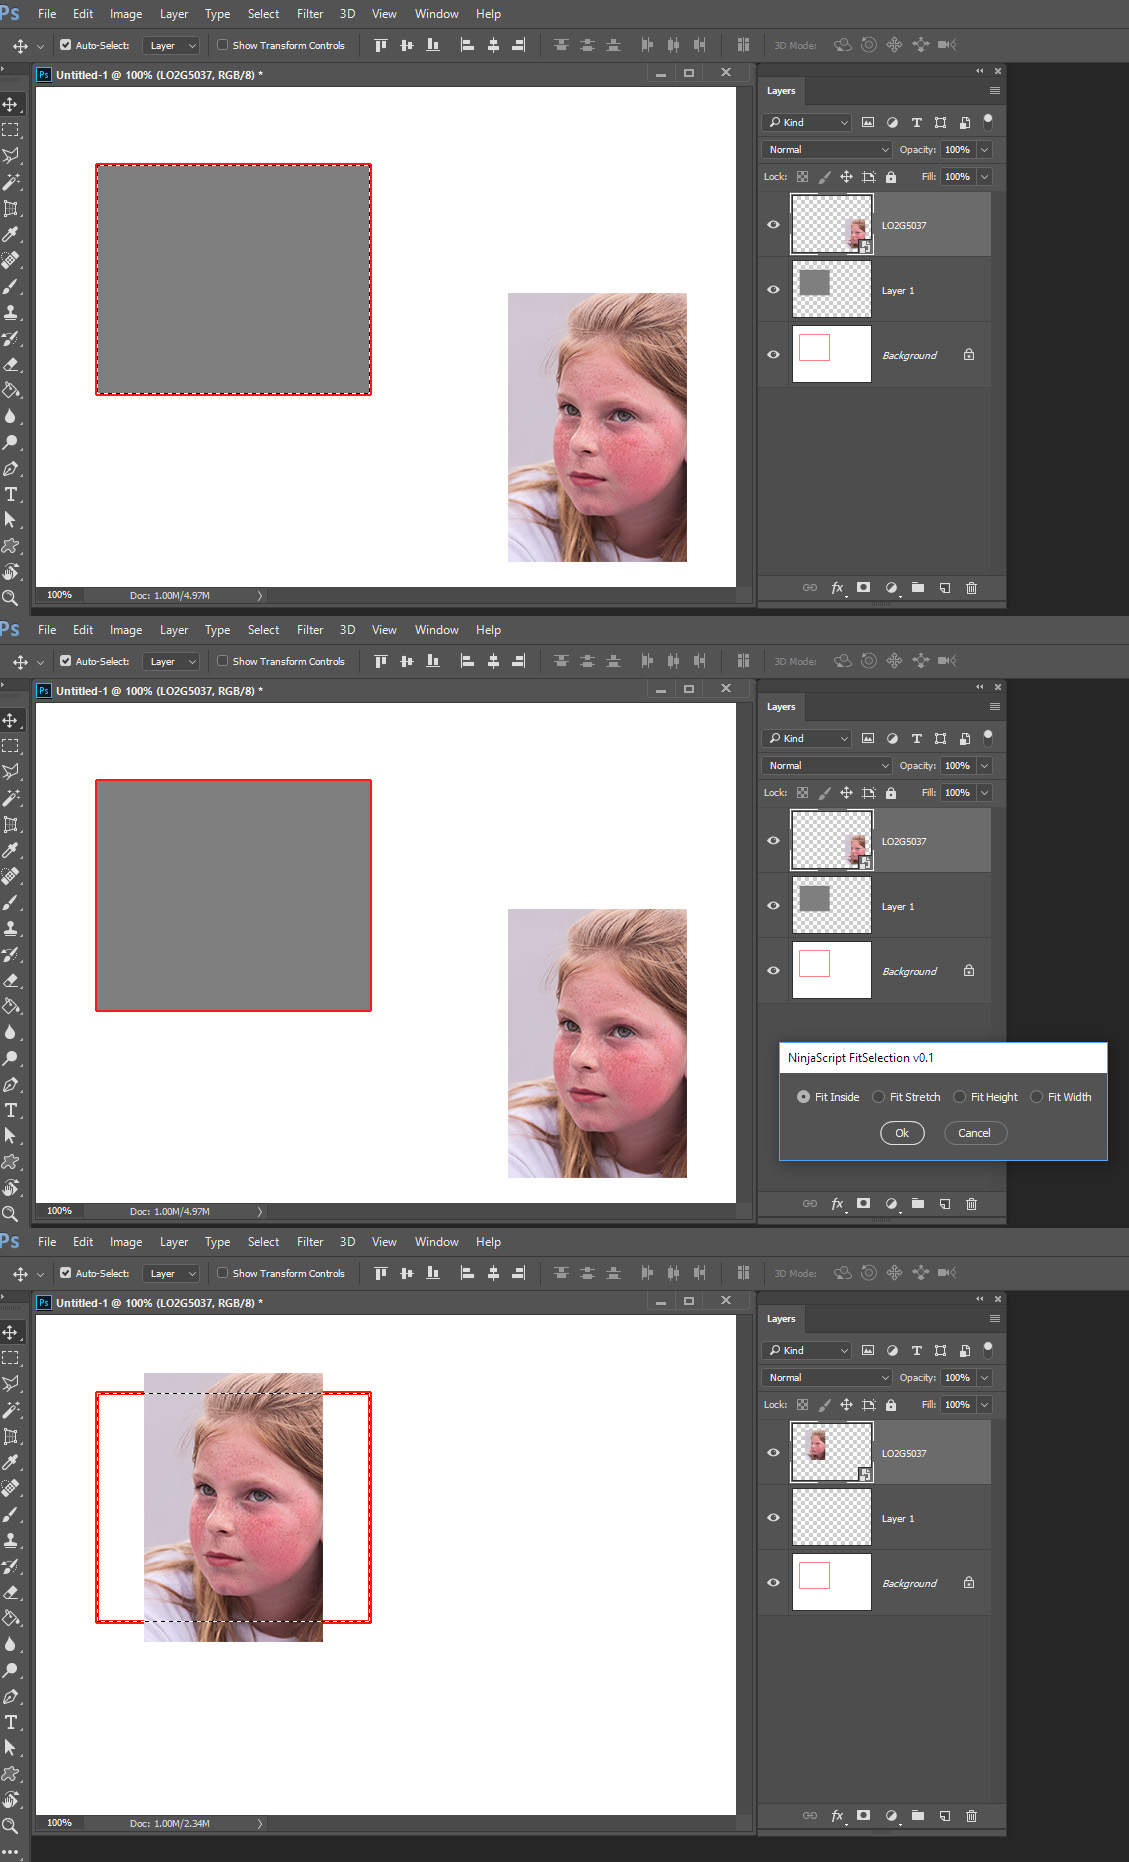
Here what I see running your script the last thing in the history state stack before running your script is Fill. I filled the selection with gray in a layer under the image layer targeted the image layer and ran your script and used fit inside radio button. Note the gray fill was removed. The image was aligned to the selection however it was not resized to fit within the selection. Your script hit the bug twicd Two previous steps are lost.

Copy link to clipboard
Copied
Great script EnsilZah! It's very close to what I really need. You could delete the dialog box and execute option 3 "Fit Height" directly. That's all I need.![]() Thank you!
Thank you!
Copy link to clipboard
Copied
Thanks! 🙂
[UPDATE: Forget what's below for now. I may have gotten confused by one of the options. It has so far created several things I can't recreate at a later moment... LOL]
I noticed another bug.
Let's say I want a perfect fit and I do Select All first, then Transform Selection... — down to keep the aspect ratio. The script will then go wildly wrong for some reason... It produces a bigger result than expected, and at first sight it seems it is splitting the difference, meaning, if I selected 100%, transformed to 50%, the result will be 75% big.
(I did add some lines to save and restore current preference units.)
