- Home
- Photoshop ecosystem
- Discussions
- Re: How to restore back erased areas using the era...
- Re: How to restore back erased areas using the era...
Copy link to clipboard
Copied
Hello I'm on Windows 10, my question
how can I restore erased elements the way I want (without using history).
In other words I want to use the eraser to trace some areas back just like the stamp clone feature but without cloning the area insteade recovering back the original part that was erased.
Should I use 2 layers in here? how many ways can I achieve that?
 3 Correct answers
This is why we use layer masks instead of erasing pixels.
You can't go back except via History as long as the document is still open. Once closed, it's gone.
As @D Fosse mentioned, you need to use layer mask. You can use color range to make a selection of the image, then use a brush to either mask that color out or to paint it back in.
I'm hesitant to say this, because I don't want to encourage bad habits, but you can use the History brush. It will do what you want, up to the number of history states you have set - but onlly as long as the document remains open.
Still, the proper and sensible way to do it is with layer masks.
Explore related tutorials & articles
Copy link to clipboard
Copied
This is why we use layer masks instead of erasing pixels.
You can't go back except via History as long as the document is still open. Once closed, it's gone.
Copy link to clipboard
Copied
Ok is there any tool similar to eraser that can restore the erased part.
EG. a brush that is dedicated to brings back what I'v delete by painting the erased material.
I agree with you that create mask is essential but what about a specific toll that can heal the erased area?
EG. instead of using the brush tool to paint a specific color instead I can use it to restore the erased area?
Copy link to clipboard
Copied
As @D Fosse mentioned, you need to use layer mask. You can use color range to make a selection of the image, then use a brush to either mask that color out or to paint it back in.
Copy link to clipboard
Copied
Sorry but could you illustrate this via screen shot I still can't understand.
Copy link to clipboard
Copied
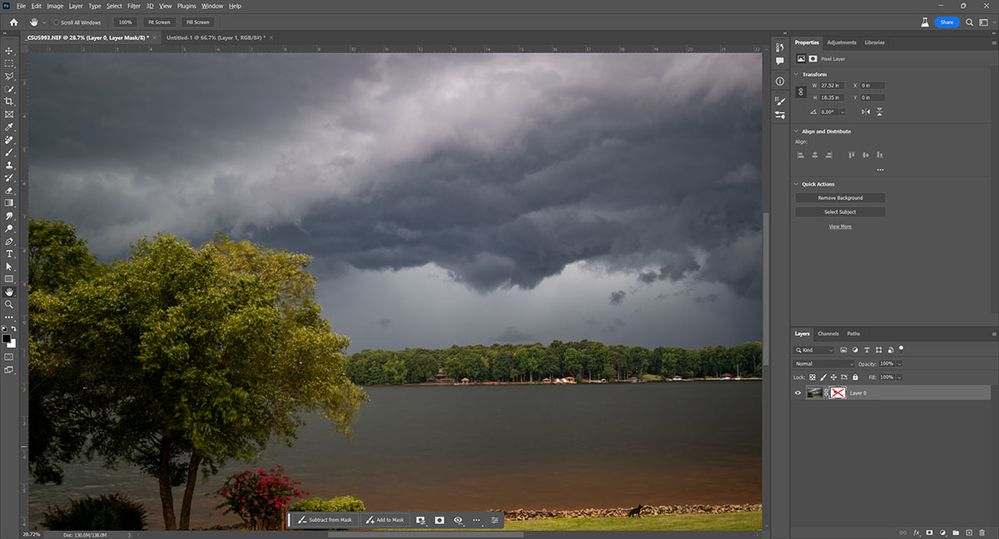
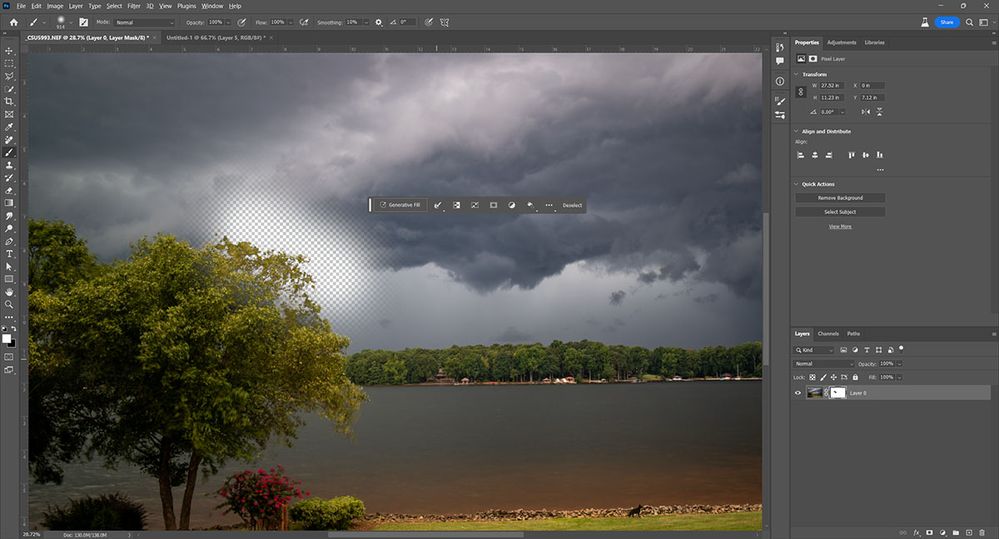
I created this file with a layer mask and I just brushed an area. However, I want to bring back the leaves in the tree.
So now I hold the shift key and click on the layer mask. This shows the entire image. A red X appears on the layer mask.
Then I choose Color Range, from the Select menu and click on the colors that I want to select. In this case the green of the leaves.
The I get the marching ants for my selection. I press shift and click on the layer mask again, but this time it turns on the mask, and I can see where I painted that masked out the area.
To see better what I'm doing, I press ctrl/cmd-H to hide the marching ants. Then I use the paint brush with white to paint back in the leaves.
Copy link to clipboard
Copied
I couldn't understand your steps this seems advanced to me. I tried to do what you explained & also search in the Youtube but still things getting confusing. I almost spend 30 minutes figuring this but the setting can't be understandable. the problem there are too many menues here & there & each click & selection counts I began to understand I can say my level now at 103 but still many things I couldn't understand it enough although I made some good graphics already but the problem it took me long time. there are many advanced levels waiting for me & I should learn them. some skills definitely needs a physical professional designer to intract with him & teach me those skills specially that some of them are hidden which are effective. Sorry for that.
Copy link to clipboard
Copied
Thanks Chuck Ubele for your illistration. I follow with you until the 3d step where you opened the "Color Range" so you mentioned the green color. In here did you used the "Sampled Color" then you brushed the earased part?
I use it but the color isn't the same because it was sampled from closer color.
also in the 4th step you mentioned the marching ants for selection what is this is used for?
Copy link to clipboard
Copied
The sampled color, in my case green, is whatever you de used to select. Sometimes, I zoom in to the image and sample at the pixel level to make sure i get the color i want. The marching ants just shows what was selected, but it isn't totally accurate, as in the case of a feathered selection it will only show pixels that have been selected above a certain threshold.
Copy link to clipboard
Copied
I'm hesitant to say this, because I don't want to encourage bad habits, but you can use the History brush. It will do what you want, up to the number of history states you have set - but onlly as long as the document remains open.
Still, the proper and sensible way to do it is with layer masks.
Copy link to clipboard
Copied
If something is partially erased, you could conceivably restore it by painting on the transparency channel, which is not available in isolation. In 32-bit days, I used TeleGraphics Filter Foundry, which could manipulate transparency directly to attempt this, but discovered (after Chris Cox explained it to me), that, once an image is fully erased down to zero, it is GONE. Adding back opacity yields the background color of the layer.
Masks do not have this limitation.
Copy link to clipboard
Copied
Copy link to clipboard
Copied
That's not "another way", that's what we recommended right from the start. That's how you work with layer masks.
Copy link to clipboard
Copied
Thanks Semaphoric for your info appreciate,
so do you mean I should create new white layer on top of the current one with transparent property by adjusting the new upper layer via the opacity slider?
Copy link to clipboard
Copied
Find more inspiration, events, and resources on the new Adobe Community
Explore Now


