• Global community
    • Language:
      • Deutsch
      • English
      • Español
      • Français
      • Português
  • 日本語コミュニティ
    Dedicated community for Japanese speakers
  • 한국 커뮤니티
    Dedicated community for Korean speakers
Exit
1

How to set correct color profile

Engaged ,
Mar 03, 2016 Mar 03, 2016

Copy link to clipboard

Copied

Up front: I am not an expert on this...

When looking over Internet about color management, color profiles, I often get a lot of text and usually meant for 'experts'.

Actually I am not so much interested in all the technical details. Rather I am seeking a simple instruction as to how 'set' a default color profile.

I don't know how my .icc profiles to select from...

Hardware:

Printer: Epson WorkForce Pro WF-5620  (having its color profiles)

Monitor: HP DreamColor Z27x

Photoshop CS6

Windows 10 x64

When launching my pc, the monitor shows that it is set to AdobeRGB.

Issues:

1) when I browse through simple .png files using Windows Explorer (png files without any EXIF data, let's say, screenshots, or images from Internet) and drag them into Photoshop, they are much darker and I need to adjust this. What Windows Explorer shows is pretty much correct, in Photoshop they are way too dark.

2) when having created a PSD within Photoshop and it all looks okay, the print results are bad, they are too light and I need to try and mess around with profiles or so in an attempt to get it right.

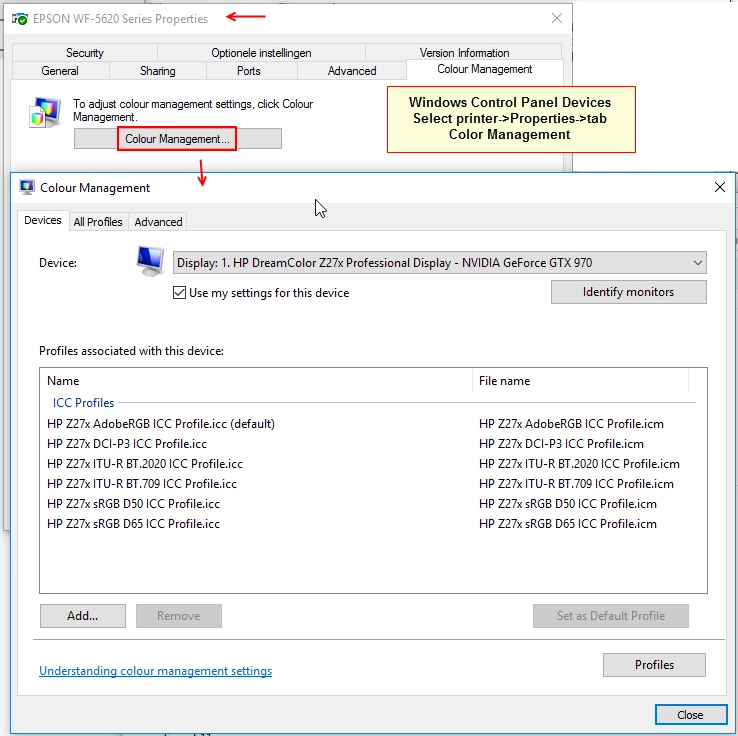
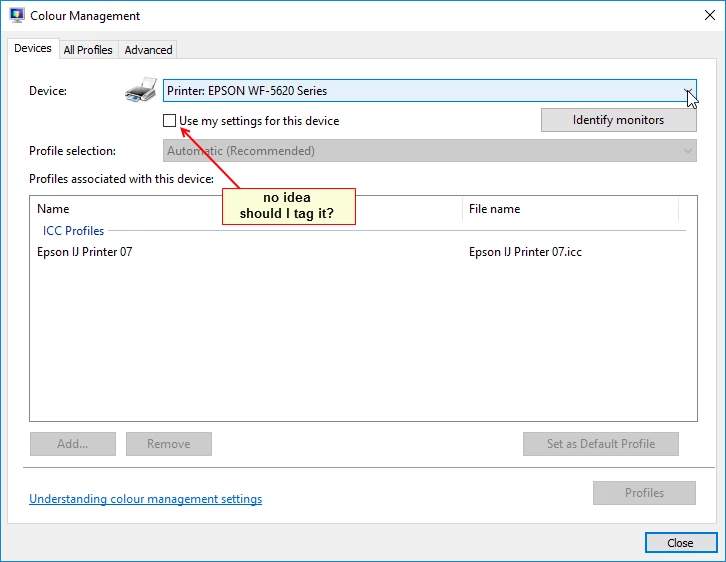
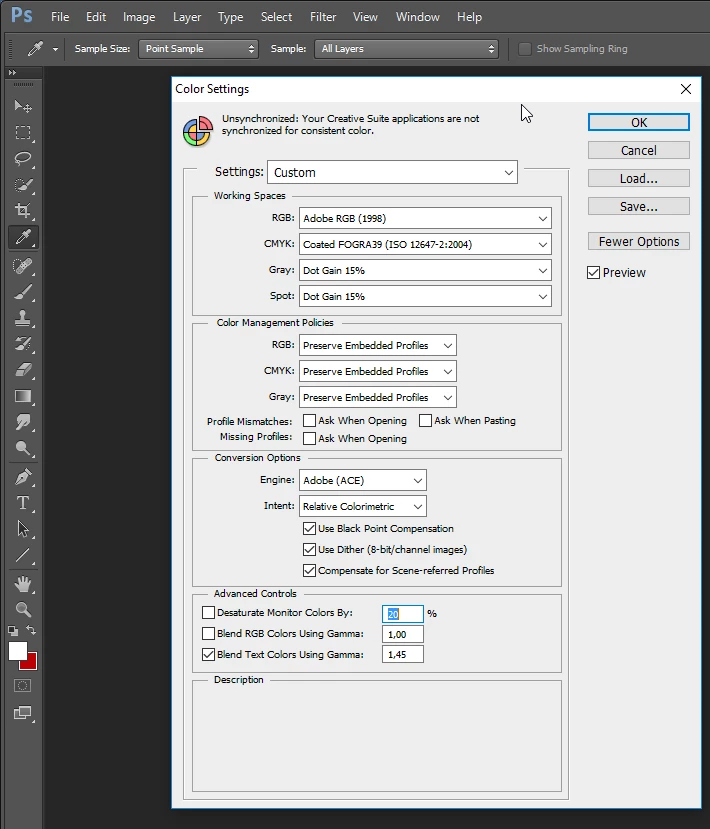
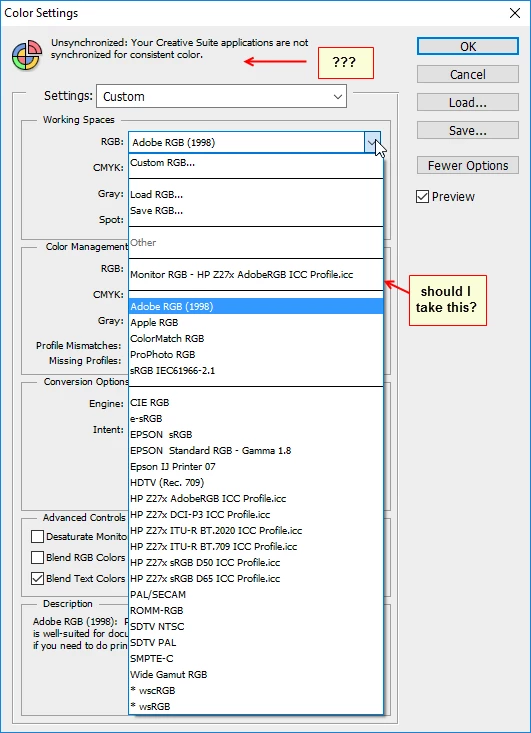
Below some screenshots:

SnagIt-04032016 071646.png

=

SnagIt-04032016 071728.png

=

SnagIt-04032016 071835.png

==

SnagIt-04032016 072910.png

=

Could anybody pleasssee... assist and give me some advice as to how to set this up?

i.e. which profiles to select where so the results on the monitor are the same as that of the printout.

again, I am not an expert and I don't intend to become one 🙂

there are sooo many profiles to select from, I don't know..

Thanks!

=

Views

17.0K

Translate

Translate

Report

Report
Community guidelines
Be kind and respectful, give credit to the original source of content, and search for duplicates before posting. Learn more
community guidelines

correct answers 1 Correct answer

Community Expert , Mar 04, 2016 Mar 04, 2016

Mylenium wrote:

Simple answer: None of it matters if your system isn't actually calibrated. You can set the default factory profiles all day and wear yourself out, and they will still be wrong.


Bit of a negative attitude there, wouldn't you say?

This isn't as complicated as many will have it. You need to think, always, in terms of source profile and destination profile. You always need two profiles, and each should be an accurate description of the color space it represents.

So what's your sou

...

Votes

Translate

Translate
Adobe
LEGEND ,
Mar 04, 2016 Mar 04, 2016

Copy link to clipboard

Copied

Simple answer: None of it matters if your system isn't actually calibrated. You can set the default factory profiles all day and wear yourself out, and they will still be wrong. That's the whole point. And Monitor profiles are just that. You don't use them as workspace profiles except when correcting screenshots. So for what it's worth, just leave everything at sRGB and un-mis-tweek your monitor and print calibration charts for your printer.

My colors look different outside Photoshop. | Mylenium's Error Code Database

My printed colors look wrong. | Mylenium's Error Code Database

Mylenium

Votes

Translate

Translate

Report

Report
Community guidelines
Be kind and respectful, give credit to the original source of content, and search for duplicates before posting. Learn more
community guidelines
Engaged ,
Mar 04, 2016 Mar 04, 2016

Copy link to clipboard

Copied

The monitor at least came calibrated. Admittedly I need to re-calibrate it again one of these days. I could set the monitor to sRGB. As you can see above, there is a number of them:

sRGB IEC61966-2.1

e-sRGB

EPSON sRGB

HP Z27x sRGB D50 ICC Profile.icc

HP Z27x sRGB D65 ICC Profile.icc

So, I need to set the monitor to e.g. sRGB D65

the printer (all-in-one) to Epson sRGB

the scanner to sRGB

SnagIt-04032016 094055.png

Capture-04032016 103343.png

=

Votes

Translate

Translate

Report

Report
Community guidelines
Be kind and respectful, give credit to the original source of content, and search for duplicates before posting. Learn more
community guidelines
Community Expert ,
Mar 04, 2016 Mar 04, 2016

Copy link to clipboard

Copied

Mylenium wrote:

Simple answer: None of it matters if your system isn't actually calibrated. You can set the default factory profiles all day and wear yourself out, and they will still be wrong.


Bit of a negative attitude there, wouldn't you say?

This isn't as complicated as many will have it. You need to think, always, in terms of source profile and destination profile. You always need two profiles, and each should be an accurate description of the color space it represents.

So what's your source? That's your file. Fine. Adobe RGB, done, don't mess with that. Don't confuse document and monitor profile! You need both.

Then you have two destinations, the monitor and the printer. Each profile an accurate description. The monitor profile is set up at system level (or your calibrator will do it), and Photoshop will find it there and use it to display the image. Again, it's a straight source > destination conversion. Once the monitor profile is set up, no further user intervention is required.

Next, the printer. Here you have different profiles for different media, and there's no default. You need to pick the correct profile for the paper you're using in the Photoshop print dialog. There you also need to make sure that Photoshop handles color, and then you need to go into the printer driver and make sure that printer color management is turned off. Pick the right paper here as well, since this controls total amount of ink.

That's it. If all profiles are present and correct, display and print should now match. If you want to take it further, you can set your monitor calibration targets so that they match the paper you're printing on - IOW set the monitor white point so that it is a visual match to paper white, and monitor black so it matches max ink density for the paper.

Votes

Translate

Translate

Report

Report
Community guidelines
Be kind and respectful, give credit to the original source of content, and search for duplicates before posting. Learn more
community guidelines
Community Expert ,
Mar 04, 2016 Mar 04, 2016

Copy link to clipboard

Copied

BTW don't set the monitor to Adobe RGB or any other preset. Just leave it at its native behavior. As long as the profile describes that behavior, you're good.

Votes

Translate

Translate

Report

Report
Community guidelines
Be kind and respectful, give credit to the original source of content, and search for duplicates before posting. Learn more
community guidelines
Engaged ,
Mar 04, 2016 Mar 04, 2016

Copy link to clipboard

Copied

Sorry, my posting crossed yours, let me revert a little later.

Votes

Translate

Translate

Report

Report
Community guidelines
Be kind and respectful, give credit to the original source of content, and search for duplicates before posting. Learn more
community guidelines
Engaged ,
Mar 04, 2016 Mar 04, 2016

Copy link to clipboard

Copied

Thanks a lot '21' !

I have set my monitor to 'Native' now.

Within Photoshop - print - it looks like the below.

The color management button [Print Settings...] is set to 'No adjustment'

What is listed under 'Printer Profile:'  does that require any changes?
It is now set to HP Z27x AdobeRGB ICC Profile.icc

Should I use Epson IJ Printer 07 there?

Please also note that one way or the other the colors of the image thumbnails are more brighter than when the files are imported into Photoshop.

These are just images without any EXIF data. Photoshop File properties show no data.

See at the bottom. This is with the monitor set to Native.

Any idea how to solve that?
(or maybe it can't be solved)

Thanks again!

=

SnagIt-04032016 105841.png

SnagIt-04032016 111750.png

Votes

Translate

Translate

Report

Report
Community guidelines
Be kind and respectful, give credit to the original source of content, and search for duplicates before posting. Learn more
community guidelines
Community Expert ,
Mar 04, 2016 Mar 04, 2016

Copy link to clipboard

Copied

Your monitor profiles (anything with z27x) have no business whatsoever in the print dialog. Here, you need to pick the correct profile for the printer/paper/ink combo - it will be called something like Epson <model> premium glossy paper or whichever the paper is. All these profiles should be installed alongside the printer driver when you installed that.

What worries me more is that document profile is listed as "untagged". A document should never be untagged - it should always have a standard color profile like sRGB, Adobe RGB or ProPhoto. Have you changed any of Photoshop's color settings? Don't do that unless you know what you're doing. Photoshop should always embed the profile at the standard settings.

Other than that, "no color adjustment" in the Epson driver looks good, that's where it should be. But you need to find your paper profiles.

Votes

Translate

Translate

Report

Report
Community guidelines
Be kind and respectful, give credit to the original source of content, and search for duplicates before posting. Learn more
community guidelines
Engaged ,
Mar 04, 2016 Mar 04, 2016

Copy link to clipboard

Copied

Under print settings [Print Settings...]  button, I get Epson screen with quite some settings.

I could select Glossy Paper, etc.

But the 'Printer Profile' - in Photoshop - there is just 1 entry (Epson IJ Printer 07  - a weird name I must admit.

FWIW: when saving the file 'Save as...'  I did not tag the ICC Profile.

SnagIt-04032016 114139.png

Photoshop Color Settings - I didn't go in there - but I changed the monitor itself to 'Native'

SnagIt-04032016 115126.png

Maybe I should take one of the presets?

I don't know..

SnagIt-04032016 115319.png

=

As for the untagged thing, that is totally new to me, I looked at Image->Mode of the PSD file

It says RGB Color.

Does that having something to do with it?

(wild guess though)

SnagIt-04032016 125350.png

=

many thanks for your patience!!

=

Votes

Translate

Translate

Report

Report
Community guidelines
Be kind and respectful, give credit to the original source of content, and search for duplicates before posting. Learn more
community guidelines
Community Expert ,
Mar 04, 2016 Mar 04, 2016

Copy link to clipboard

Copied

Aah...I suppose you got the "color management policies off" - advice somewhere on the internet.

All I can say is...don't believe everything you read on the net. There are lots of clueless people out there, and this is absolutely the wrong way to go about it. You're messing everything up, and it can be a long way back.

  • Set Color Management Policies to "Preserve Embedded Profiles". Don't touch that setting again.
  • As working space, choose one of the standard spaces - sRGB, Adobe RGB or ProPhoto. Each has advantages and disadvantages, but that's a different subject. The important thing here is to pick one of them.
  • Always embed the profile. Always. Always.
  • Get a calibrator. You have a wide gamut monitor, and using a wide gamut monitor requires full color management at all times. That means working with an embedded document profile, and having a valid/accurate monitor profile. Only a calibrator will give you that. Manufacturer profiles are generic and not accurate enough.
  • Without color management that monitor will not display correctly, ever. That's a fact of life, and the deal you accept when you purchase one. Applications that are not color managed (that's quite a few) will not display correctly, whatever you do. Again, that's the deal and if you can't live with that, sell it and get a standard unit.

Votes

Translate

Translate

Report

Report
Community guidelines
Be kind and respectful, give credit to the original source of content, and search for duplicates before posting. Learn more
community guidelines
Engaged ,
Mar 04, 2016 Mar 04, 2016

Copy link to clipboard

Copied

I made some comparisons, the files are too big to be placed here, so I have added a link below.

1. Monitor: set to Native

2. Color Management Policies: I believe I never touched it, wouldn't what would be happening, so I leave them as they are

3. Working space: I'll selet sRGB or AdobeRGB (makes hardly any difference in what I see on the screen)

4. Always embed the profile: eh . . . how?

5. Calibrator: I'll get that soon. I have been through calibration papers of this monitor (a 15 pages PDF document - I don't understand a single word of it, to be honest)

6. There is a really huge difference between what I see opening a file with XnView (just to serve as a quick viewer) and what is being displayed when the file is loaded in Photoshop. Where XnView shows details in shadow, within Photoshop these details are simply gone and the photo is much much darker. Am not sure as to whether calibration will result in such a significant improvement, I mean that Photoshop will look the same as XnView.

7. Did a monitor reset to factory defaults (resulting in sRGB D65) - makes no difference

8. Have set to Europe General Purpose 3, after reset, no difference.

9. Then back to 'Native'.

How does your color settings look like?

Probably I have to live with it, i.e. spending time on adjusting 'imported' files so they look a little bit like XnView, which is realistic.

http://imageshack.com/a/img922/369/ZFO69r.png

http://imageshack.com/a/img922/6955/ju2Xy1.png

http://imageshack.com/a/img924/8421/QmQL3Z.png

http://imageshack.com/a/img923/2761/bRlqtE.png

http://imageshack.com/a/img921/6251/ghupsh.png

http://imageshack.com/a/img921/8009/xn5mzC.png

btw : the monitor is tested on HP Z27x OSD Setup And Calibration, where you can see the menus etc.

later: I found something, set Image->Mode to RGB Color, if it is CYMK.

then view-> proof setup-> tag Monitor RGB.

Okay, sure this isn't the right way, but the colors are pretty much okay now... at least the image isn't sooo terribly dark.

ahum..

Votes

Translate

Translate

Report

Report
Community guidelines
Be kind and respectful, give credit to the original source of content, and search for duplicates before posting. Learn more
community guidelines
Community Expert ,
Mar 04, 2016 Mar 04, 2016

Copy link to clipboard

Copied

1. OK

2. If you set Monitor RGB as working space, policies automatically goes to "off". Both are equally wrong (it's just there as a legacy setting for people still living in the stone age).

3. Working space is a default for new files. It doesn't affect existing files (should have made that clear). To restore your files properly, do a Edit > Assign Profile. sRGB, Adobe RGB - whichever looks roughly right. Stick with that and go from there. You may need to adjust the file slightly to get it up to the correct appearance.

4. Photoshop embeds the profile unless you uncheck it from the Save As dialog. Save For Web is a special case, here it's unchecked by default and you need to check it.

Now: There will be a huge difference between color managed (right) and non-color managed (wrong) applications. That's normal and as I said, the way it is with wide gamut monitors.

As long as you have an embedded document profile and a good/accurate monitor profile, Photoshop will display correctly. That's what a color managed display pipeline does. IOW, that's how the file really is. Other applications without color management will be wrong.

It's really, really important that if you change any setting in the monitor (such as switching between sRGB and Adobe RGB presets), you must also change to the corresponding monitor profile on system level. The profile must be an accurate description of the monitor's actual behavior.

If all this is still above your head, I suggest you set your monitor to sRGB for now (and use that profile). This will minimize the difference. Just as long as you understand that this turns your expensive wide gamut monitor into an ordinary standard gamut one - and so you've wasted a lot of money.

Votes

Translate

Translate

Report

Report
Community guidelines
Be kind and respectful, give credit to the original source of content, and search for duplicates before posting. Learn more
community guidelines
Community Expert ,
Mar 04, 2016 Mar 04, 2016

Copy link to clipboard

Copied

Actually this whole exchange is an excellent example of what I've been saying all along: Color Management is simple. Lack of color management quickly gets difficult.

This would have basically worked with Photoshop at out-of-the-box settings, the monitor at out-of the-box settings, and an hp monitor profile installed automatically. Then we could discuss how to set things up so that it works optimally - getting a calibrator to make a better monitor profile, setting the calibration parameters to get a good match from screen to print, and so on.

But when people see non-color managed software display incorrectly, they panic, change settings east and west, convinced color management is "broken" in Photoshop. It's not broken. The other applications are broken, because they don't do the required conversion from document to monitor. That's the one thing that has to happen when using wide gamut displays, and Photoshop does it.

Leave Photoshop's color settings alone, and color management just works. Not only that, it solves problems.

The question was fully answered in my first post. That covers all basic principles, the rest is just details and cleaning up misunderstandings.

Votes

Translate

Translate

Report

Report
Community guidelines
Be kind and respectful, give credit to the original source of content, and search for duplicates before posting. Learn more
community guidelines
Engaged ,
Mar 06, 2016 Mar 06, 2016

Copy link to clipboard

Copied

Sorry for the delay.

Many thanks for all your advices.

It is truly appreciated.

I have reset Photoshop settings (ctrl-alt-shift)  when launching Photoshop and leave it to Europe Prepress 3, which apparently is the default.

As for the dark images, they seem to be CYMK.

when opening I get a warning

The document "Wild World ..." does not have an embedded

CMYK profile.

What would you like to do?

O Leave as is (don't color manage)

O  Assign working CMYK: Coated FOGRA39 (ISO 12647-2:2004)

O Assign profile:    Coated    FOGRA27    (ISO    12647-2:2004)

and then convert document to working CMYK

Nothing changes, whatever option I select.

So, I'll be using my ' crappy workaround' (which I am sure is -absolutely not- the proper way, but it works for me)

Image->Mode->change from CYMK to RGB

then

View->Proof Setup->Select Monitor RGB
(the monitor is set to AdobeRGB)

Anyway, again - thanks - for input and above all patience

=

Votes

Translate

Translate

Report

Report
Community guidelines
Be kind and respectful, give credit to the original source of content, and search for duplicates before posting. Learn more
community guidelines
Community Expert ,
Mar 06, 2016 Mar 06, 2016

Copy link to clipboard

Copied

adwul62 wrote:

View->Proof Setup->Select Monitor RGB

No no no... Stop and go back to start.

That turns off/disables all display color management. You must have full display color management with that monitor! OK? It's an absolute requirement. What you need is:

  • An embedded document profile
  • A valid monitor profile set at system level - one that accurately describes the monitor's actual behavior
  • Color managed software that reads both these profiles, and converts from one into the other

Listen carefully now: ignore what the non-color managed applications show you. It's wrong and will never be right, not if the earth turned on its axis. They will never display identically to properly color managed software like Photoshop. That's always true, but with a wide gamut monitor the difference really jumps in your face.

Any material that is intended to be viewed without color management is sRGB - for the simple reason that most standard monitors are close enough to sRGB natively that it displays roughly correctly. If the monitor is not close to sRGB natively, and yours isn't, that no longer applies. All the normal fallbacks are dead and void and you need color management.

Votes

Translate

Translate

Report

Report
Community guidelines
Be kind and respectful, give credit to the original source of content, and search for duplicates before posting. Learn more
community guidelines
New Here ,
Nov 02, 2017 Nov 02, 2017

Copy link to clipboard

Copied

Hi,

Got the same dark colors on photoshop on the same monitor HP dreamcolor Z27x, and solved the problem:

I just changed the color profile in windows color management from "hpZ27x AdobeRGBICC Profile.icc" to "Adobe RGB(1998)" as default profile. With this setting, proofing towards "RVB Monitor" (with CTRL+Y) don't show any difference which is expected.

The color profile given by HP for the HP Z27x seems to have a problem, however, "hpZ27x AdobeRGBICC Profile.icc" and "Adobe RGB(1998)"  are very close since converting a picture to the "hpZ27x AdobeRGBICC Profile.icc" profile doesn't show any difference.

Regards,

JC

Votes

Translate

Translate

Report

Report
Community guidelines
Be kind and respectful, give credit to the original source of content, and search for duplicates before posting. Learn more
community guidelines
Community Expert ,
Nov 03, 2017 Nov 03, 2017

Copy link to clipboard

Copied

LATEST

That just confirms what I was trying to get across throughout this whole thread:

A wide gamut monitor requires full color management at all times, and you must have a valid monitor profile set up at system level. The only way to be sure to get that is to buy and use a calibrator.

In fact, any wide gamut monitor sold without including a calibrator in the deal is a disaster waiting to happen. It's an essential part of the package. Vendors really should start taking a little responsibility here, instead of just marketing these units for their "brilliant color".

BTW Anything else in connection to the special requirements of wide gamut displays is well covered above. Read again from the start.

Votes

Translate

Translate

Report

Report
Community guidelines
Be kind and respectful, give credit to the original source of content, and search for duplicates before posting. Learn more
community guidelines