- Home
- Photoshop ecosystem
- Discussions
- Re: I need to make a poster that contains all my c...
- Re: I need to make a poster that contains all my c...
I need to make a poster that contains all my coworkers pictures on a grid
Copy link to clipboard
Copied
[Moderator moved from The Lounge to Photoshop for Beginners.]
I need to make a poster that contains all my coworkers pictures on a grid (kind of like a yearbook). Need to keep various roles together. Have lightroom and Photoshop. Can someone guide me in making this or to a tutorial?
Explore related tutorials & articles
Copy link to clipboard
Copied
How do you plan to use this image? Will this be used for a printed poster and if so, what size poster do you need?
Copy link to clipboard
Copied
This will be a poster so that others at work will know who they are speaking with in our dept. I will just lay out the photos in a grid. Separating for who are the MD's, Nurses, Therapists. Size will be 24 x 30 inches.
Copy link to clipboard
Copied
Go to File > New and create a custom document or Preset. See screenshot.
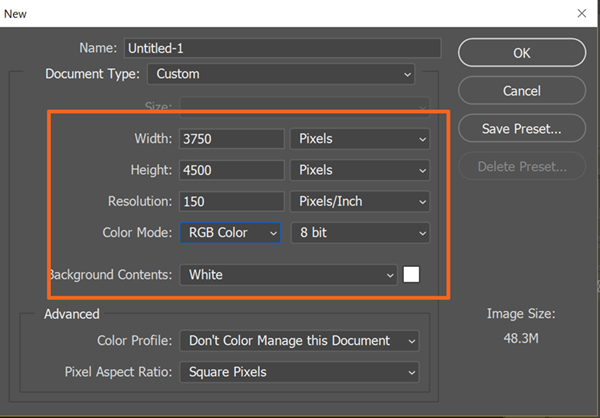
Next go to View > Show > Grid. You can customize the Grid size & color by going to Edit > Preferences > Guides, Grid & Slices.
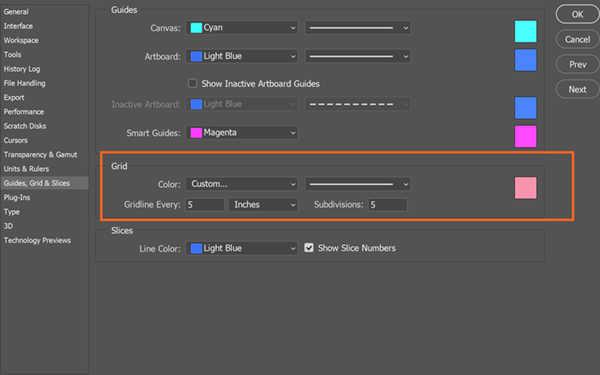
Grid lines do not print. They are strictly a visual aid to help you line things up. If they get in your way, you can toggle Grid on/off with Ctrl+H.
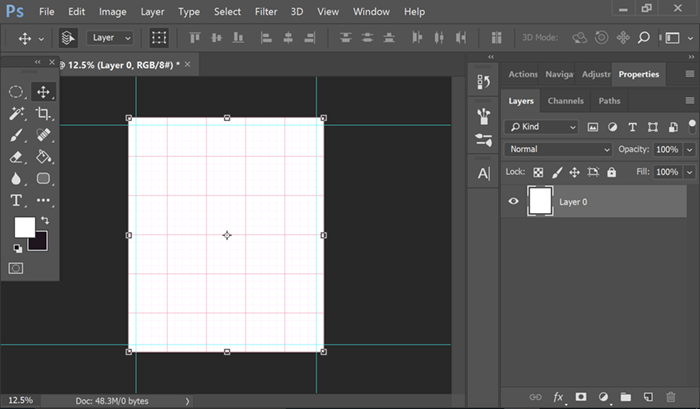
Remember to add some printer margins to the top & sides of your poster. View > New Guide. I used 150px each for my 4 guide lines. Adjust as your printer requires.
Now start opening your staff images. Edit as required. Use Ctrl+A to select a staff image. Switch to Poster and hit Ctrl+V to paste. This should put your staff image on a separate layer. Repeat for other staff images.
Save your work often with Ctrl+S.
Nancy
Copy link to clipboard
Copied
Nancy, I did most of what you mentioned, though I did not change colors and I used inches and not pixels for the measurement. I will be sending it to a printer to print the large 24 x 30 inches. Now, forgive my ignorance, but I am stuck trying to get the images in to photoshop. Starting with a single image to edit is no problem, but adding one to this starting layer I have not figured out yet.
Copy link to clipboard
Copied
By the way, Thanks for all the help. Also should I change settings to pixels???
Copy link to clipboard
Copied
If you're going to use an off site print shop, you should get the printer specs directly from your print professional. He/she will no doubt want you to bring them a high print quality, CMYK image and not an RGB.
Assuming the images are saved to your computer, go to File > Open.
Use Ctrl+A to select all pixels in an image. Ctrl+C to Copy.
Switch to Poster tab and hit Ctrl+V to Paste. See screenshot of Layers Panel. Each image should be on it's own Layer.
It's a good idea to name your layers something meaningful. 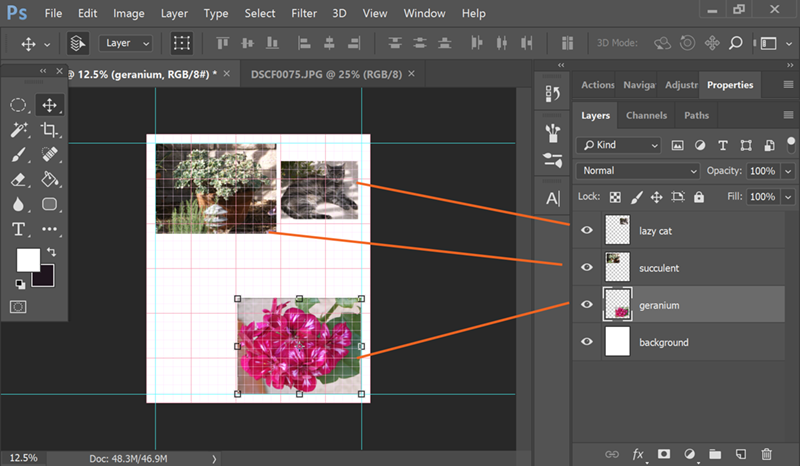
Copy link to clipboard
Copied
I disagree with Nancy on the matter of of color mode. Leave your images in RGB and let the printer convert to CMYK, or other spec they may want, such as PDF/X-4.
Copy link to clipboard
Copied
Some printers charge extra for conversions, etc.... I think it's best to discuss DPI, paper & other print requirements PRIOR to beginning the project. The last thing anybody wants is an 11th hour surprise after the art work has been completed. I speak from personal experience.
Nancy
Copy link to clipboard
Copied
There are several ways to do it.
If these solutions do not work for you let us know!
Good luck!
Copy link to clipboard
Copied
Chances are, if you are preparing a poster of the faces of coworkers, you have been supplied with images that vary in size, resolution and appropriate cropping. If that is the case, the following Photoshop technique will allow you to prepare the images for placement in the grid.
In the sample below, images that varied in size, res and required crop were changed to provide the required uniformity. I hope this helps.
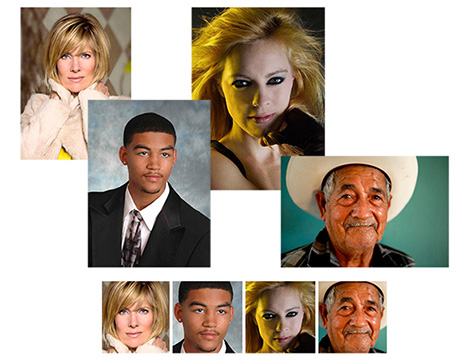
1. Open two or more images. Pick one.
a. Choose the Crop tool. Checkmark the “Delete Cropped Pixels” box in the Options bar and crop the image to the desired shape.
b. Choose Image > Image Size and enter the desired dimensions, and resolution. Confirm that the Resample Image box is checked and that “Bicubic Automatic” appears in the field at the bottom of the menu.
Once OK’d, we will refer to this master as the Front Image.
2. With the Front Image still chosen, switch to the Crop tool. In the Options Bar’s first field use the double arrows to change the field designation from Unconstrained to Size & Resolution.
3. In the drop-down Menu that appears, change the Source field from Custom to Front Image. The size and resolution of that file will be automatically entered in the appropriate fields.
4. Click OK and then click the Esc key.
5. With the Crop tool still chosen, click a file to be changed. The cropped version of it will appear immediately. At this time, if desired, you may move, rotate and/or alter the crop area. (If you want to shift area chosen, click on a crop handle, then reposition to the desired area.) The image proportion will not change.
6. Click the Return key. The size and resolution of this cropped image will match the file you designated Front Image.
7. Save and close the file if desired.
8. Repeat Steps 5 through 7 for each the other files that require adjustment.
9. Finally, in the Crop tool’s Options Bar, use the double arrows to return the field designation to Unconstrained.
Copy link to clipboard
Copied
Afterthought: After completing the insertion of images into the grid you may want to consider adding a common amount of space below each row, adding a type layer and keying in the name of each person below his/her image.
Copy link to clipboard
Copied
In Lightroom, your poster is really easy to make.
First choose the Print categorie on the top of the screen
and all images have to be in Lightroom
2) In Layout style: choose contact sheet
3) In the page setup you have to define the paper size before you go further
3) In Layout: choose how many images per column and rows and define your margins
4) et voila: that easy!
Optional you can add a black frame around the images with Image settings
If you want to some text you can do that as a comment in Acrobat Reader or in Word/PowerPoint or something like that.
I hope it's Helpful.
Good luck
Patrick
Copy link to clipboard
Copied
I have already done that, presented it to my employer, only to have them tell me that they wanted them to grouped by job title (that gives me 4 different groups, about 30 people total). So what they wanted was changed after they were given the poster. Each group needed a margin between. Basically what they asked for and what they want has evolved. Can that be done in Lightroom?
Copy link to clipboard
Copied
You want a custom poster. So for grid layout, resizing images, adding text, moving things around, printing a proof, etc... Photoshop is the tool of choice. Lightroom is a digital darkroom. It's great for some things but it's not a replacement for Photoshop.
Copy link to clipboard
Copied
Obviously, as I mentioned, if a printer has given you a spec you should (normall) follow it, but many printers are out of date with their approach. For example if they specify PDF/X-1 instead of PDF/X-4.
In my view if a printer wants to charge you extra for converting to CMYK you should change printers!
This article explains clearly why you should (normally) leave your color mode in RGB and convert on Export:
https://indesignsecrets.com/import-rgb-images-indesign-convert-cmyk-export.php
Copy link to clipboard
Copied
Don't get me wrong, Derek. I work with PSDs in RGB mode. I don't convert to CMYK mode until I'm ready to saveAs high quality PDF.
Sometimes switching color modes changes the image -- especially text -- in undesirable ways. If I can see the problems, I can remedy them with adjustments before handing off to my print professional. This all comes down to quality control.
Nancy
Copy link to clipboard
Copied
The High Quality Print preset is for use on Desk-top inkjet printers where the printer's software does the conversion to CMYK or even CMYK + to get the advantage of the wide gamut of say 9 colour printing. For commercial litho printing select PDF/X-4
Copy link to clipboard
Copied
When I said high quality, I meant it in a generic sense. I have a custom preset that I use.


