 Adobe Community
- Home
- Photoshop ecosystem
- Discussions
- Image looks completely different when it opens in ...
- Image looks completely different when it opens in ...
Image looks completely different when it opens in Camera Raw

Copy link to clipboard
Copied
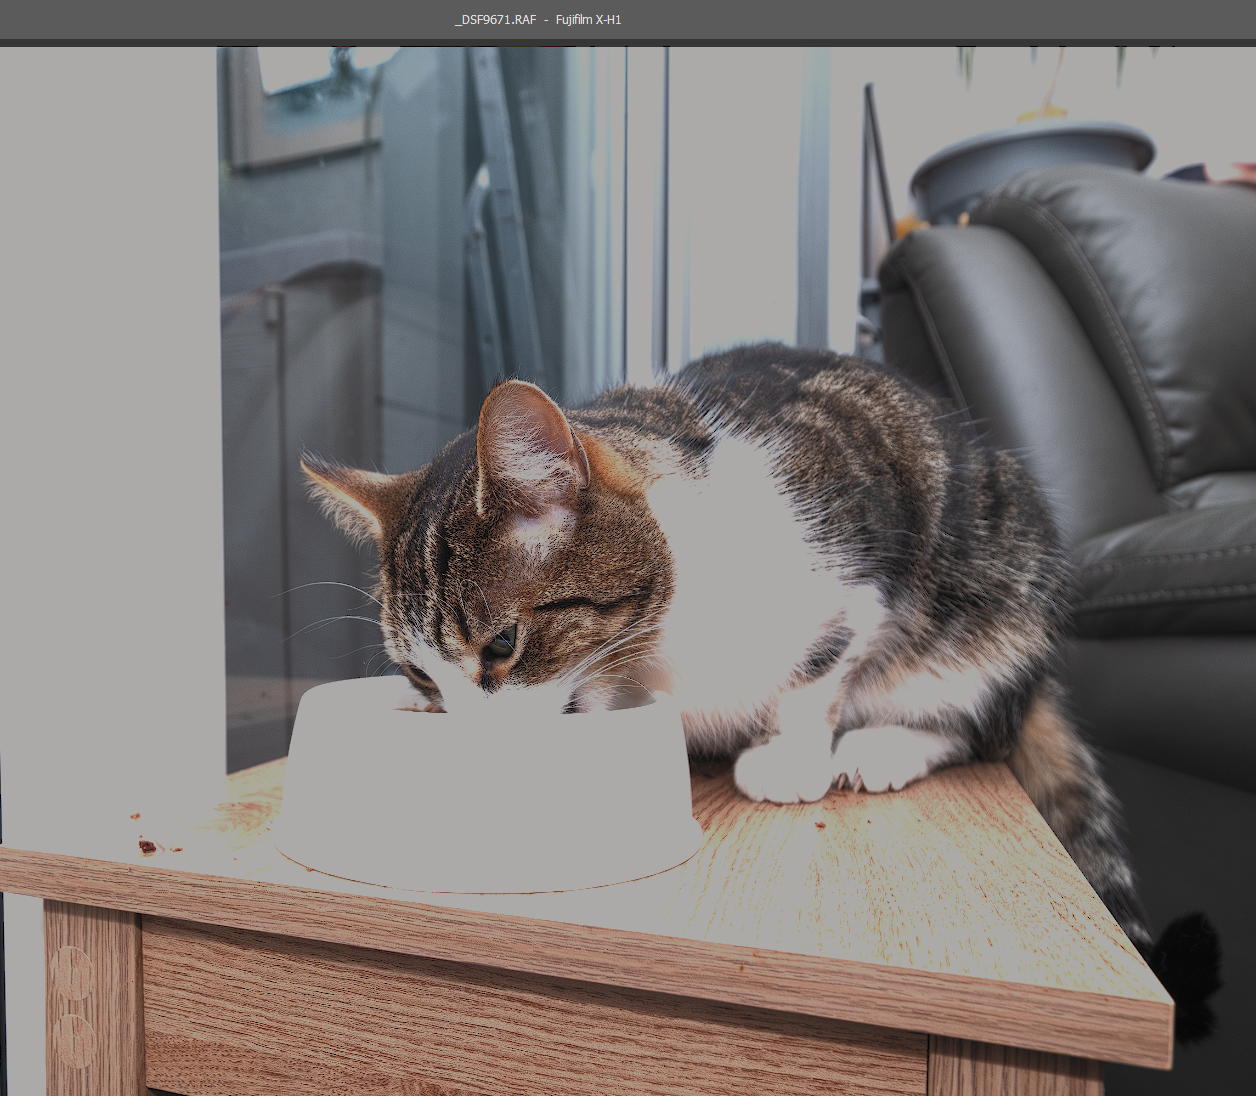
Can anyone help me understand why my image looks completely different in camera raw? I'm fine with how it's shot, then I open it, it opens in camera raw, and looks terrible!! All blown out and contrasty!! And that's the way it stays when I open it in Photoshop. What's going on? I'm attaching a sample... Camera Raw is on the Left, Bridge view (and how it looked on the back of my camera), is on the Right.
Shooting with a Nikon D700 and using the latest versions of PS and CR. Thanks!


Explore related tutorials & articles
 50
Replies
50
50
Replies
50

Copy link to clipboard
Copied
Why are you using CIE RGB? That's not a standard profile.
Use sRGB IEC61966-2.1 if you want something safe. Other standard profiles are Adobe RGB and ProPhoto RGB, but I would recommend sRGB until you get more experience with profiles and understand the implications.
Other than that, we don't see your ACR settings. You are not supposed to just accept the defaults - the sliders are there to be used. Just as an example, see what happens when the Highlight slider is used here:

EDIT: one more thing. All those camera settings that Sony call "creative styles", effects and profiles - all of that is ignored in ACR. Those only apply to the camera-processed jpegs! You will see their effect in Windows Photos, which just shows you the camera jpeg, but you will not see them in ACR, which shows you a rendition from the raw sensor data.
A raw file is just a data dump from the sensor, what the sensor recorded in the capture. Eveything else is processing.

Copy link to clipboard
Copied
Thanks for your reply D Fosse.
I was flicking between the colour profiles to see what difference it made and happened to have it on CIE RGB when I took that photo, but I have tried it in all the profiles and nothing shows the original detail, including sRGB IEC61966-2.1. I have adjusted the adobe camera raw settings as advised in this thread instead of accepting the defaults, but it has made no difference to the issue I am experiencing.
I understand that adjusting the highlights and shadows will show more detail than what I'm initiall presented with, but even with as much detail as possible added back in this way there is still no comparison to the detail seen in the windows photo viewer app.
I just can't understand why it's happening to me and why I can't find a solution anywhere online! When I watch youtube tutorials of people explaining how to do certain things in ACR, I see them open an image file and all the beautiful details are retained; the images look exactly as expected and the user doesn't have to start messing with the highlights in order to get a decent starting point for further editing. It's so frustrating.
Any help (other than suggesting I just accept this and adjust the highlights) would be greatly appreciated. Thanks 🙂
P.s. could it be my camera. lens or settings? I have tried using other raw image editing software and it's happening in all of those programmes too. I've tried ACR via Photoshop. Lightroom and Lightroom Classic, Sony Image Edge Desktop and Affinity Photo 2 - all with the latest versions and updates. I have also tried on two different windows computers. All images shot as uncompressed RAW in sRGB on a Sony ILCE-7M2.
Copy link to clipboard
Copied
Do you have any camera settings enabled (styles/profiles)? Perhaps you did and forgot? Check again.
As I said, all those settings will be ignored in a raw processor like ACR, but will show in any image viewer that just displays the camera jpeg preview. That's camera processing, not part of the raw sensor data.
From your description, I'm pretty sure that's the case here.
Copy link to clipboard
Copied
@Marianne29103517zr39 "I was flicking between the colour profiles to see what difference it made and happened to have it on CIE RGB when I took that photo, but I have tried it in all the profiles and nothing shows the original detail, including sRGB IEC61966-2.1. "
In what application are you "flicking between the colour profiles"?
neil barstow, colourmanagement net - adobe forum volunteer - co-author: 'getting colour right'
google me "neil barstow colourmanagement" for lots of free articles on colour management
Copy link to clipboard
Copied
Marianne Errington

Copy link to clipboard
Copied
Has this been solved? I agree that all of the comments here are not understanding/addressing the actual issue.
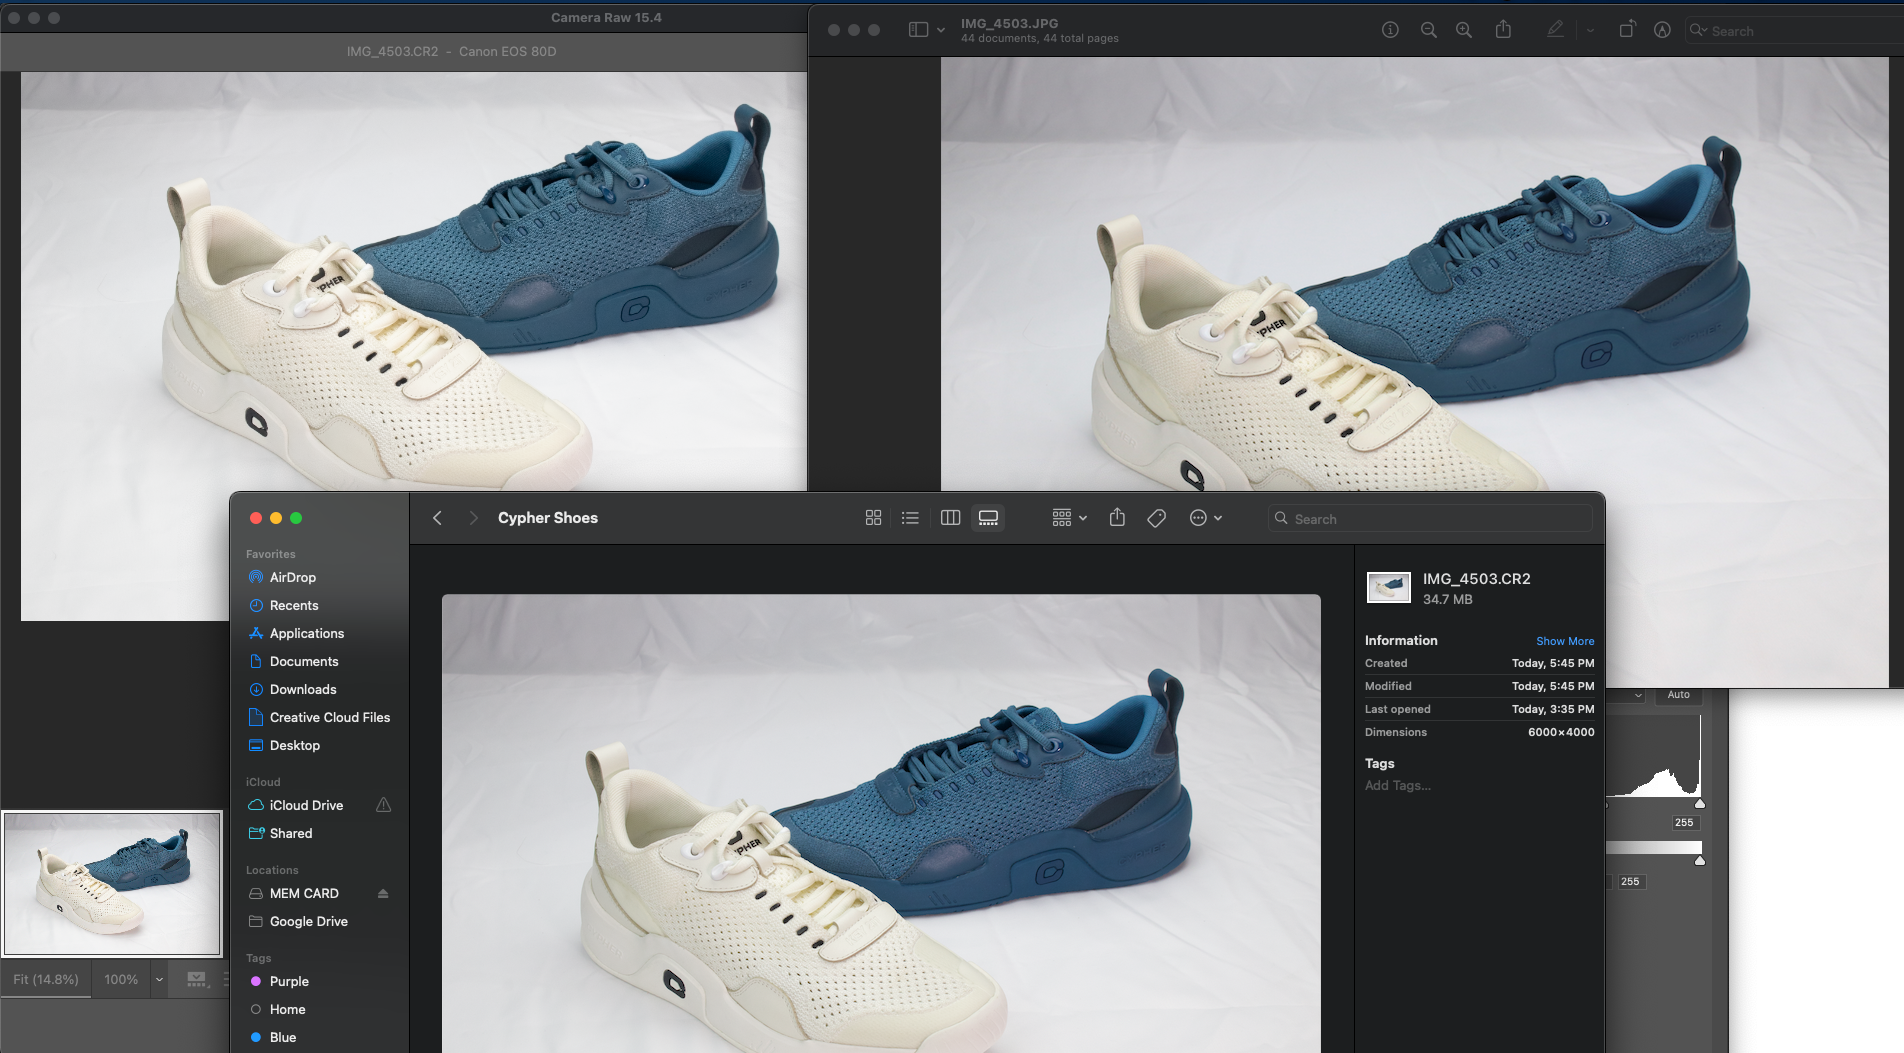
I have been working with Photoshop for years, and this just happened to me today. Previously I would shoot raw, and I would pull up all my JPG images and choose which ones I wanted to edit. Then I would open my .CR2 (RAW) image and it would look almost identical to my JPG; however, I would have much more editing capabilities.
I was shooting shoes today, and I edited the first picture I took this way, and it worked fine. After that, I took more pictures (I didn't change any camera settings or photoshop settings) later, I go to edit the photos, and this started happening. You can see the JPG looks good, and the CR2 (RAW) looks good in the file preview, but when I open the image, it completely changes and gets all washed out and super bright.
I understand I can change the color profiles and get the photos to a better, more accurate starting point, or I can edit them to be closer, but why has this randomly changed? I used to open RAW images, and they would almost match my JPG's with all default settings, letting me fine-tune them quickly. Something is wrong in a photoshop setting and I don't know what. I know its photoshop and not the camera because the original photo I edited earlier today is doing it now but was not doing it earlier.
Copy link to clipboard
Copied
Unfortunately I havent found a solution. My friend and I have the exact same camera and lens, so we went through and made our settings match exactly, then took the same photo. It looked washed out in my adobe camera raw/photoshop but fine on his. This leads me to believe it's defo not a camera settings issue. We were both running the same version of PS. Regretably we didnt have time to spend matching up all our PS settings to see if we could find the problem there.
Copy link to clipboard
Copied
I actually had the same thing happen to me in Premier Pro about a year ago. Everything looks fine, even when editing and then exporting it's all washed out. I know it's a setting issue in PS or Premier for sure. Just not sure where it is. For now, I'm using the "Camera Faithful" profile until a real solution can be found. Super disappointing though., as Photoshop is a staple in my work and this is quite annoying.

Copy link to clipboard
Copied
I'm having the exact same issue in both lightroom and Camera Raw, did you find a solution ?
I just uploaded my portraits and all was good for a second there, but now the colors don't feel rich and contrast is completely blown out. I would have to reduce hilights and whites way down to get a result that is barely descent...
I checked my camera settings = sRGB, then I tried going into lightroom to "Profile" - "Browse" - and switched to "Camera Matching" there are options available there, the result seems better but still not great...
Going into the Creative Cloud app, I see that Lightroom is up to date, I'm updating Photoshop right now, and will update the Mac operating system to see if it fixes the issue...
Let me know if anyone has found a solution,
Thanks !
Copy link to clipboard
Copied
I just spoke on the phone with a senior photoshop tech support woman. I let her have remote control of my PC to check the settings were all as they should be on my device and on Lightroom. She couldn't find any reason why this would be happening. She said that the 'blown out' looking photos in Camera Raw and Lightroom are actually the raw photos, and the ones viewed on the computer image viewer are previews which have a darker overlay on them, and dragging the exposure down in LR will bring them to my desired look. So I suppose the final solution here folks is to take less bright photos if we don't like the way they look.
Copy link to clipboard
Copied
A fact that people tend to miss in these situations is that it's exactly the same sensor data. It's exactly the same camera exposure.
It's not really lighter or darker! It's just different processing.
Copy link to clipboard
Copied
A fact that people tend to miss in this thread is that most of the people with this issue DO understand RAW images. We know that using a different processing option will change things, and selecting a different color profile and settings when initially working with the RAW image in Photoshop can result in the image we want.
The issue is that in the past, using the exact same settings and even the exact same RAW images, the default result with no editing, using the default Adobe Color profile, the image was close to resembling the JPG copy that we saw when we snapped the photo and what see when we preview the photo. It required little work to obtain the result we wanted.
Then suddenly, with no changes made, Photoshop decided that when importing RAW images from the same camera, same camera settings, same Photoshop settings, everything! That the photo would look like ass. Now instead of opening the raw image, making small minor adjustments, and being happy, we have to change the profile and make lots of changes to get the result we wanted.
Yes, RAW images can be interpreted many different ways, and the photo is not actually "lighter," but the work we need to achieve the photo we want just tripped out of nowhere for no reason.
To further my point on the inconvenience of the issue, nobody wants to snap pictures with a camera after spending the time getting the settings right to achieve close to the look that you want, just to have to do a ton of work in Photoshop to get back to that look!? It doesn't make sense. There's a reason why before this spontaneous change, Photoshop interpreted the RAW images with default settings in a way that matched the JPG, because it makes sense.

Copy link to clipboard
Copied
As of today, I'm having the same issue. My photos look terrible once I open them in Photoshop. Same camera settings, no changes that I've made to my Photoshop settings. I can't work with these and have no idea what to do.

Copy link to clipboard
Copied
I've had the same problem for the past 3 years so I'll be glad if this is resolved one day.
Copy link to clipboard
Copied
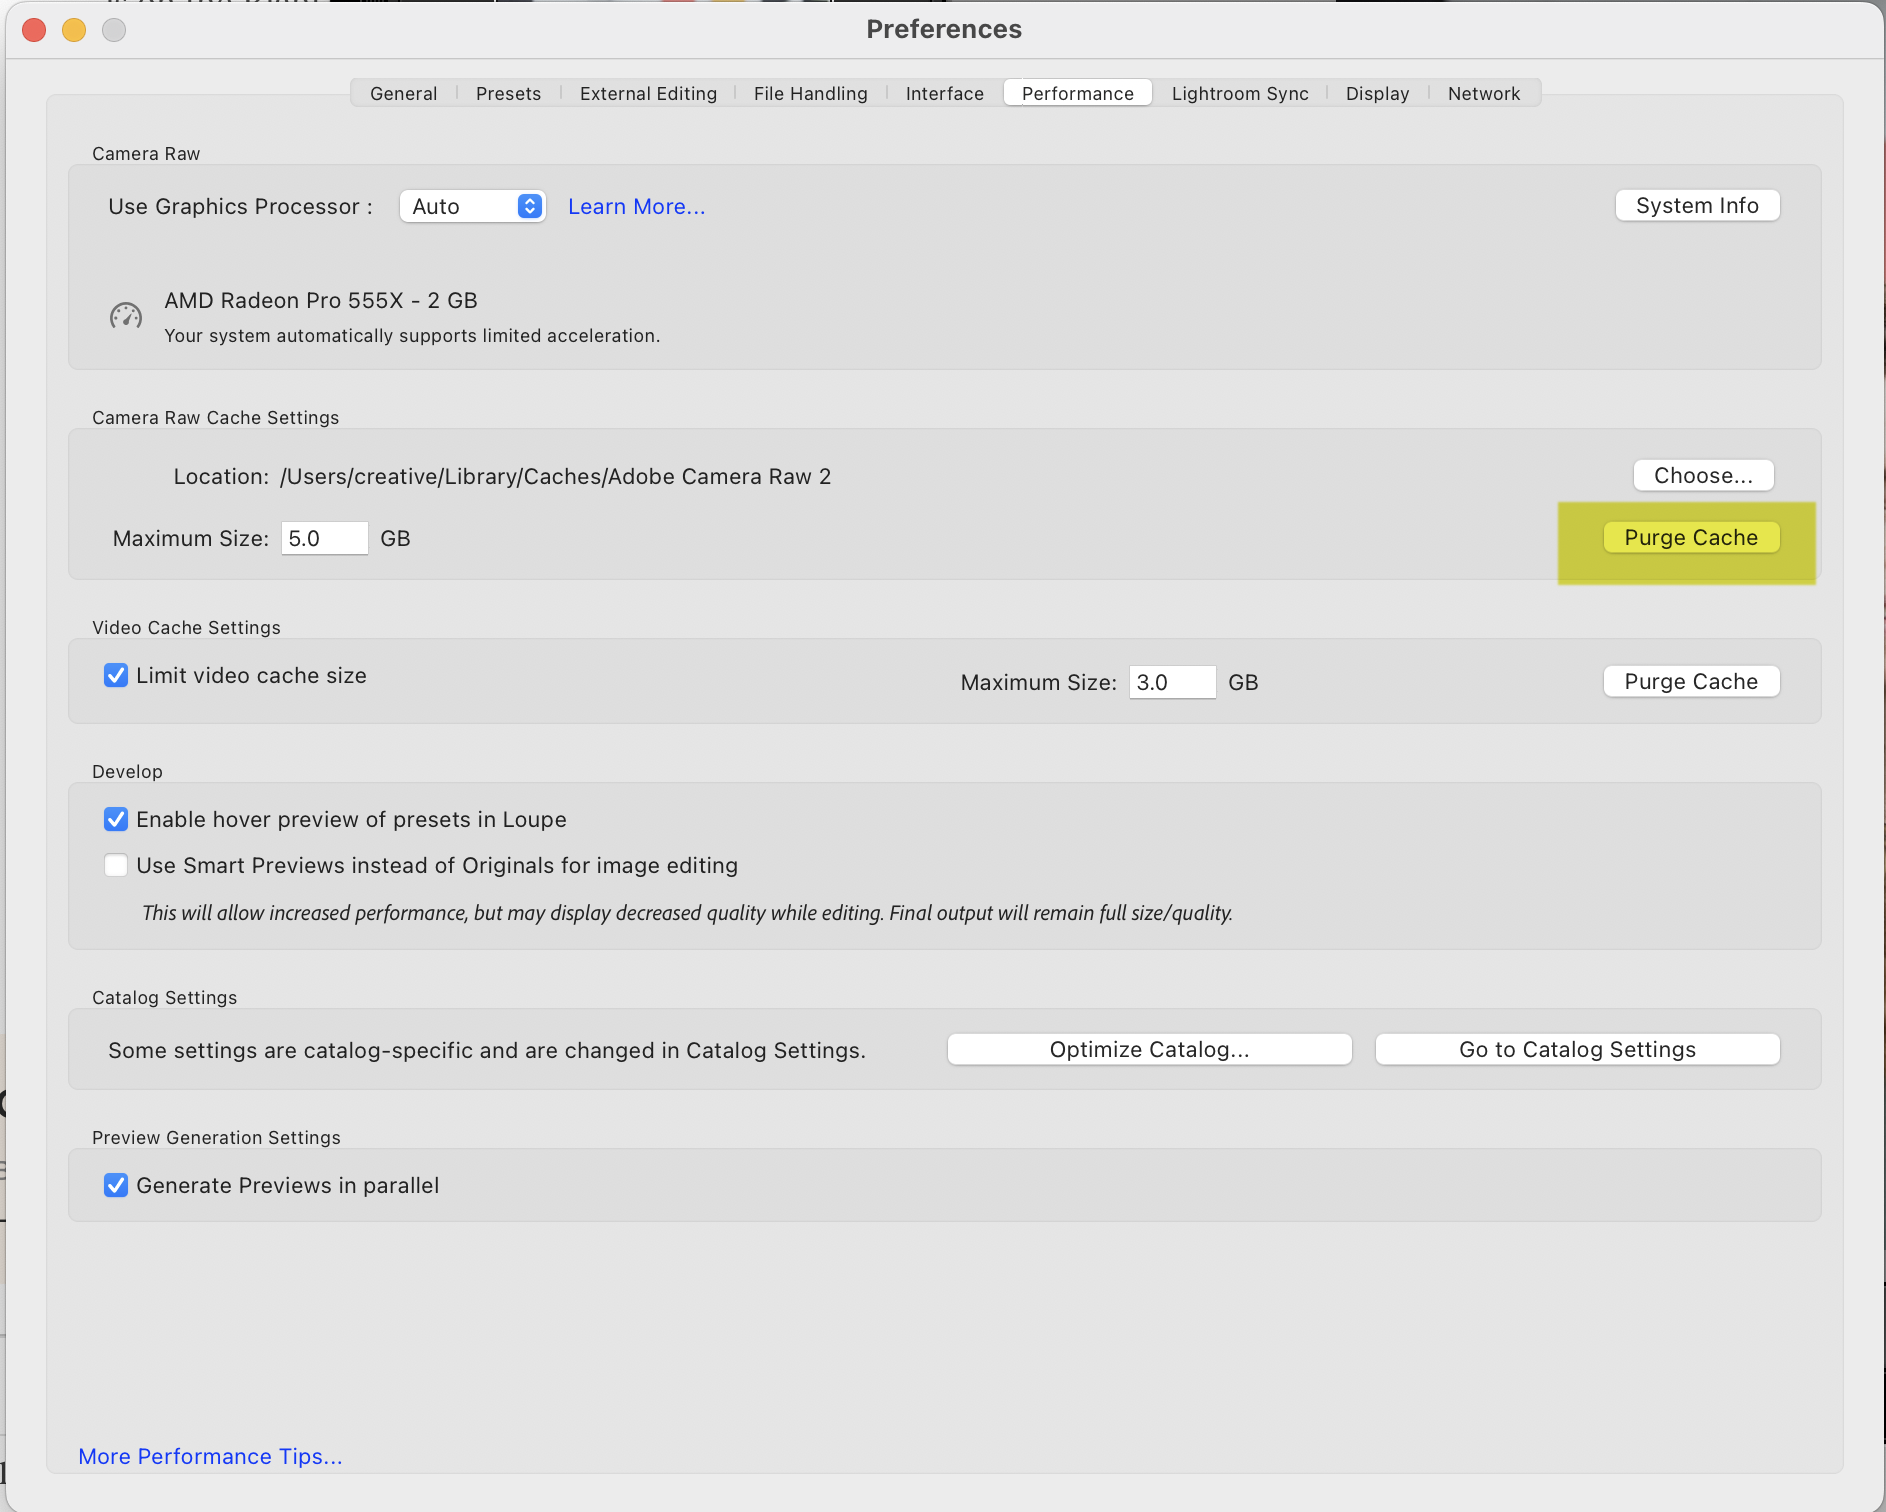
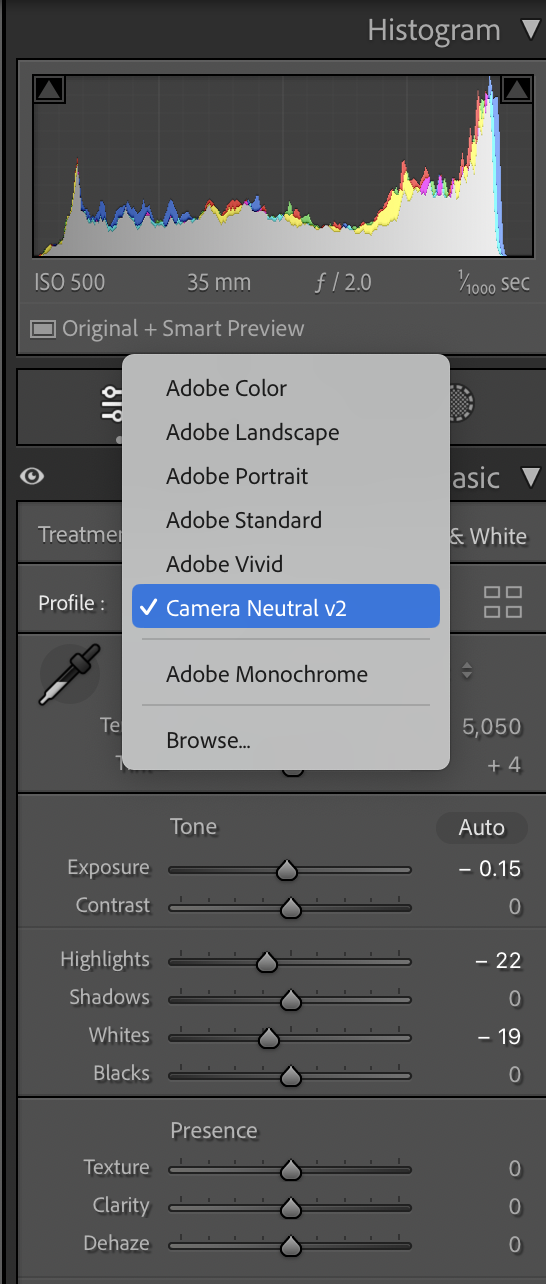
Hello everyone, I had Adobe support helping with this and my RAW files now look much better! Try going into Lightroom Preferences -> Performance, and purge the cache in the section: Camera Raw Cache Settings
Then choosing the image I want to work with, and setting the Profile, to the one from my camera (see screenshot) fixed the problem.
I have asked to agent who helped me to update this post with instructions just in case I'm missing something else he might have done.
Does this work for you ?
Copy link to clipboard
Copied
This did not help me. I appreciate the input though. Is there away to clear the Photoshop cache? Hopefully, the person who helped you comes in an updates the thread.
Copy link to clipboard
Copied
Did you restart your app, even try restarting your computer, and see if it works.
Nathaniel Huard
Designer Graphique
—
[PII removed]

Copy link to clipboard
Copied
Try a Different program....I did and have no issues at all.
Copy link to clipboard
Copied
I installed earlier version of adobe raw and all is well so there must be a glitch in raw 16.2
Dave
Copy link to clipboard
Copied
One on right is opened in latest photoshop and camera raw 16.2 One on left is opened in latest photoshop and camera raw 14.5, so I can't usr camera raw 16.2 as my files are blown out, yet there is a masking in raw 16.2 that I want to use but can't as its not in 14.5.....So is there a fault in raw 16.2.

Copy link to clipboard
Copied
I can see the blown out highlights in one of your screenshots but without seeing the raw file or the file settings it does not really tell us anything. Can you attach a link to the raw file (dropbox or similar)?
Dave
Copy link to clipboard
Copied
Hi,
Sorted it was a colour profile conflict and HD setting in my pc settings.
cheers
Dave

Copy link to clipboard
Copied
Oh my goodness! you are so correct! i had HDR set to on on my monitor, turned if off and boom, it fixed it.

Copy link to clipboard
Copied
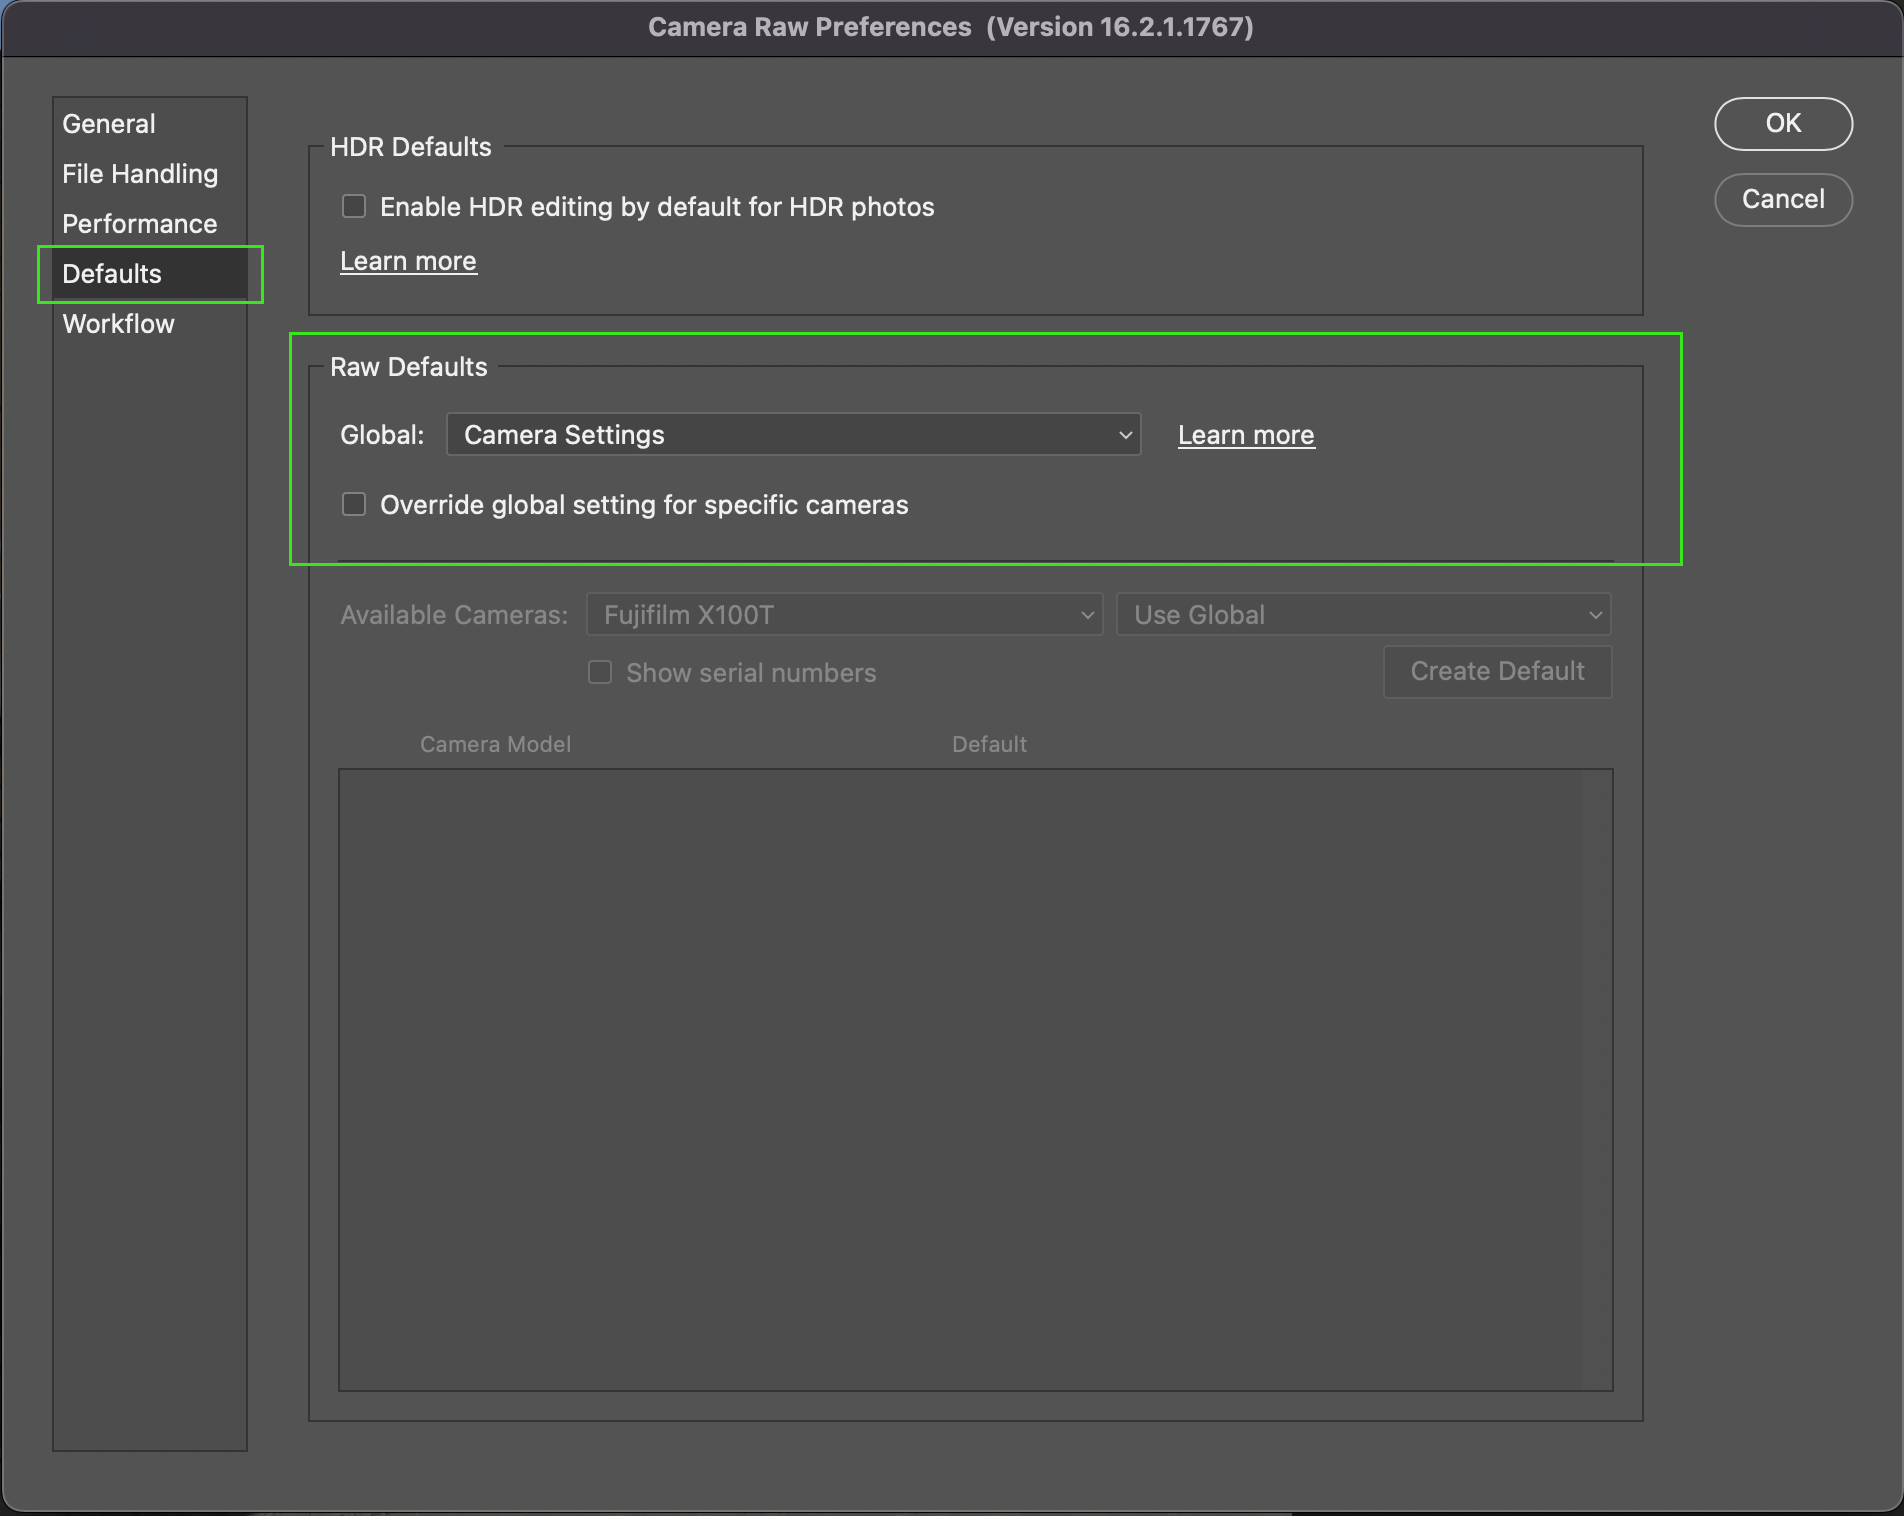
I think I found a solution! I believe it has to do with the "Raw Default Settings" in the Camera Raw Preferences. If you do not want the profile to automatically open up as an Adobe profile (such as "Adobe Color" or "Adobe Standard") then you need to set the Global Raw Default to "Camera Settings" instead of "Adobe Default."
To do this:
- Open an image in Camera Raw
- Open the Camera Raw Preferences dialog box by either:
- Clicking on the gear-shaped icon* in the top right of the window - SEE Settings Icon.png*
- Using the keyboard shortcut (Command+K on a Mac)
- Go to the "Defaults" section* of Preferences (It should be the 4th one down) - SEE Camera Raw Preferences.png*
- Go to the "Raw Defaults" sub-section
- Click on the drop-down menu next to "Global:"
- Select "Camera Settings" instead of "Adobe Default"
- Click OK to solidify the setting change.
Once you do this, every image should open up automatically in the profile settings of your camera rather than the Adobe default profiles, such as "Adobe Color" or "Adobe Standard."
I've included screenshots to show where the icon is and where the sections are within the Camera Raw Preferences.
I hope this helps!

Copy link to clipboard
Copied
https://helpx.adobe.com/camera-raw/kb/acr-raw-defaults.html
My understanding is that Adobe make their own best guess/interpretation of OEM "camera settings", it's not as if Nikon or Canon etc. provide Adobe with their secret special sauce to make raw files look like camera JPEG files.

 AdChoices