 Adobe Community

Copy link to clipboard
Copied
Hi everybody,
this is what I need to do:
All image files from my input folder must be converted to JPEG, RGB, 72dpi and 234 Pixels in width or height.
Source files are TIFF, JPEG or EPS files.
I do not know much about scripting, but I searched the Internet for my purposes and built the follwing script from my search results:
// main settings
var picSourcePath = "C:\\Users\\nolte\\Desktop\\Originale\\";
var picTargetPath = "C:\\Users\\nolte\\Desktop\\Ausgang\\";
var maxSize = 234; // max width and height
//###################################################################################
// save settings and customize environment
var startRulerUnits = app.preferences.rulerUnits;
var startTypeUnits = app.preferences.typeUnits;
var startDisplayDialogs = app.displayDialogs;
app.preferences.rulerUnits = Units.PIXELS;
app.preferences.typeUnits = TypeUnits.PIXELS;
app.displayDialogs = DialogModes.NO;
//var doc = app.activeDocument;
var picFolder = Folder(picSourcePath);
var fileList = picFolder.getFiles();
if (picSourcePath != null && picTargetPath != null) {
for (var i=0; i<fileList.length; i++) {
if (fileList instanceof File) {
open(fileList);
var newFileName = fileList.name;
app.activeDocument.changeMode(ChangeMode.RGB);
{
// resize
resize(maxSize);
//if (confirm('Sharpen?')) {
// app.activeDocument.activeLayer.applySharpen();
//}
//if (confirm('Save and Close?')) {
saveWebJpg(newFileName.substring(0, newFileName.length-4) + ".jpg", picTargetPath, 100);
//app.activeDocument.close(SaveOptions.DONOTSAVECHANGES);
//}
}
// ... and close at all events
app.activeDocument.close(SaveOptions.DONOTSAVECHANGES);
}
}
}
// restore settings
app.preferences.rulerUnits = startRulerUnits;
app.preferences.typeUnits = startTypeUnits;
app.displayDialogs = startDisplayDialogs;
// Funktion um Dokument als Jpeg zu speichern (Fuer Web speichern...)
// Parameter: Dateiname, Pfad mit abschliessendem '\'!, Qualitaet 1-100
function saveWebJpg(jpgName, filePath, jpgQuality ) {
var saveFile = new File(filePath + jpgName);
var webJpgOptions = new ExportOptionsSaveForWeb();
webJpgOptions.format = SaveDocumentType.JPEG;
webJpgOptions.optimized = true;
webJpgOptions.quality = jpgQuality;
activeDocument.exportDocument(saveFile, ExportType.SAVEFORWEB, webJpgOptions);
File = null; ExportOptionsSaveForWeb = null;
}
function resize(size)
{
if(app.activeDocument.width > app.activeDocument.height)
app.activeDocument.resizeImage(size, (size * app.activeDocument.height/app.activeDocument.width),null, ResampleMethod.BICUBIC);
else
app.activeDocument.resizeImage((size * app.activeDocument.width/app.activeDocument.height), size, null, ResampleMethod.BICUBIC);
}
The script works fine for JPEG, TIFF and pixel EPS files. The only problem occurs with vector EPS files.
Photoshop opens vector EPS files in low resolution (72dpi), then my script exports these files with the "Save as Web JPG" settings. The output quality of the processed pictures is really bad.
I found out, that there is an "epsOpenOptions" command for Photoshop scripting. I tried to build the following code into my script in order to force Photoshop to open vector EPS files with an resolution of 300dpi. Then the rest of my script shall export these according to my specifications.
// Create a EPS option object [height & width are doc size]
var epsOpenOptions = new EPSOpenOptions
epsOpenOptions.antiAlias = true
epsOpenOptions.mode = OpenDocumentMode.RGB
epsOpenOptions.resolution = 300
epsOpenOptions.page = 3
epsOpenOptions.constrainProportions = true
However, I cannot get this to work and I don't know where I'm wrong. Can anybody help me to modify my script, so that only EPS files will be opened with these options and all other files will be opened as they are?
Thanks in advance!


 1 Correct answer

OK… I had a very quick chop about with your code… Try this and see how you get on…
...#target photoshop
var picSourcePath = Folder( Folder.desktop + '/Originale' );
var picTargetPath = Folder( Folder.desktop + '/Ausgang' );
var maxSize = 234; // max width and height
var startRulerUnits = app.preferences.rulerUnits;
var startTypeUnits = app.preferences.typeUnits;
var startDisplayDialogs = app.displayDialogs;
app.preferences.rulerUnits = Units.PIXELS;
app.preferences.typeUnits = TypeUnits.PIXELS;
app.displayDi
Explore related tutorials & articles
 28
Replies
28
28
Replies
28
Copy link to clipboard
Copied
Do all your *.eps files contain vector data or are they a mixed bag ( some photoshop + some other creators )?
Copy link to clipboard
Copied
The EPS files do only contain vector data.
Copy link to clipboard
Copied
OK you have a choice of having 1 script that deals with the conditions… or using 2 scripts…? An easy edit may be…?
// Will ONLY get EPS files
var fileList = picFolder.getFiles( /\.eps$/i );
// Will ONLY get JPG & TIF files
var fileList = picFolder.getFiles( /\.(jpg|tif)$/i );
// Will ONLY get EPS, JPG & TIFfiles
var fileList = picFolder.getFiles( /\.(eps|jpg|tif)$/i );
Copy link to clipboard
Copied
Thanks for your quick reply!
I would like to have one script only.
Maybe I got your answer wrong, but I don't think that my problem is solved.
I'm thinking of a solution, where the script detects the file type while opening. EPS files shall be opened with a resolution of 300dpi and exported according to my specifications.
All other file types shall be opened as they are and be exported as well.
Copy link to clipboard
Copied
OK… I had a very quick chop about with your code… Try this and see how you get on…
#target photoshop
var picSourcePath = Folder( Folder.desktop + '/Originale' );
var picTargetPath = Folder( Folder.desktop + '/Ausgang' );
var maxSize = 234; // max width and height
var startRulerUnits = app.preferences.rulerUnits;
var startTypeUnits = app.preferences.typeUnits;
var startDisplayDialogs = app.displayDialogs;
app.preferences.rulerUnits = Units.PIXELS;
app.preferences.typeUnits = TypeUnits.PIXELS;
app.displayDialogs = DialogModes.NO;
var epsOpenOptions = new EPSOpenOptions
epsOpenOptions.antiAlias = true
epsOpenOptions.mode = OpenDocumentMode.RGB
epsOpenOptions.resolution = 300
//epsOpenOptions.page = 3 EPS DOES NOT HAVE MULTI-PAGE
epsOpenOptions.constrainProportions = true
if ( picSourcePath.exists && picTargetPath.exists ) {
var fileList = picSourcePath.getFiles( /\.(eps|jpg|tif)$/i );
for( var i=0; i<fileList.length; i++ ) {
if ( /\.eps$/i.test( fileList.name ) ) {
open( fileList, epsOpenOptions );
} else {
open( fileList );
}
var newFileName = fileList.name;
app.activeDocument.changeMode(ChangeMode.RGB);
resize(maxSize);
saveWebJpg(newFileName.substring(0, newFileName.length-4) + ".jpg", picTargetPath, 100);
app.activeDocument.close(SaveOptions.DONOTSAVECHANGES);
}
}
app.preferences.rulerUnits = startRulerUnits;
app.preferences.typeUnits = startTypeUnits;
app.displayDialogs = startDisplayDialogs;
function saveWebJpg(jpgName, filePath, jpgQuality ) {
var saveFile = new File(filePath + '/' + jpgName);
var webJpgOptions = new ExportOptionsSaveForWeb();
webJpgOptions.format = SaveDocumentType.JPEG;
webJpgOptions.optimized = true
webJpgOptions.quality = jpgQuality;
activeDocument.exportDocument(saveFile, ExportType.SAVEFORWEB, webJpgOptions);
File = null; ExportOptionsSaveForWeb = null;
};
function resize(size) {
if(app.activeDocument.width > app.activeDocument.height)
app.activeDocument.resizeImage(size, (size * app.activeDocument.height/app.activeDocument.width),null, ResampleMethod.BICUBIC);
else
app.activeDocument.resizeImage((size * app.activeDocument.width/app.activeDocument.height), size, null, ResampleMethod.BICUBIC);
}
Copy link to clipboard
Copied
this works PERFECTLY! thank you so much!! 
Copy link to clipboard
Copied
Hi everybody,
after quite a while I need to build a second version of this script and adjust the SaveWebJpg options, so that the output files are reduced to a file size of 100kB max. each.
I have searched the web for hours, but I can't find the proper commands and where to include them.
I would appreciate any help - thank you!
Copy link to clipboard
Copied
no one? 

Copy link to clipboard
Copied
Drop the quality you pass into the save function until you get the size below what you want.
Here is a script that does something similar only it uses the built in JPEG instead of Save for Web.
// Version 2017.6.12
// Given a max size, reduce the quality of the jpeg
// until it is small enough
var maxSize = 1024 * 1024;
var smallEnough = false;
var tries = 1;
var q = 12;
var f = new File('/d/Testout/1meg.jpg');
if (f.exists)
f.remove();
if (f.exists)
throw('what!');
while ( ! smallEnough && q ) {
smallEnough = SaveFile(f, maxSize, q);
q--;
}
SaveFileAll([f.parent + "/", f.name.split(".")[0], "." + f.name.split(".")[1]]);
'DONE ' + q;
function SaveFile(inFile, inMaxSize, inQ) {
var smallEnough = false;
var idsave = stringIDToTypeID( "save" );
var desc78 = new ActionDescriptor();
var idas = stringIDToTypeID( "as" );
var desc79 = new ActionDescriptor();
var idextendedQuality = stringIDToTypeID( "extendedQuality" );
desc79.putInteger( idextendedQuality, inQ );
var idmatteColor = stringIDToTypeID( "matteColor" );
var idmatteColor = stringIDToTypeID( "matteColor" );
var idnone = stringIDToTypeID( "none" );
desc79.putEnumerated( idmatteColor, idmatteColor, idnone );
var idJPEG = stringIDToTypeID( "JPEG" );
desc78.putObject( idas, idJPEG, desc79 );
var idin = stringIDToTypeID( "in" );
desc78.putPath( idin, inFile );
var idcopy = stringIDToTypeID( "copy" );
desc78.putBoolean( idcopy, true );
executeAction( idsave, desc78, DialogModes.NO );
// there is inFile.length but it is wrong on windows 7
if ( inFile.open('r') ) {
var a = inFile.read();
inFile.close();
if (a.length <= inMaxSize)
smallEnough = true;
}
return smallEnough;
}
// Another version that tries to save them all, call in the same loop above
// but pass in an array of dir, filename, fileExtension
function SaveFileAll(inF) {
for (var i = 1; i < 13; i++) {
var idsave = stringIDToTypeID( "save" );
var desc78 = new ActionDescriptor();
var idas = stringIDToTypeID( "as" );
var desc79 = new ActionDescriptor();
var idextendedQuality = stringIDToTypeID( "extendedQuality" );
desc79.putInteger( idextendedQuality, i );
var idmatteColor = stringIDToTypeID( "matteColor" );
var idmatteColor = stringIDToTypeID( "matteColor" );
var idnone = stringIDToTypeID( "none" );
desc79.putEnumerated( idmatteColor, idmatteColor, idnone );
var idJPEG = stringIDToTypeID( "JPEG" );
desc78.putObject( idas, idJPEG, desc79 );
var idin = stringIDToTypeID( "in" );
var f = new File( inF[0] + inF[1] + i + inF[2] );
desc78.putPath( idin, f );
var idcopy = stringIDToTypeID( "copy" );
desc78.putBoolean( idcopy, true );
executeAction( idsave, desc78, DialogModes.NO );
}
}
Copy link to clipboard
Copied
Thanks for your reply!
Is it possible that this script does not work in Photoshop CS6? I always receive an error code 8800 (general photoshop error... command "save" is not available at the moment...).
Also, the script seems to be working solo only. What do I have to do to include that code in the script Muppet Mark has written for me?

Copy link to clipboard
Copied
CS6 Image Processor should work in CS6 I know of not bugs reports on it.
It look like Muppet Mark wrote more than one thing for you. Which code?
Paul Riggott has a script named Picture Processor on the web the can filter source image file extension you may wan to look at.
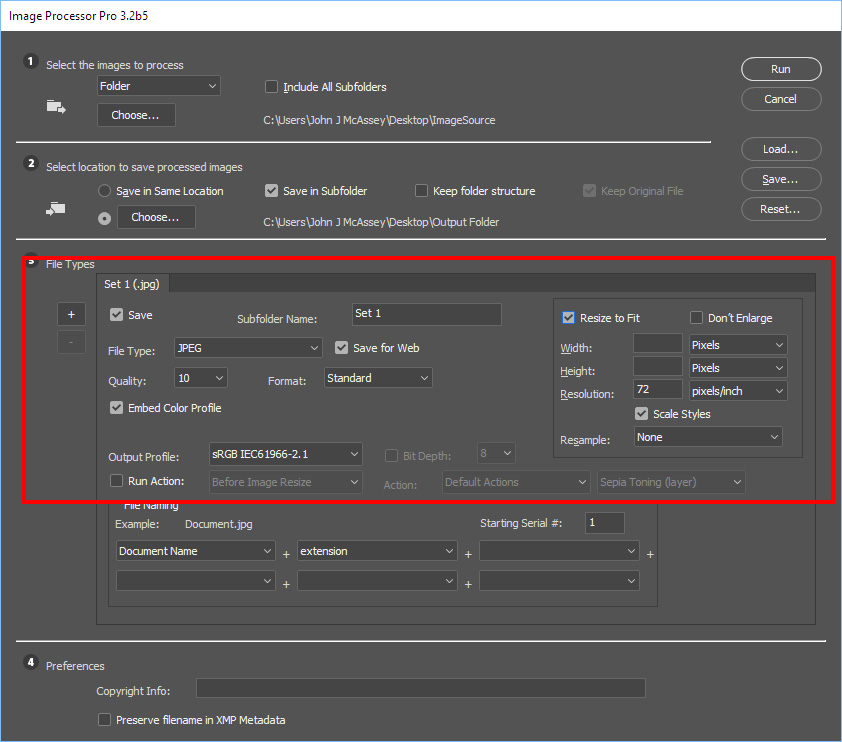
X has Image Processor Pro Plug-in on the web it has much better savings option and is a plug-in sot it cans be recorded into actions. It is a better Image Processor.
Copy link to clipboard
Copied
Thank you!
Both Picture Processor and Image Processor Pro seem to be pretty cool and helpful tools I did not know about yet. Good bet!
The problem is, that there is still no option to constrain the file size of the processed images.
Also I can't get Tom's script working with PS CS6.
The script I was talking about is Muppet Mark's post from 2013/06/28, 08:47. It is also marked as the correct answer to this topic. That script works perfectly for me, now I just need to include a possibility to constrain the output file size to 100kB max. each or - even better - a freely selectable value.
Copy link to clipboard
Copied
c_nolte wrote
The problem is, that there is still no option to constrain the file size of the processed images.
Good IMO the day of slow dial-up Internet connections are for the most part over. Users that still need to use slow speed connections do not want to visit web site that display many images. The only image file really useful on the web are Jpeg, PNG and GIF are. If you really care about file size Image Processor pro support resizing and save for web to strip metadata. You should be able to save your images the size you want at some quality you want your images to have and be sure 90%+ of your image files will be under the file size you need to have.
These days you should be more concerned that you have quality image the size you need for the different web devices in use these days. One size no longer fits all...
Is a four year old append marked correct still correct today?
Copy link to clipboard
Copied
I totally agree with you, but that is not the point.
What I need to do with the script is to shrink down print quality images of all kinds of sizes and file types (vector eps, pixel eps, tif, jpg...) to web quality jpgs of fixed measurements AND a file size of 100kB max. each. Please don't question my motives, just accept them like I have to do also  I didn't define the requirements, I just need to find a way to make this possible. Image Processor Pro won't help as there is just an option to define image quality for save for web, but not the output file size.
Copy link to clipboard
Copied
As I wrote with the Image Processor pro script you can do want 90%+ of your image will be exactly what you want. A small present that have a tremendous amount of detail may save a little over the 100kb size you want. You could then open those over 100kb in Photoshop and save them at a lower quality. You are not saving layered file with vectors etc for the web you are saving Jpeg, Png or Gif.
LOOK Again at IPP
Copy link to clipboard
Copied
As I said before, Image Processor Pro is not the right choice in my case. For example, vector eps files won't be opened and processed in proper quality.
I need all the features from Muppet Mark's script and include file size limitation anywhere in there.
Copy link to clipboard
Copied
c_nolte wrote
As I said before, Image Processor Pro is not the right choice in my case. For example, vector eps files won't be opened and processed in proper quality.
I need all the features from Muppet Mark's script and include file size limitation anywhere in there.
Actually the resize quality depends more are the size of the Files being process. The end result will always be the size and resolution of the output file. If the original Layer files with your vector text and shape layers are print quality files your vectors will be large and high quality when opened by Image Processor Pro and still be vector layers. If the files were Web size files but still layer documents with vector layers when opened by Image Processor the document will be smaller in size and resolution then the print documents when the script resized these documents the vector layers will be resized with vector graphics the raster layer will be resized via interpolation. The resized document will have layers resized by vector graphics and others by interpolation. Small Web Raster Image layers quality may suffer large quality lost all Vector layers should resize well. How does Muppet Mark's script resize raster layers? Evert time a raster layer is resized some image quality is lost as far as I know. It look like he uses image resize to me. That is document.resizeImage(size);
Some vector File are not actually open as vector documents by Photoshop is where the problem is. File type support in Photoshop is not as good as it should be. Like you are better off Placeing in SVG files then opening them in Photoshop. Placed SVG files become vector smart object. ESP files are not opened as vectors but you can specify the size you want the file scaled to when opening them. There is just so much you can program in and keep a Scripts UI easy to use and understand. Yes IPP does not have Input file filtering or opening options for particular file types. ESP and PDF files are not actually image file formats.
So if you want to create and use ESP, PDF, SVG, AI and others and use them in you Photoshop workflow you need to know how Photoshop works with these file types. Photoshop support is limited with some file types.
File formats in Adobe Photoshop
Supported file formats in Photoshop
EPS
EPS (Encapsulated PostScript) is another print industry standard format that's been around for quite a while, but its use has been in decline over the years. EPS files are not really image files in the traditional sense. Instead, they contain a series of instructions for how a printer should reproduce the image. They can be imported into most page layout programs, but the "encapsulated" part means the files are essentially locked and can no longer be modified unless they're re-opened in Photoshop. A preview image must be embedded in the EPS file when you save it in Photoshop if you want it to be viewable onscreen when working in your page layout program, otherwise you won't be able to see it until the layout is printed. While EPS remains an industry standard format, you probably won't use it very often unless it's the format specifically requested by your commercial printer.
Finally, while most people are familiar with PDF files for viewing, sharing and printing electronic documents (hence the name Portable Document Format), PDF is also gaining in popularity as a great choice for saving images destined for print. Like the PSD and TIFF formats, PDF supports and preserves all of Photoshop's features, including the ability to use spot colors, something the EPS format does not support. PDF gives you the choice of either JPEG compression, complete with a Quality setting to balance image quality with file size, or lossless ZIP compression. And the PDF format benefits from the fact that anyone with the free Adobe Reader installed on their computer can view the image.
The most important thing to remember is to save your working Photoshop file as an unflattened PSD file to use as your master copy, which will preserve all of your layers, channels and so on in Photoshop's native file format, allowing you to return to your work at any time. From there, you can save a copy of your image in one of the other six formats depending on where the image is headed (print, the web, or a multimedia program) or which format your printer has requested.
IPP has no problem processing PSD files...... The ones you should have.
Copy link to clipboard
Copied
I really appreciate your effort but don't quite understand why you are giving a lecture on file formats ect. That's not what I need.
Muppet Mark's script opens (rasterizes) vector eps files in high quality (300dpi), then converts them to the required specifications. IPP can't do that.
If the input files are jpg or tif it opens them just as they are. Layers don't matter, as the output files will be flattened pixel graphics only.
Copy link to clipboard
Copied
I thought you know little to nothing about Photoshop Scripting may not realize the limited support Photoshop has for some unsupported file types like ESP, SVG, AI and PDF. You can to do some thing in Photoshop using a tailored process when using unsupported file types. That If you have good knowledge you may not need anyone to program a custom process for your needs in the future. You could work independently.
Copy link to clipboard
Copied
Once again your answer has nothing to do with my question or the topic of this post.
Who said I would like to convert SVG, AI and PDF with Photoshop? Please stop confusing me or other readers who may have an idea to help me.
Copy link to clipboard
Copied
c_nolte wrote
Please stop confusing me or other readers who may have an idea to help me
I will not try to help you any more you do not seem to want any.
Copy link to clipboard
Copied
I would appreciate any help, but it seems that you lost the thread of this conversation.
You keep telling things that I never have asked for.
Copy link to clipboard
Copied
I just tried with my CS6 and it works. What is your file look like? You might have to add a .flatten() and or change the mode of the doc to make JPEG save happy.
Copy link to clipboard
Copied
Thanks, Tom.
I created a jsx file with the following content:
#target photoshop
// Version 2017.6.12
// Given a max size, reduce the quality of the jpeg
// until it is small enough
var maxSize = 1024 * 1024;
var smallEnough = false;
var tries = 1;
var q = 12;
var f = new File('/d/Testout/1meg.jpg');
if (f.exists)
f.remove();
if (f.exists)
throw('what!');
while ( ! smallEnough && q ) {
smallEnough = SaveFile(f, maxSize, q);
q--;
}
SaveFileAll([f.parent + "/", f.name.split(".")[0], "." + f.name.split(".")[1]]);
'DONE ' + q;
function SaveFile(inFile, inMaxSize, inQ) {
var smallEnough = false;
var idsave = stringIDToTypeID( "save" );
var desc78 = new ActionDescriptor();
var idas = stringIDToTypeID( "as" );
var desc79 = new ActionDescriptor();
var idextendedQuality = stringIDToTypeID( "extendedQuality" );
desc79.putInteger( idextendedQuality, inQ );
var idmatteColor = stringIDToTypeID( "matteColor" );
var idmatteColor = stringIDToTypeID( "matteColor" );
var idnone = stringIDToTypeID( "none" );
desc79.putEnumerated( idmatteColor, idmatteColor, idnone );
var idJPEG = stringIDToTypeID( "JPEG" );
desc78.putObject( idas, idJPEG, desc79 );
var idin = stringIDToTypeID( "in" );
desc78.putPath( idin, inFile );
var idcopy = stringIDToTypeID( "copy" );
desc78.putBoolean( idcopy, true );
executeAction( idsave, desc78, DialogModes.NO );
// there is inFile.length but it is wrong on windows 7
if ( inFile.open('r') ) {
var a = inFile.read();
inFile.close();
if (a.length <= inMaxSize)
smallEnough = true;
}
return smallEnough;
}
Running the file in Photoshop CS6 will lead to the following message:
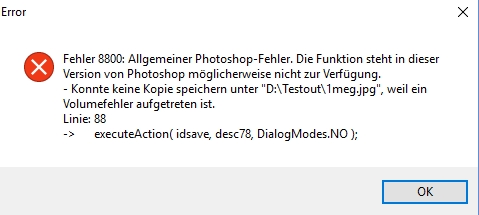
Also, when I add the last part of your script it won't work:
// Another version that tries to save them all, call in the same loop above
// but pass in an array of dir, filename, fileExtension
function SaveFileAll(inF) {
for (var i = 1; i < 13; i++) {
var idsave = stringIDToTypeID( "save" );
var desc78 = new ActionDescriptor();
var idas = stringIDToTypeID( "as" );
var desc79 = new ActionDescriptor();
var idextendedQuality = stringIDToTypeID( "extendedQuality" );
desc79.putInteger( idextendedQuality, i );
var idmatteColor = stringIDToTypeID( "matteColor" );
var idmatteColor = stringIDToTypeID( "matteColor" );
var idnone = stringIDToTypeID( "none" );
desc79.putEnumerated( idmatteColor, idmatteColor, idnone );
var idJPEG = stringIDToTypeID( "JPEG" );
desc78.putObject( idas, idJPEG, desc79 );
var idin = stringIDToTypeID( "in" );
var f = new File( inF[0] + inF[1] + i + inF[2] );
desc78.putPath( idin, f );
var idcopy = stringIDToTypeID( "copy" );
desc78.putBoolean( idcopy, true );
executeAction( idsave, desc78, DialogModes.NO );
}
}
Where do I have to add ".flatten()"?
-
- 1
- 2

 AdChoices